HTML 参考 https://www.w3cschool.cn/html/html-form.html
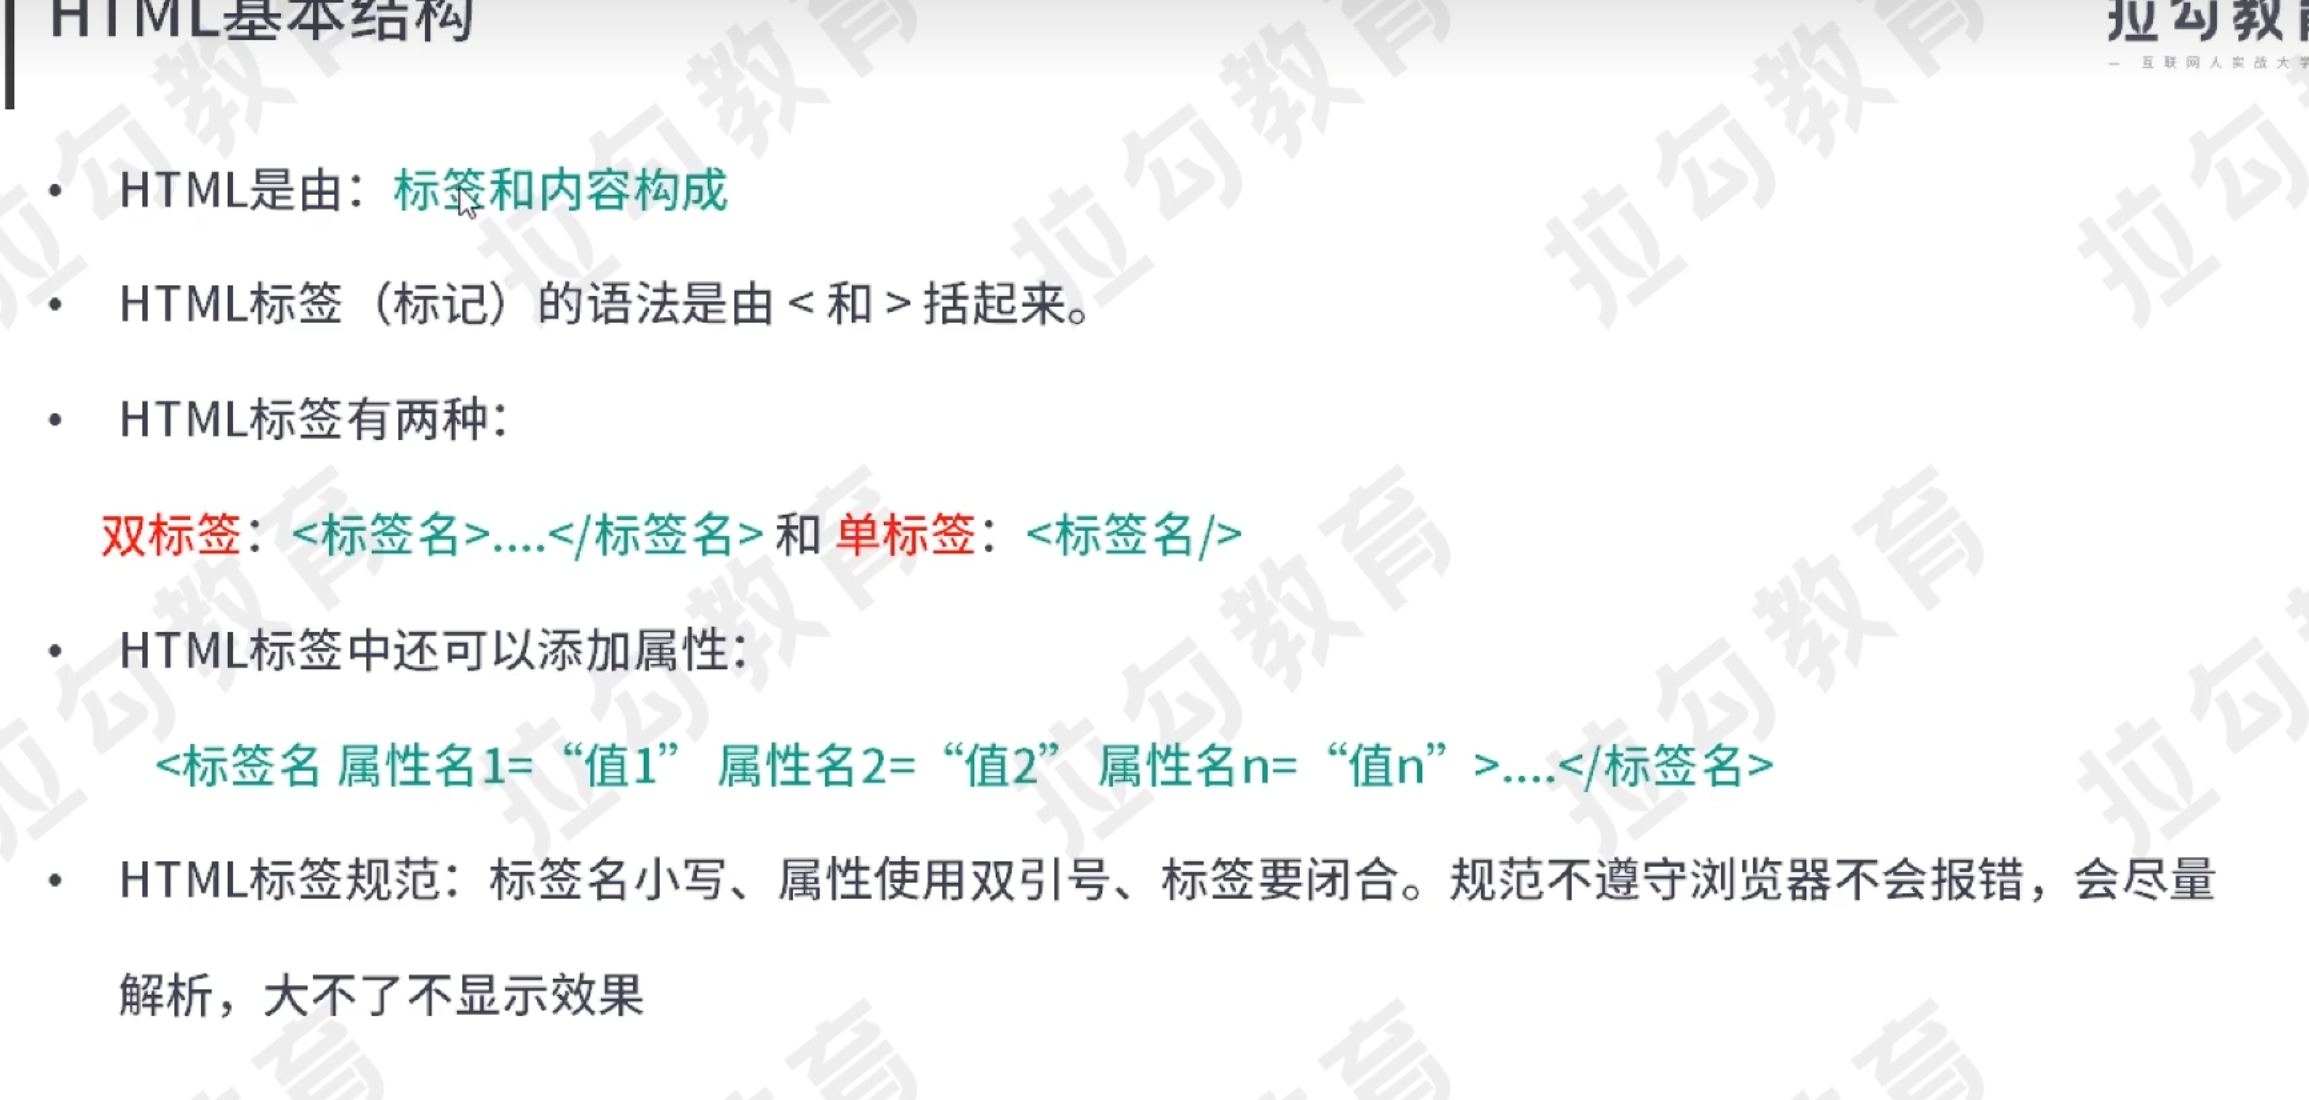
基本语法
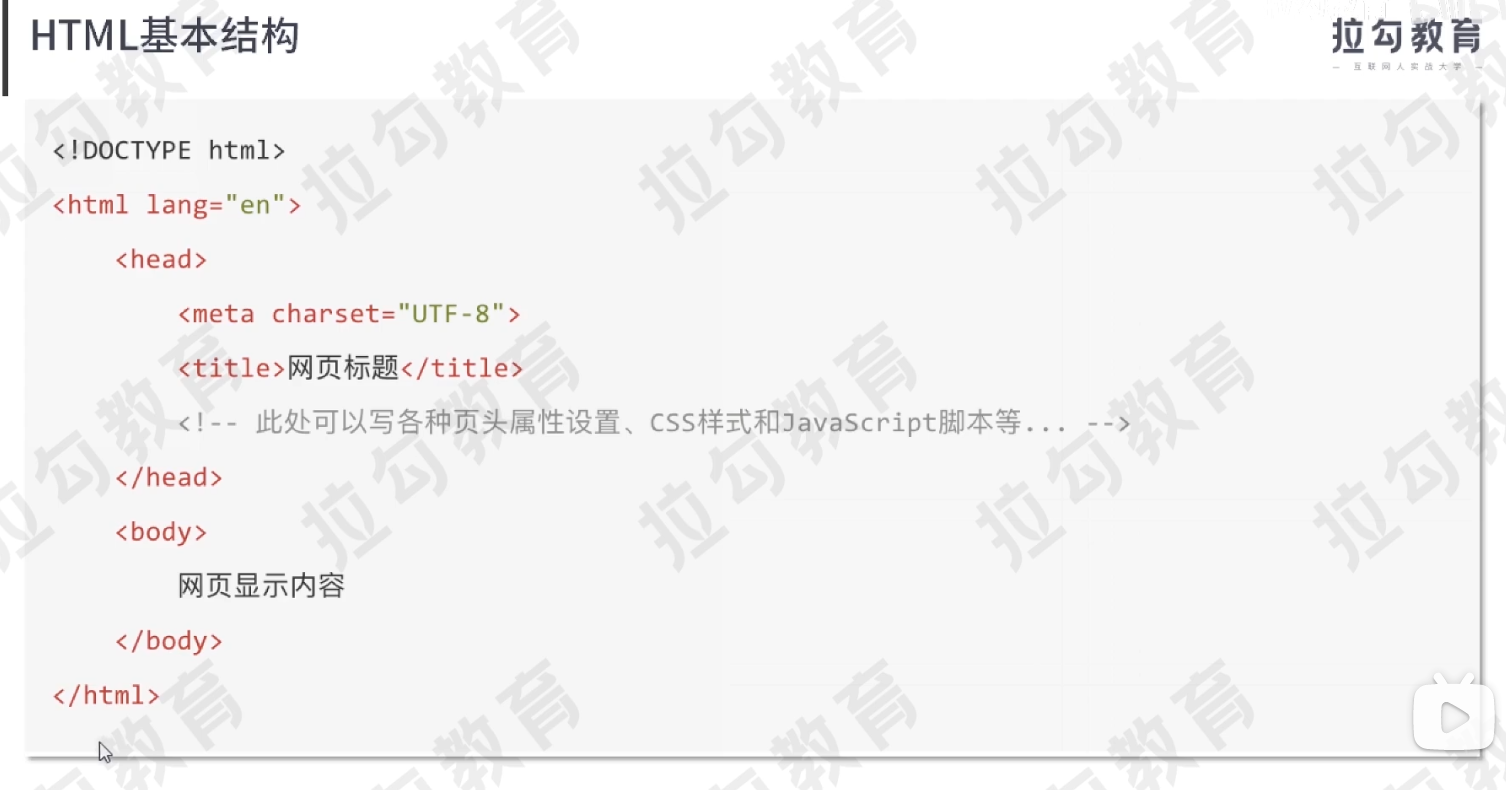
基本结构
不允许交叉嵌套
1
2
3
4
5
6
7
8
9
正确: <div > <a > </a > </div > 错误: <div > <a > </div > </a >
1 2 3 4 5 6 7 8 9 10 11 12 13 14 15 <DOCTYPE html > <html lang ="en" > <head > <meta charset ="utf-8" > <title > test </title > </head > <body > </body > </html >
vscode中输入!+tab可以自动补全
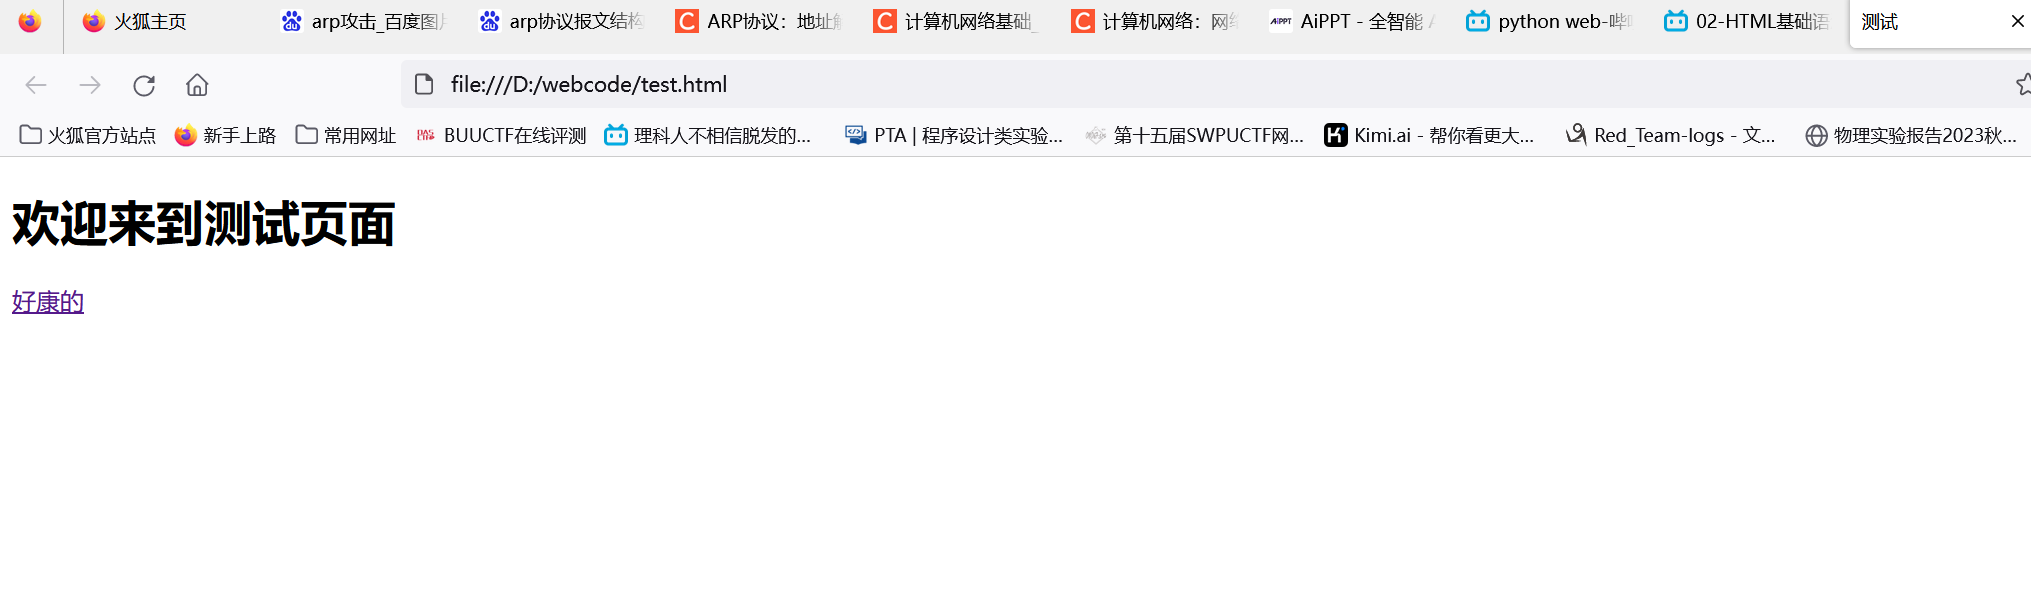
简单页面小代码
1 2 3 4 5 6 7 8 9 10 11 12 <!DOCTYPE html > <html > <head > <meta charset ="UTF-8" > <meta name ="viewport" content ="width=device-width, initial-scale=1.0" > <title > 测试</title > </head > <body > <h1 > 欢迎来到测试页面</h1 > <a href ="https://space.bilibili.com/375081822/favlist?fid=3135803622&ftype=create " > 好康的</a > </body > </html >
效果
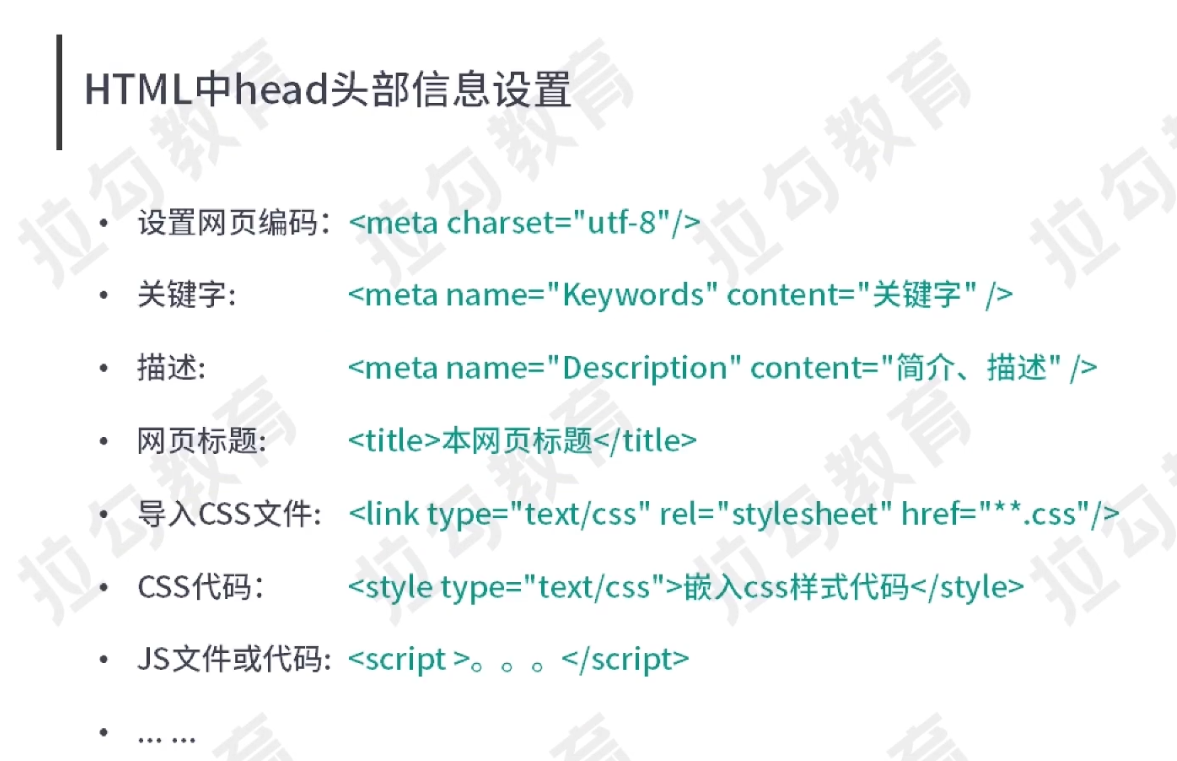
头部信息
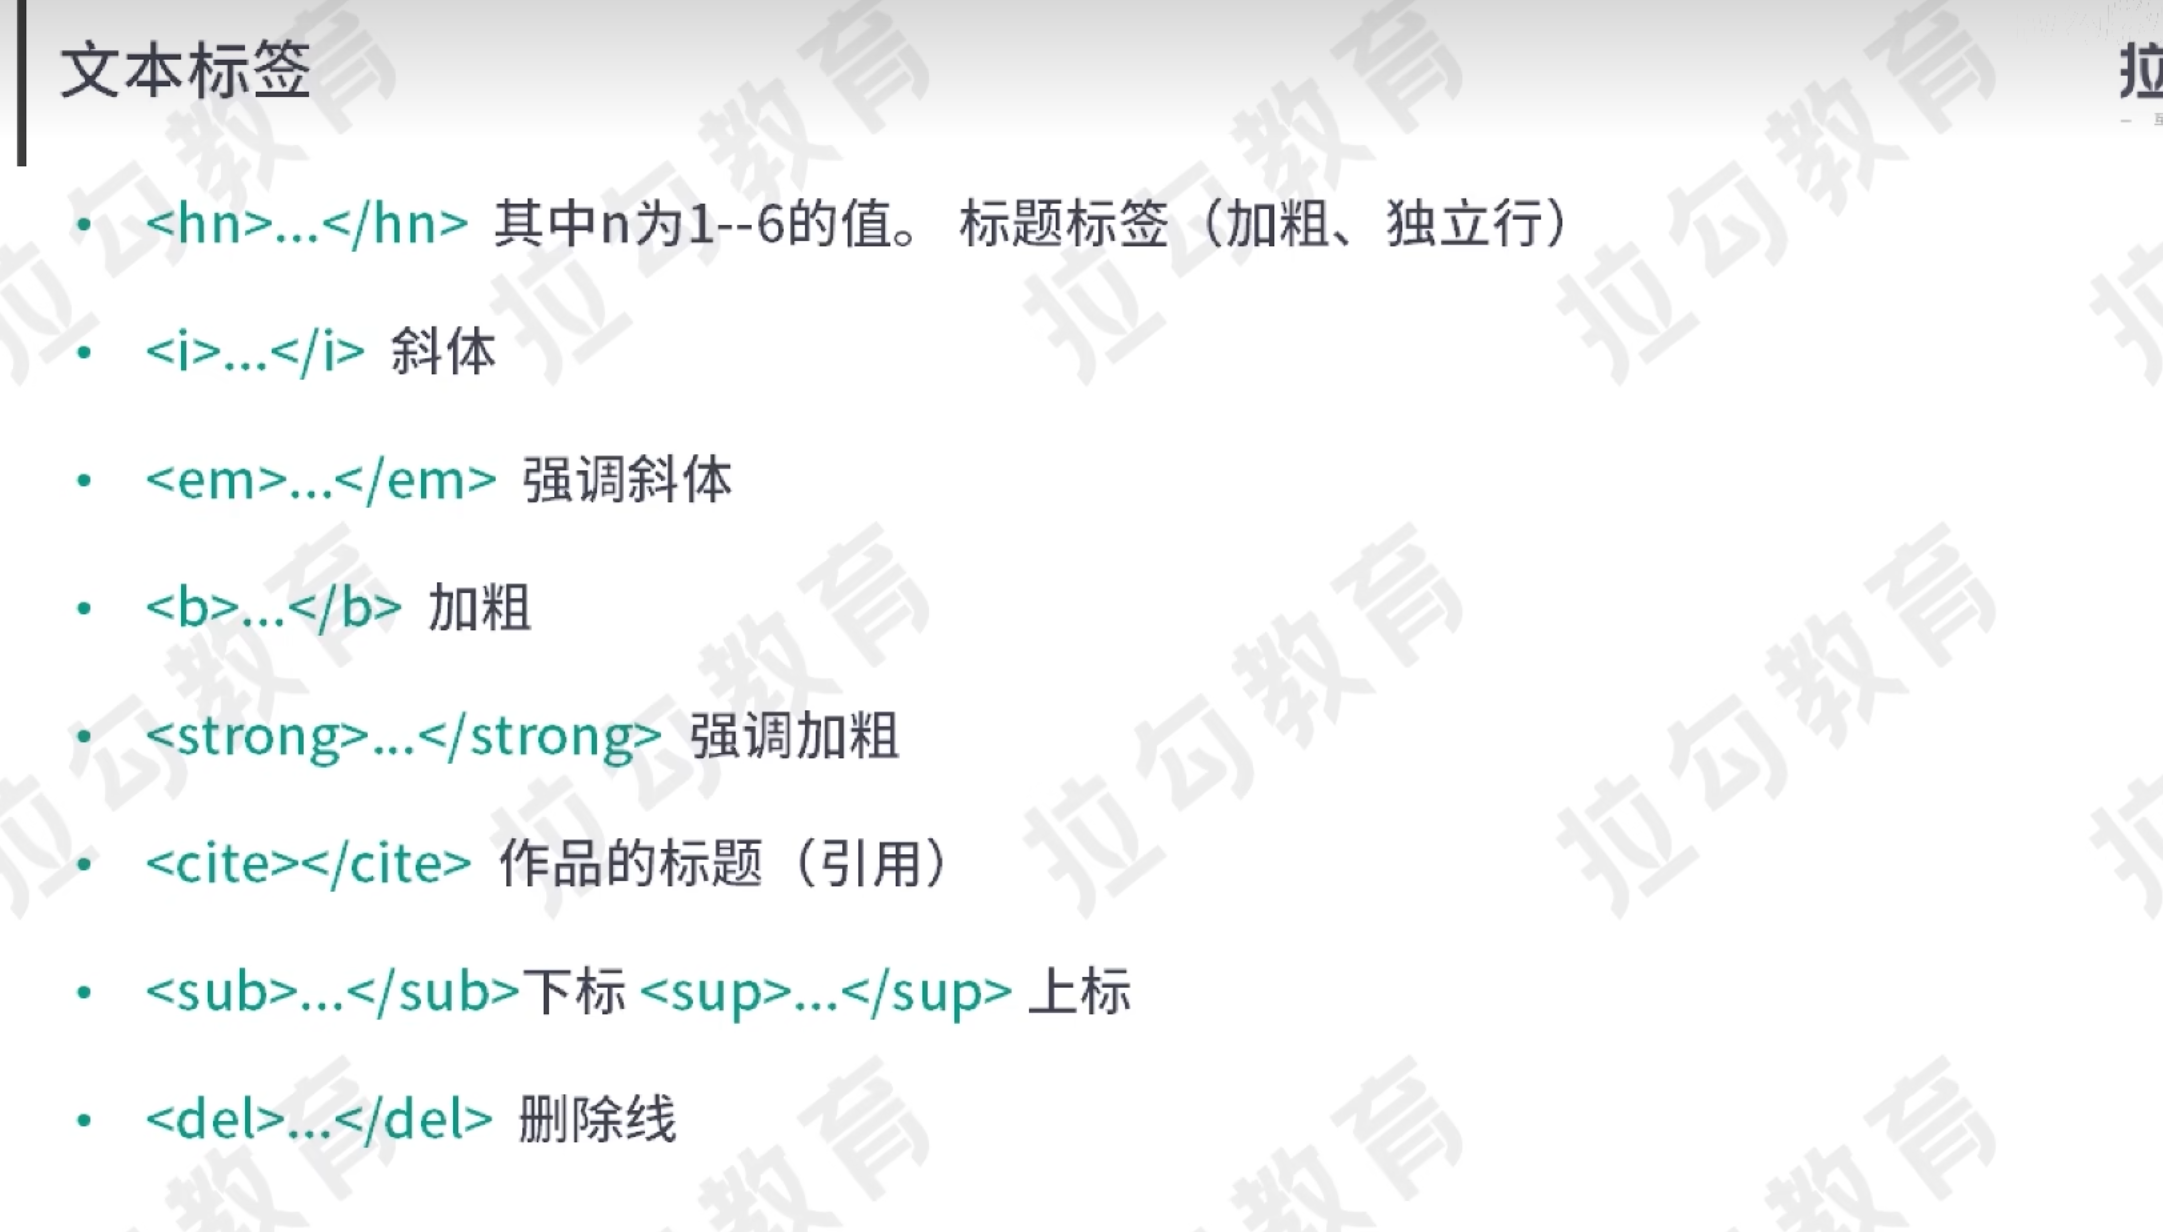
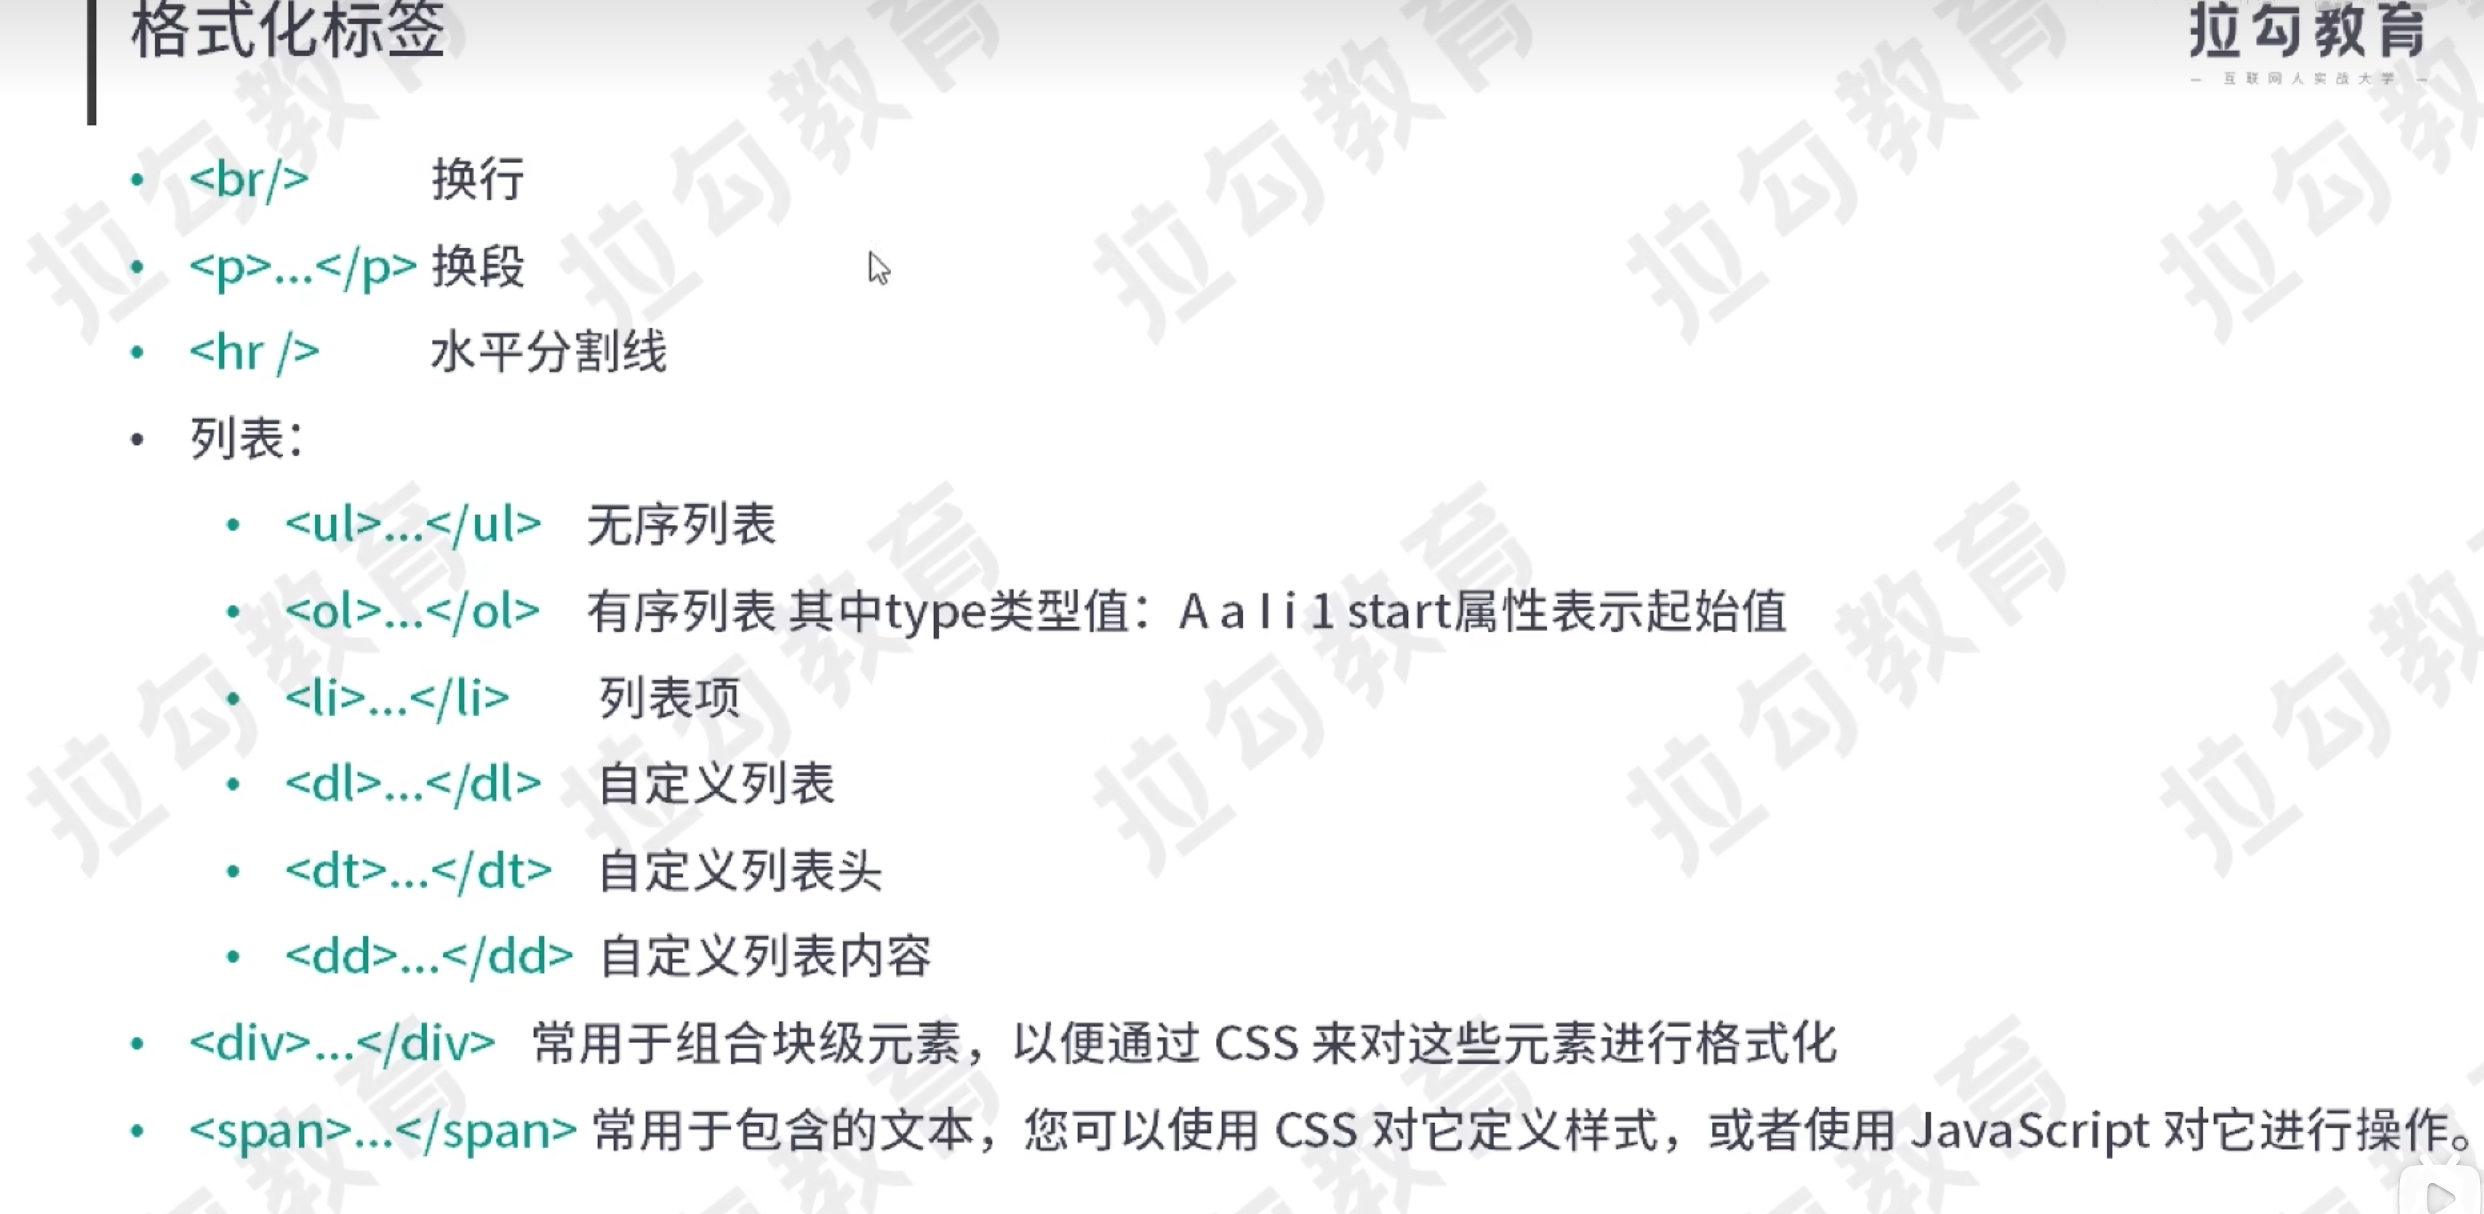
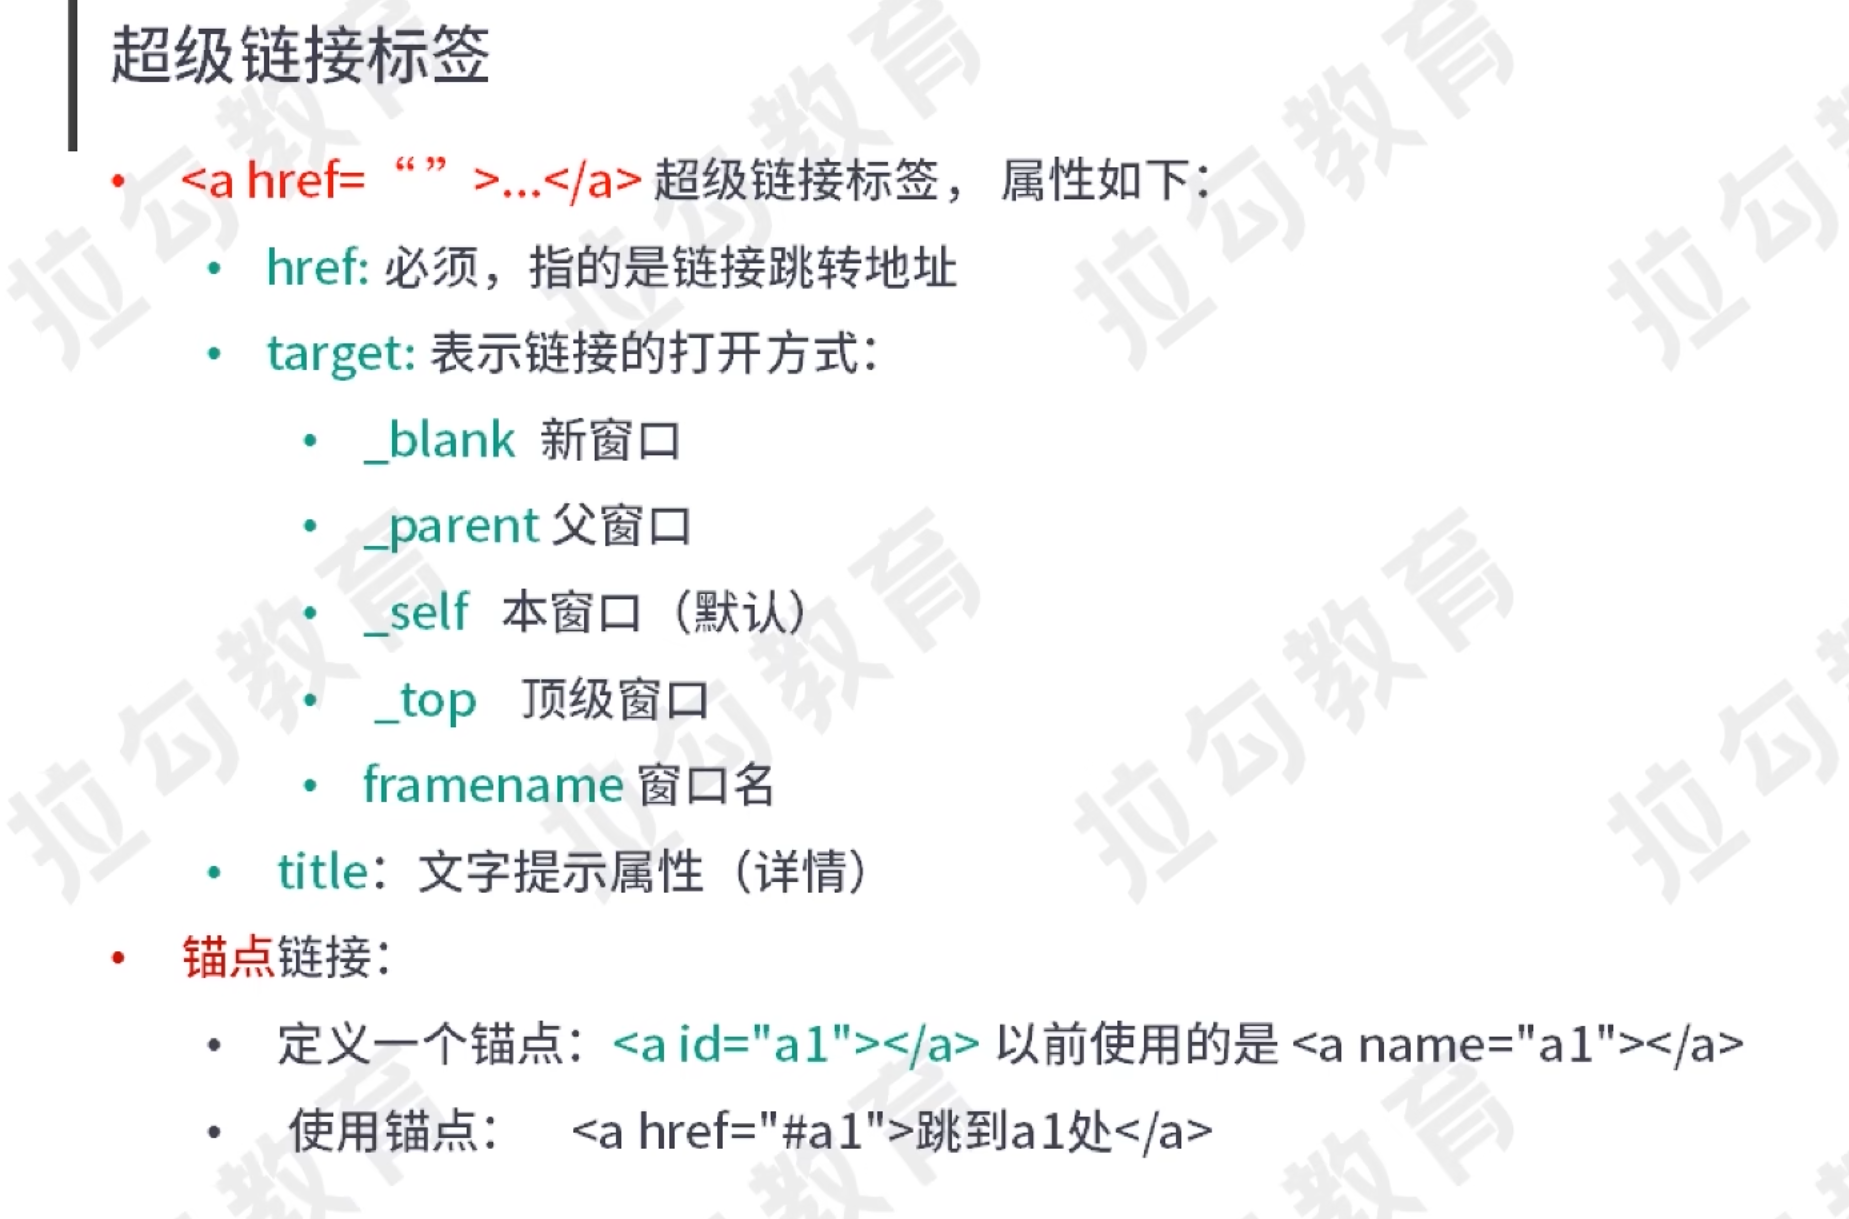
常用标签
1 2 3 <b > </b > <strong > </strong >
列表中也可以放链接
1 2 3 4 5 <ul > <li > <a href ="https://space.bilibili.com/375081822/favlist?fid=3135803622&ftype=create" > 好康的</a > </li > <li > <a href ="https://www.baidu.com" > 好用的</a > </li > <li > ccc</li > </ul >
锚点就像goto和标签,#作用是定位,比如./h1.html#chiikawa1意思就是跳转到h1.html下的chiikawa1锚点
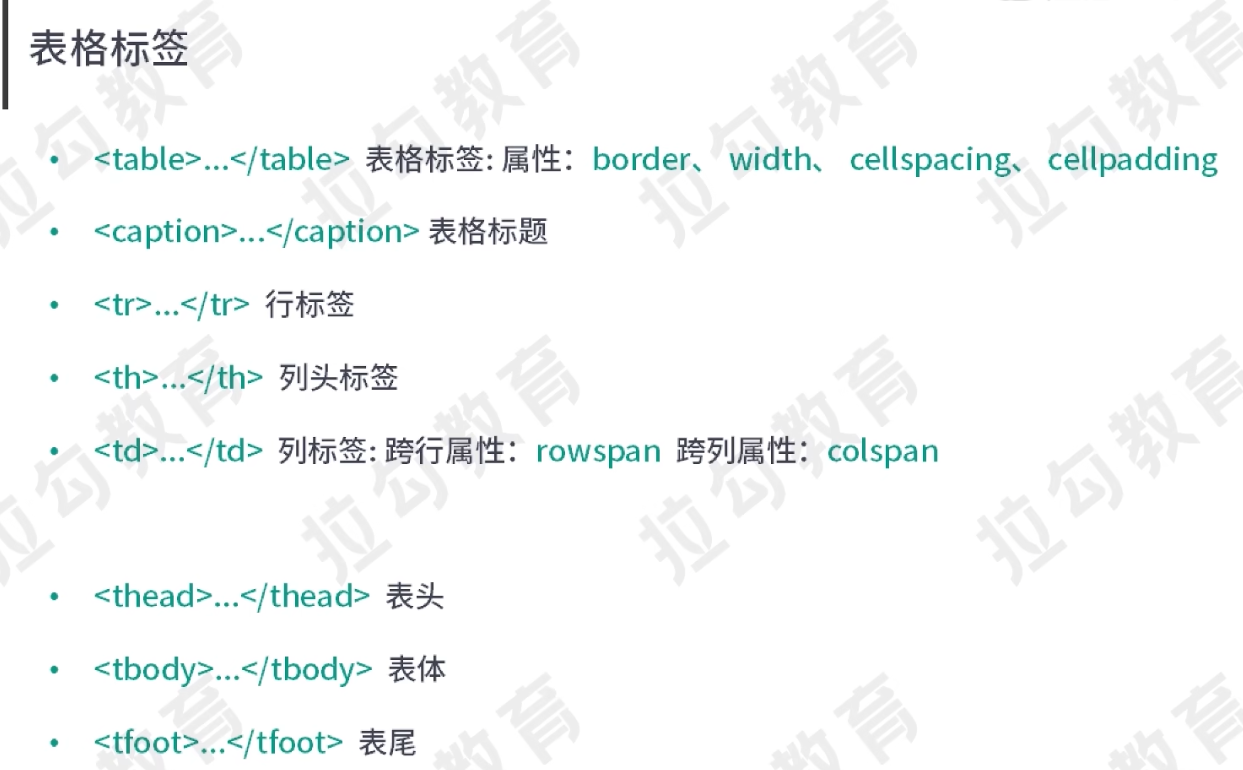
合并单元格:由左向右,由上到下
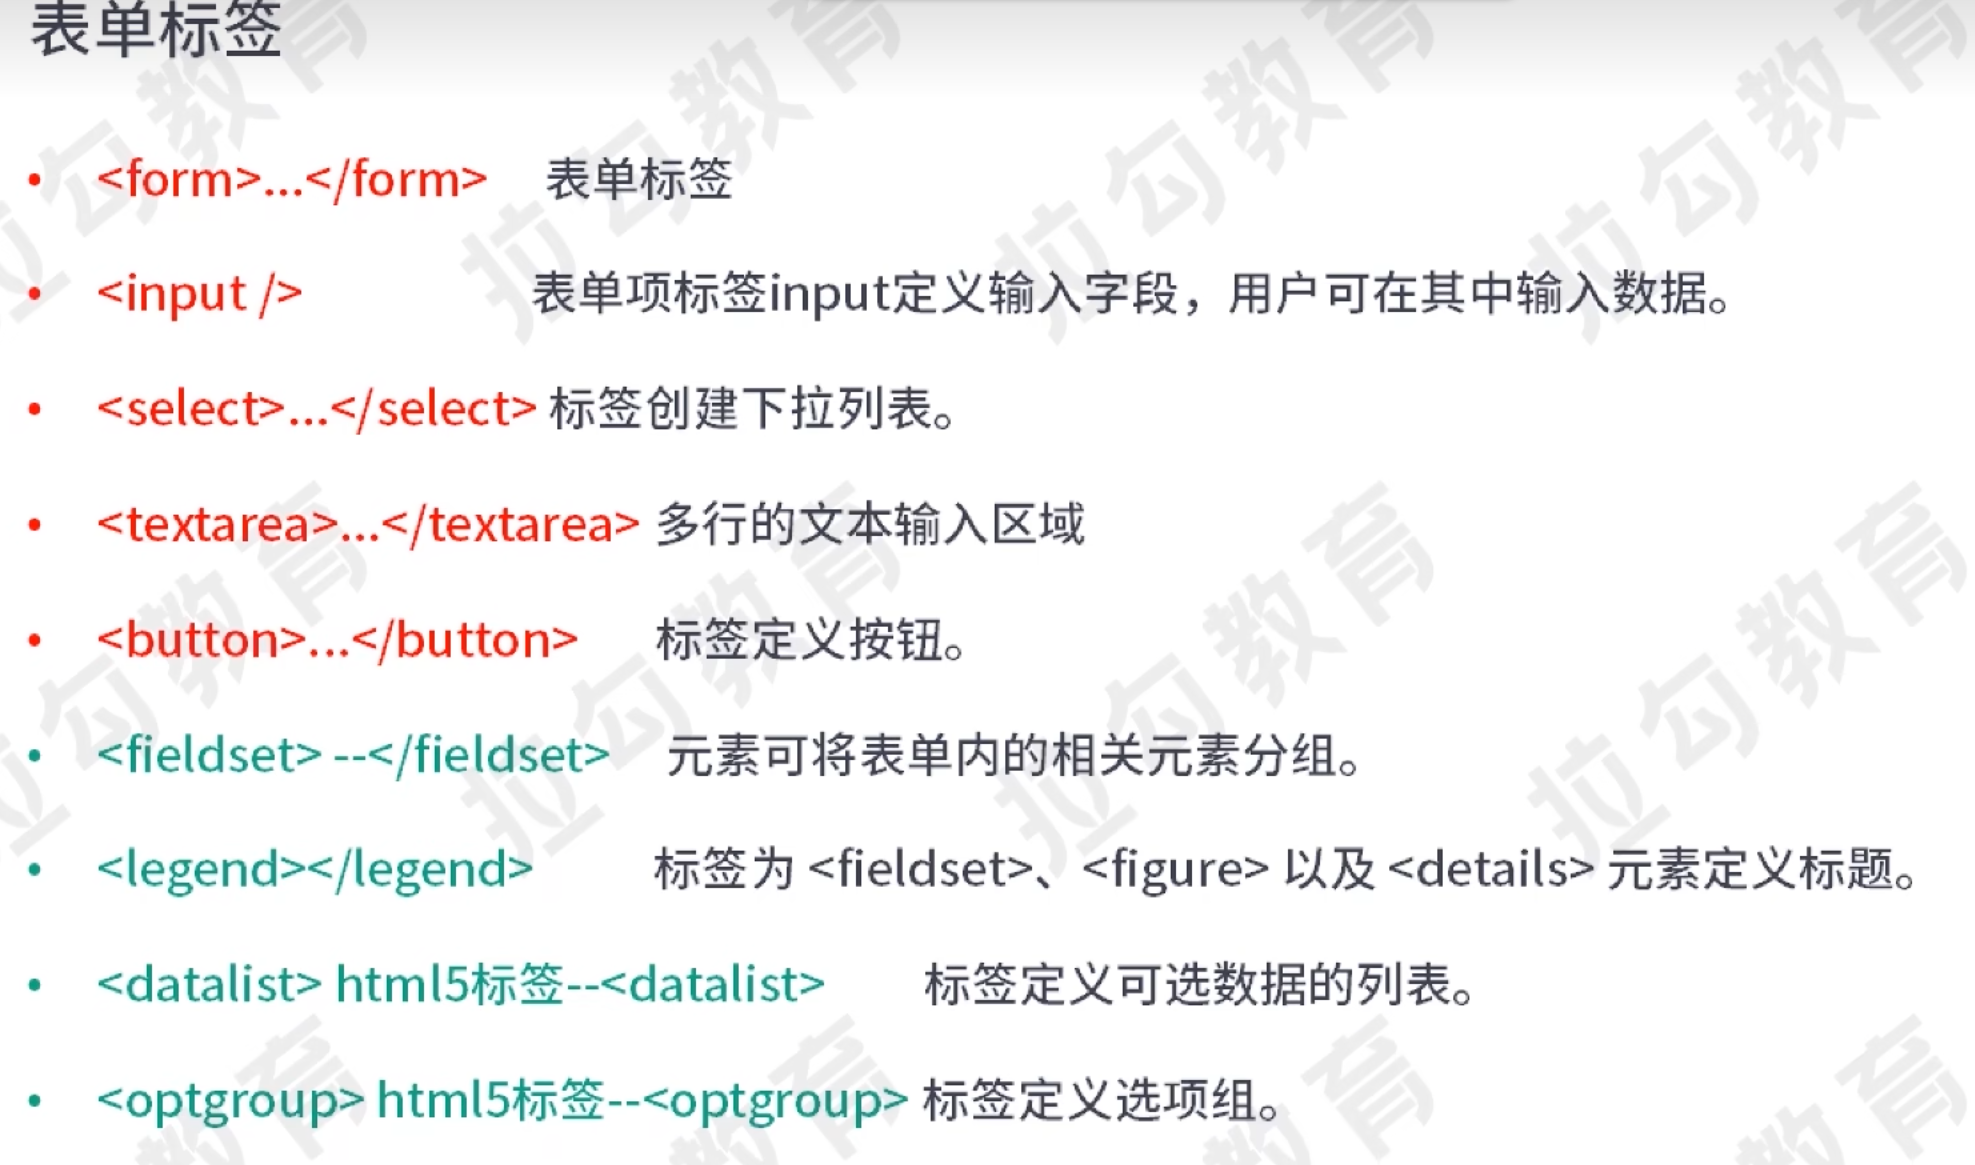
1 2 3 4 5 6 7 8 9 10 11 12 13 14 15 <!DOCTYPE html > <html > <head > <meta charset ="UTF-8" > <meta name ="viewport" content ="width=device-width, initial-scale=1.0" > <title > Document</title > </head > <body > <form action ="./h1.html" method ="GET" > <input type ="text" name ="uname" > <br /> <br /> <input type ="password" name ="upass" > <br /> <br /> <input type ="submit" value ="登录" > </form > </body > </html >
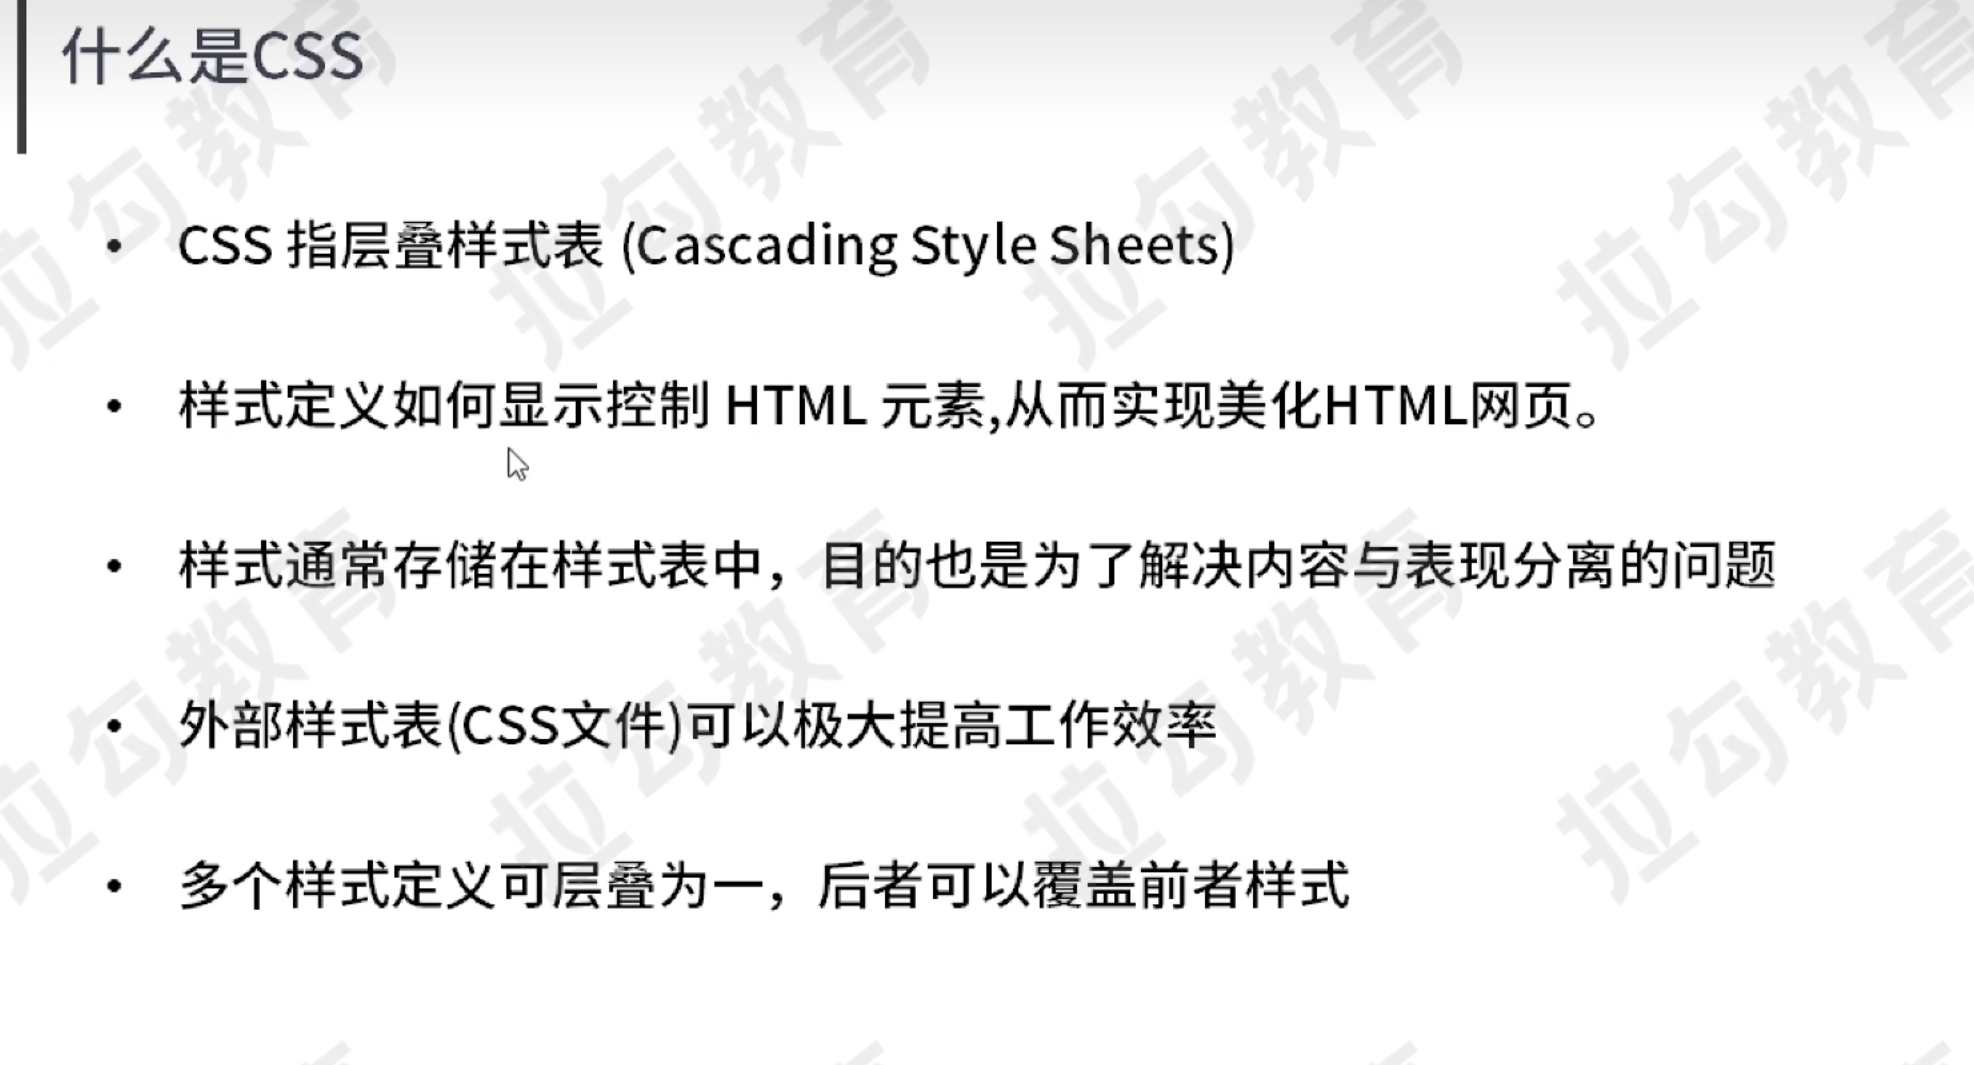
CSS
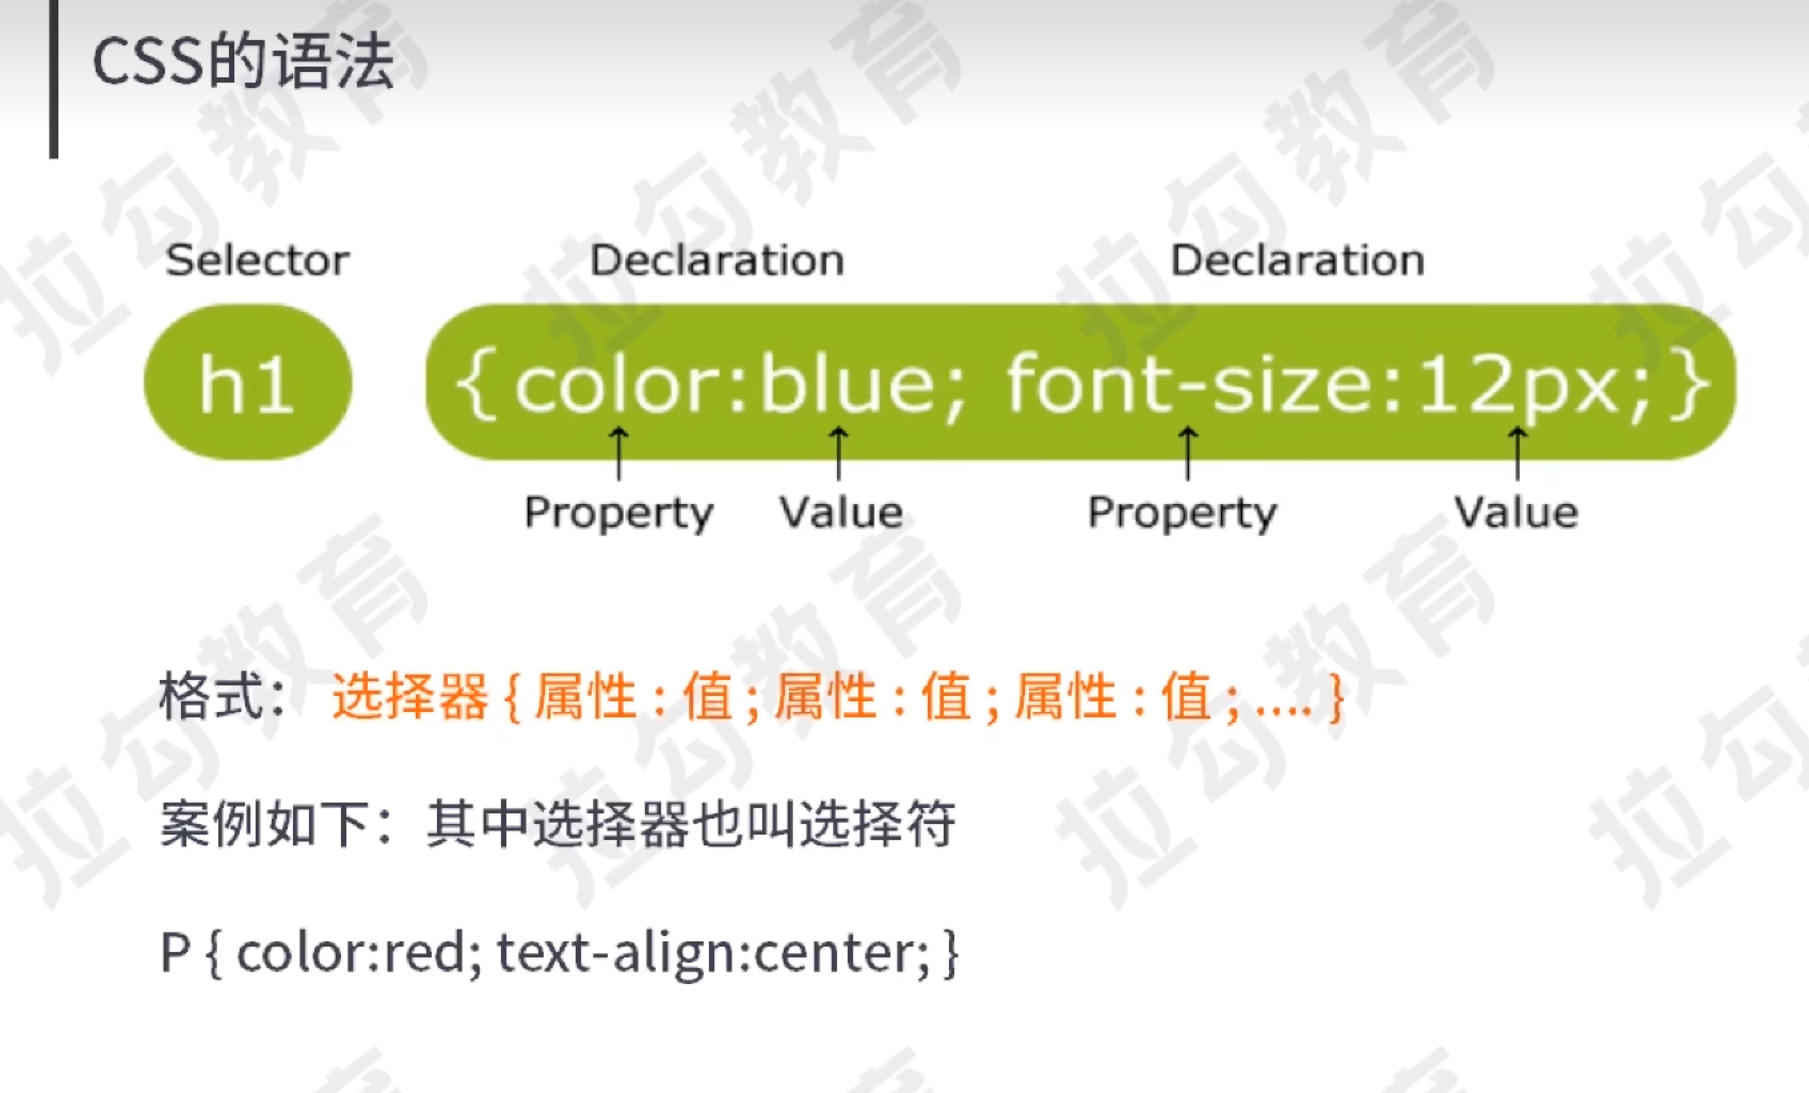
语法
选择器:选的是
中的标签名
1 2 3 4 5 6 7 8 9 10 11 12 13 14 15 16 17 18 19 20 21 22 <!DOCTYPE html > <html > <head > <meta charset ="GBK" > <meta name ="viewport" content ="width=device-width, initial-scale=1.0" > <title > Document</title > <style > strong {font-size : 20 ;color : aquamarine;} </style > </head > <body > <strong > 这是CSS测试页面</strong > <ul > <li > <a href ="https://www.bilibili.com" > 学习网站</a > </li > <li > CSS测试</li > <li > 油专</li > </ul > </body > </html >
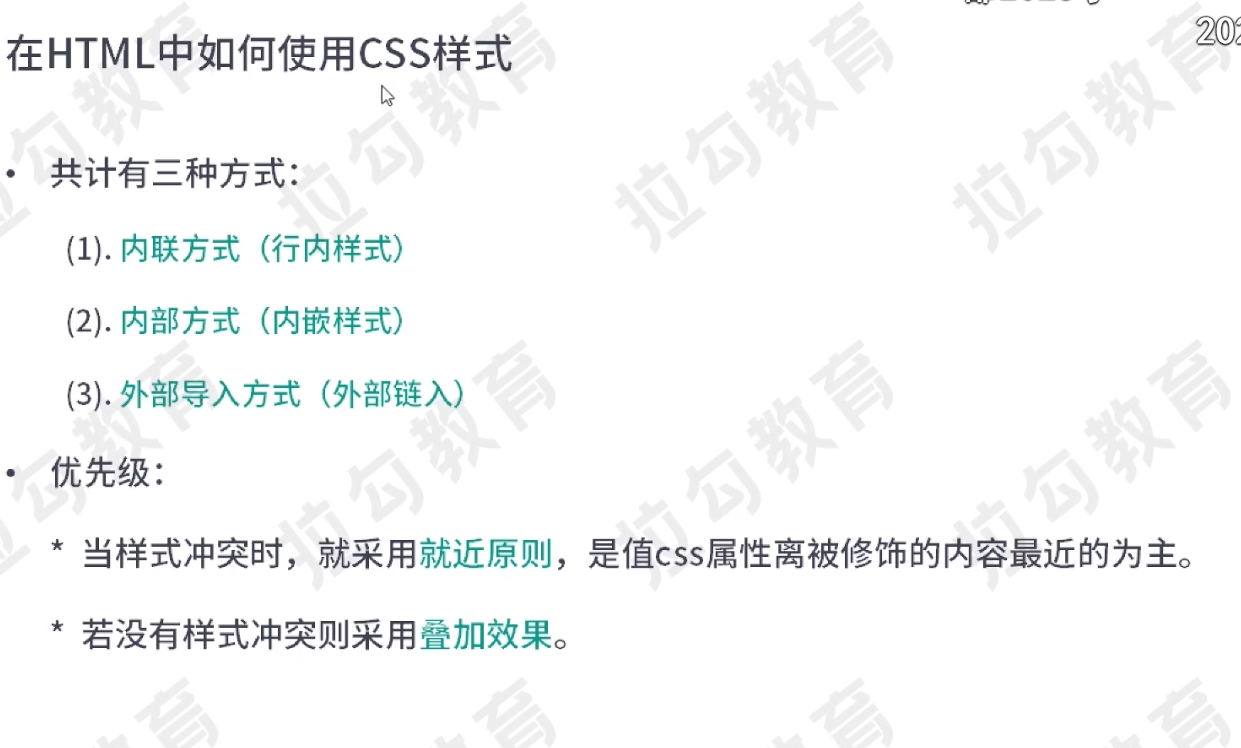
使用方法
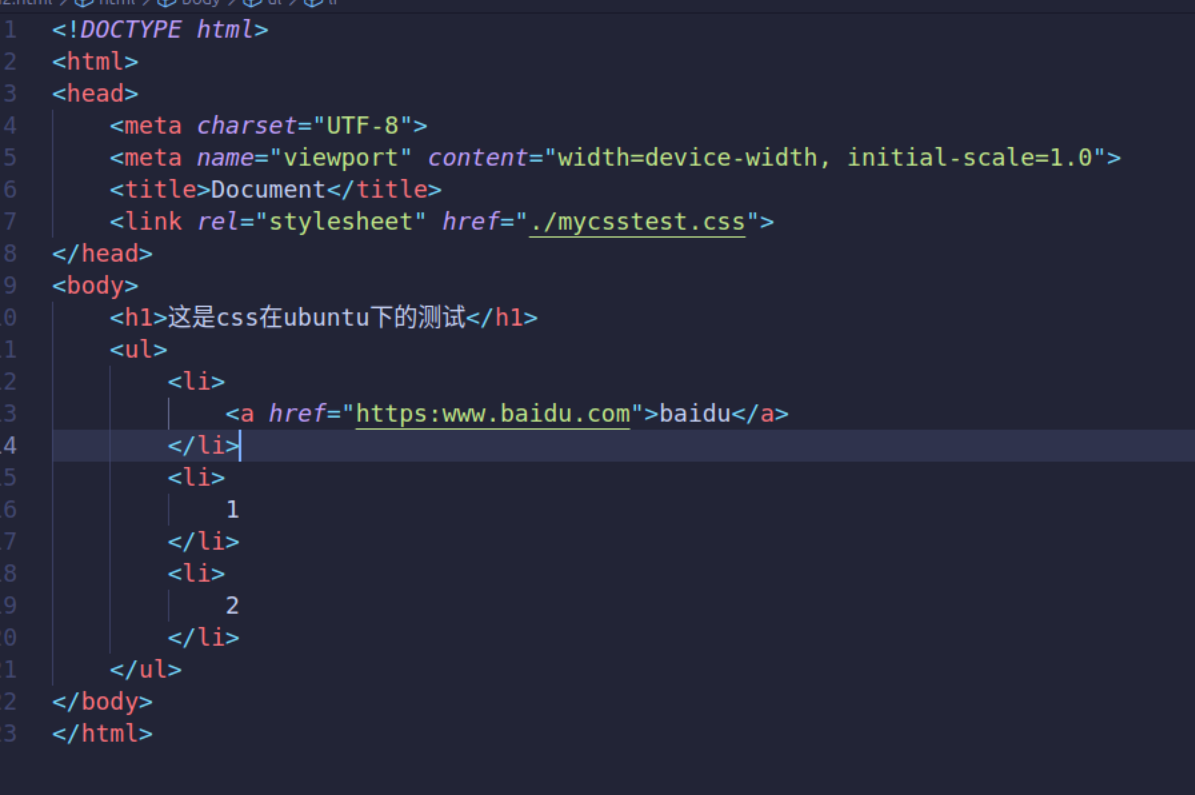
1.外部样式表:
html中用link单标签引用
1 2 h1 {font-size : 30 ;background-color : aquamarine;color : crimson;}
2.内嵌方法
嵌入在style中
3.内联样式
1 2 3 4 <ul > <li style ="font-size:25;color:red" > </li > </ul >
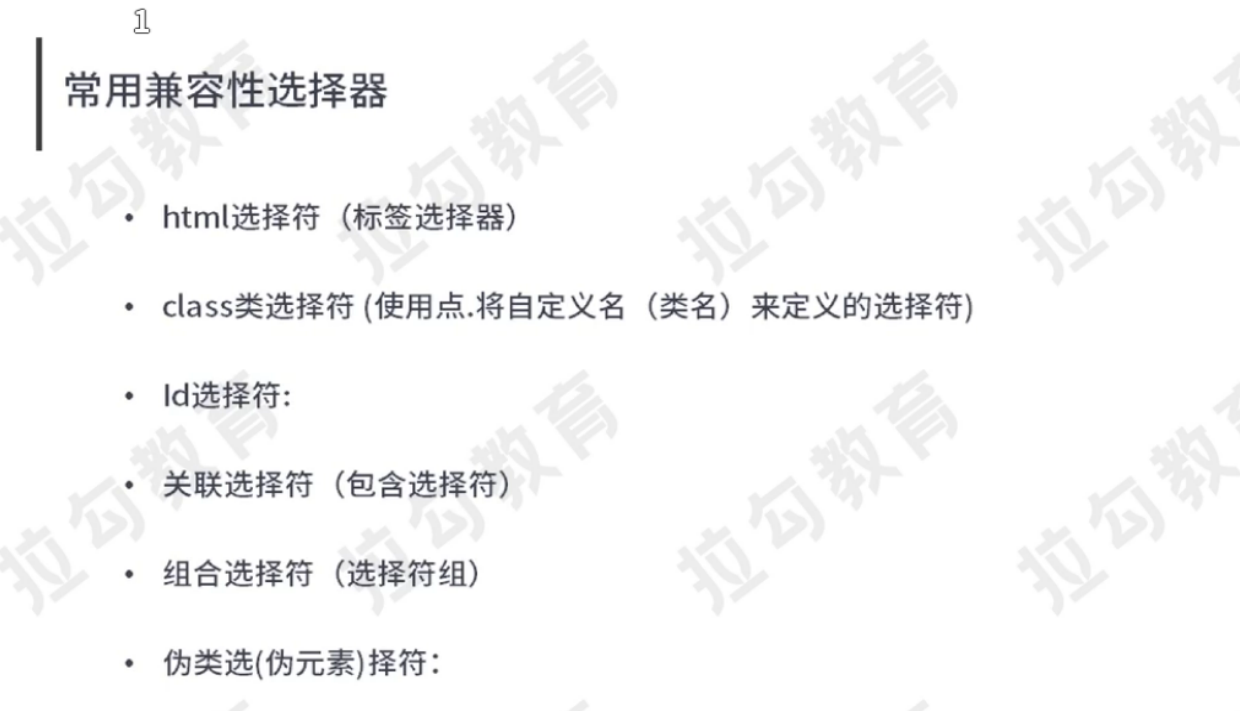
CSS2常用选择器
html选择器 把html的标签作为选择器,比如h1,a,也可以用*表示对所有标签生效(可能有兼容性问题)
缺点:过于笼统,html中有很多标签是重复的
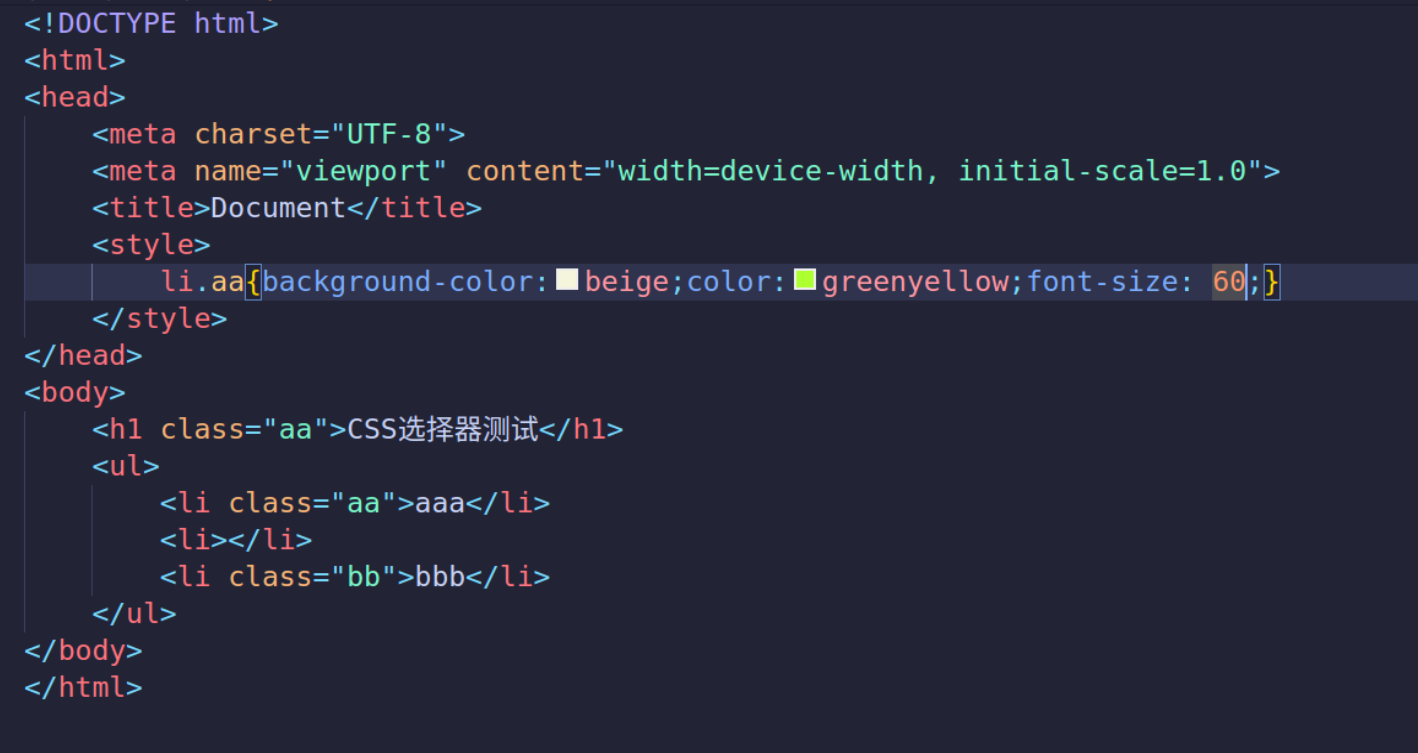
类选择器 在标签中加入class属性,在创建css样式时用 (标签名).属性值进行标记
属性名可写可不写,不写属性名,那么只要class属性值等于css样式前的类属性值,css就会对该标签生效
id选择器 根据标签中的id属性的属性值进行选择
1 2 3 4 5 6 7 8 9 10 11 12 13 14 15 16 17 18 19 20 21 22 <!DOCTYPE html > <html > <head > <meta charset ="GBK" > <meta name ="viewport" content ="width=device-width, initial-scale=1.0" > <title > Document</title > <style > #hid {font-size : 20 ;color : aquamarine;} </style > </head > <body > <strong > 这是CSS测试页面</strong > <ul > <li id ="hid" > <a href ="https://www.bilibili.com" > 学习网站</a > </li > <li > CSS测试</li > <li > 油专</li > </ul > </body > </html >
关联选择器/包含选择器
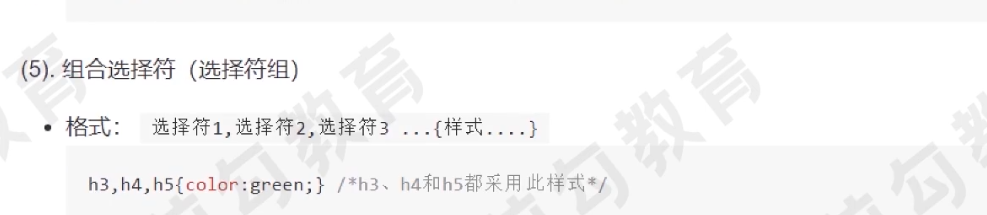
组合选择器
伪类选择器 常用属性
尺寸与单位
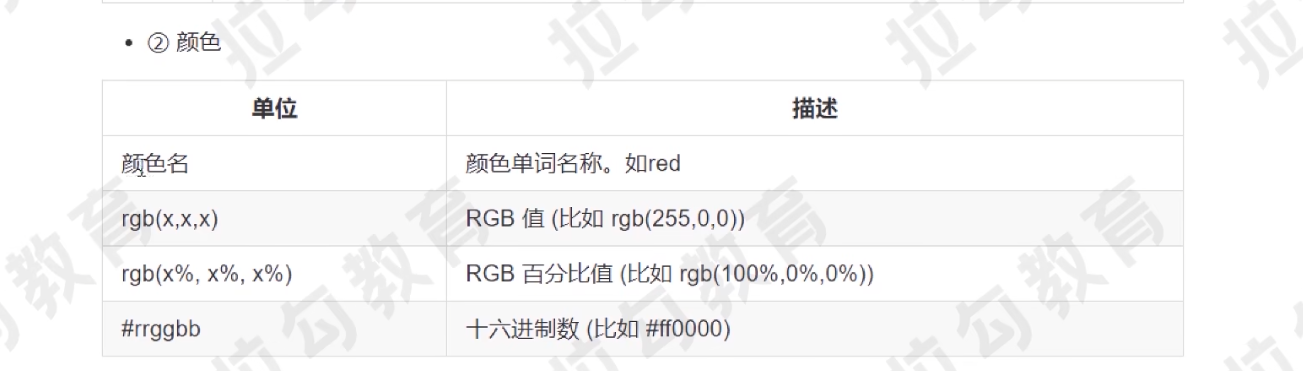
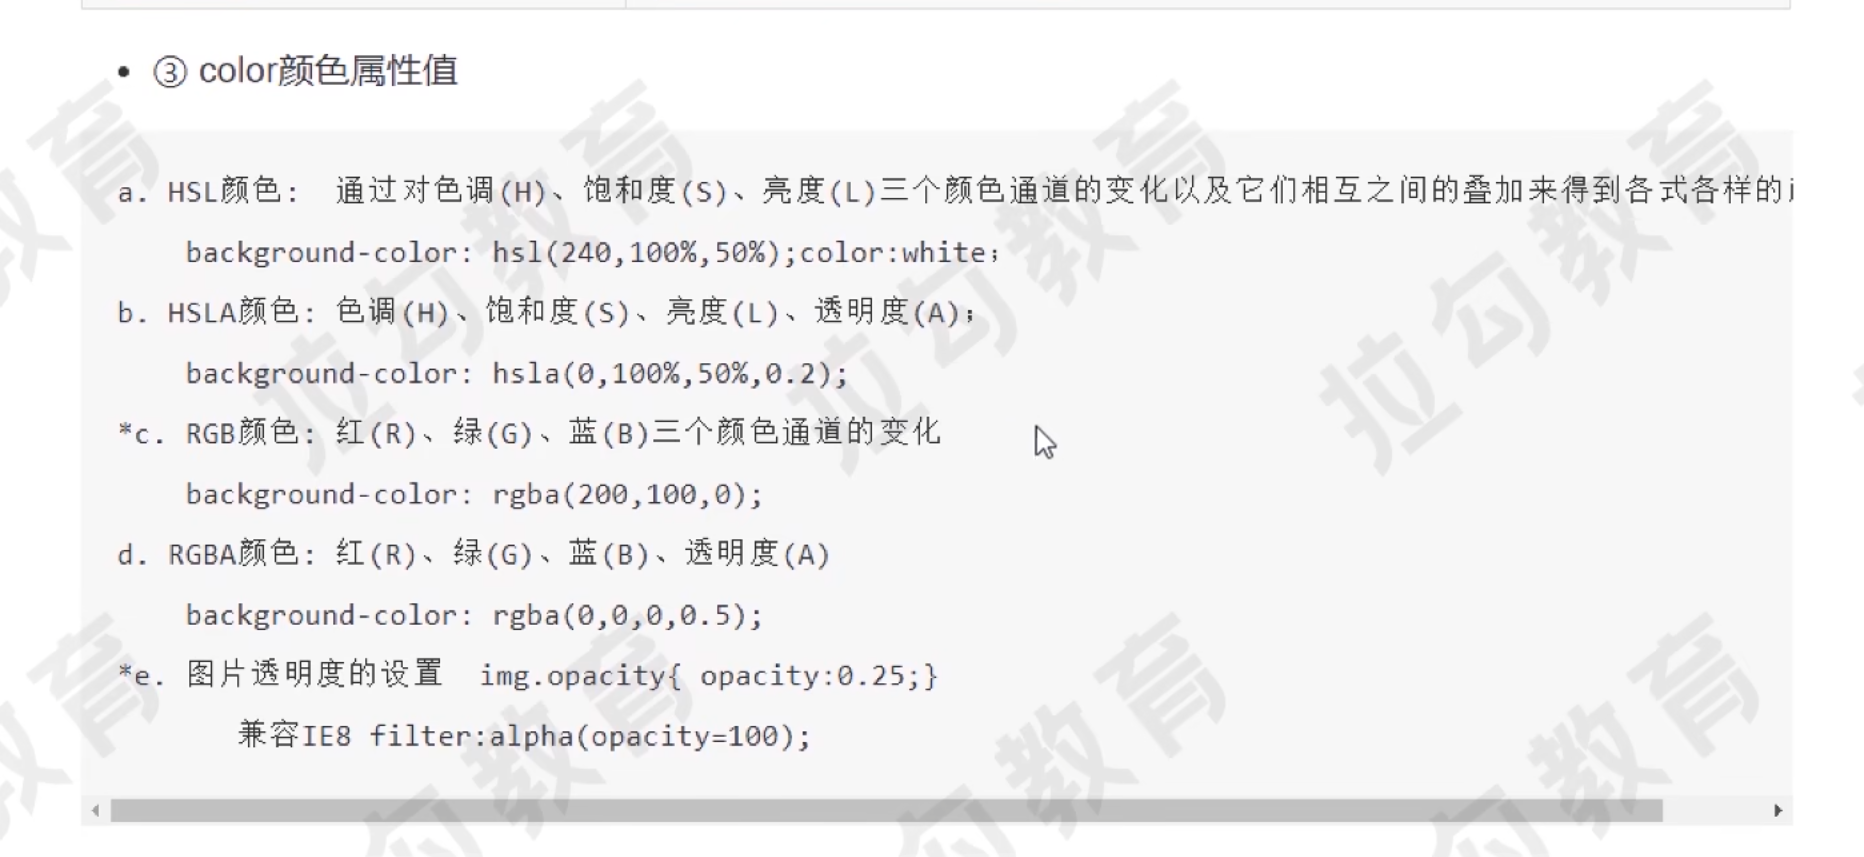
颜色
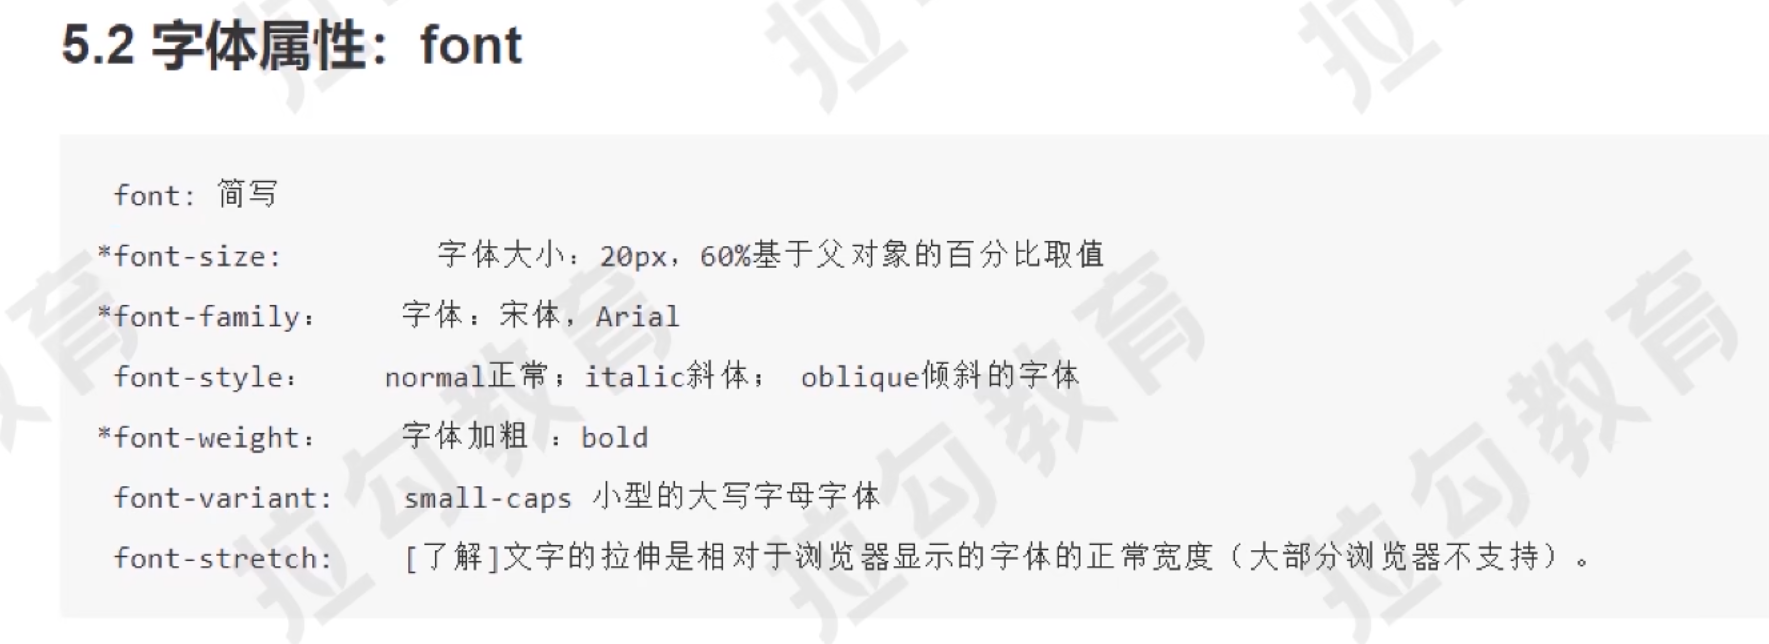
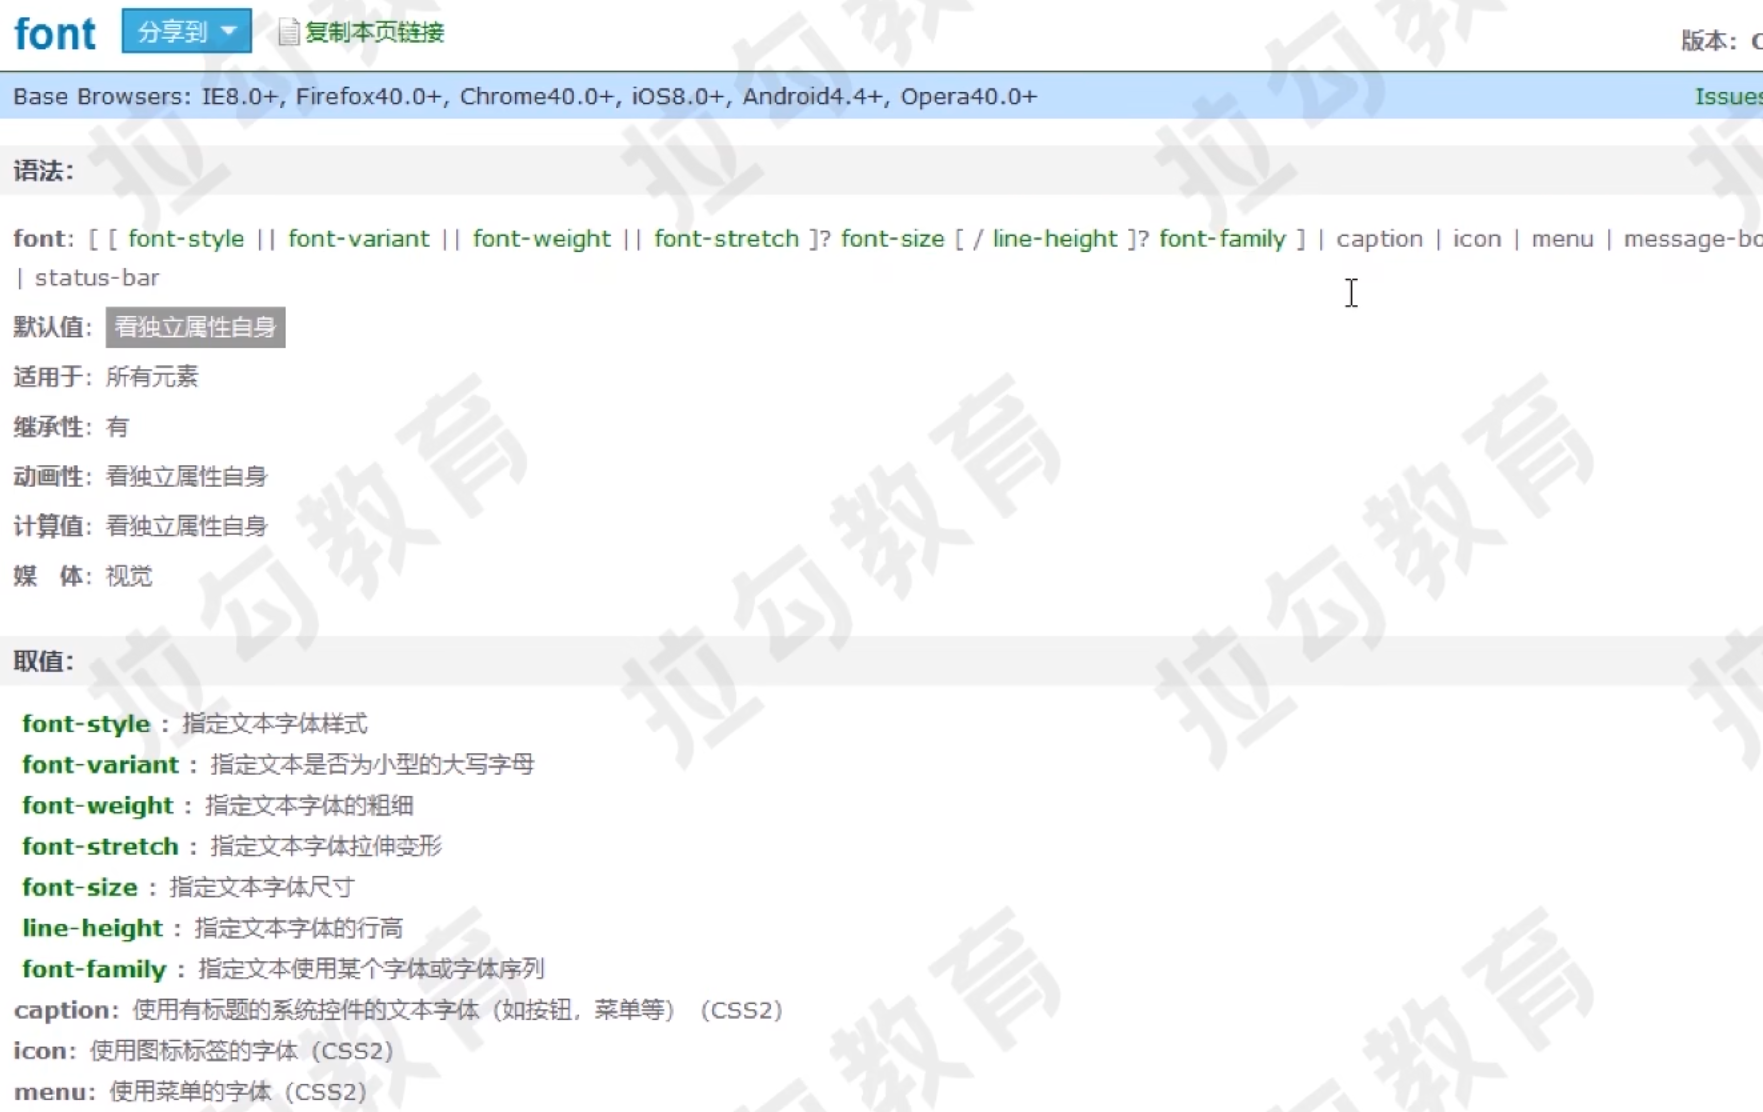
字体属性font
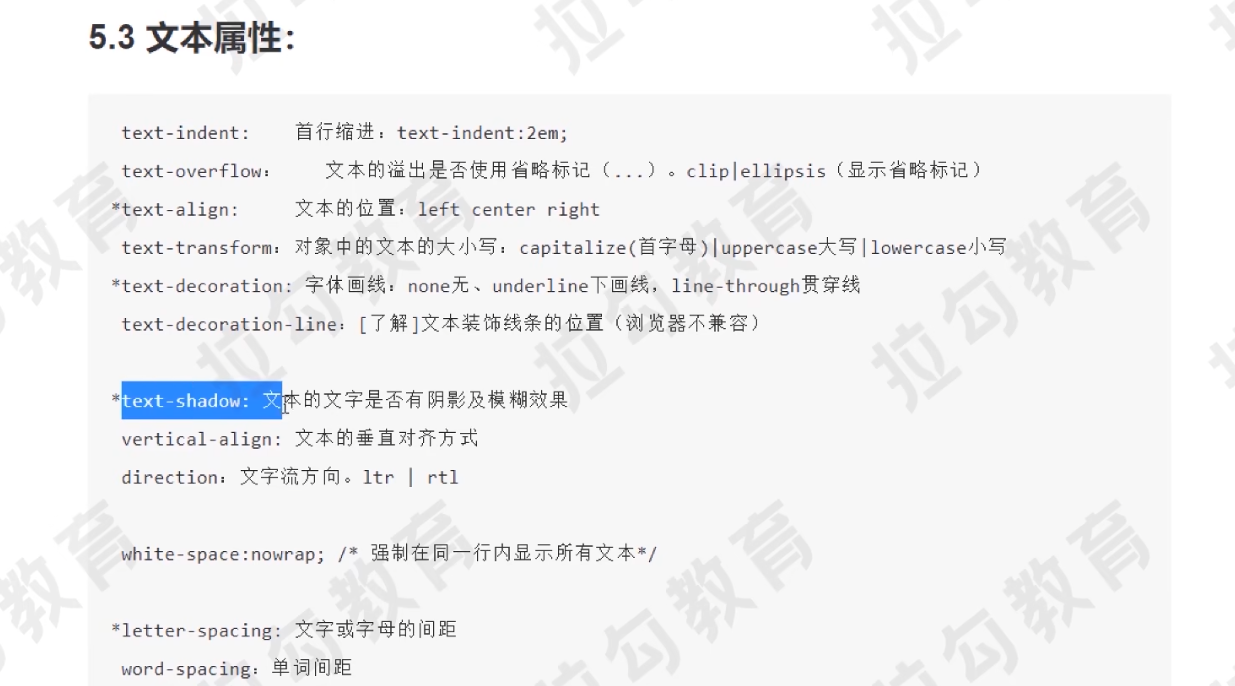
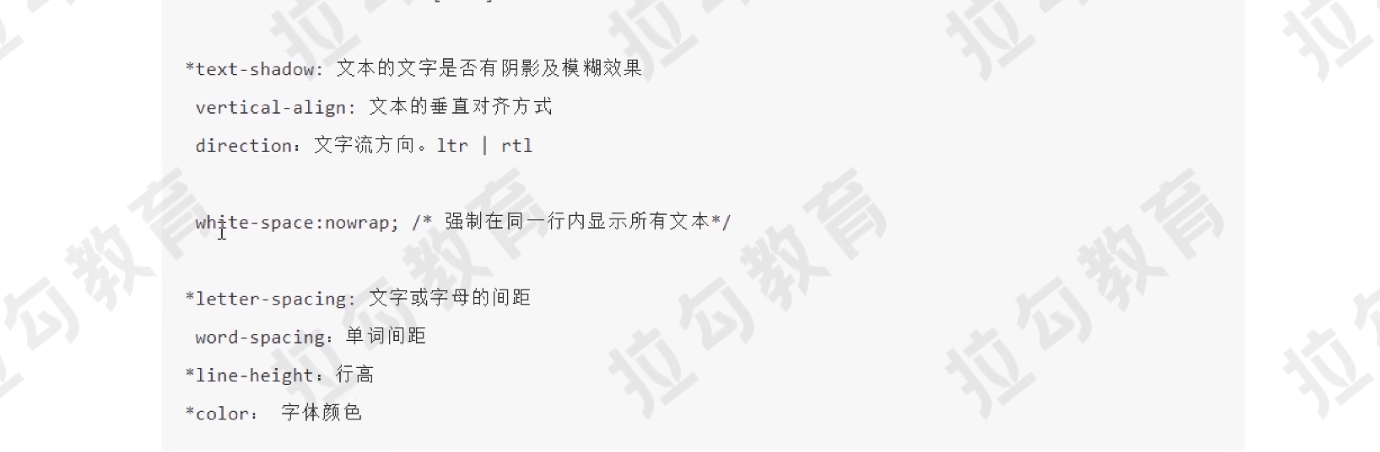
文本属性
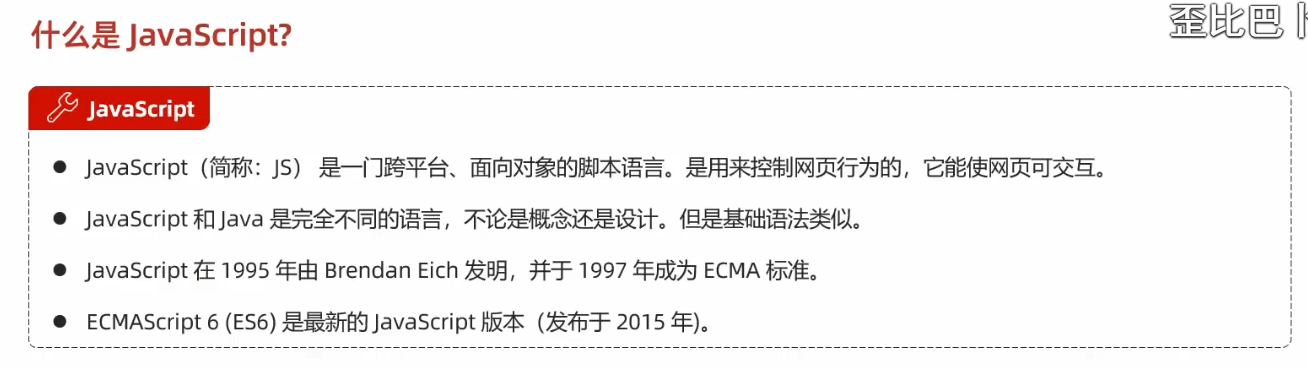
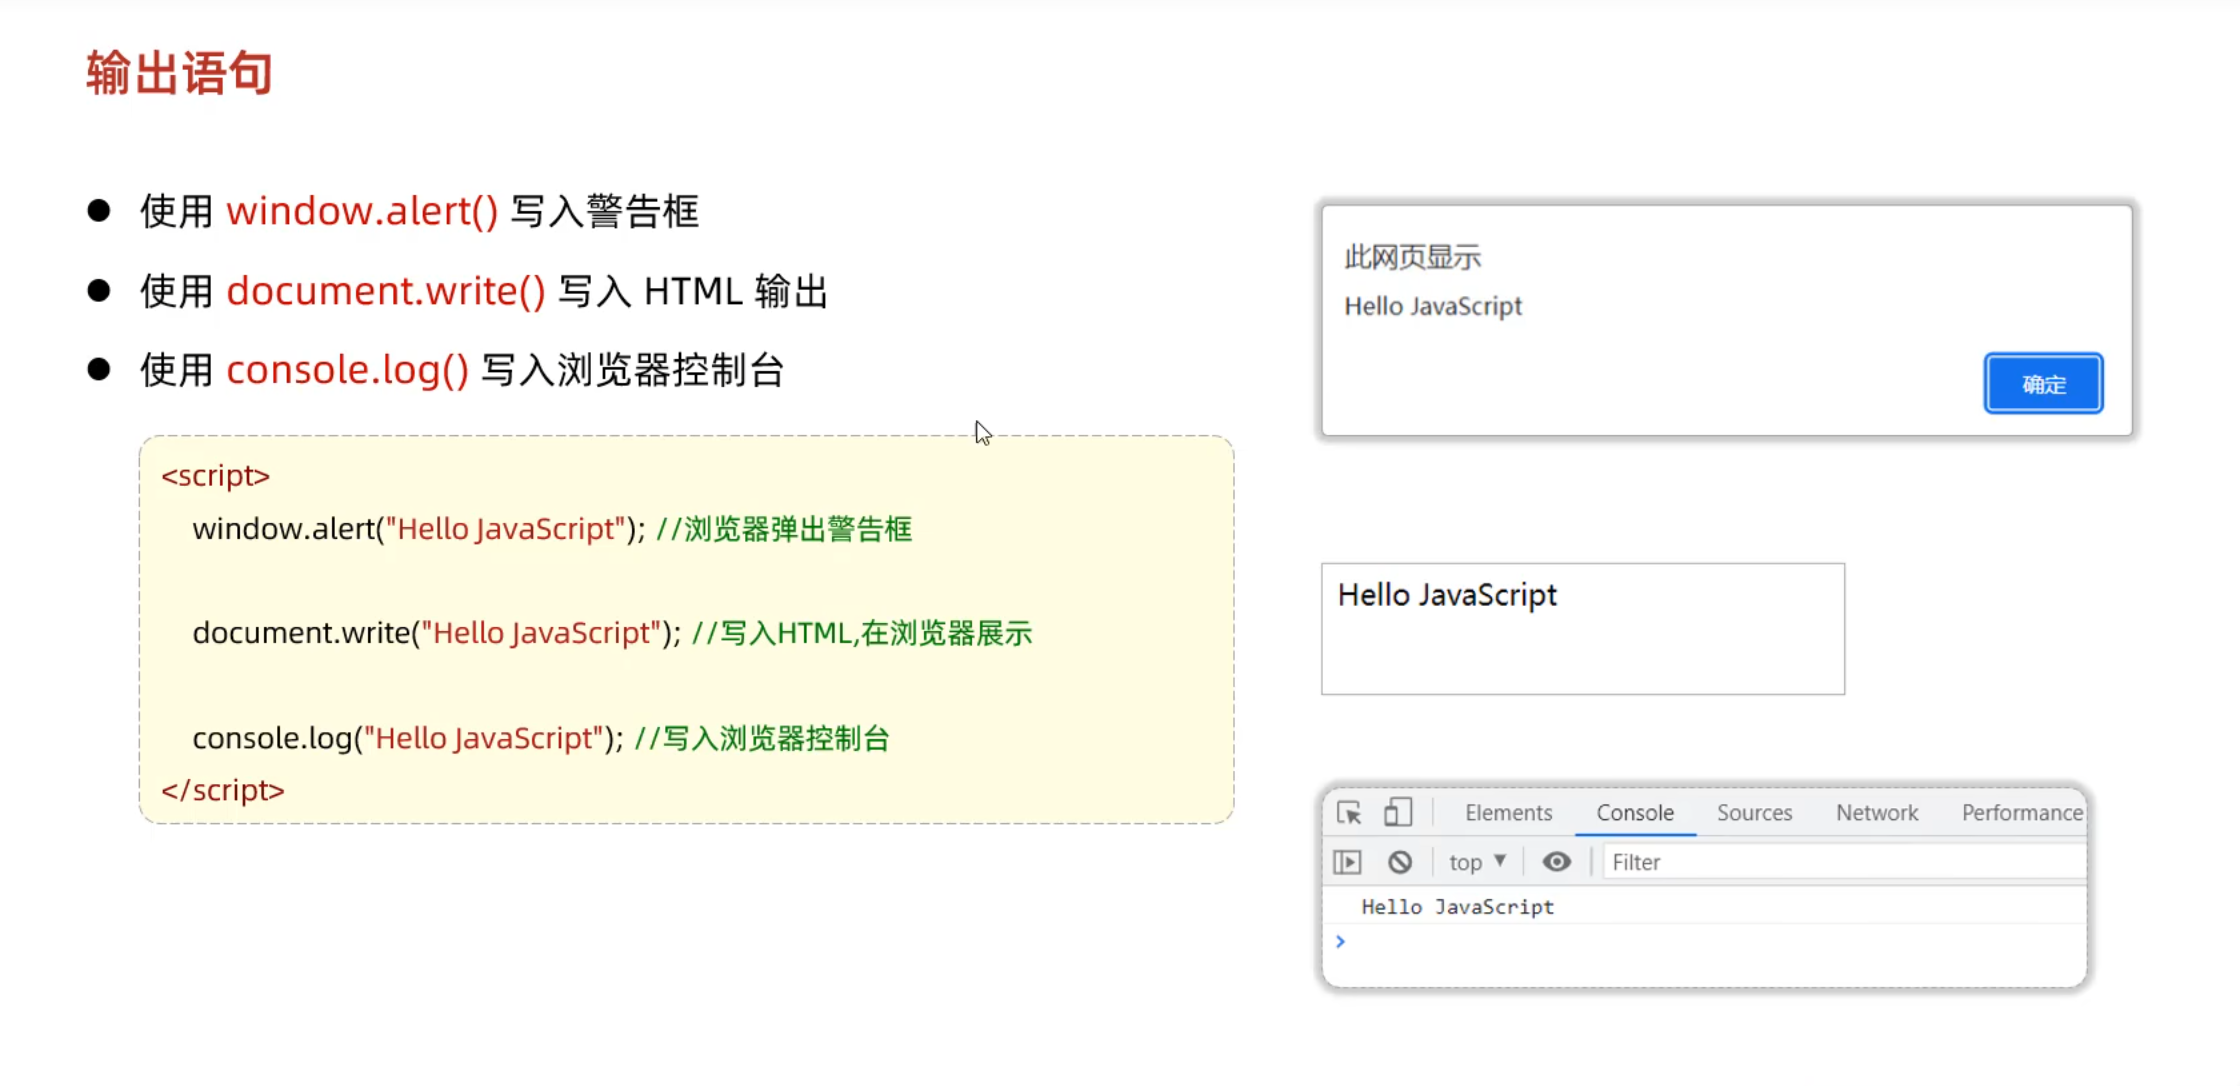
JavaScript
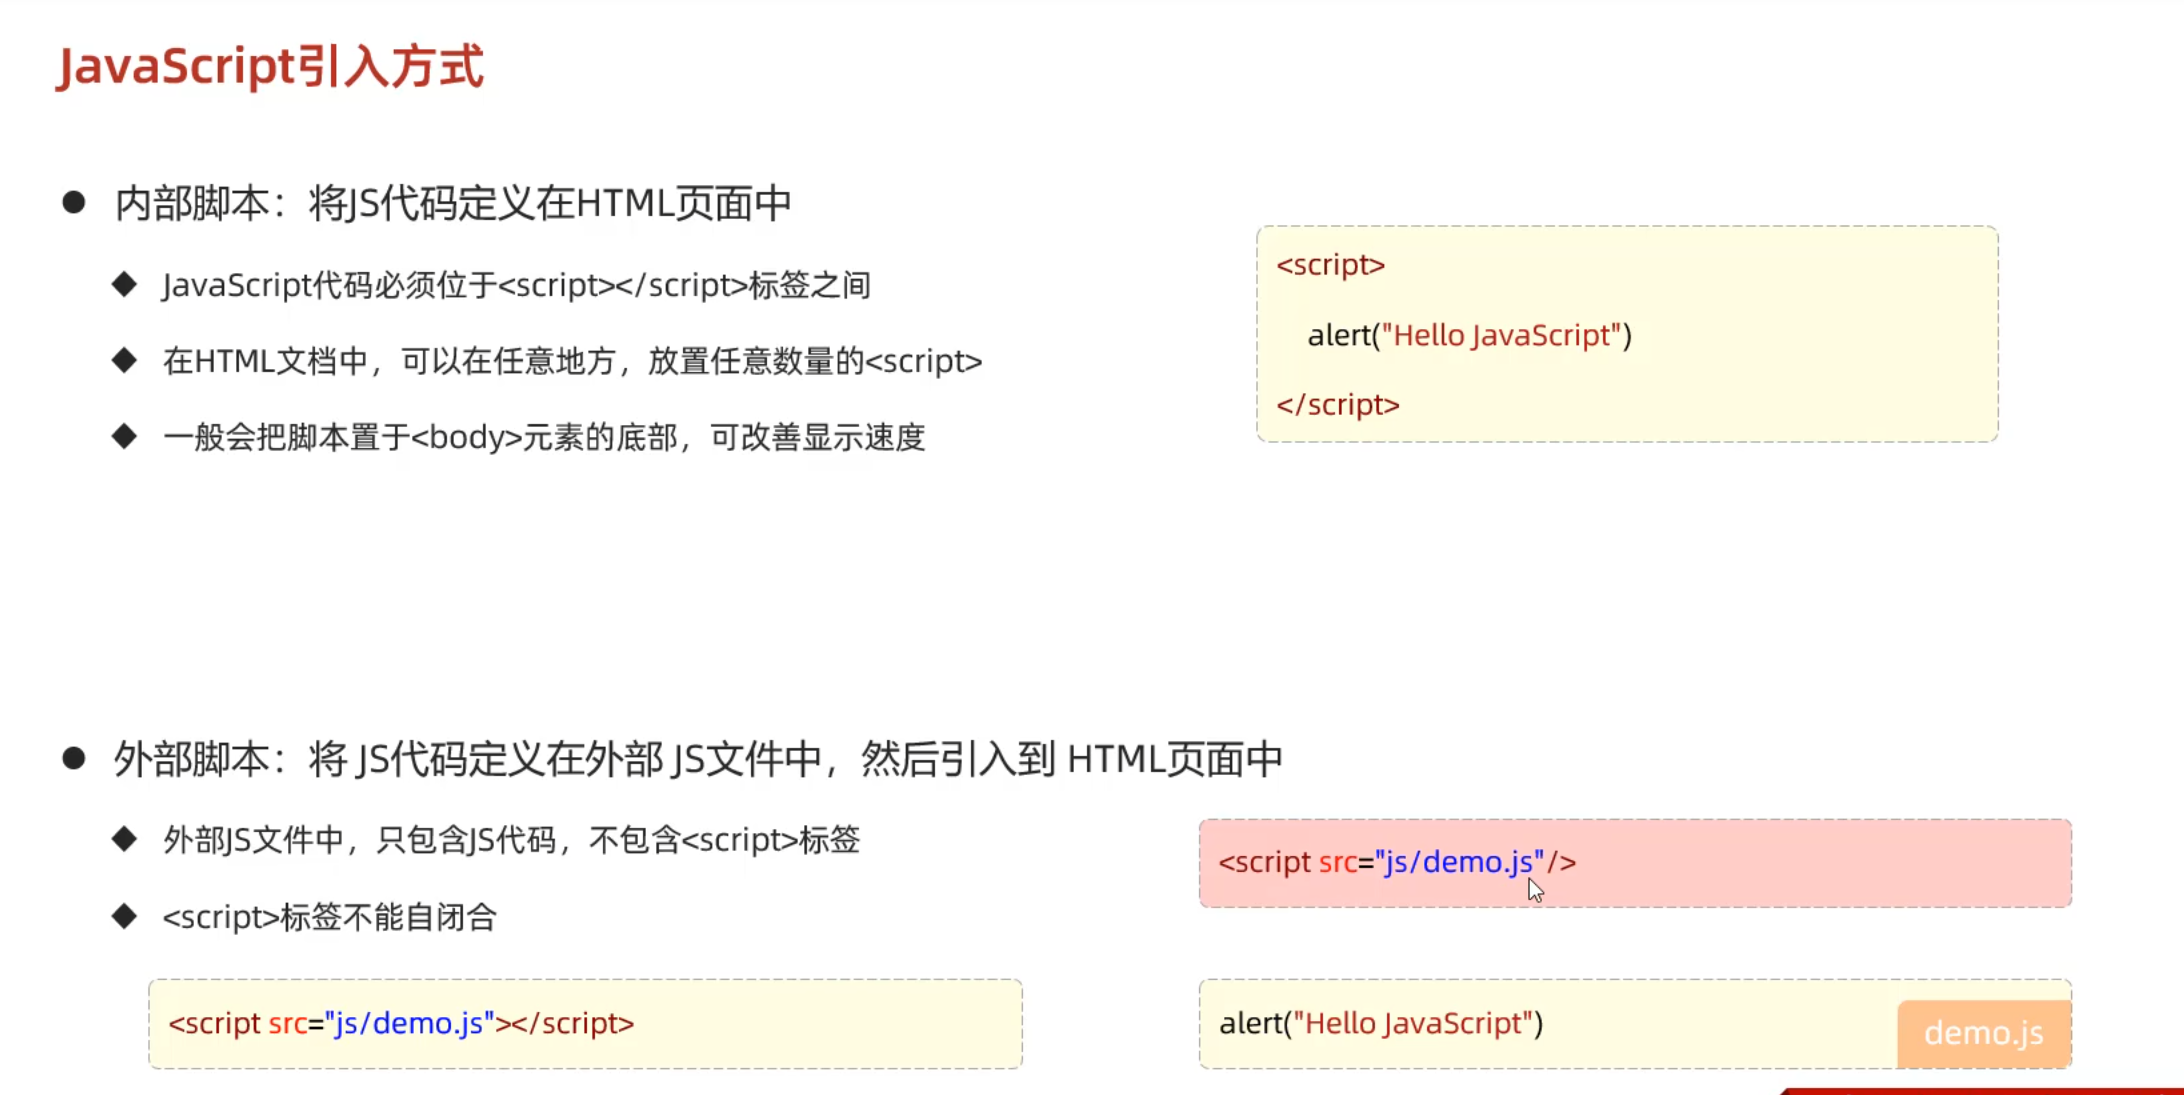
引入方式
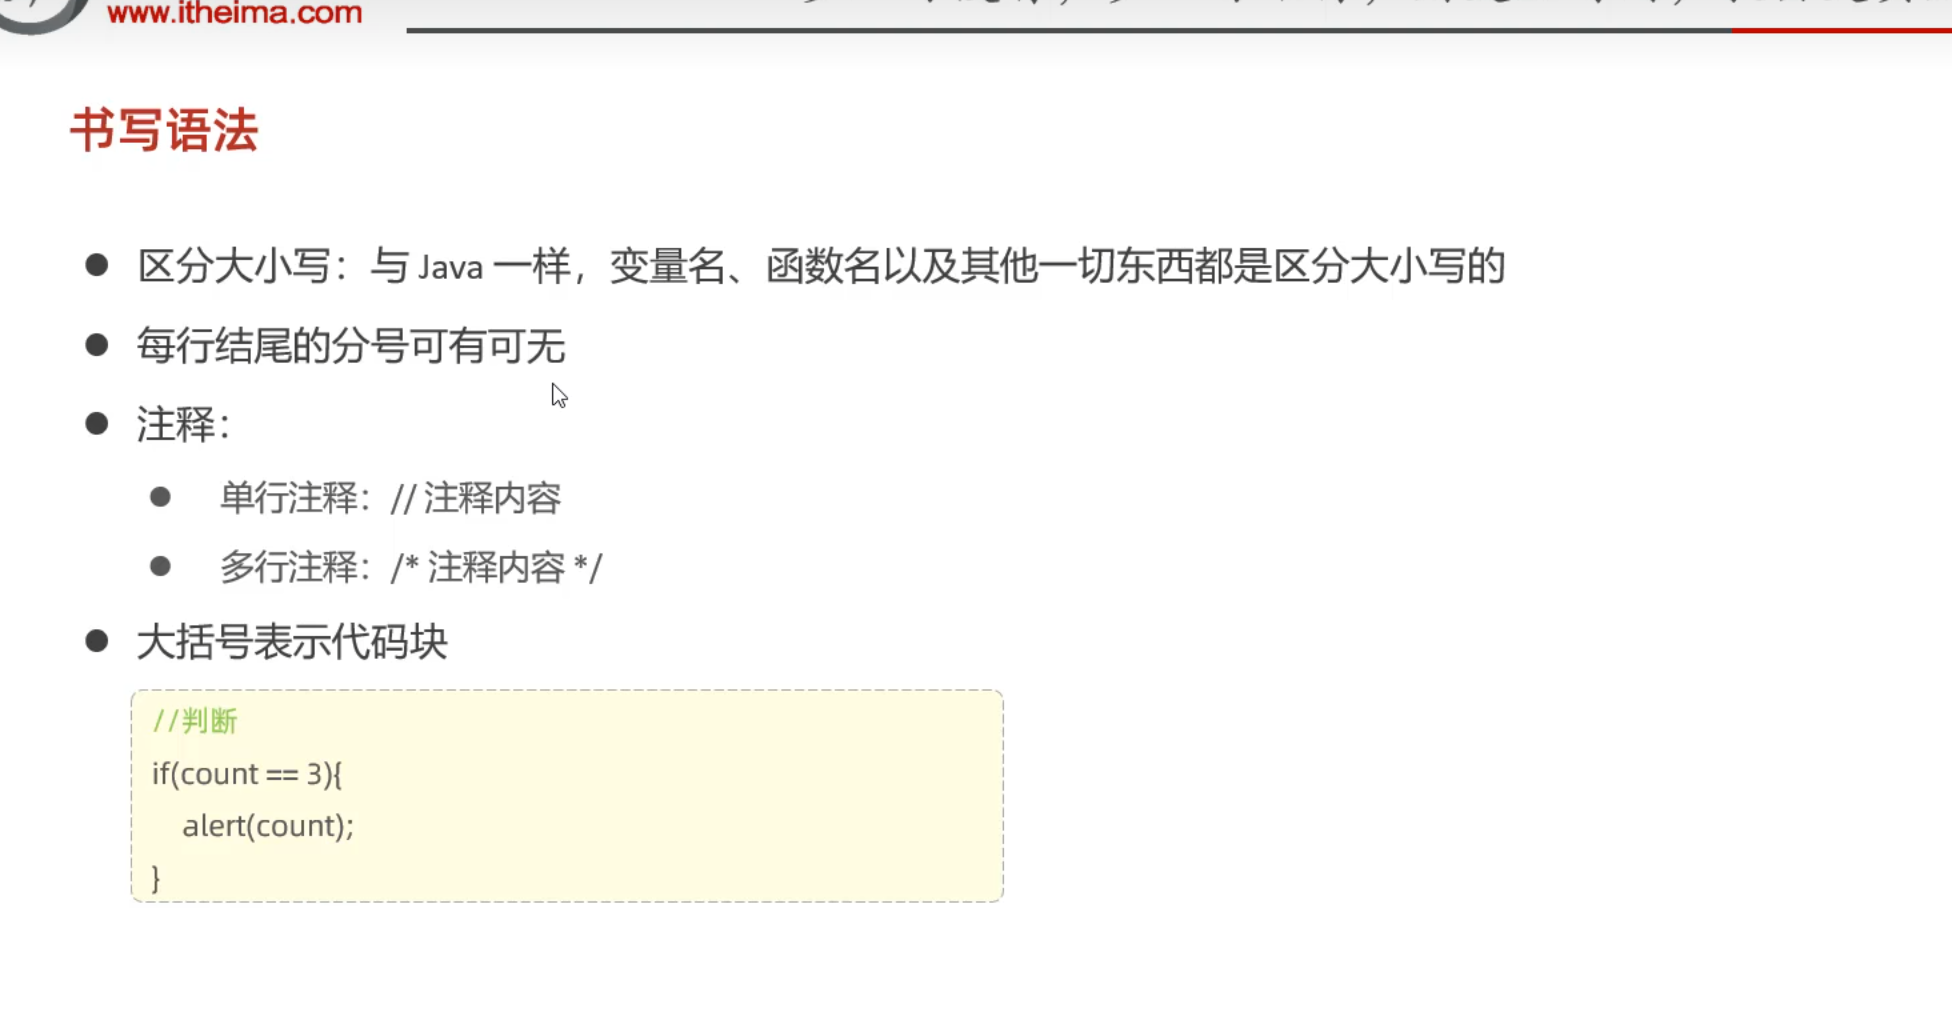
书写语法
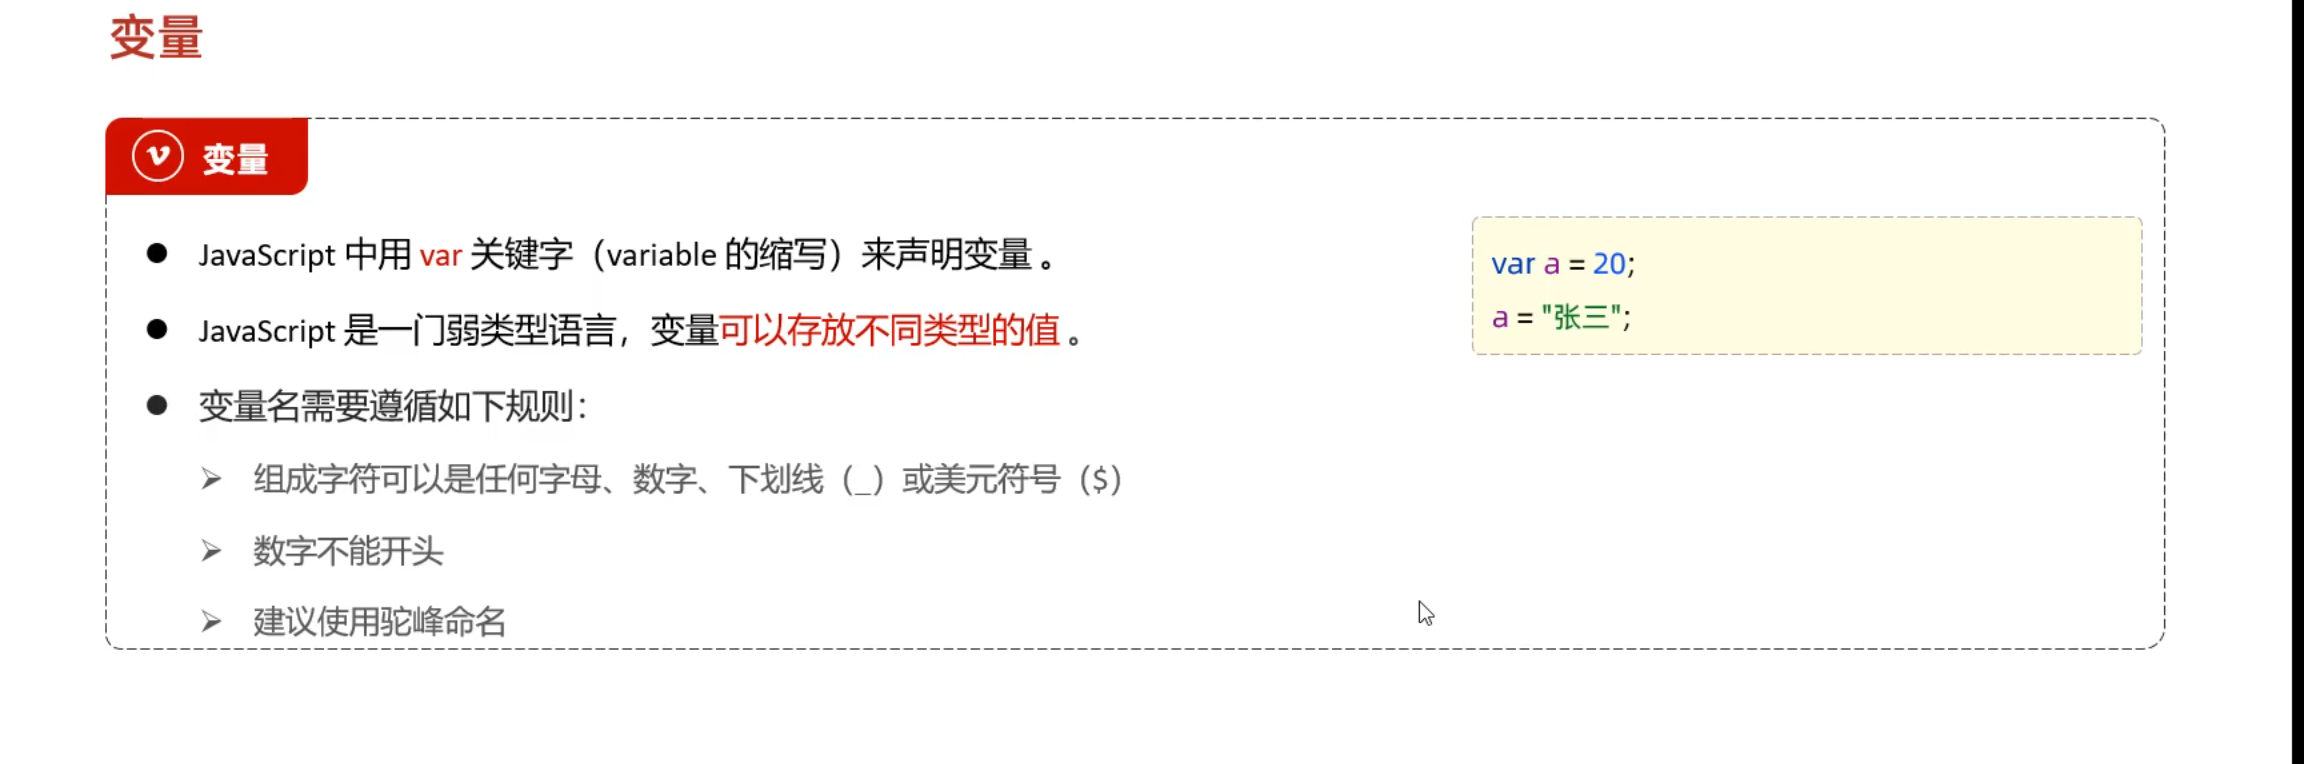
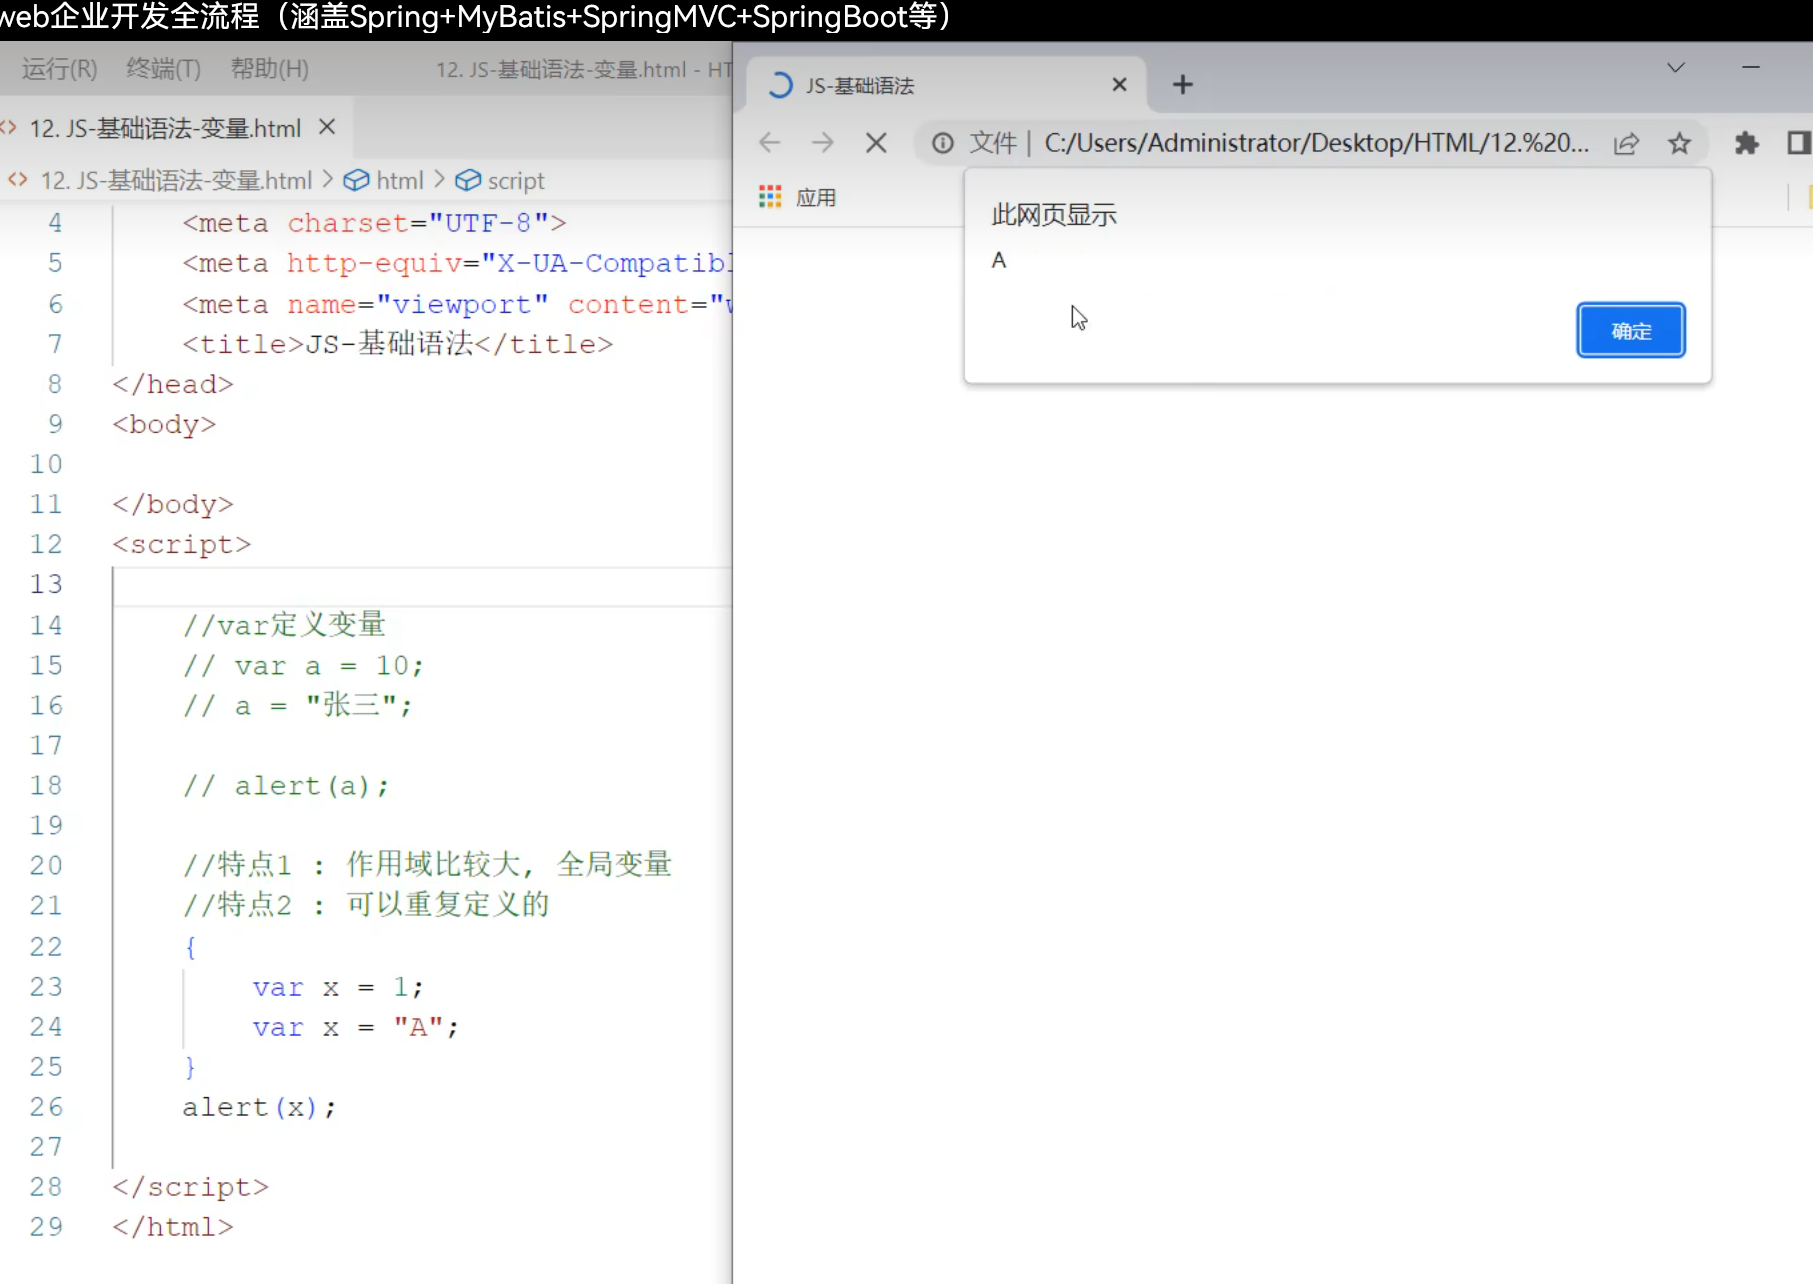
变量
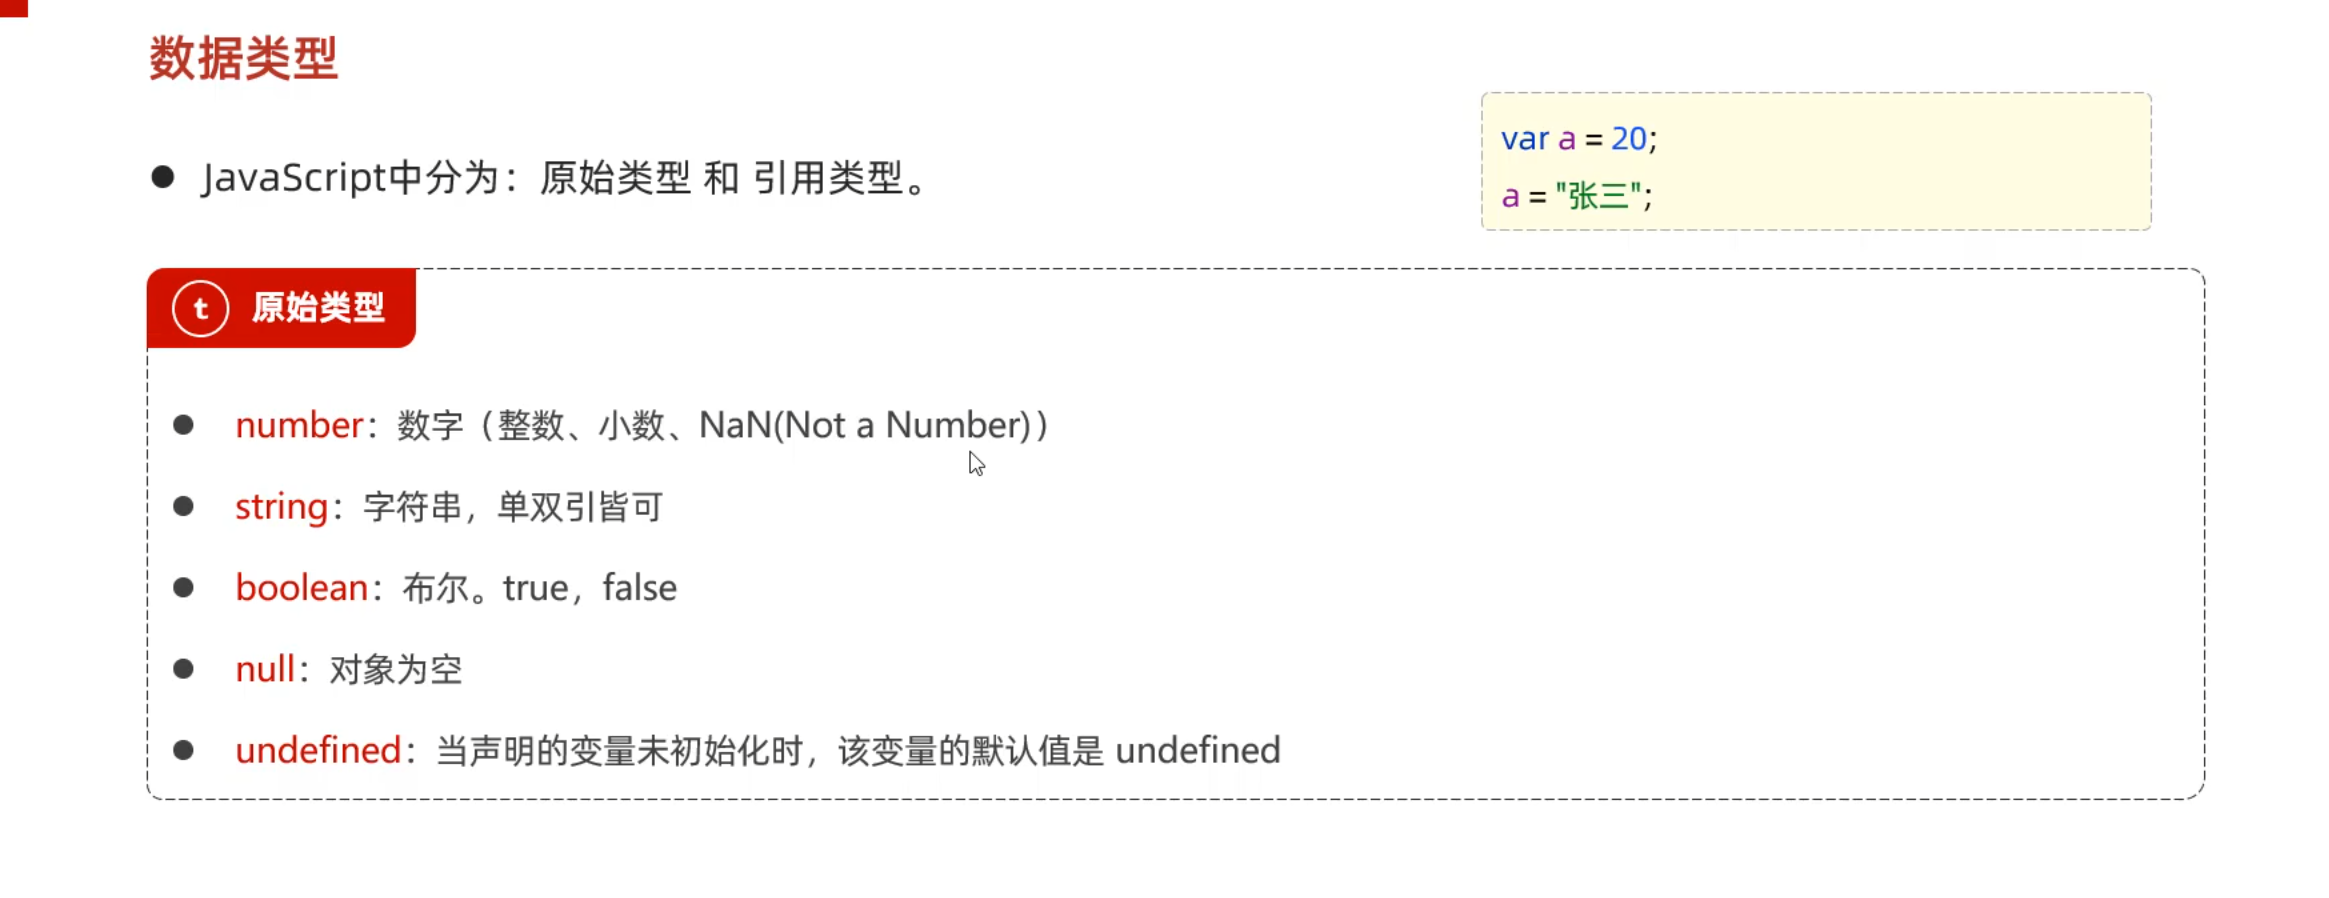
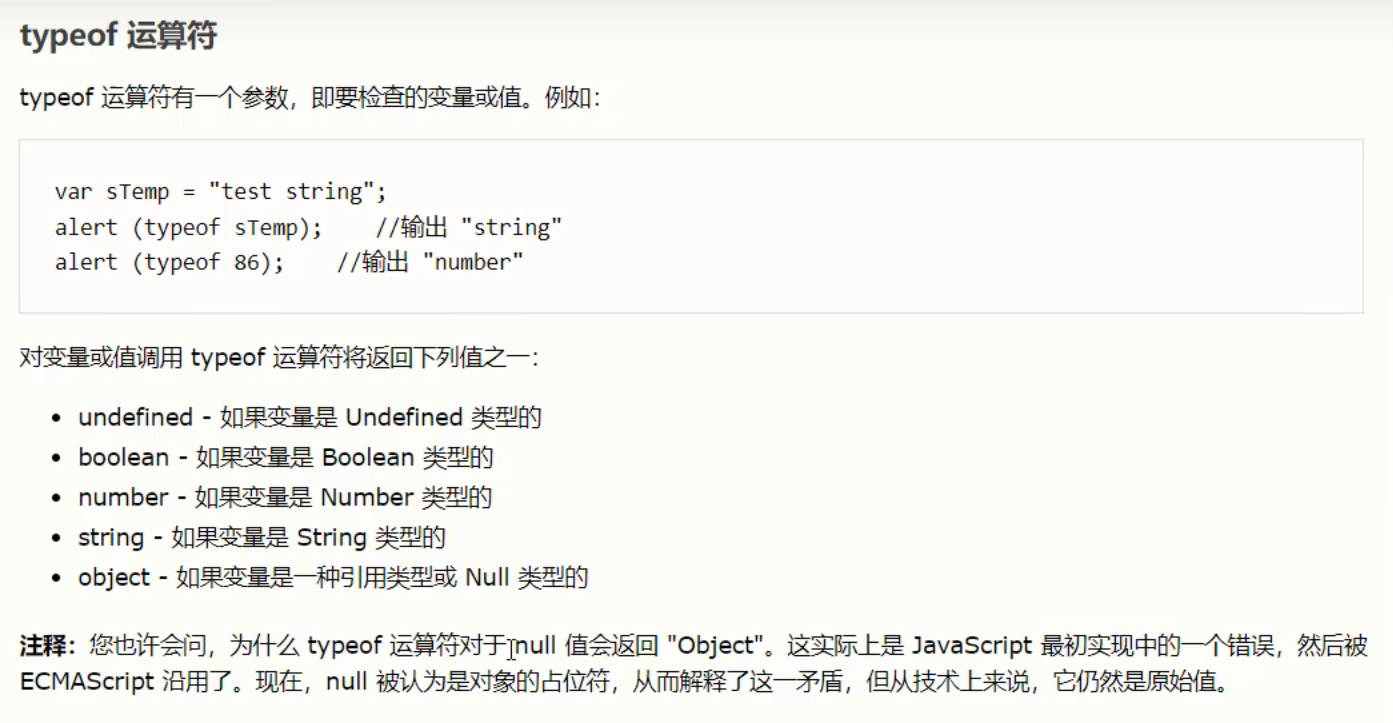
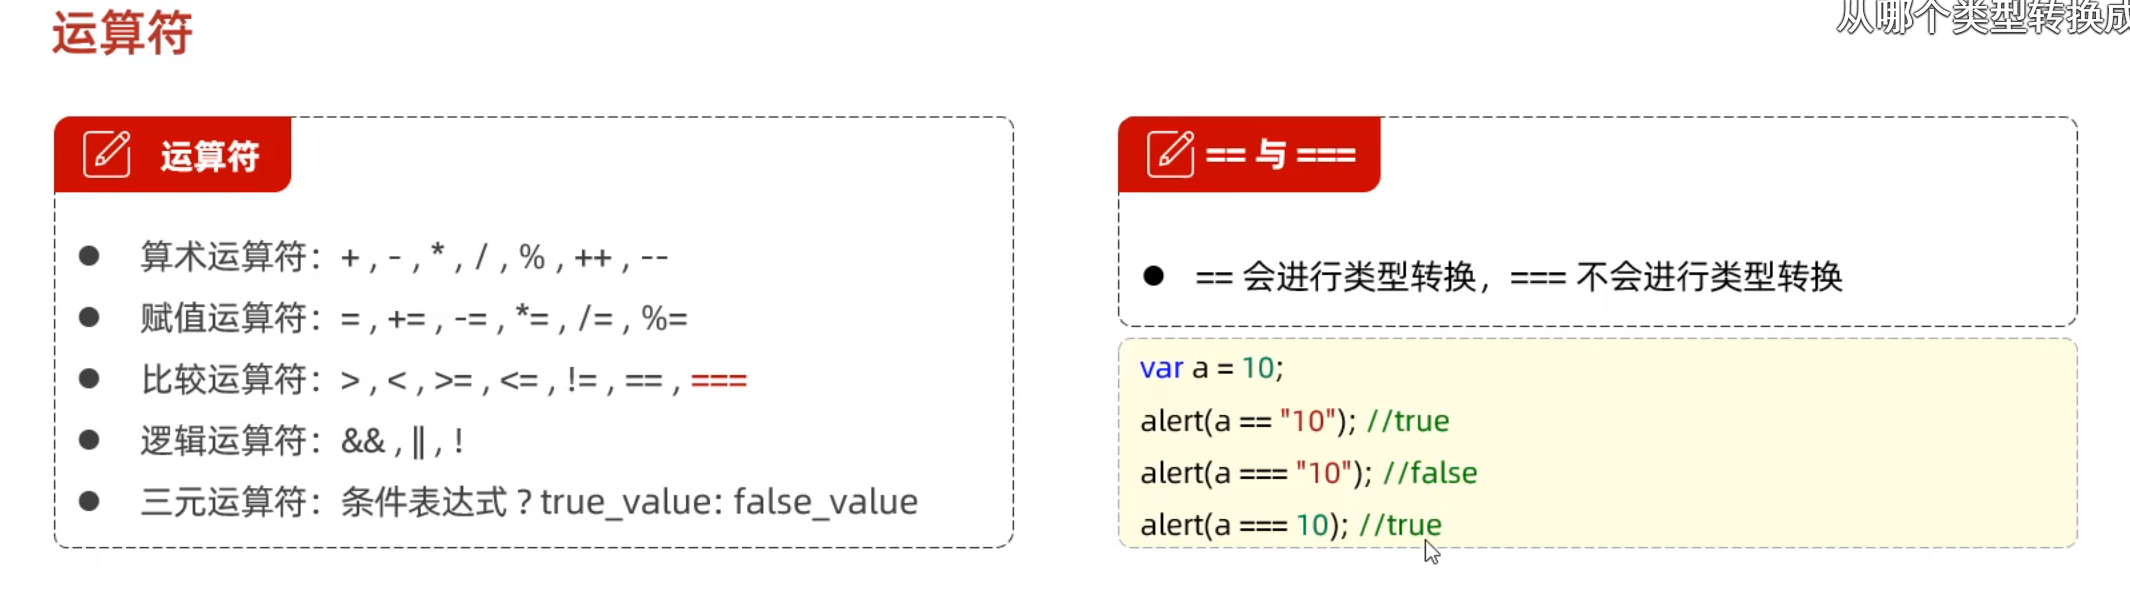
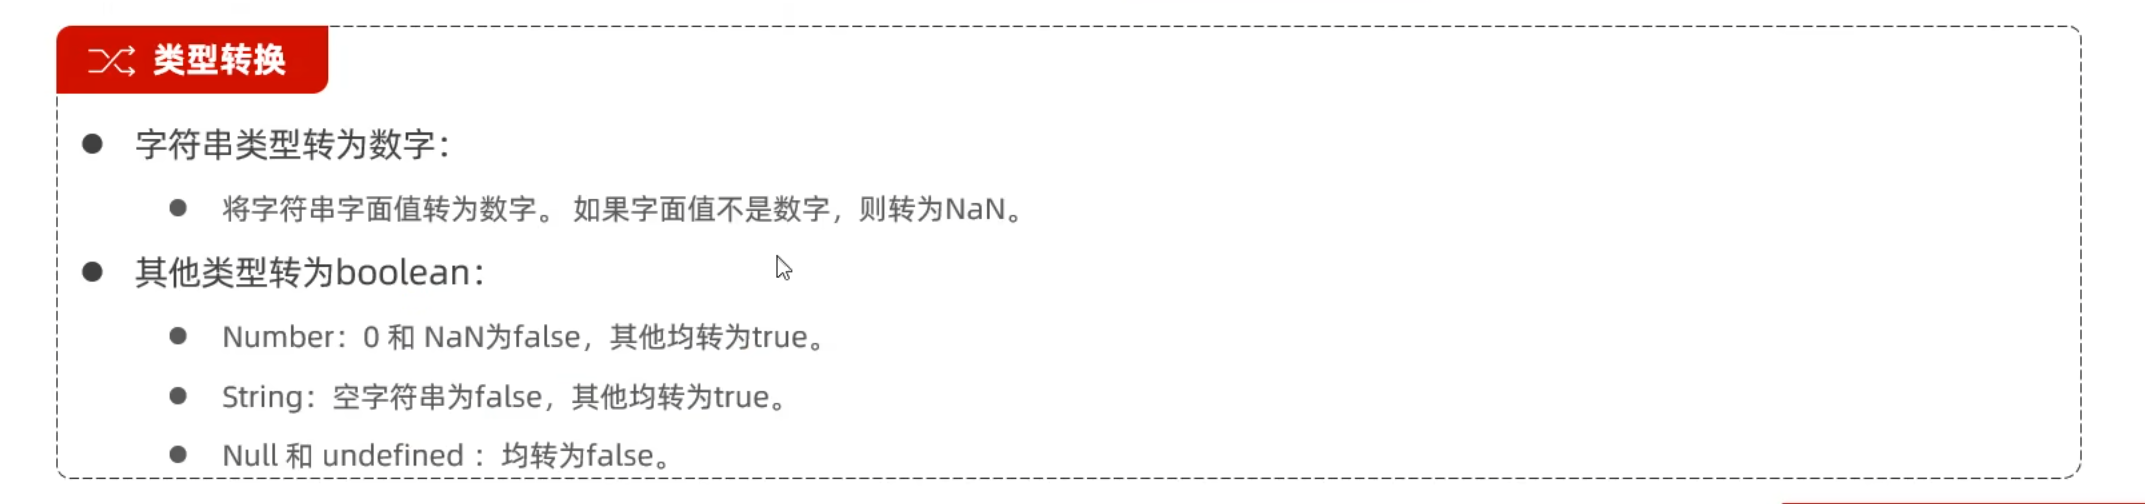
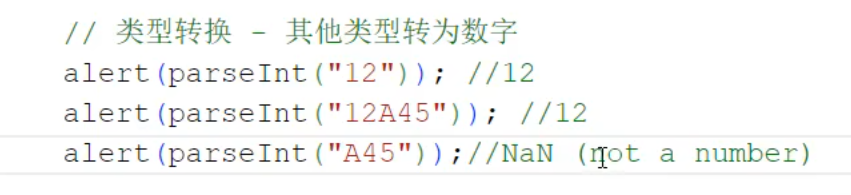
数据类型&运算符
parseInt()会从第一个字符开始匹配,直到遇到第一个非数字停止转换;所以如果转换的内容第一个字符就不是数字,转换结果就是NaN
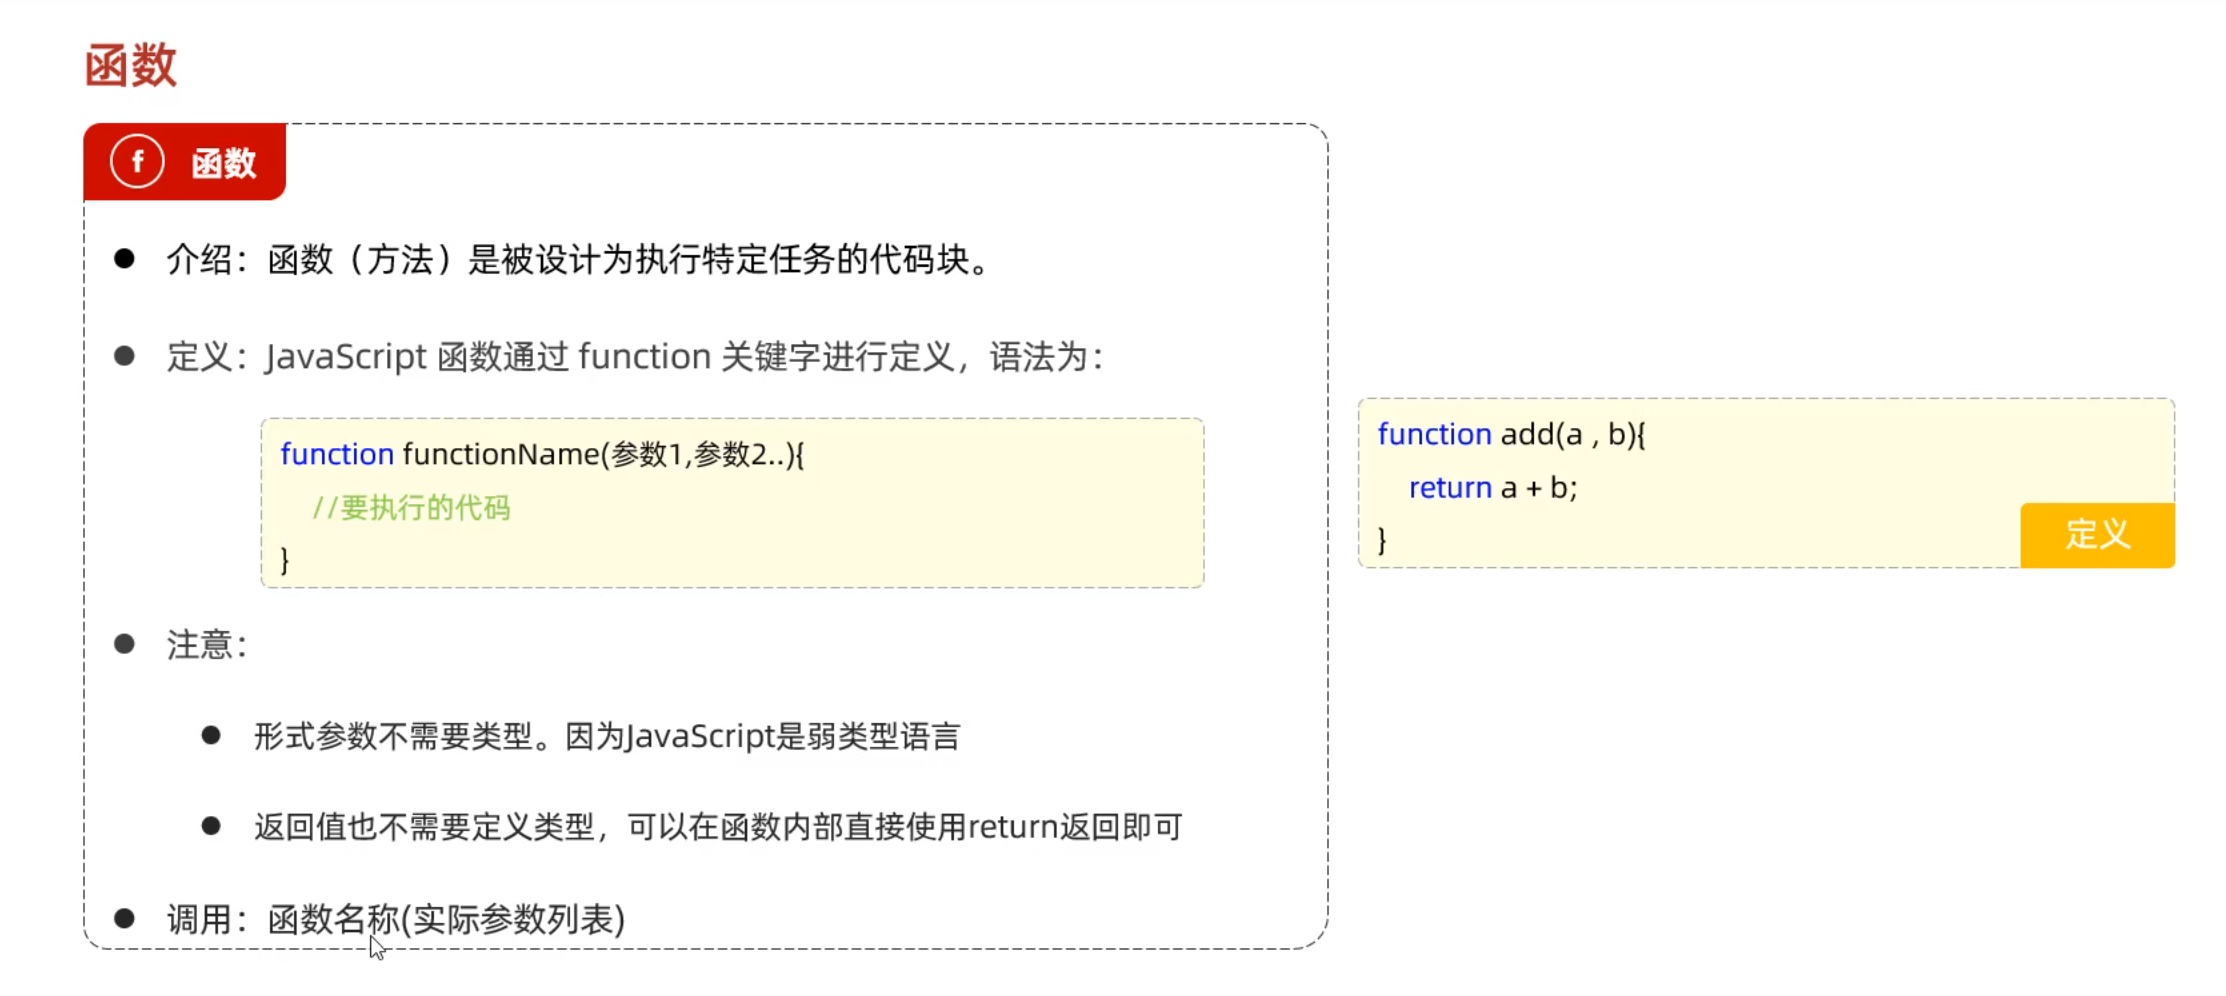
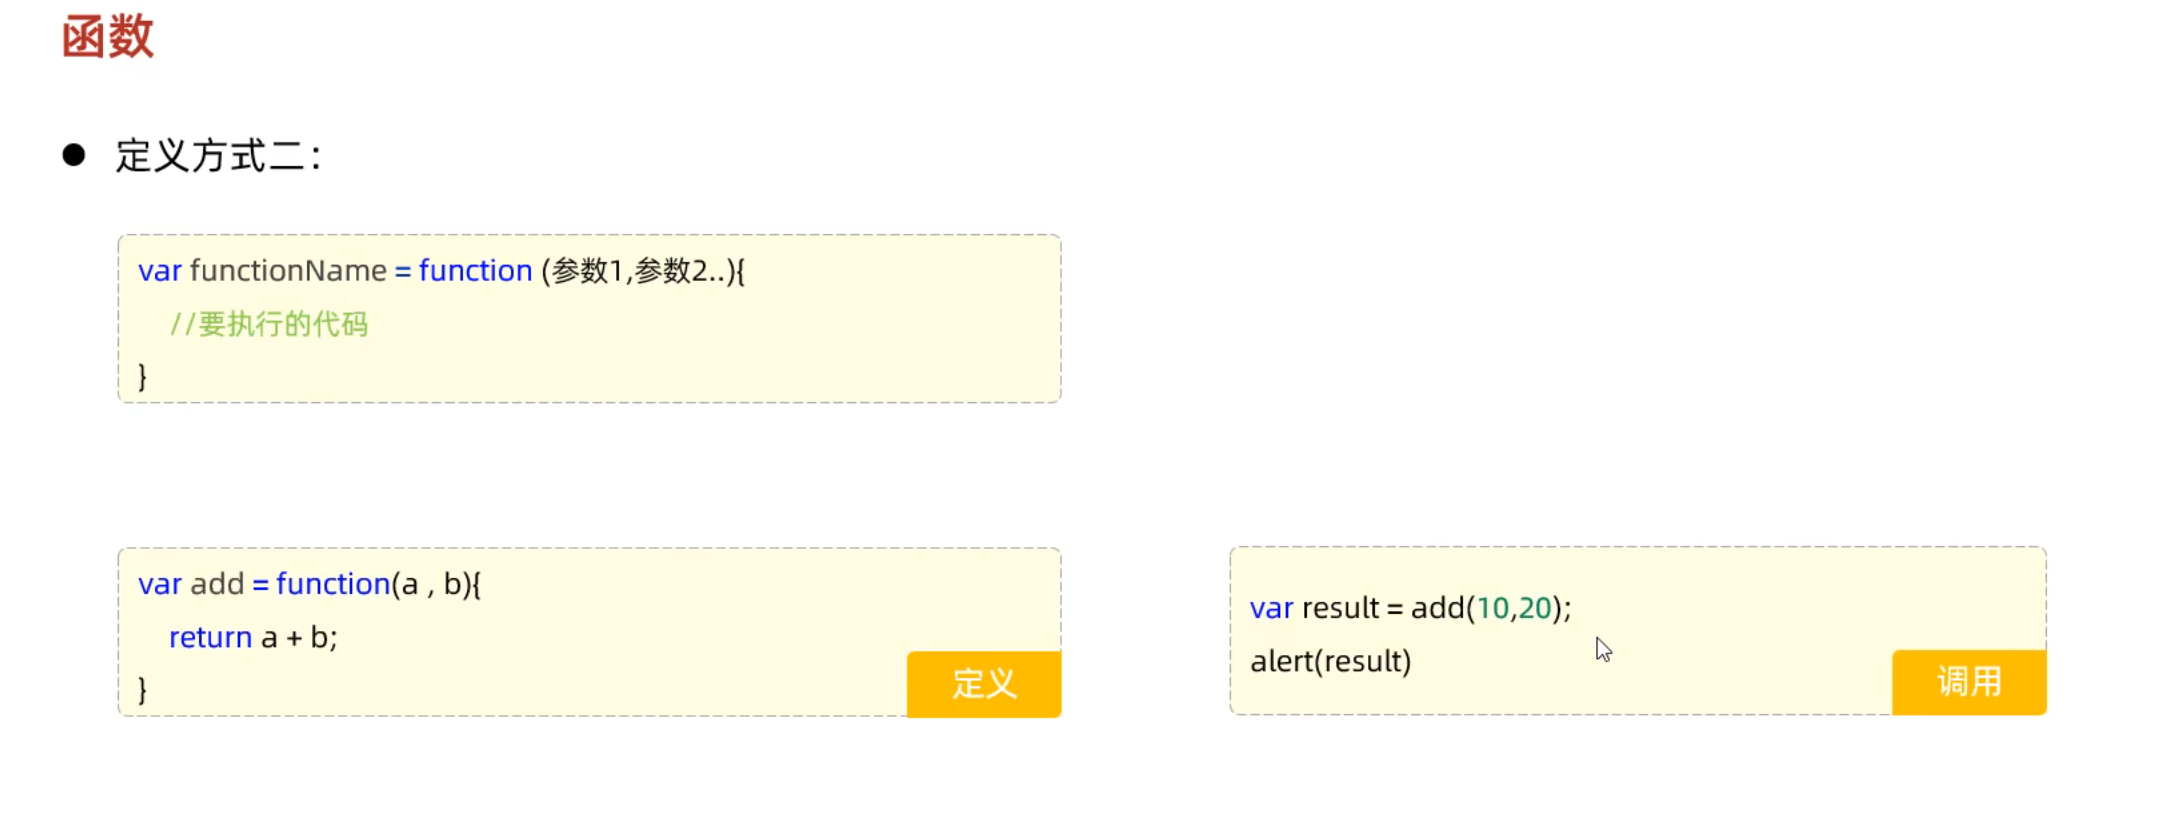
Day02-06. JS-函数
js函数可以接收任意个数参数,有几个形参就接收前几个参数
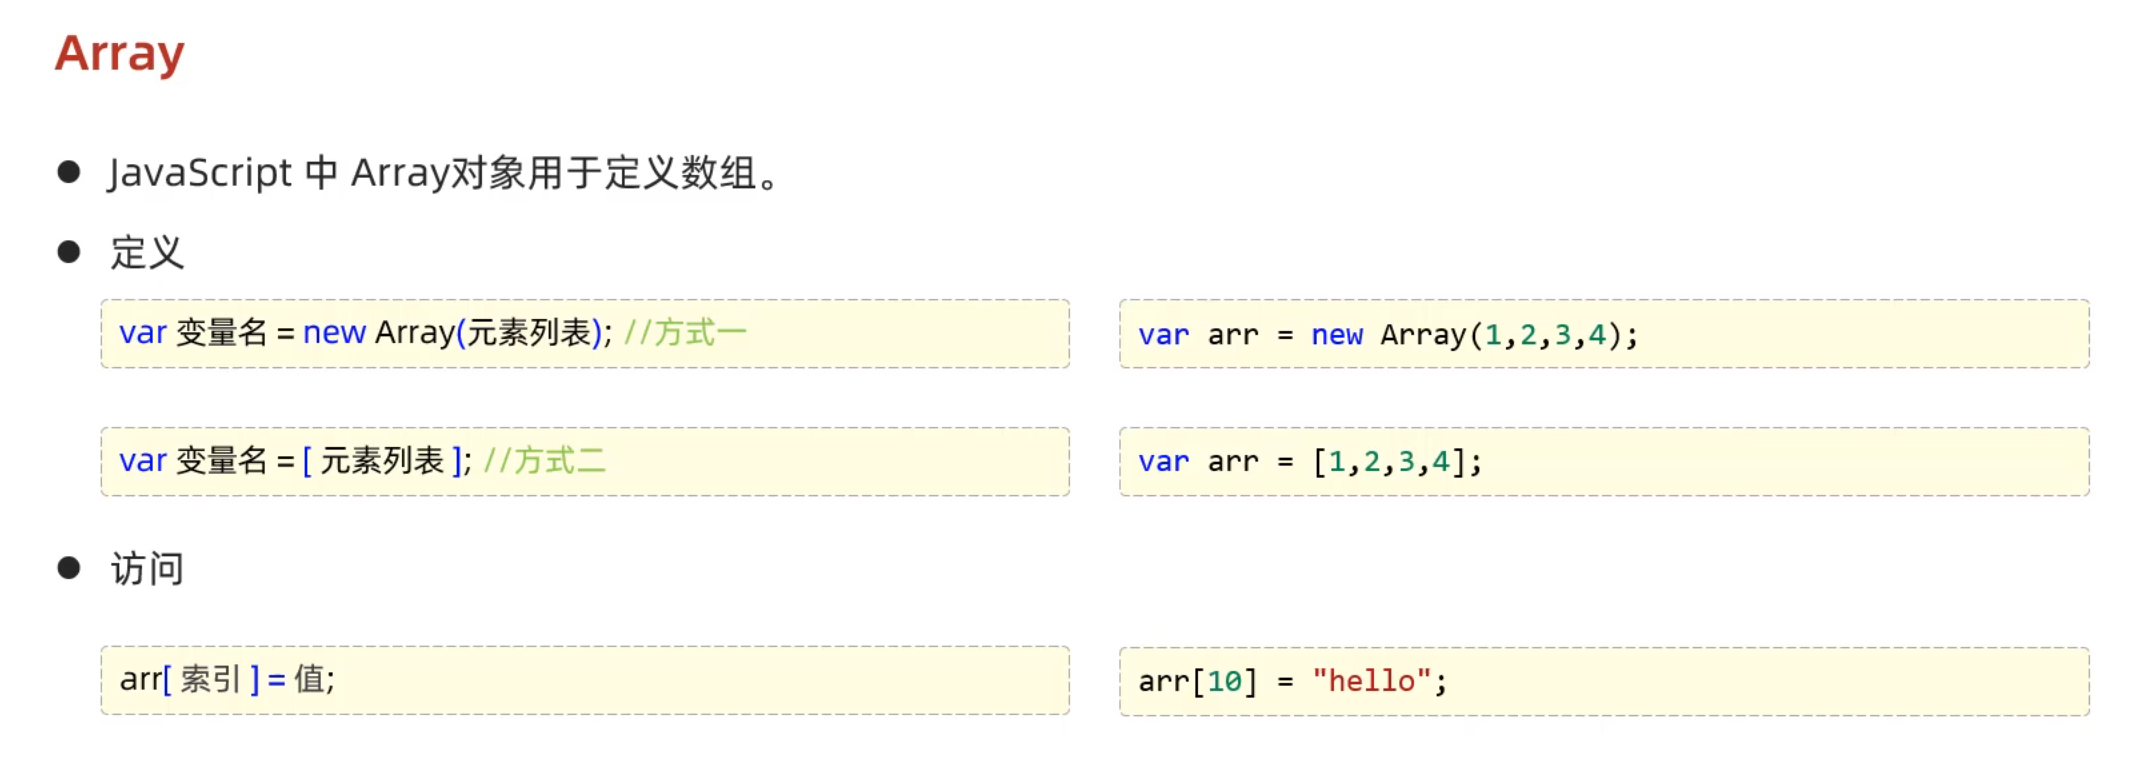
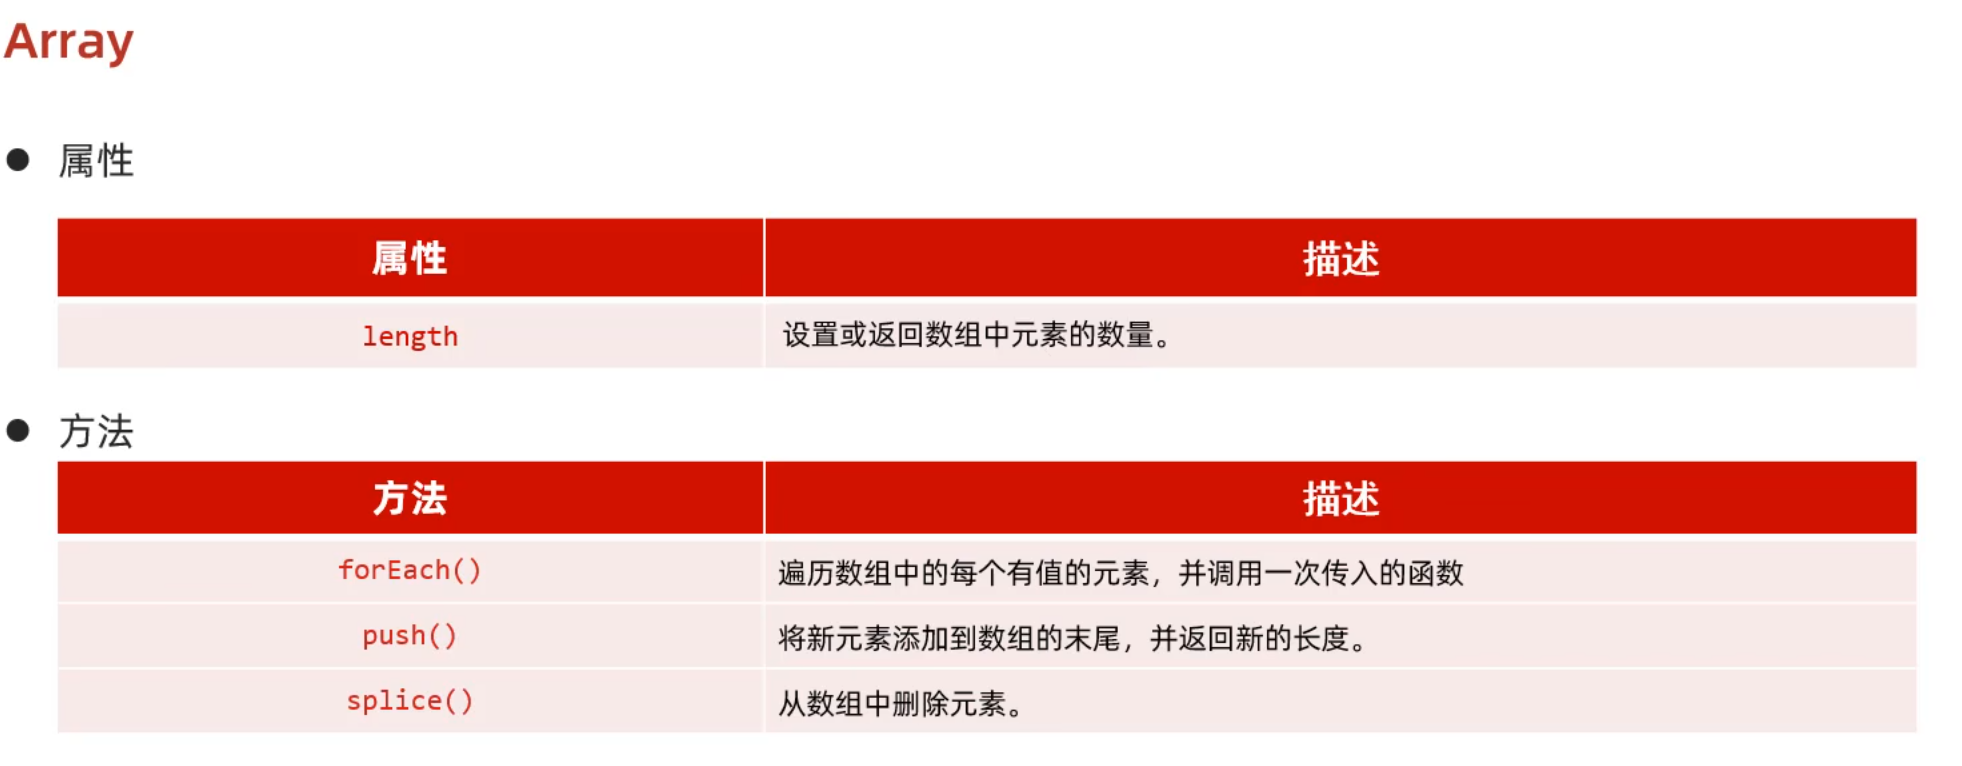
Day02-07. JS-对象-Array数组
1 2 3 4 5 6 7 8 9 10 11 12 13 var arr = [1 ,2 ,3 ,4 ];arr[10 ] = "佐佐木淳平" ; arr.forEach (function (e ){ console .log (e); }) var arr = [1 ,2 ,3 ,4 ];arr[10 ] = "佐佐木淳平" ; arr.forEach ((e )=> { console .log (e); })
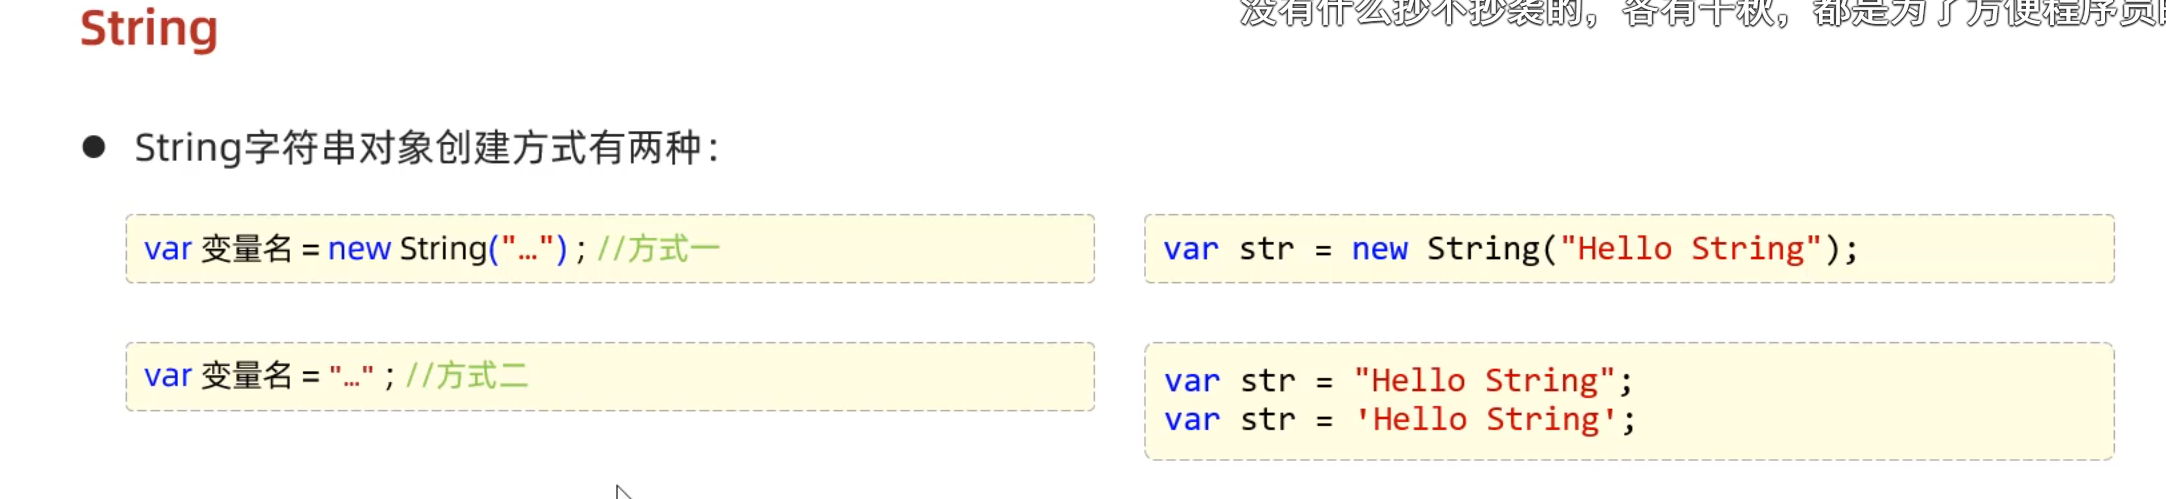
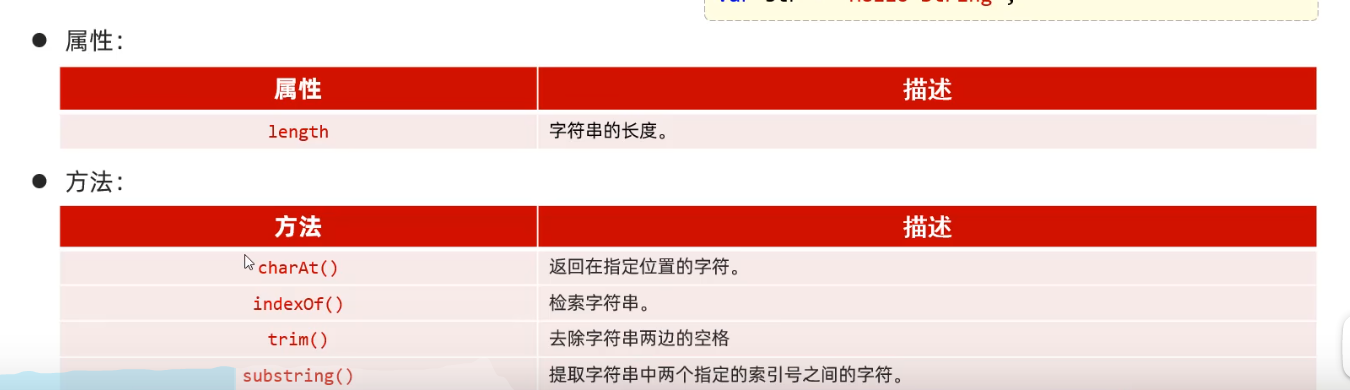
Day02-08. JS-对象-String字符串
substring参数1:开始索引,参数2:结束索引;左闭右开
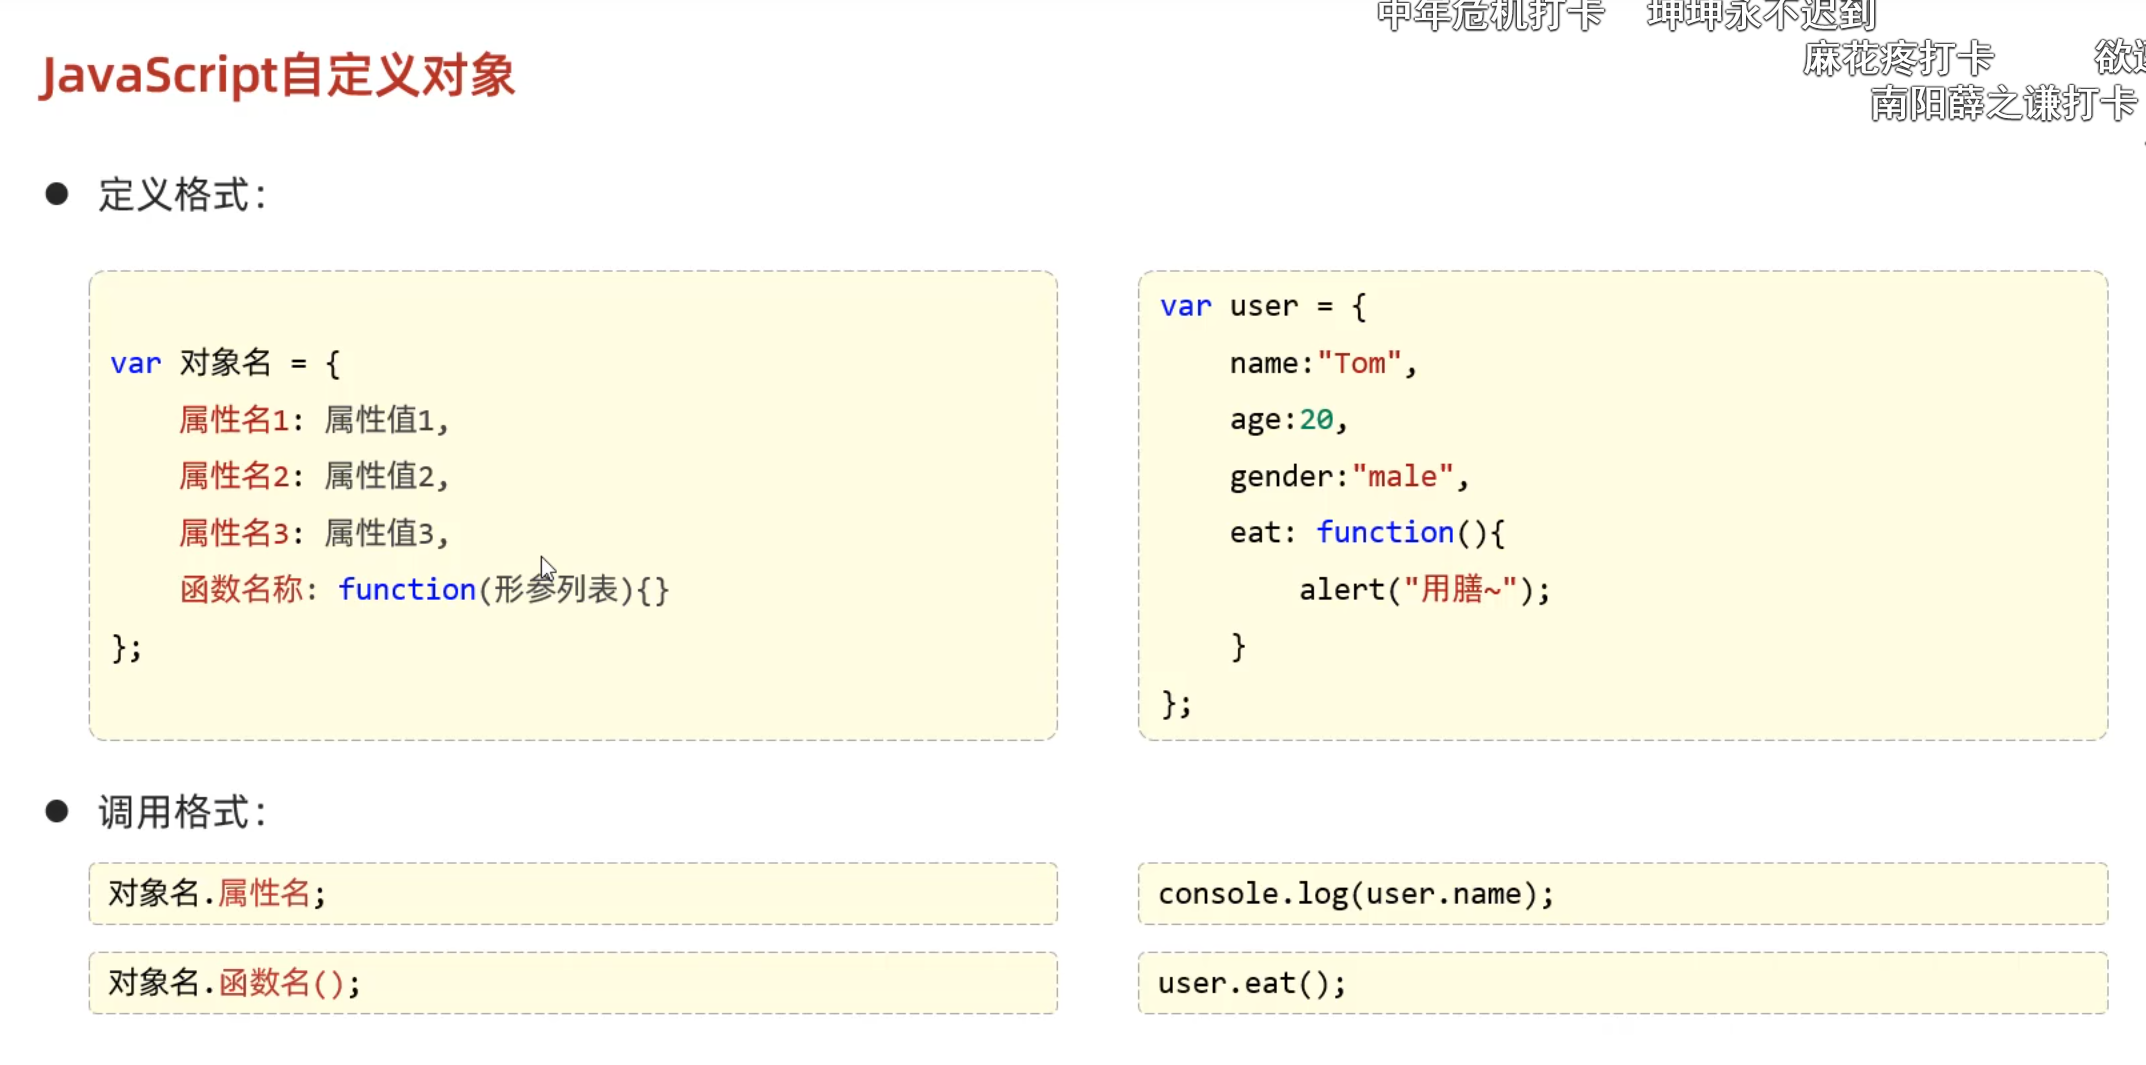
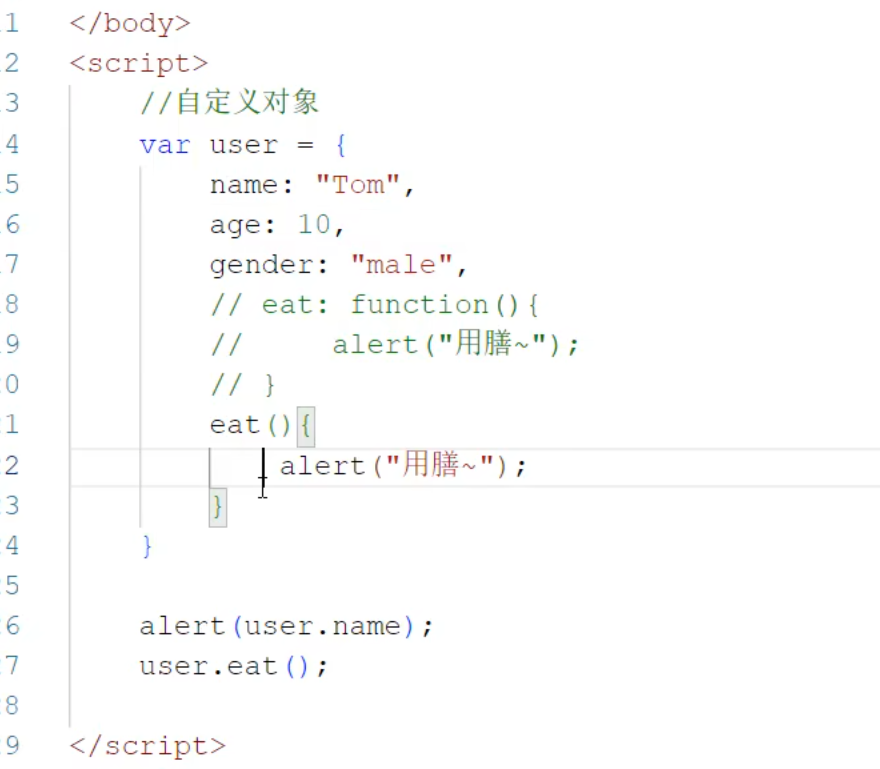
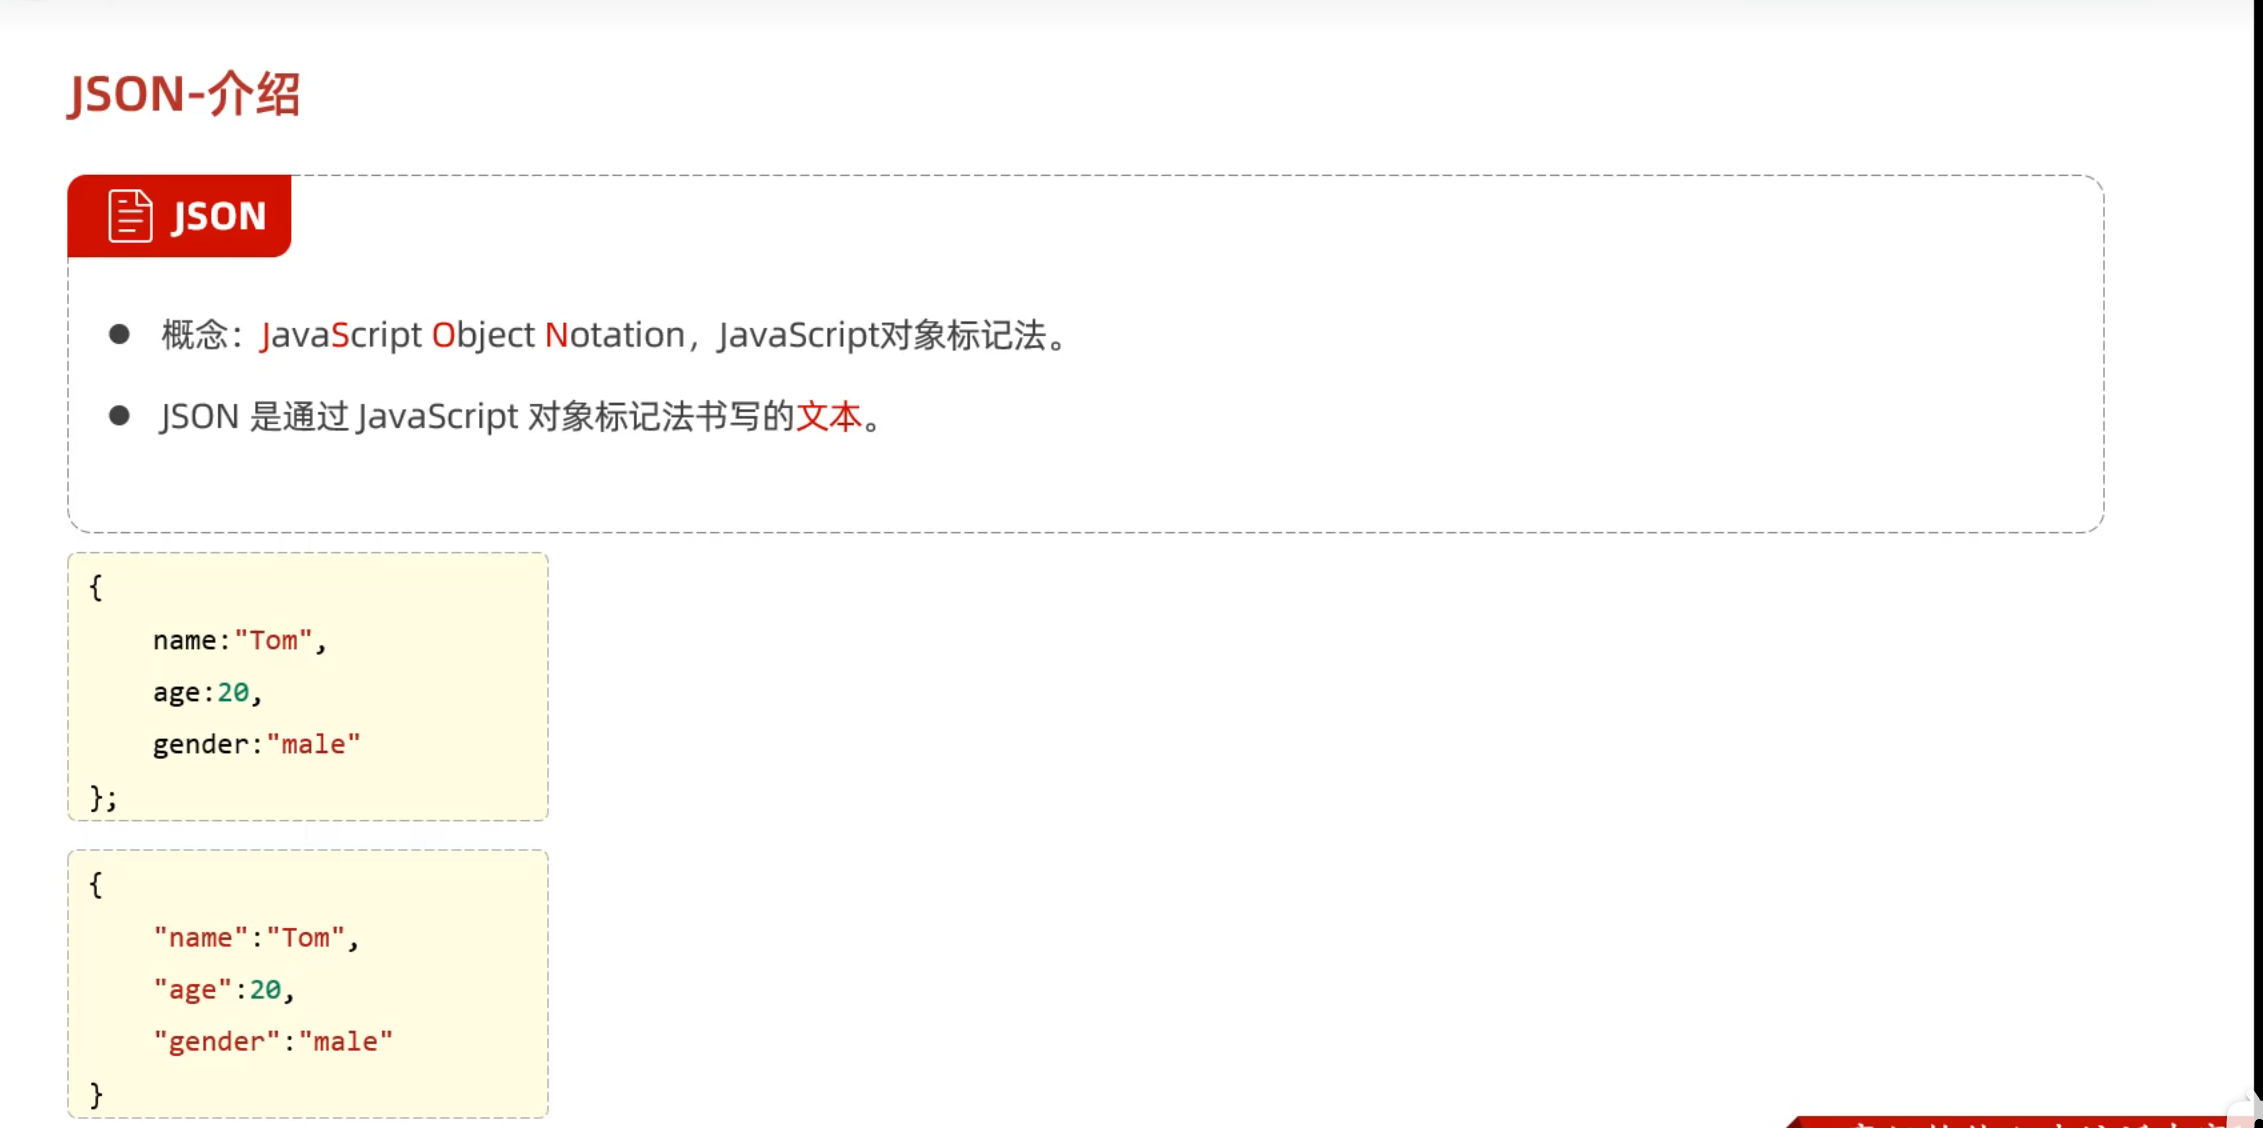
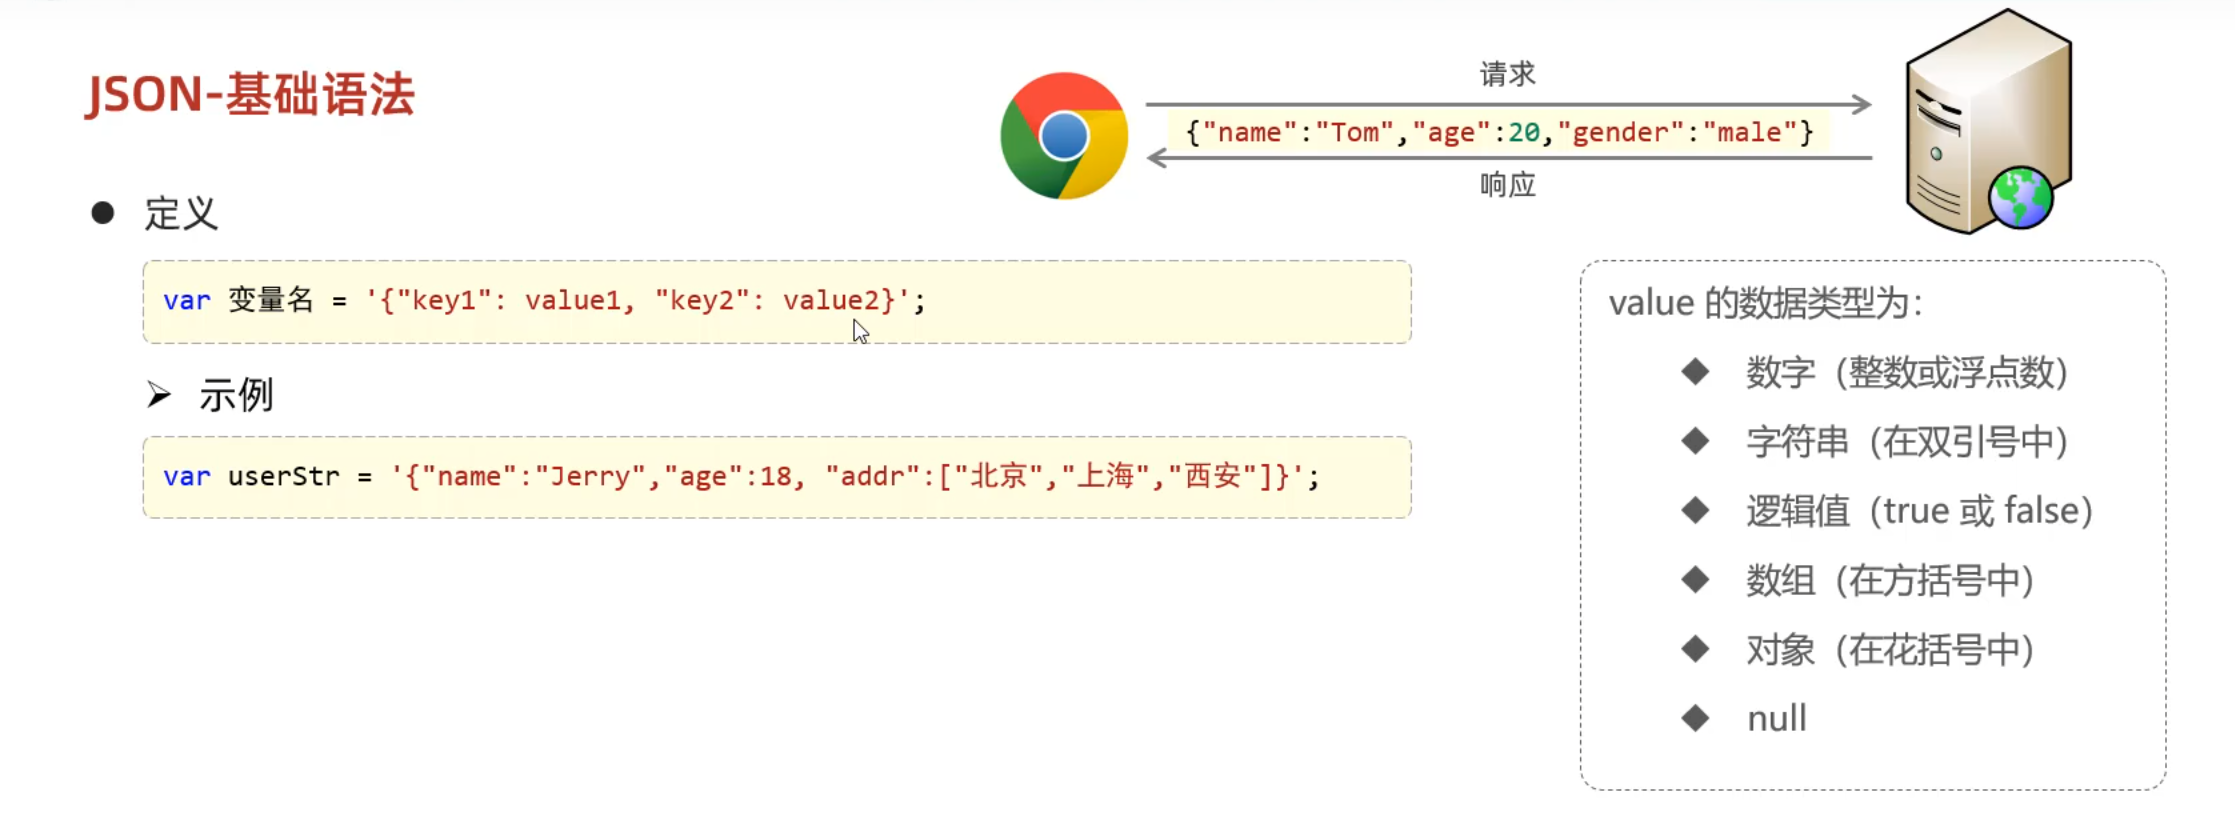
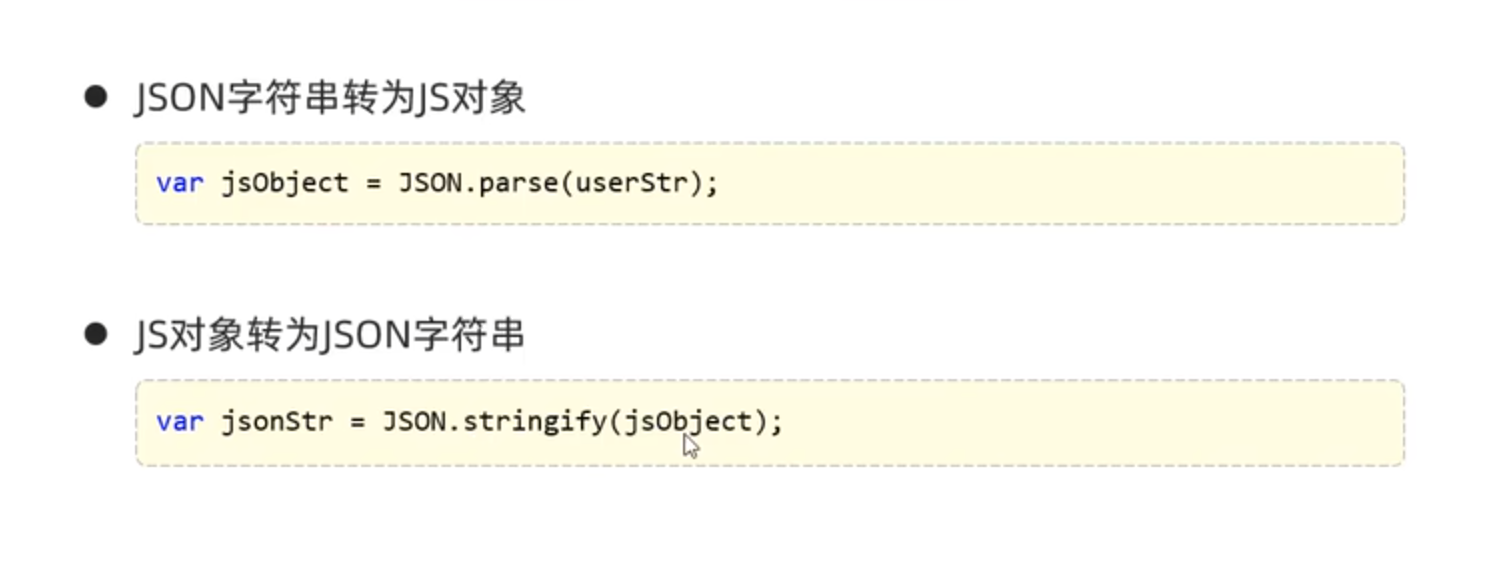
Day02-09. JS-对象-JSON
函数简化写法:
key-value形式
key必须用双引号包围
1 2 3 4 5 var json_str = '{"name":"wwwtty","password":114514}' ;var json_obj = JSON .parse (json_str);var json_str = JSON .stringify (json_obj);alert (json_obj.name );alert (json_str);
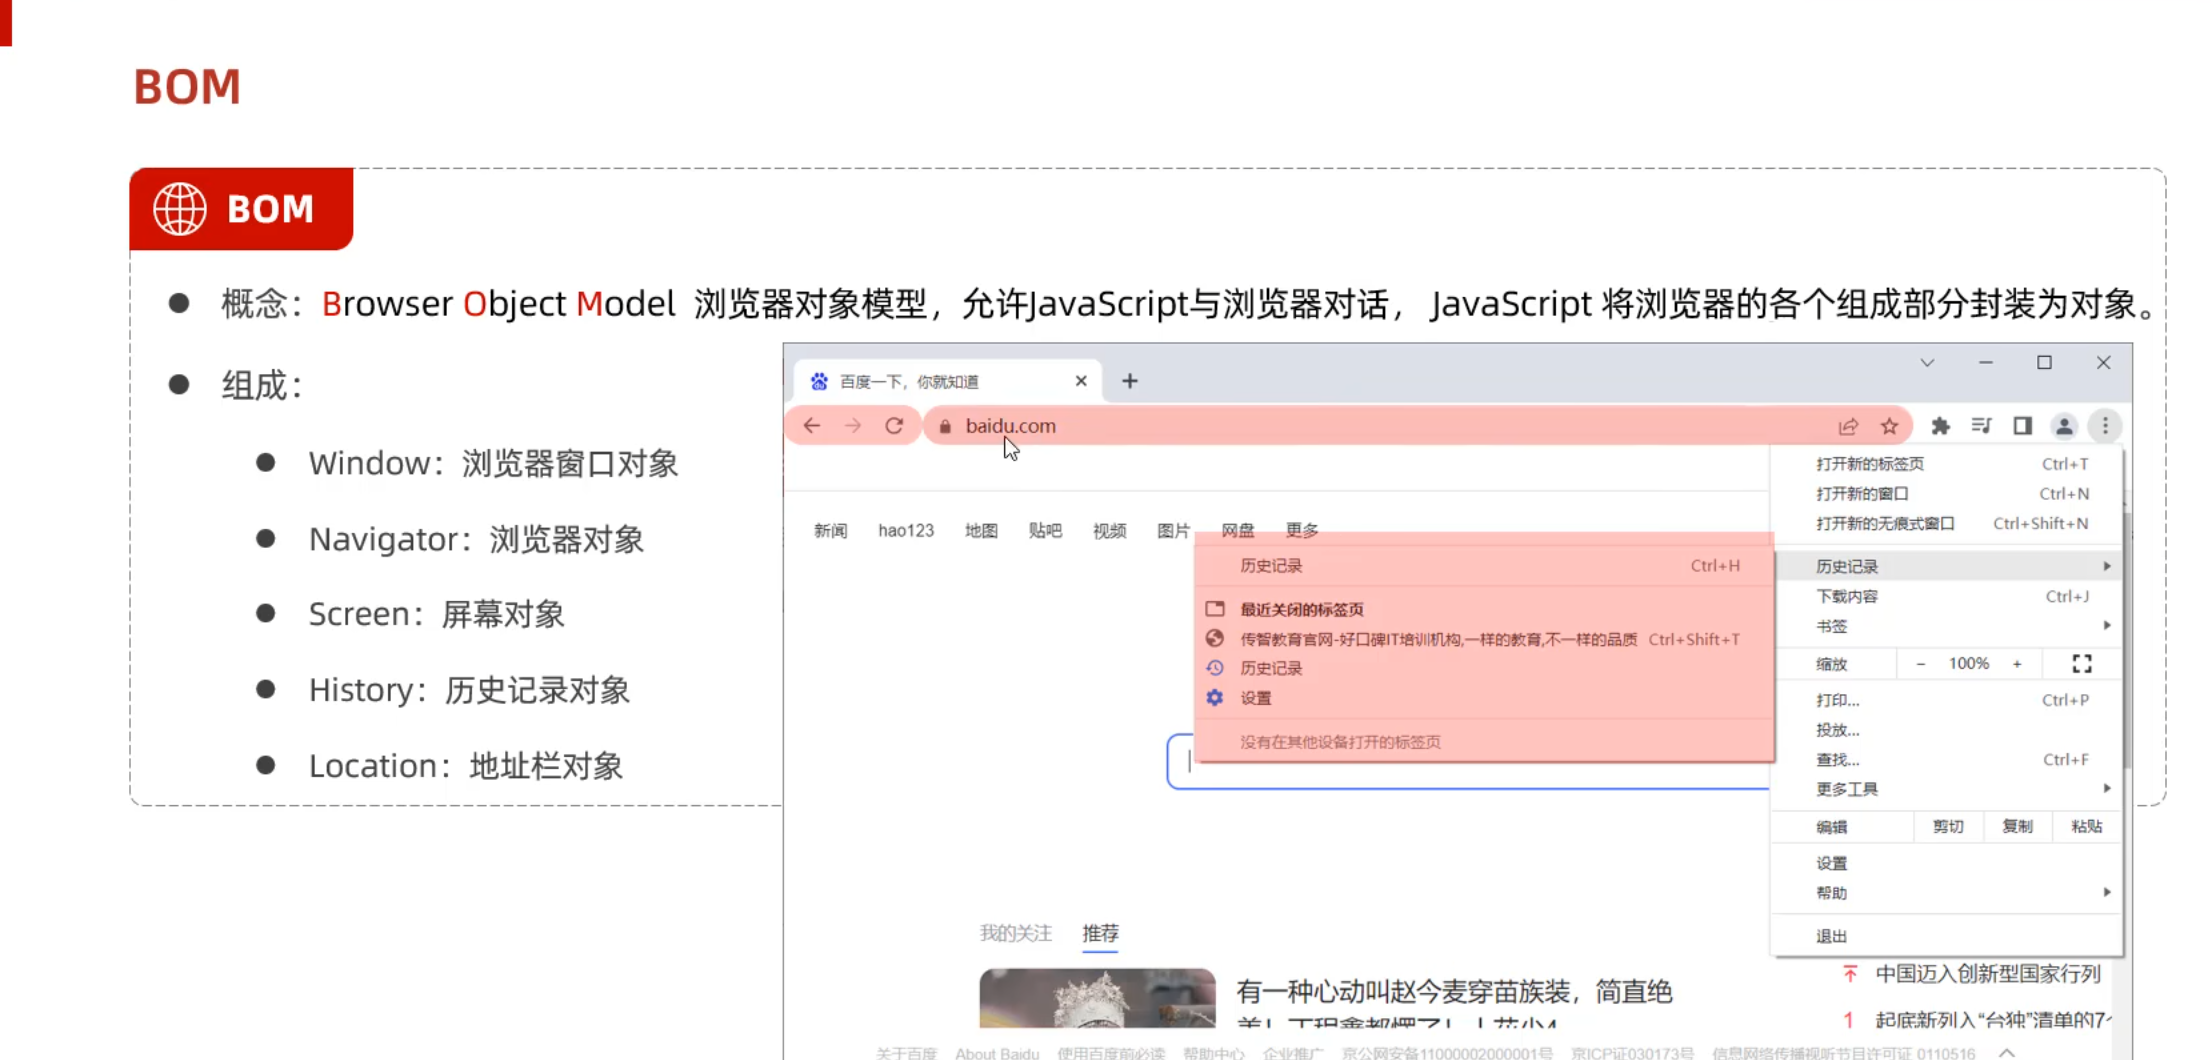
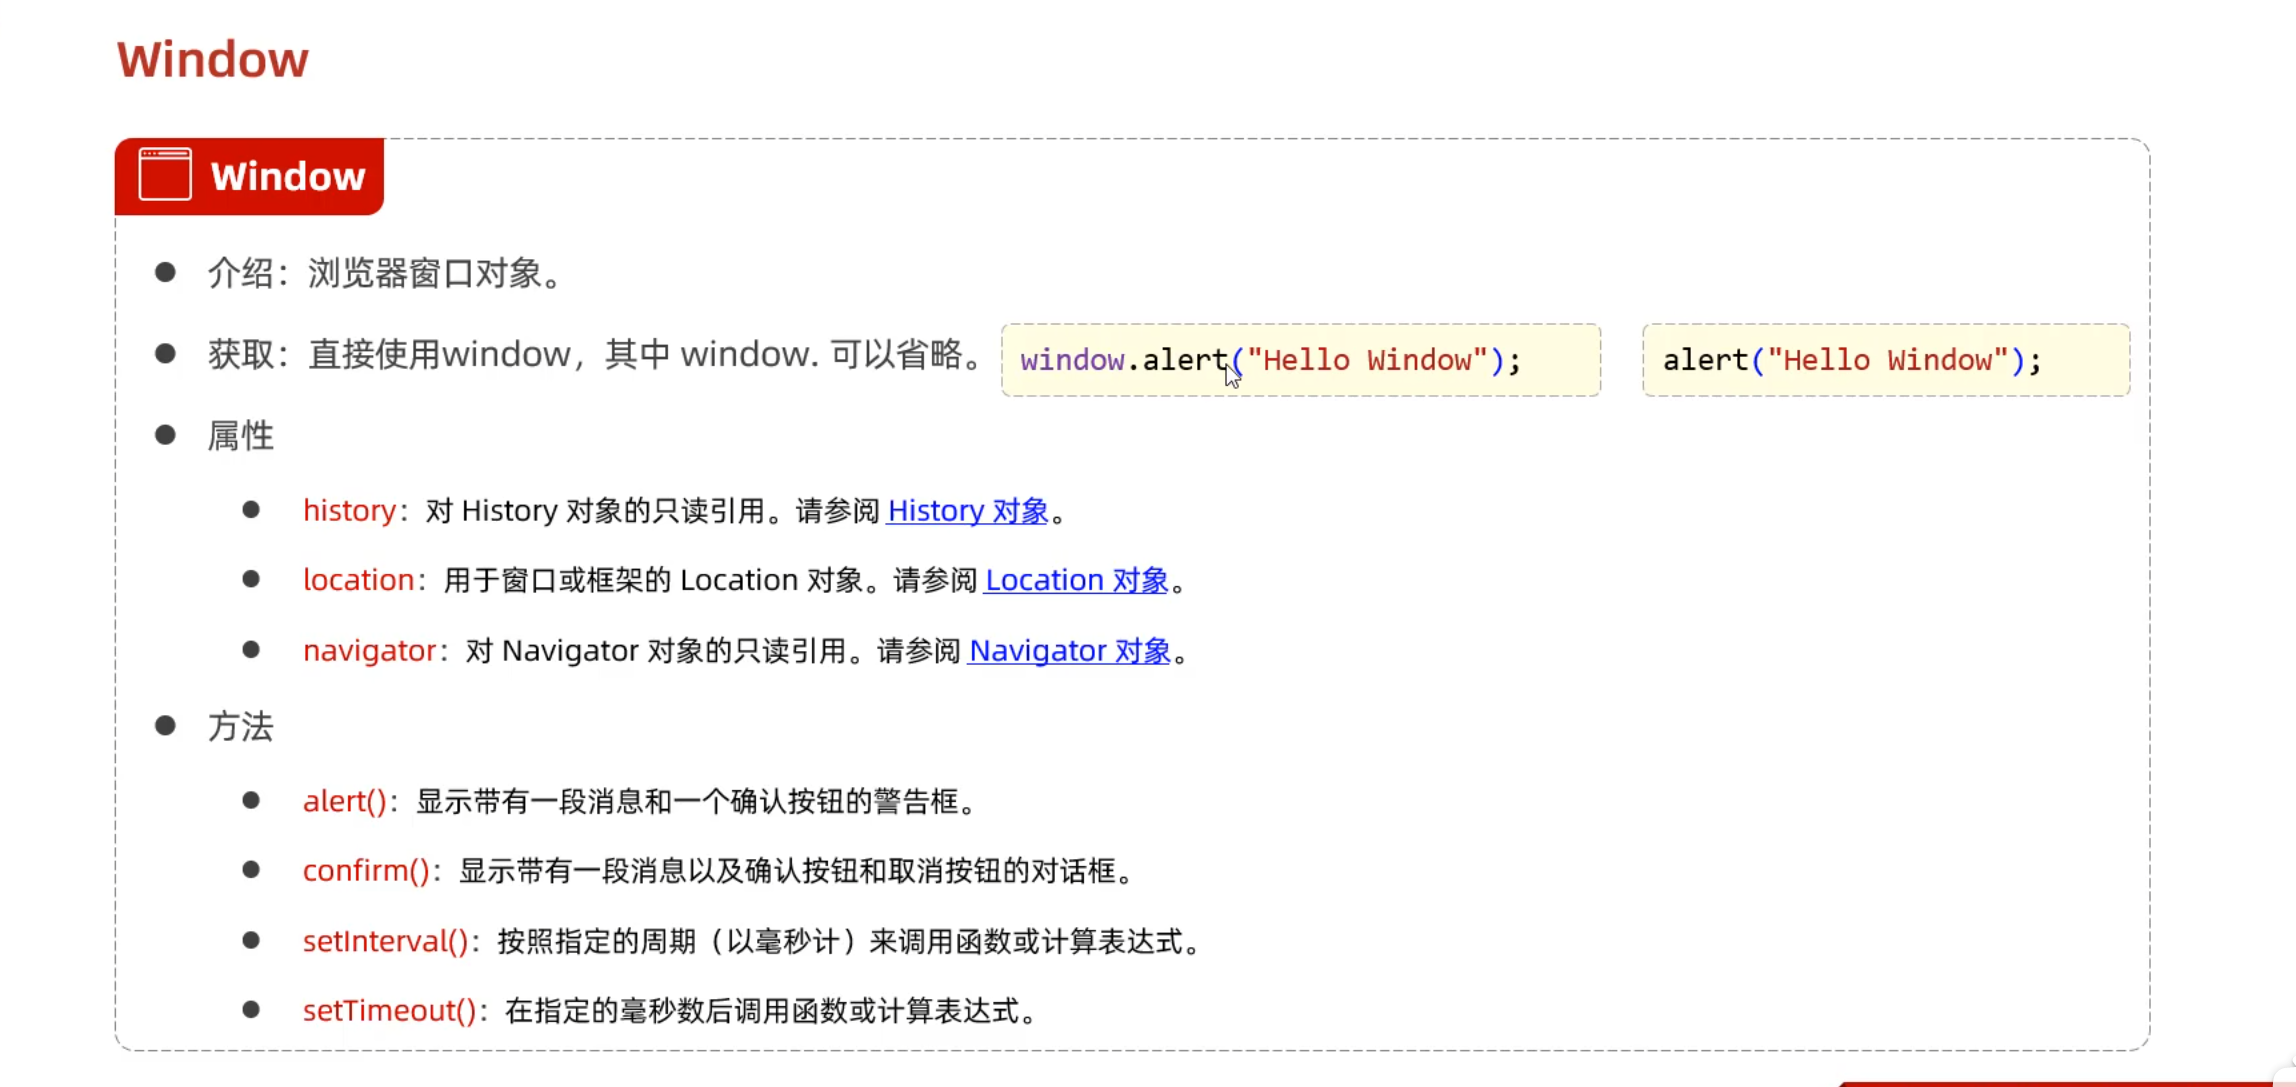
Day02-10. JS-对象-BOM
1 2 3 4 5 6 var res = window .confirm ();if (res){ alert ("确定" ); }else { alert ("取消" ); }
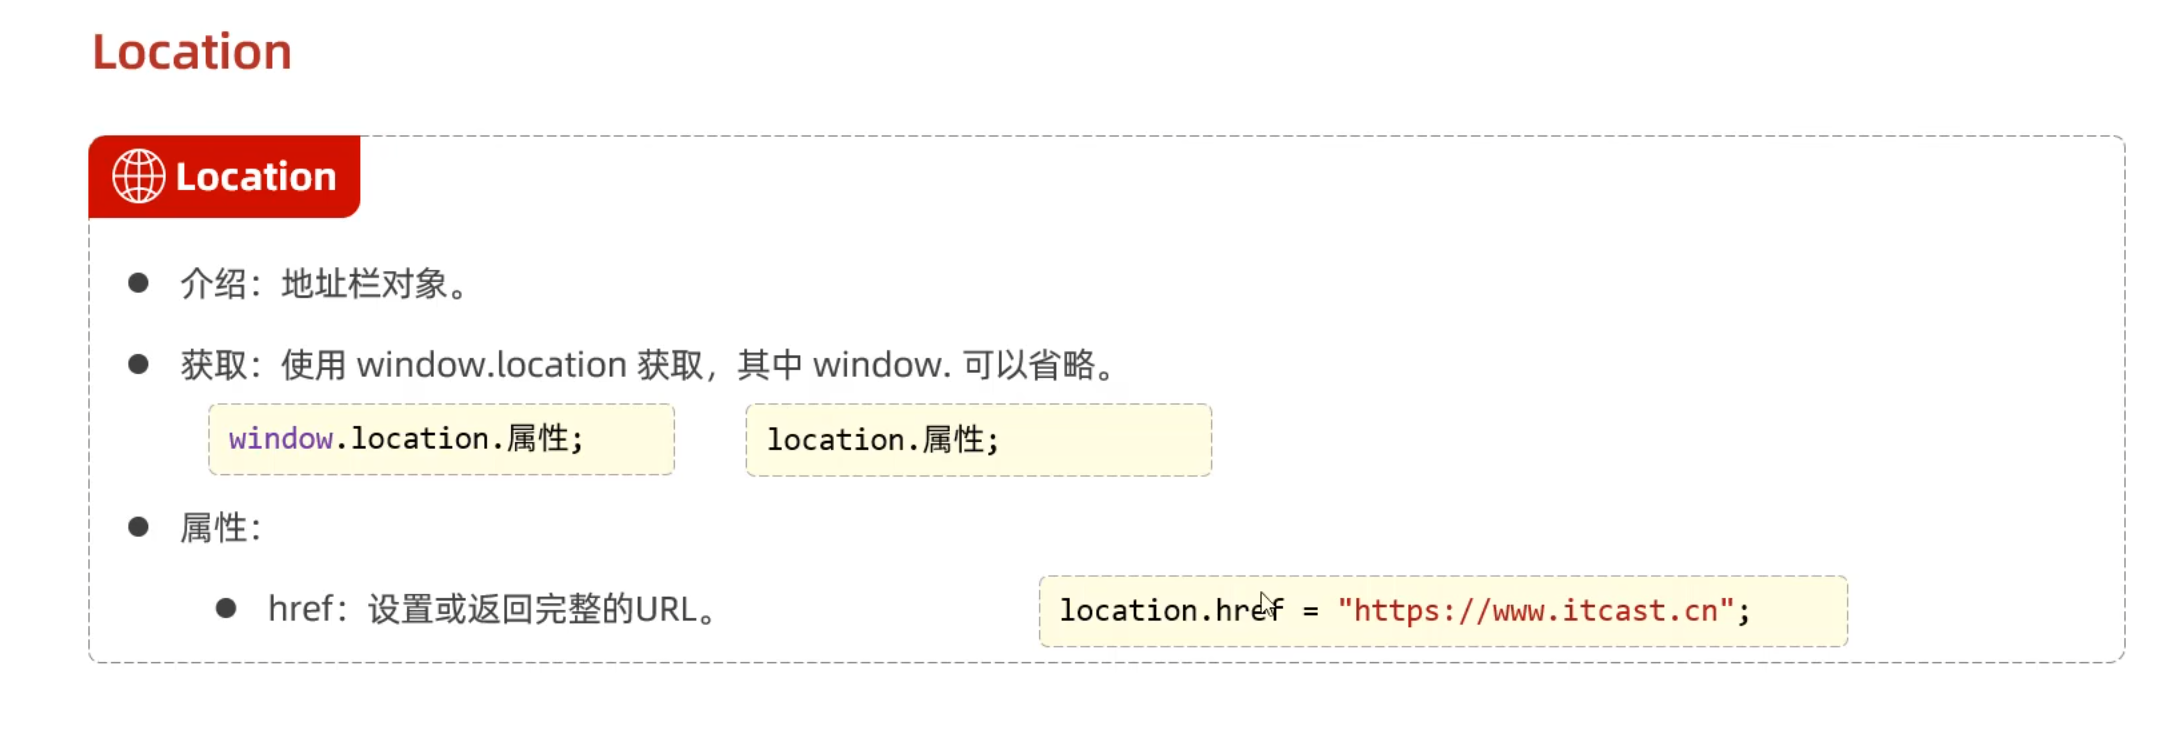
1 2 alert (location.href );location.href ="https://www.bilibili.com" ;
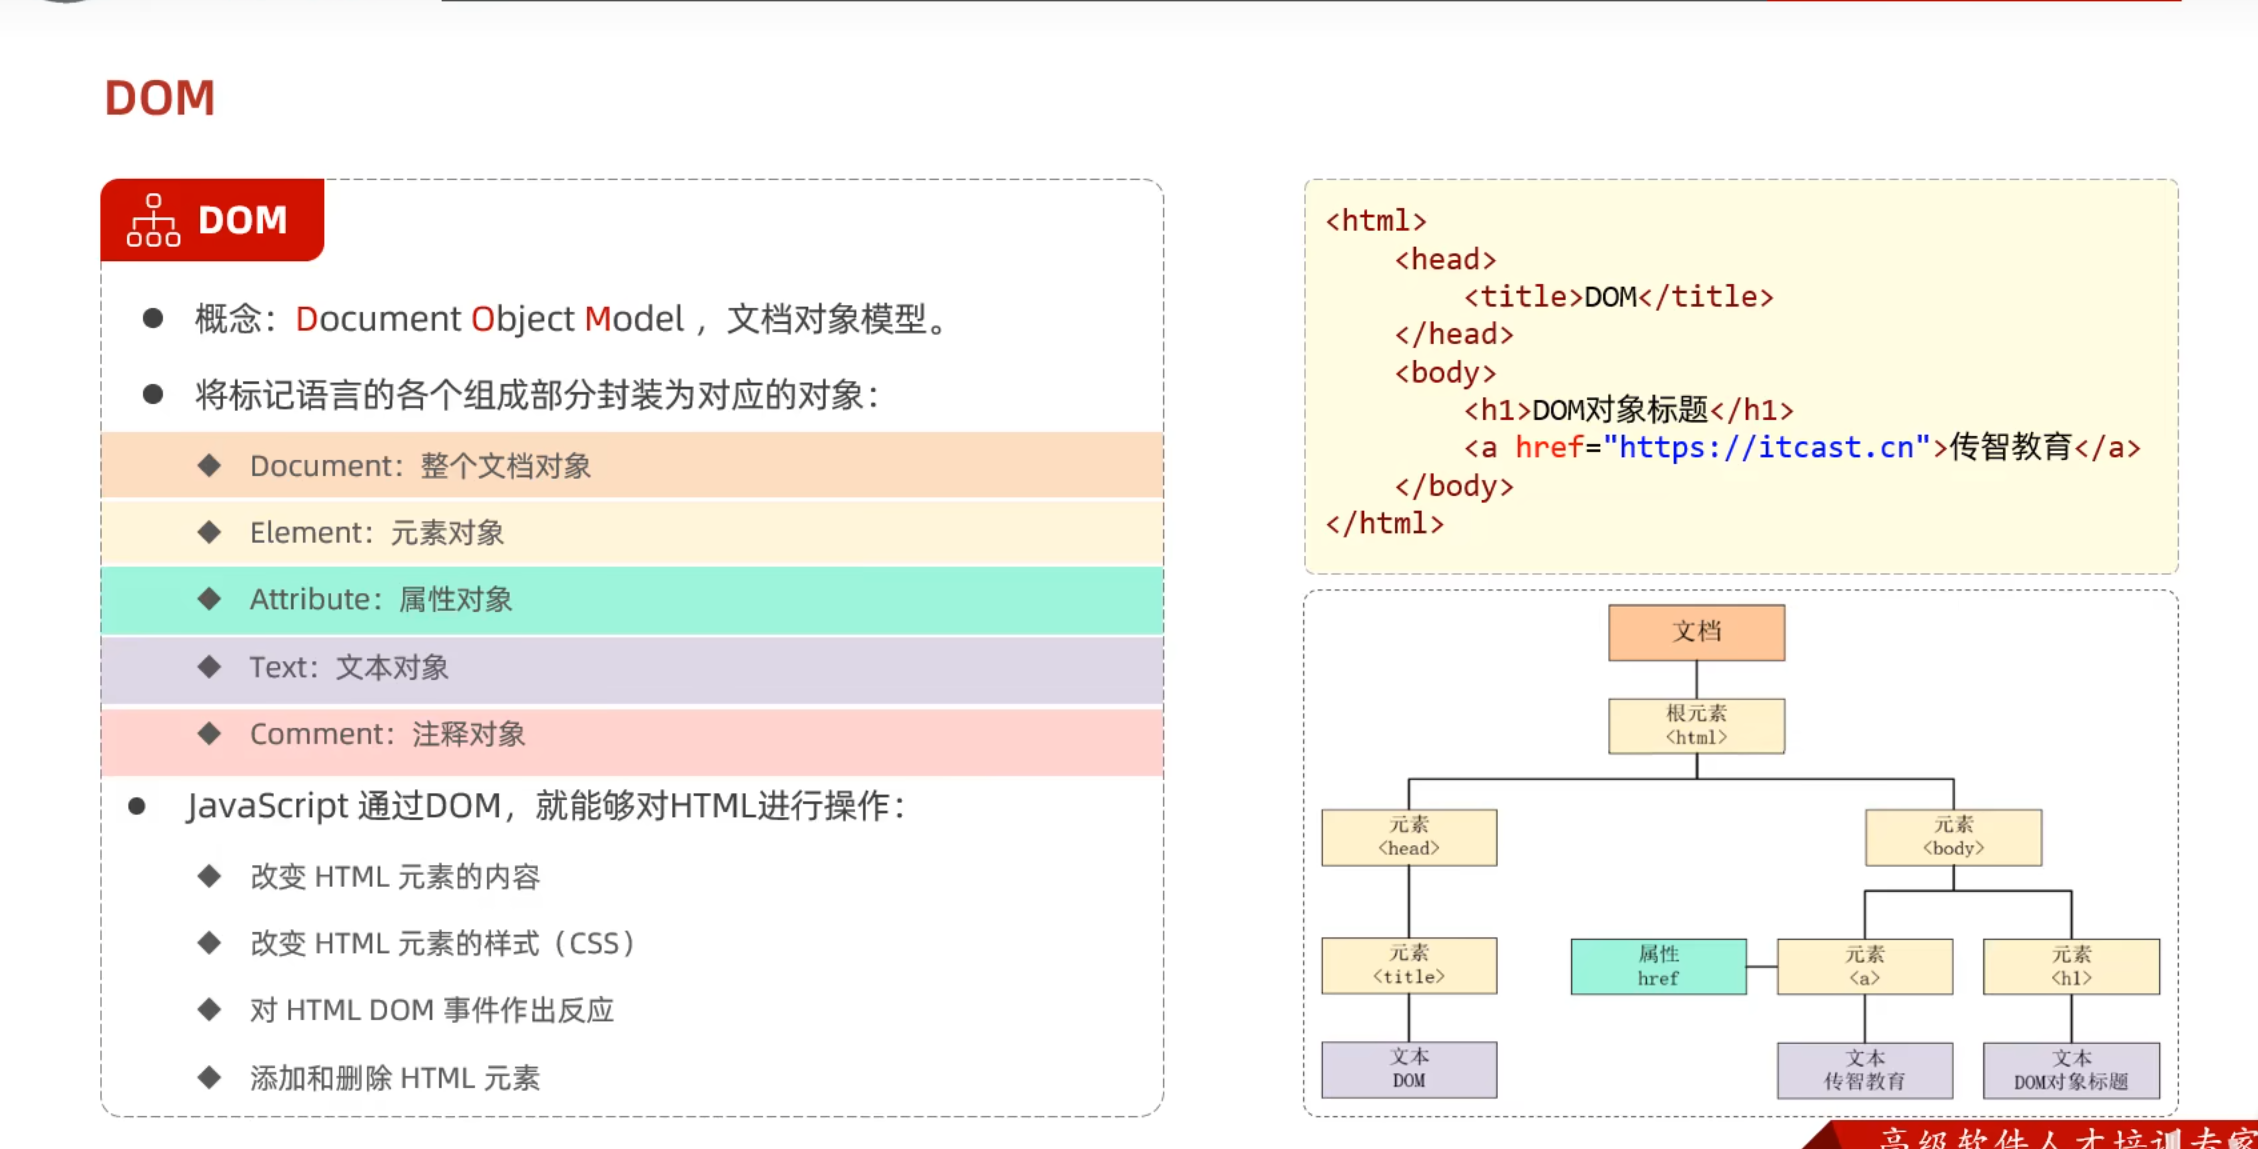
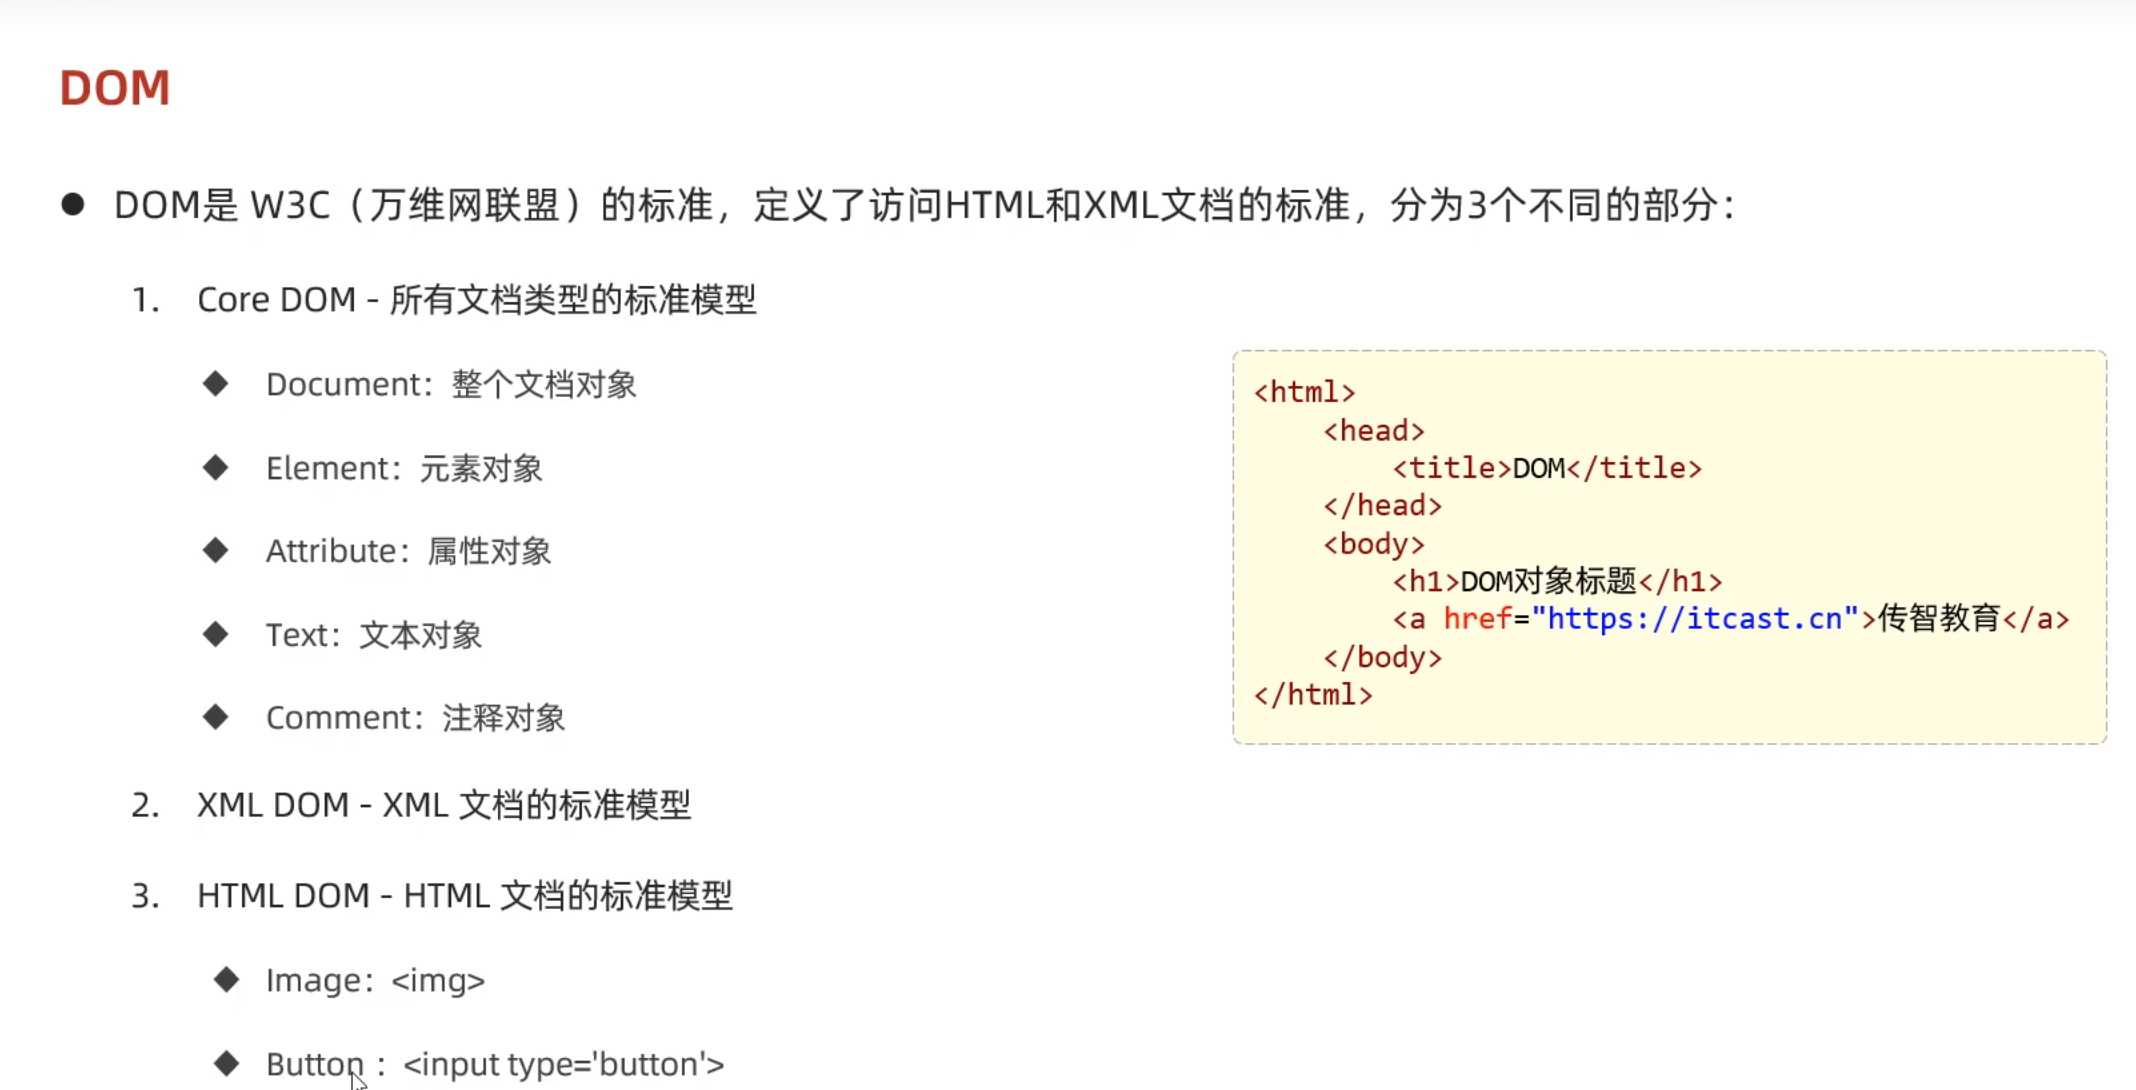
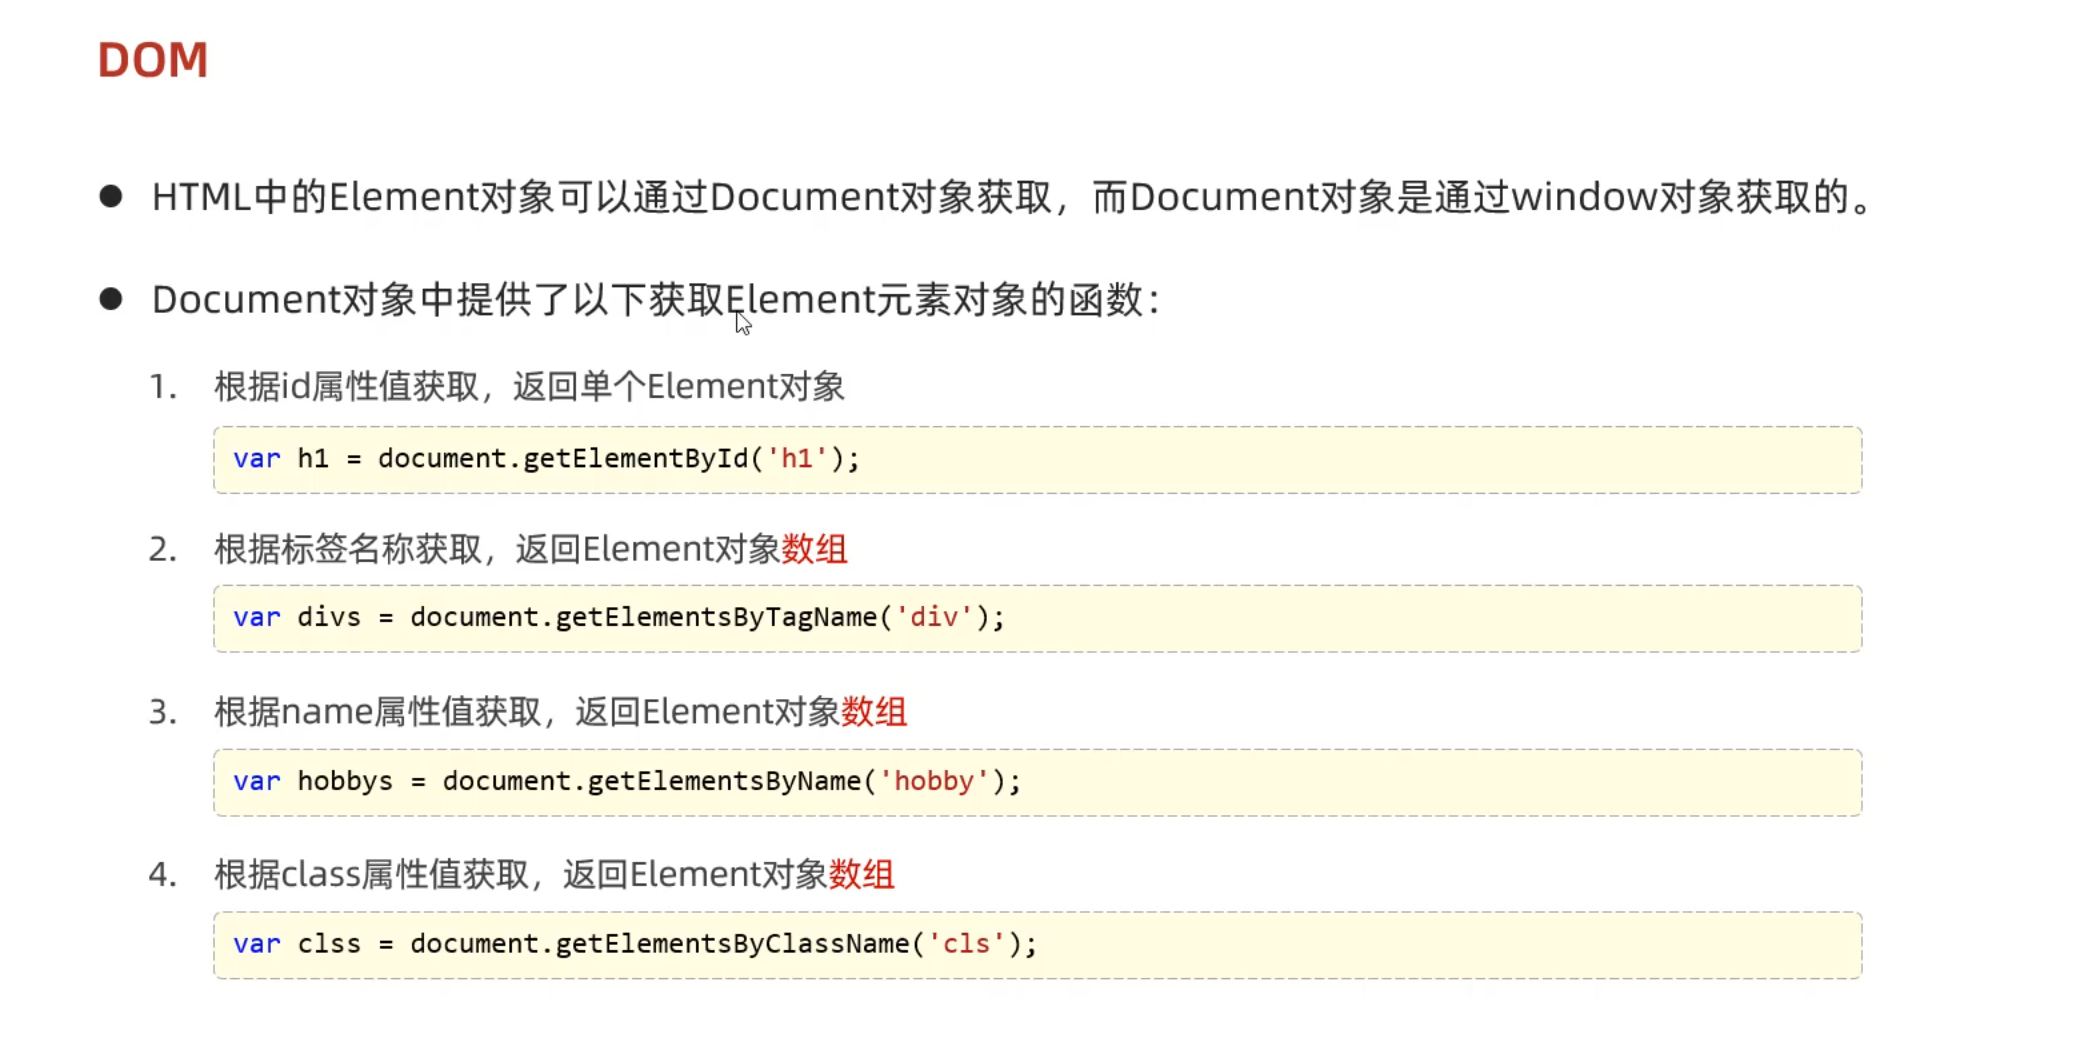
Day02-11. JS-对象-DOM
Day02-12. JS-对象-DOM案例
可以用.innerHTML=修改div标签内文本内容
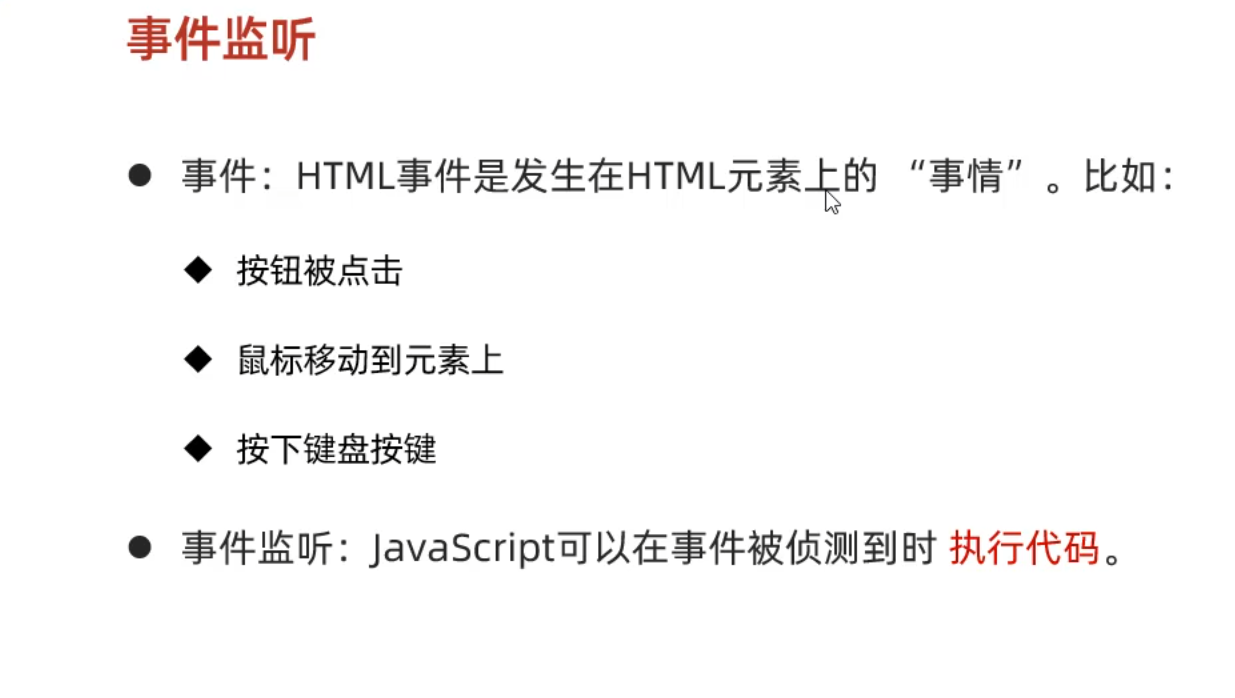
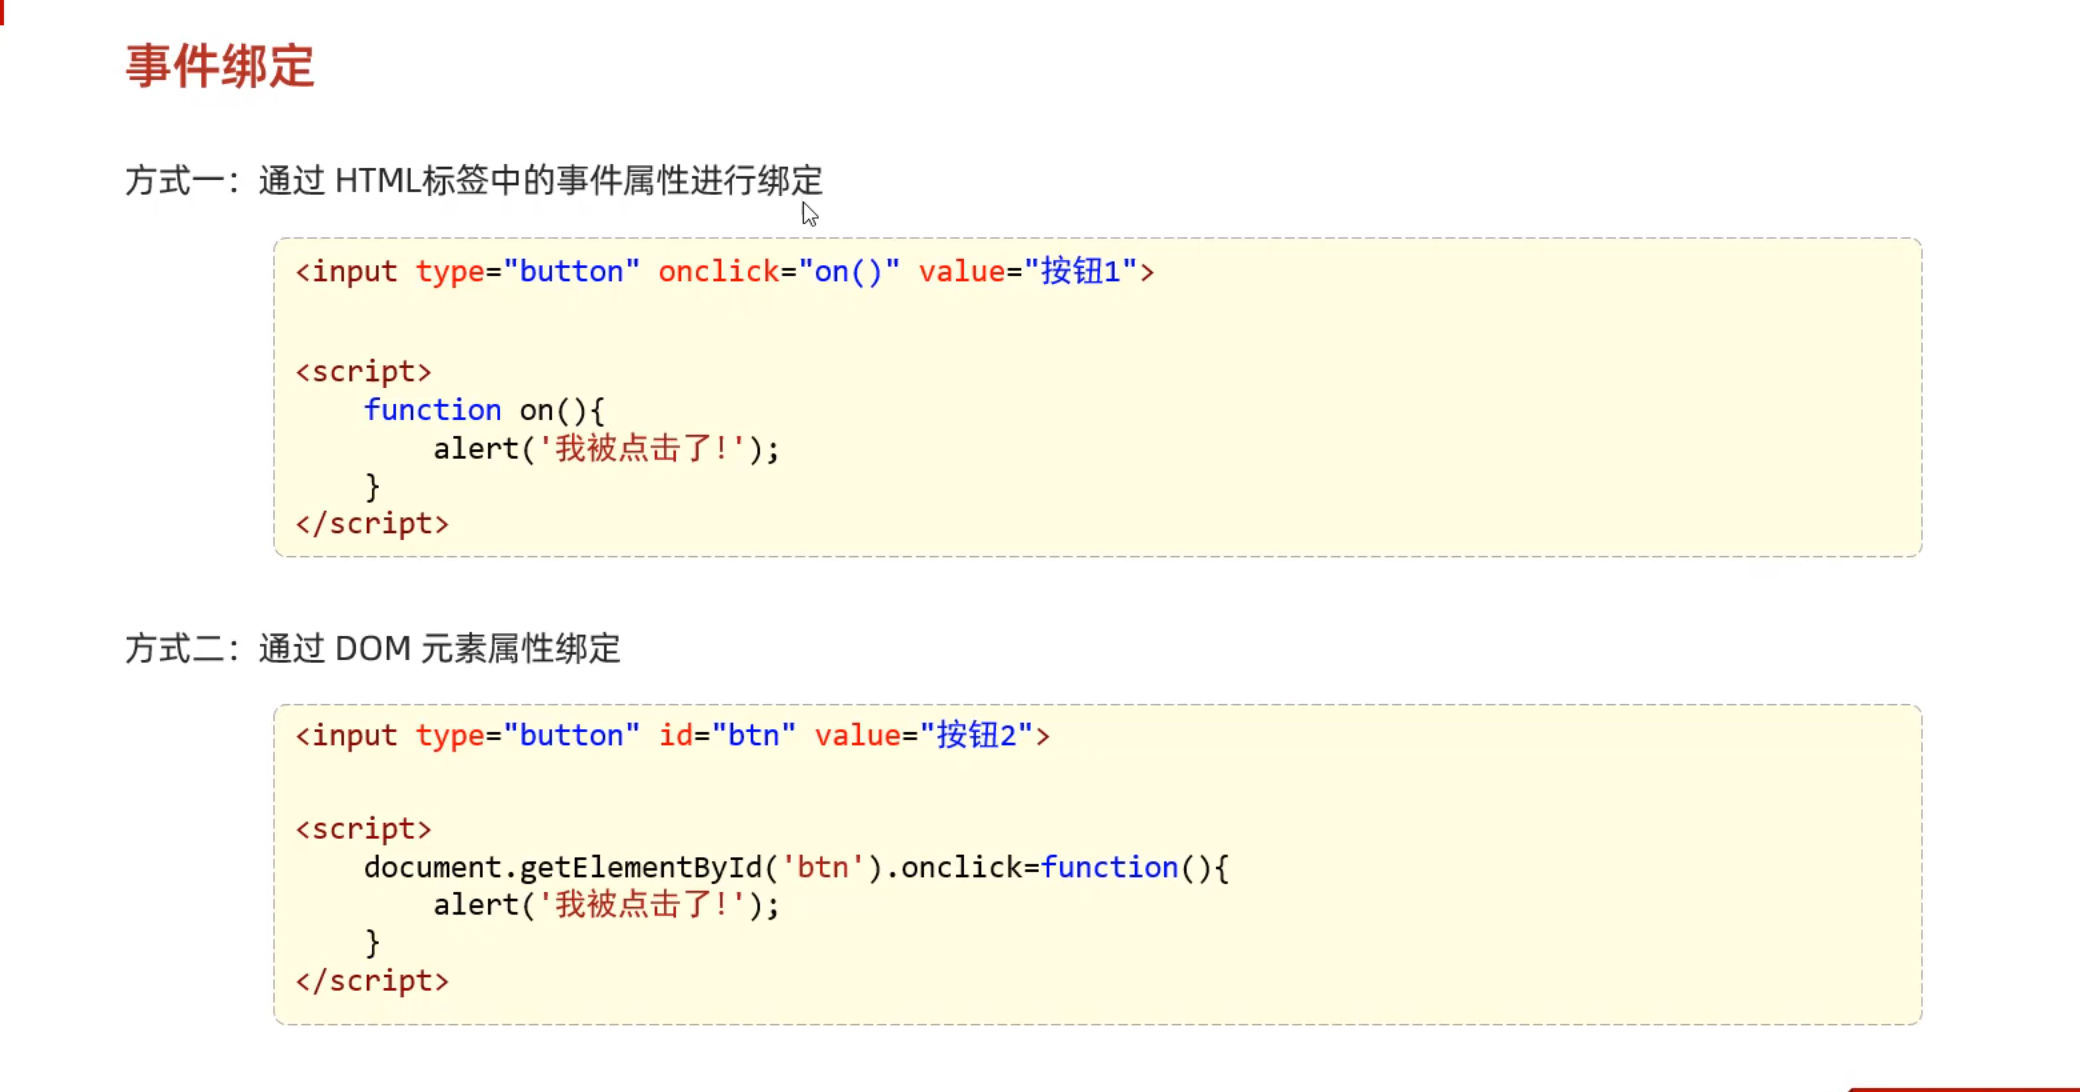
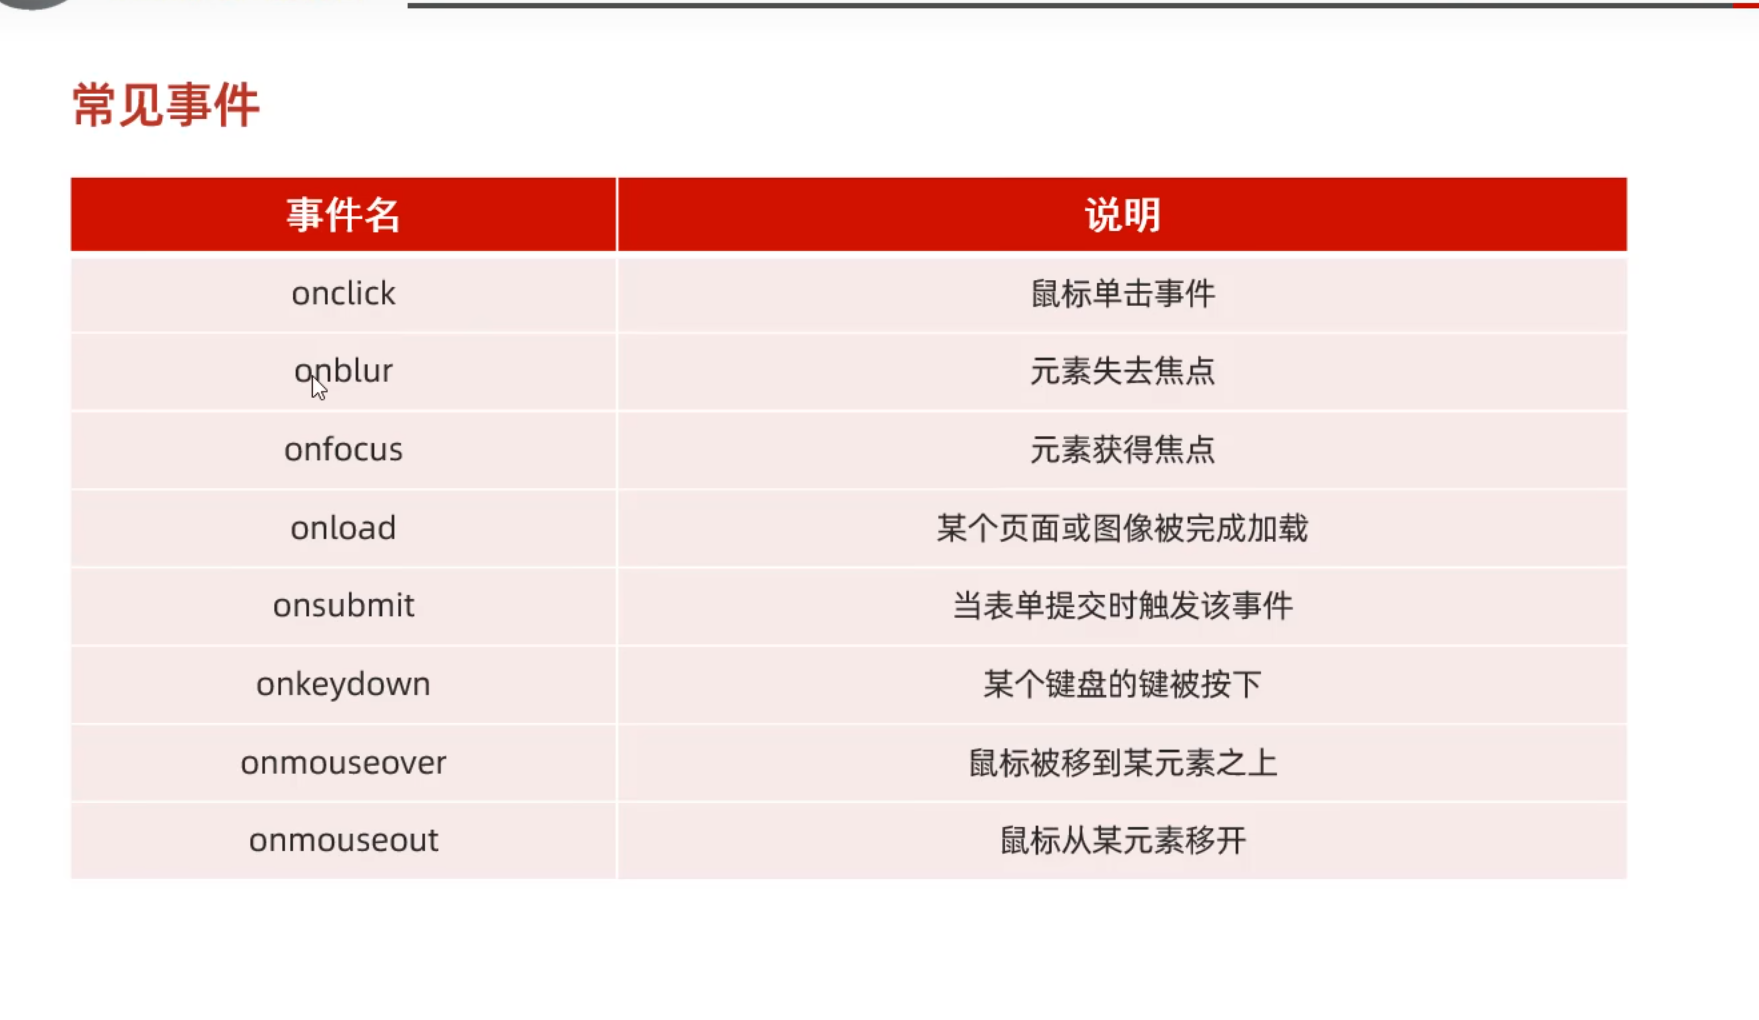
Day02-13. JS-事件-事件绑定&常见事件
1 2 3 4 5 6 7 8 9 10 11 12 13 14 15 16 17 18 19 20 21 22 23 <!DOCTYPE html > <html > <head > <meta charset ="UTF-8" > <meta name ="viewport" content ="width=device-width, initial-scale=1.0" > <title > 测试</title > </head > <body > <form action ="" method ="get" > <input type ="button" value ="点我" id ="hhh" > </form > <script > function on ( alert ("点我干嘛?" ); } document .getElementById ("hhh" ).onclick =function ( alert ("干嘛点我" ); } </script > </body > </html >
焦点:比如光标在输入框中闪烁
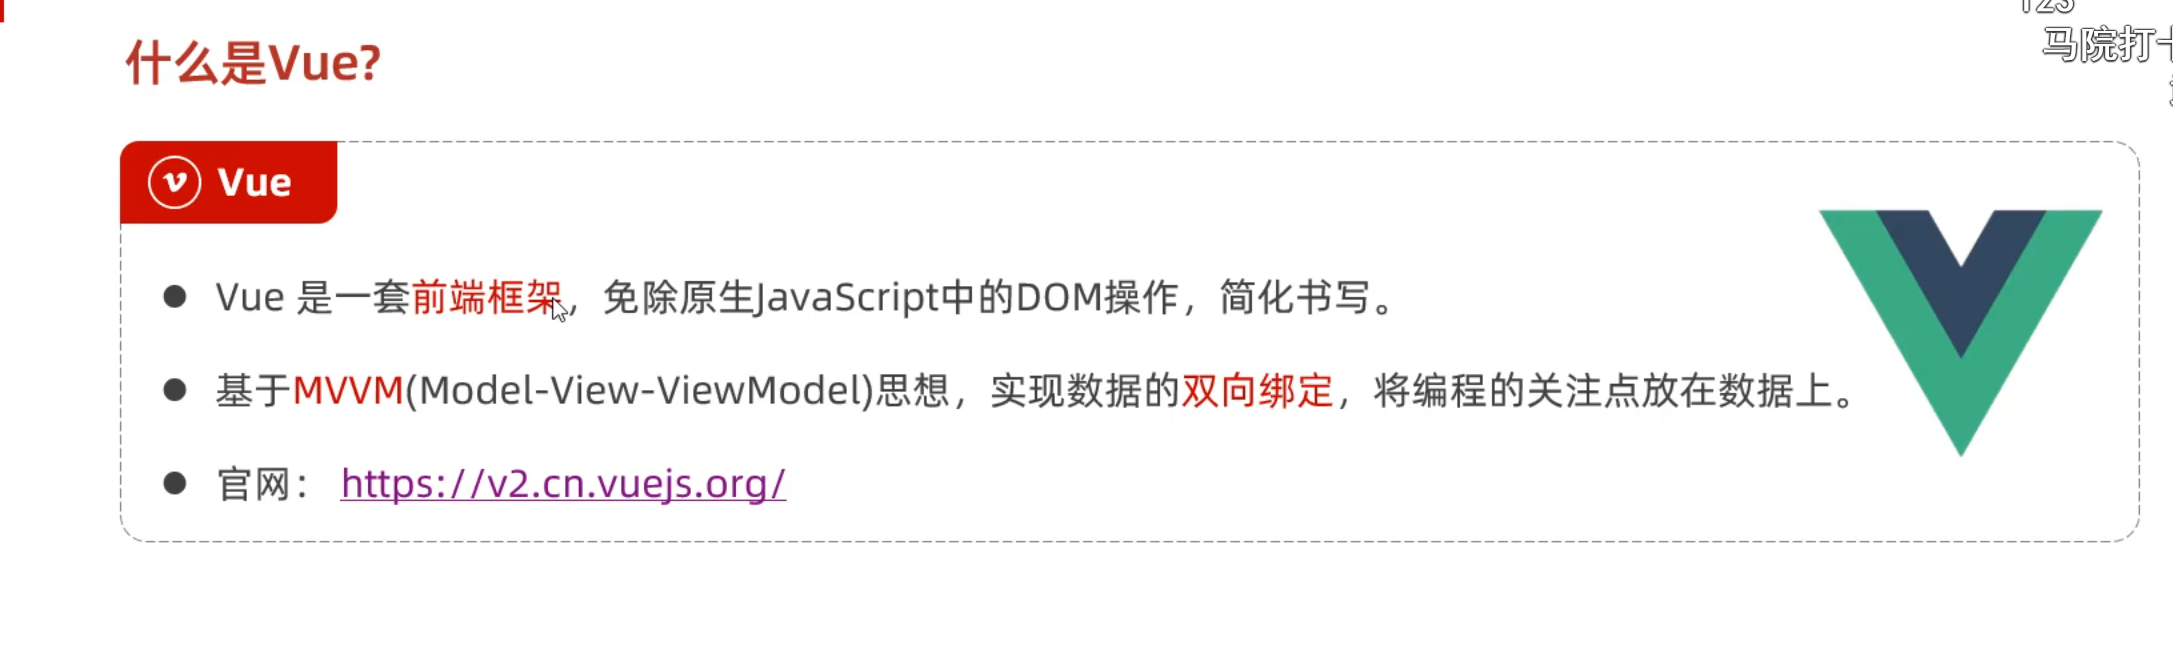
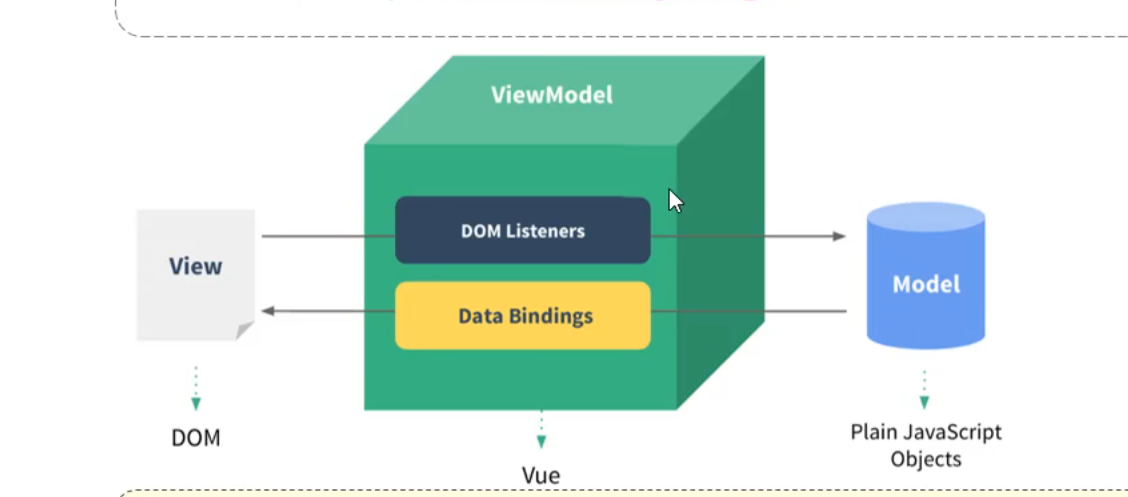
Day02-14. JS-事件-案例 Vue Day02-15. Vue-概述
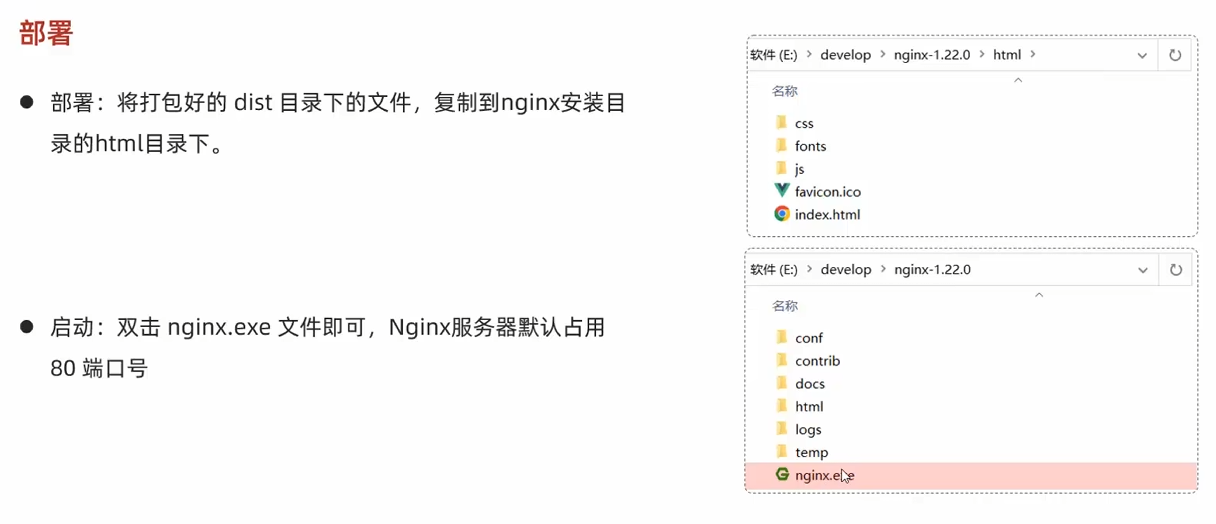
Day02-16. Vue-指令-v-bind&v-model&v-on Day02-17. Vue-指令-v-if&v-show&v-for Day02-18. Vue-指令-案例 Day02-19. Vue-生命周期 Ajax nginx打包部署 打包好后会有一个dist文件夹
部署:将dist复制到nginx的/html中,启动nginx.exe 占用80端口(默认)
若端口被占用,在nginx.conf里更改
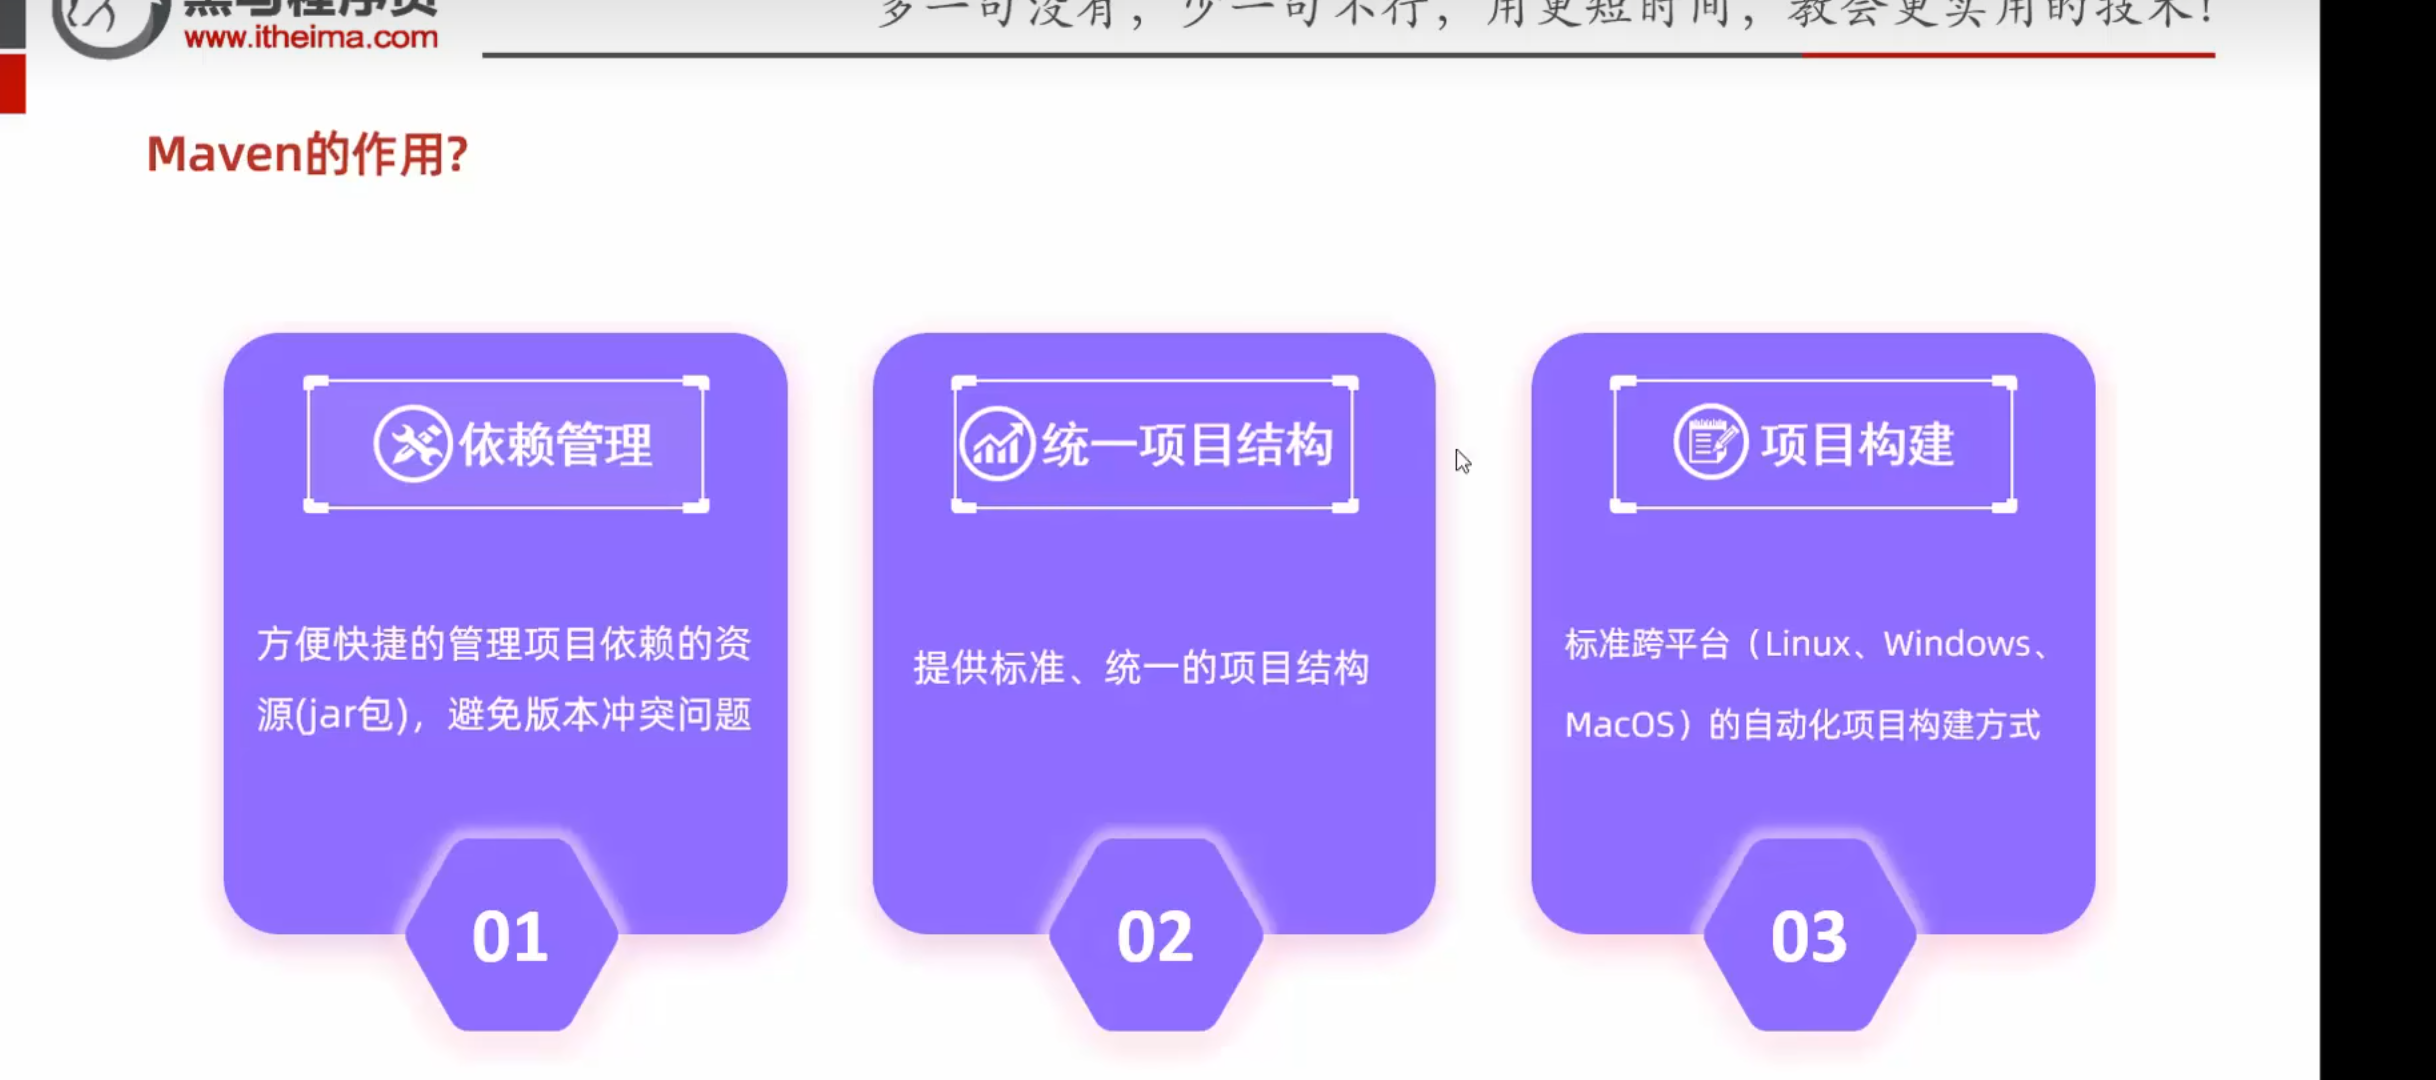
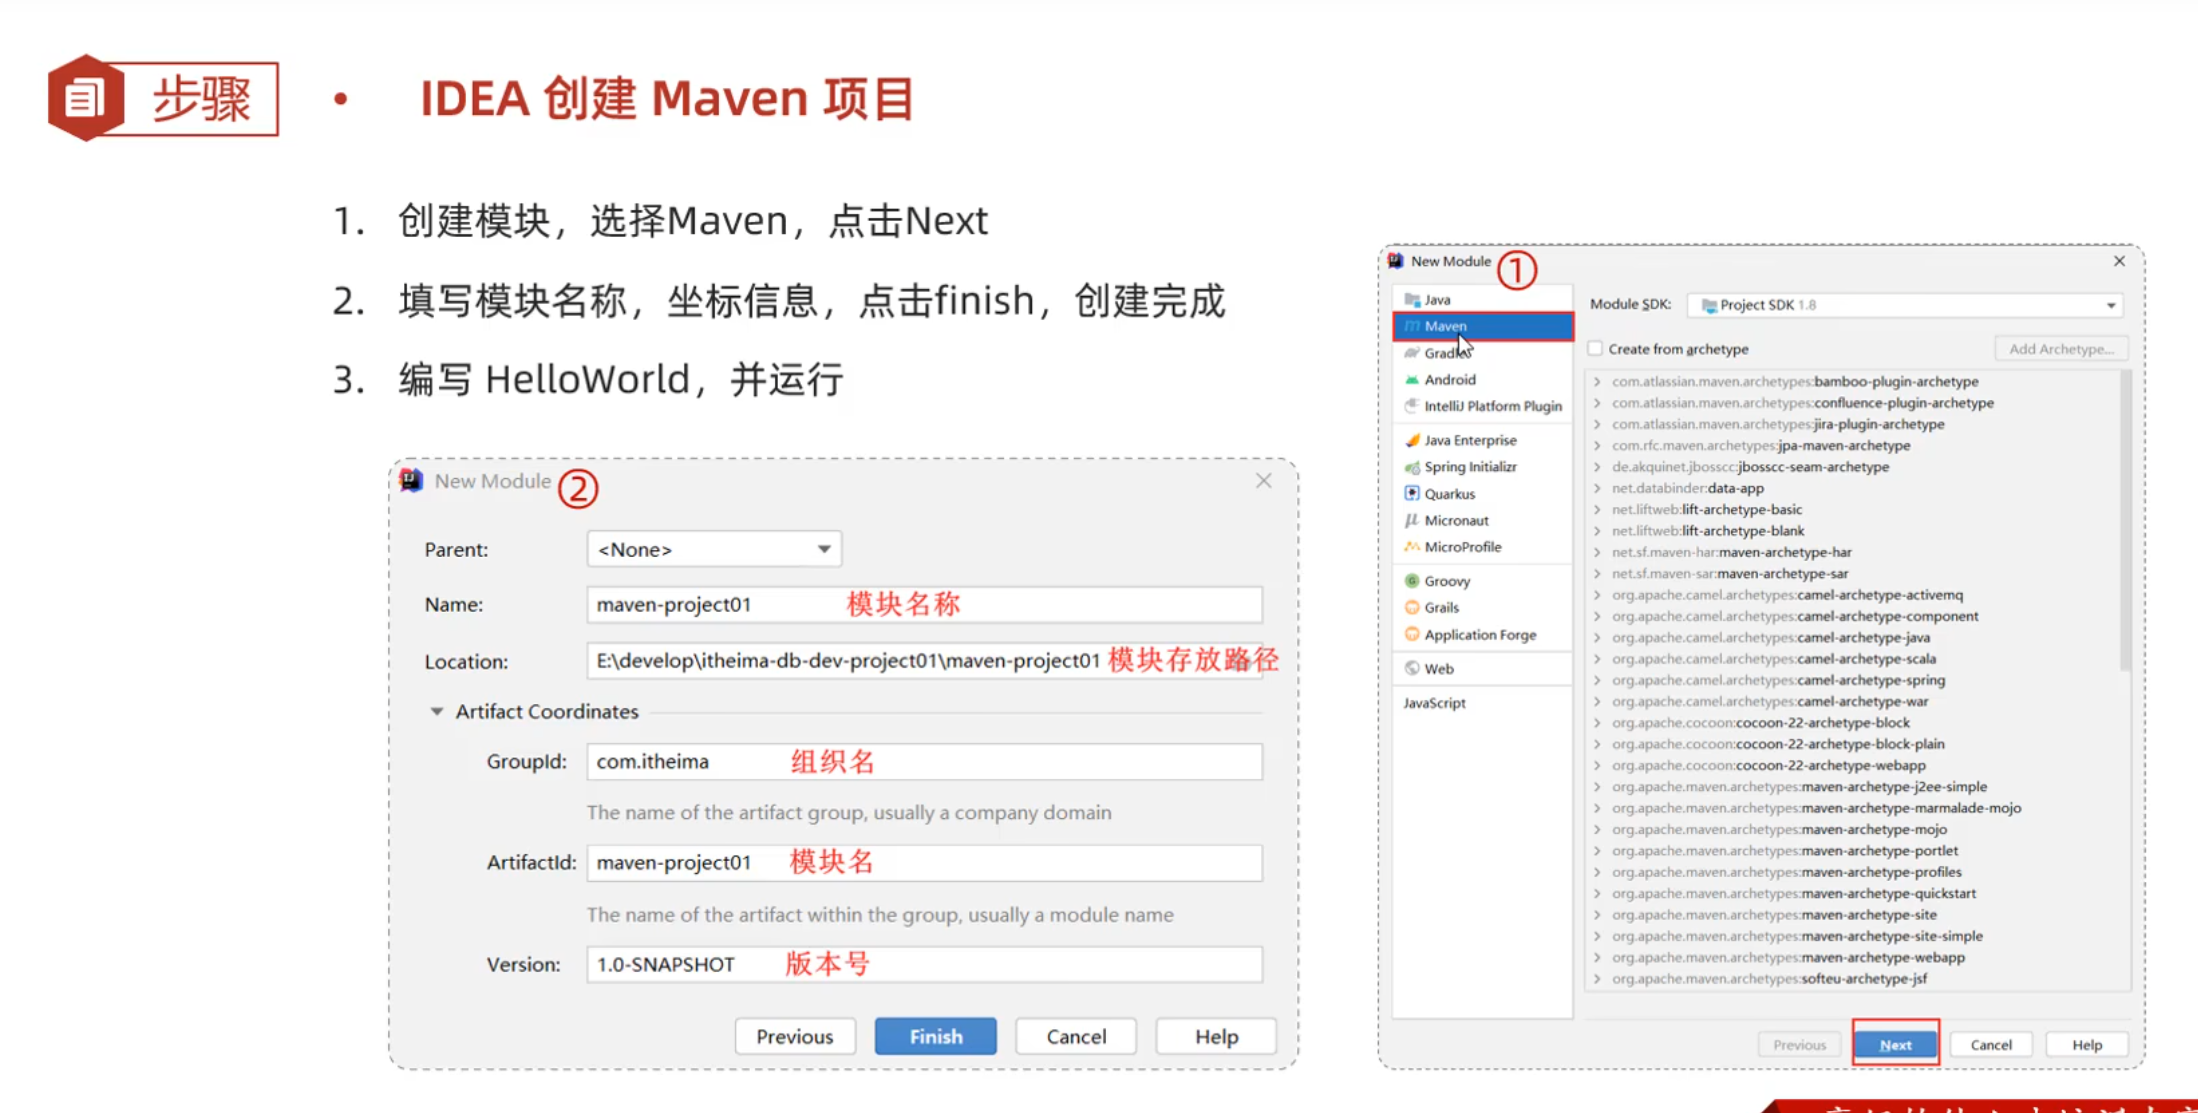
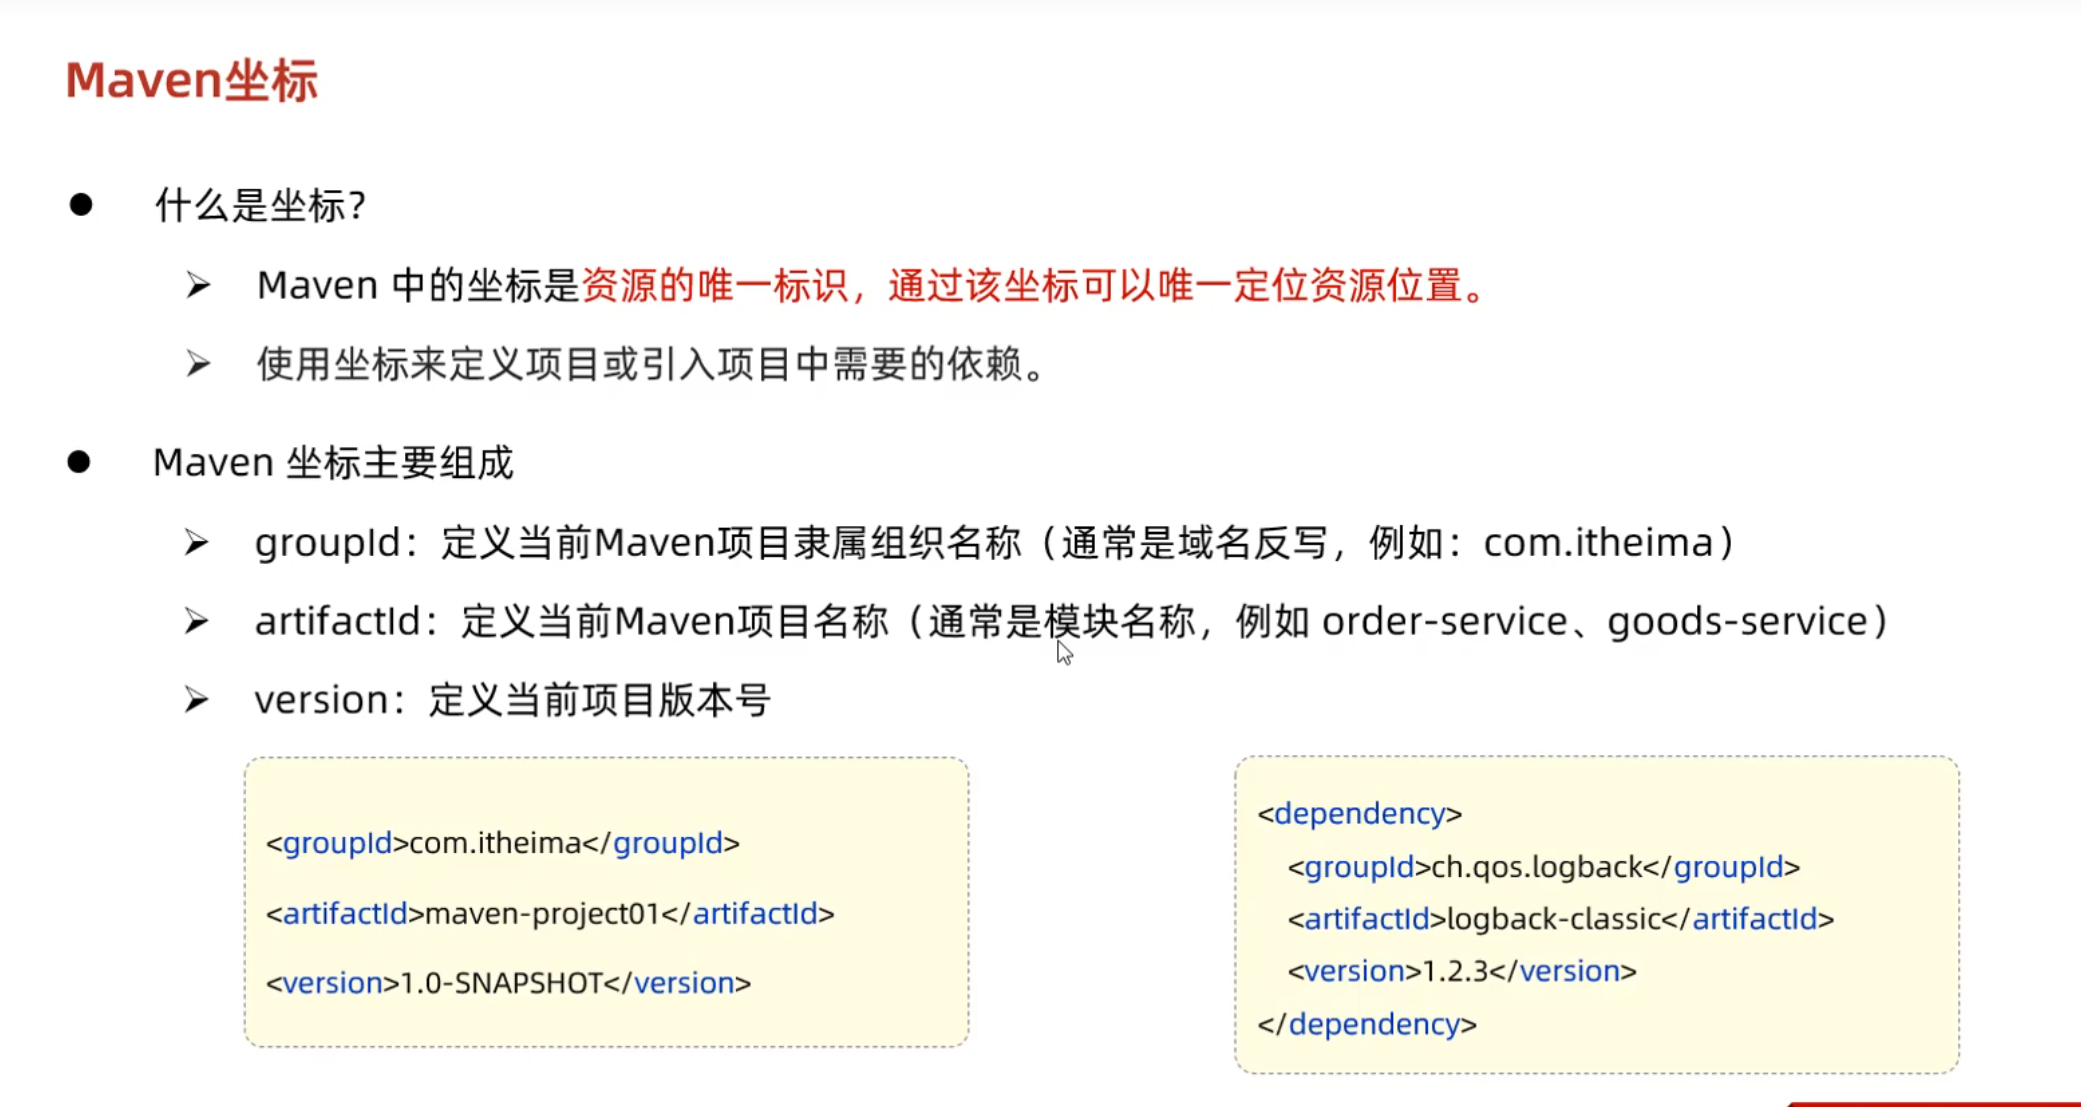
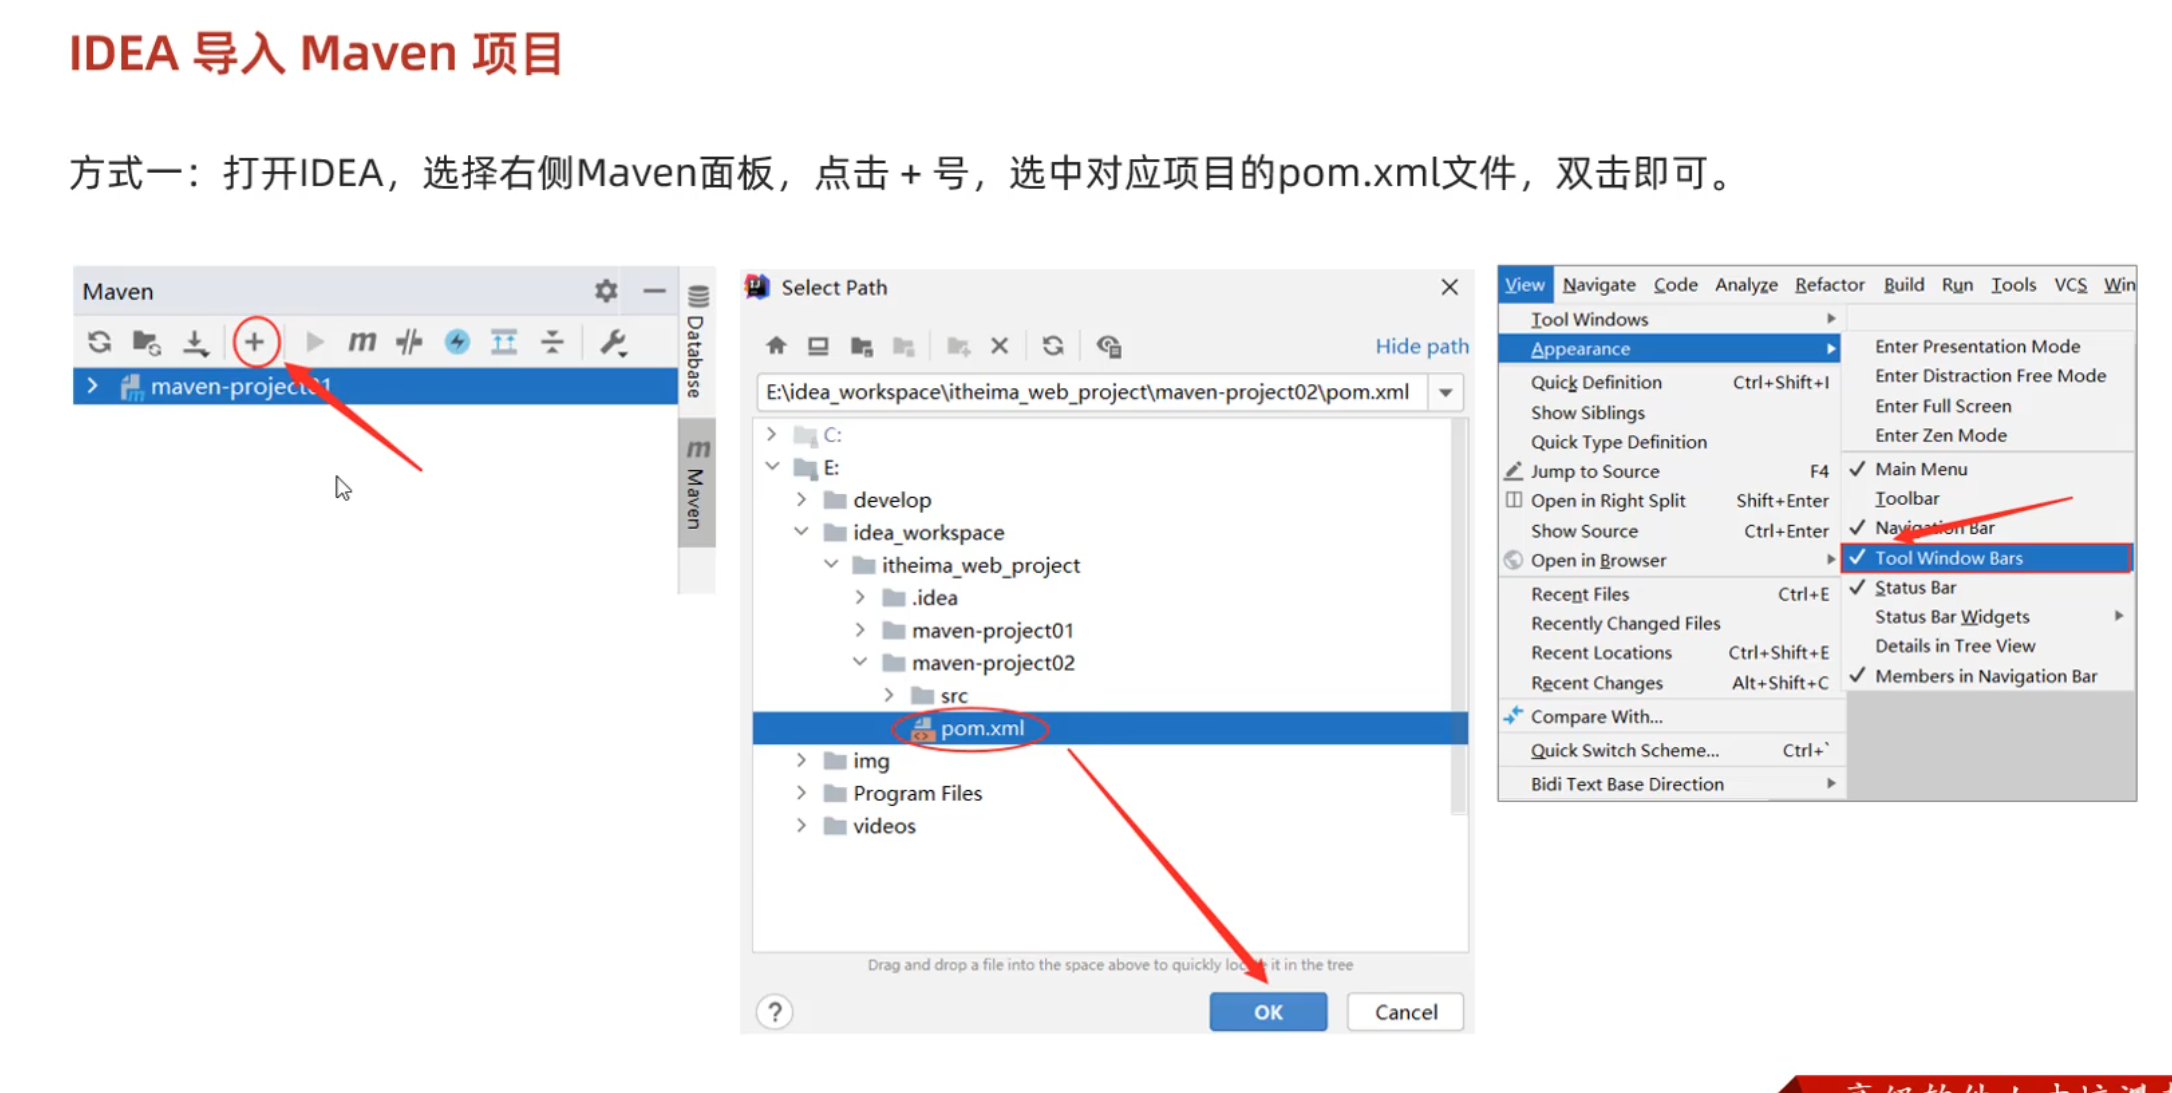
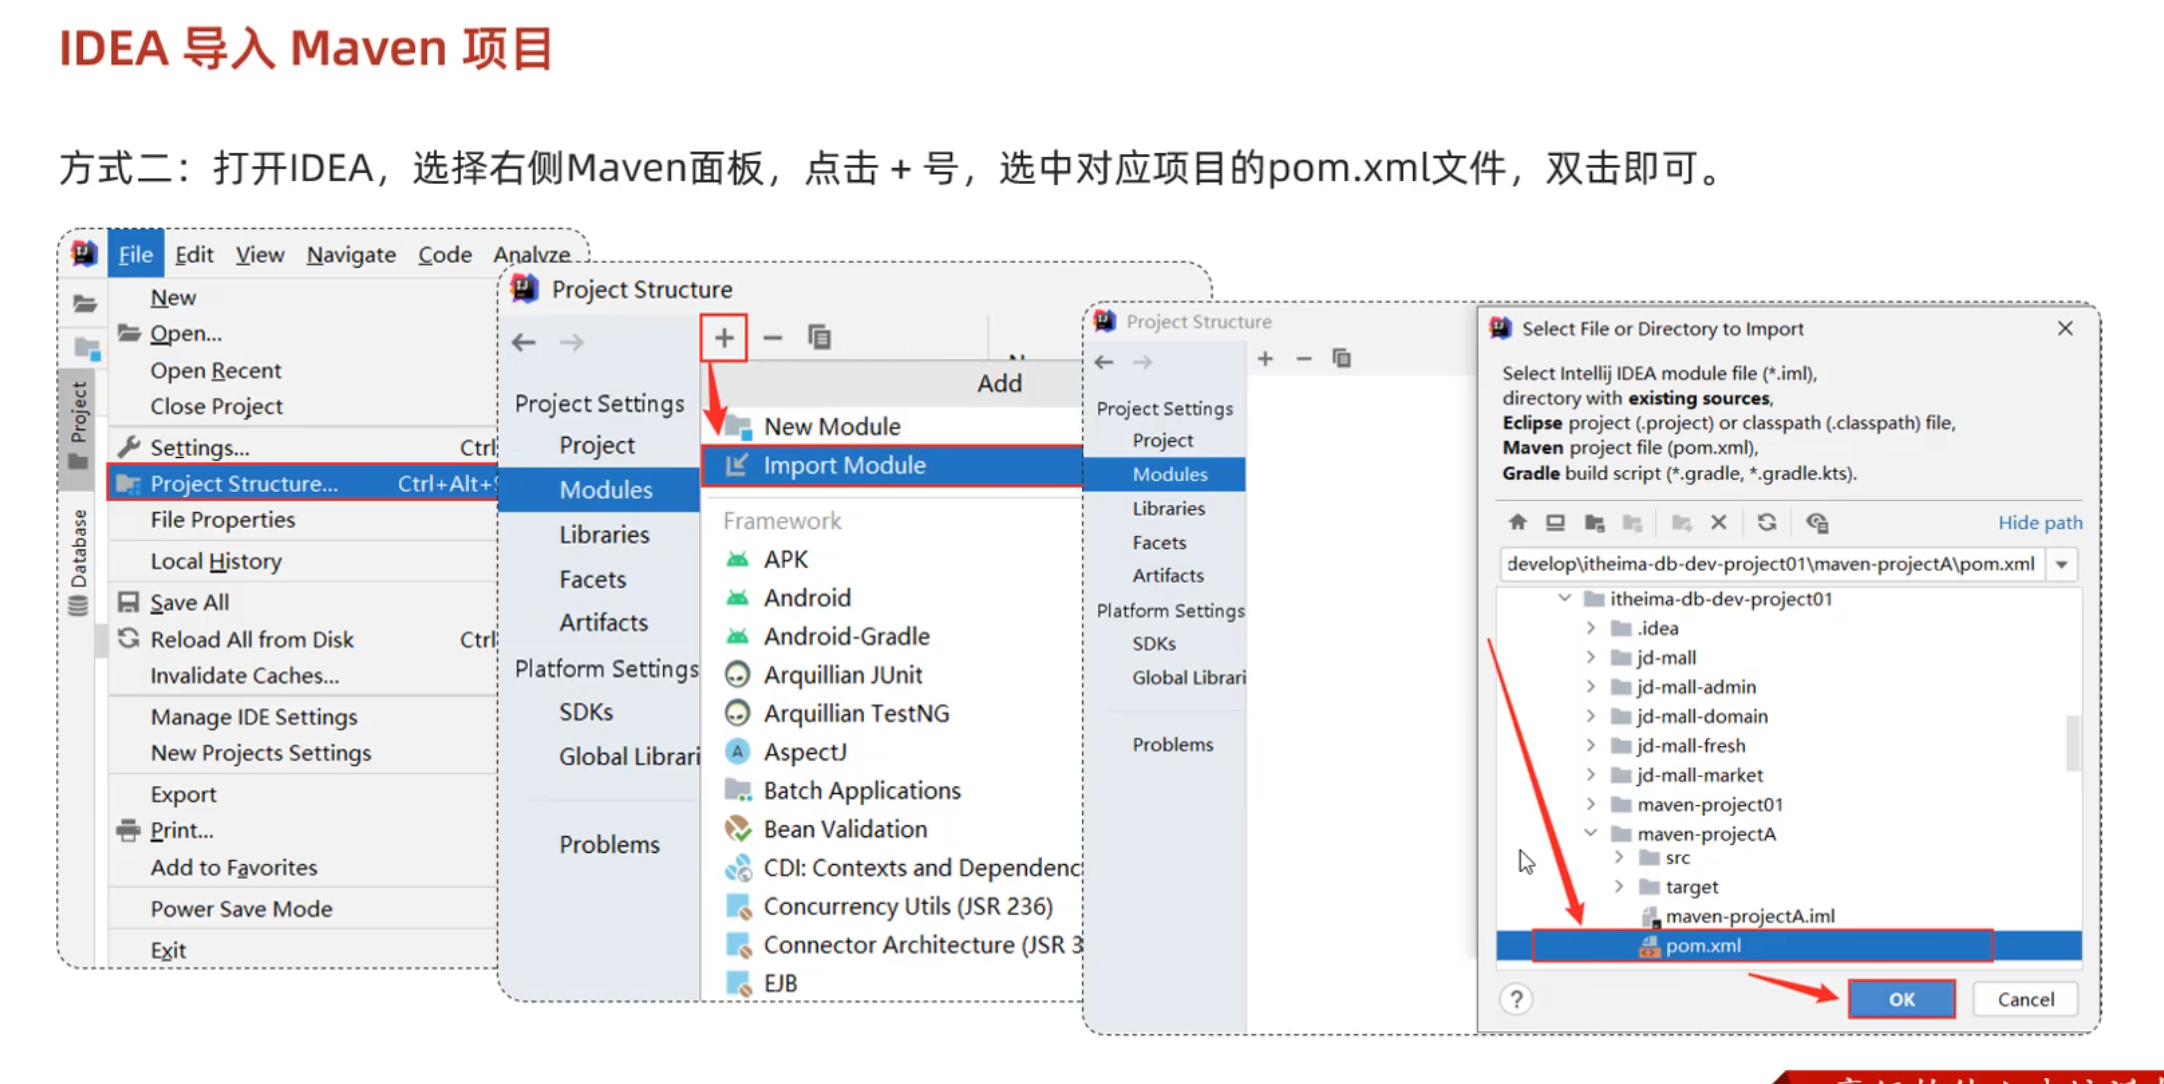
Maven
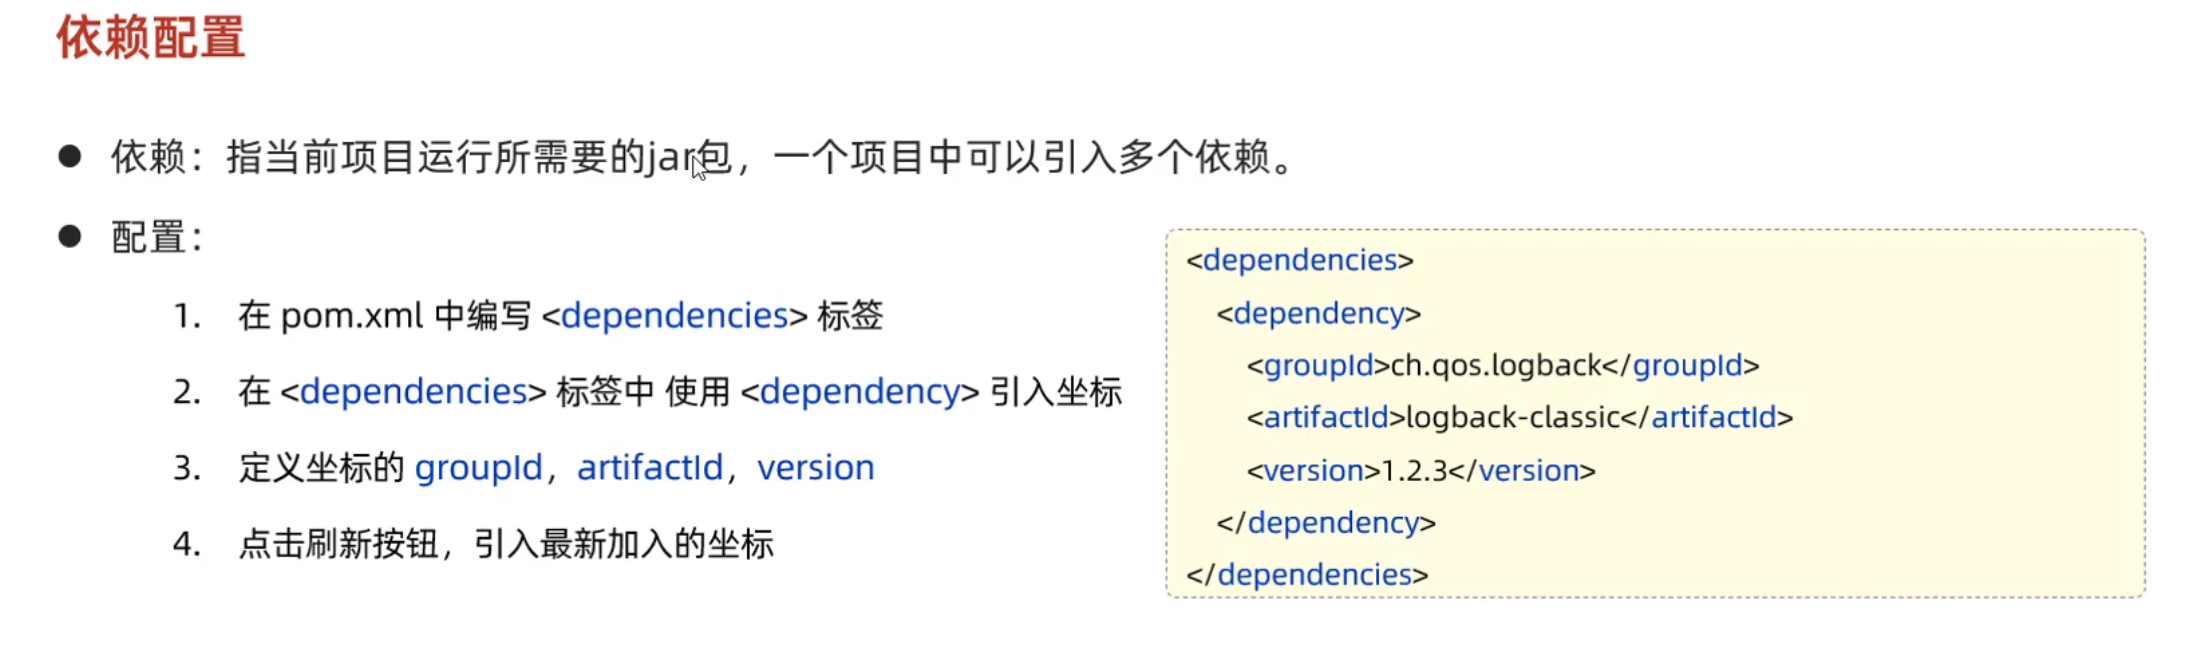
依赖配置
1 2 3 4 5 6 7 <dependencies > <dependency > <groupId > ch.qos.logback</groupId > <artifactId > logback-classic</artifactId > <version > 1.5.6</version > </dependency > </dependencies >
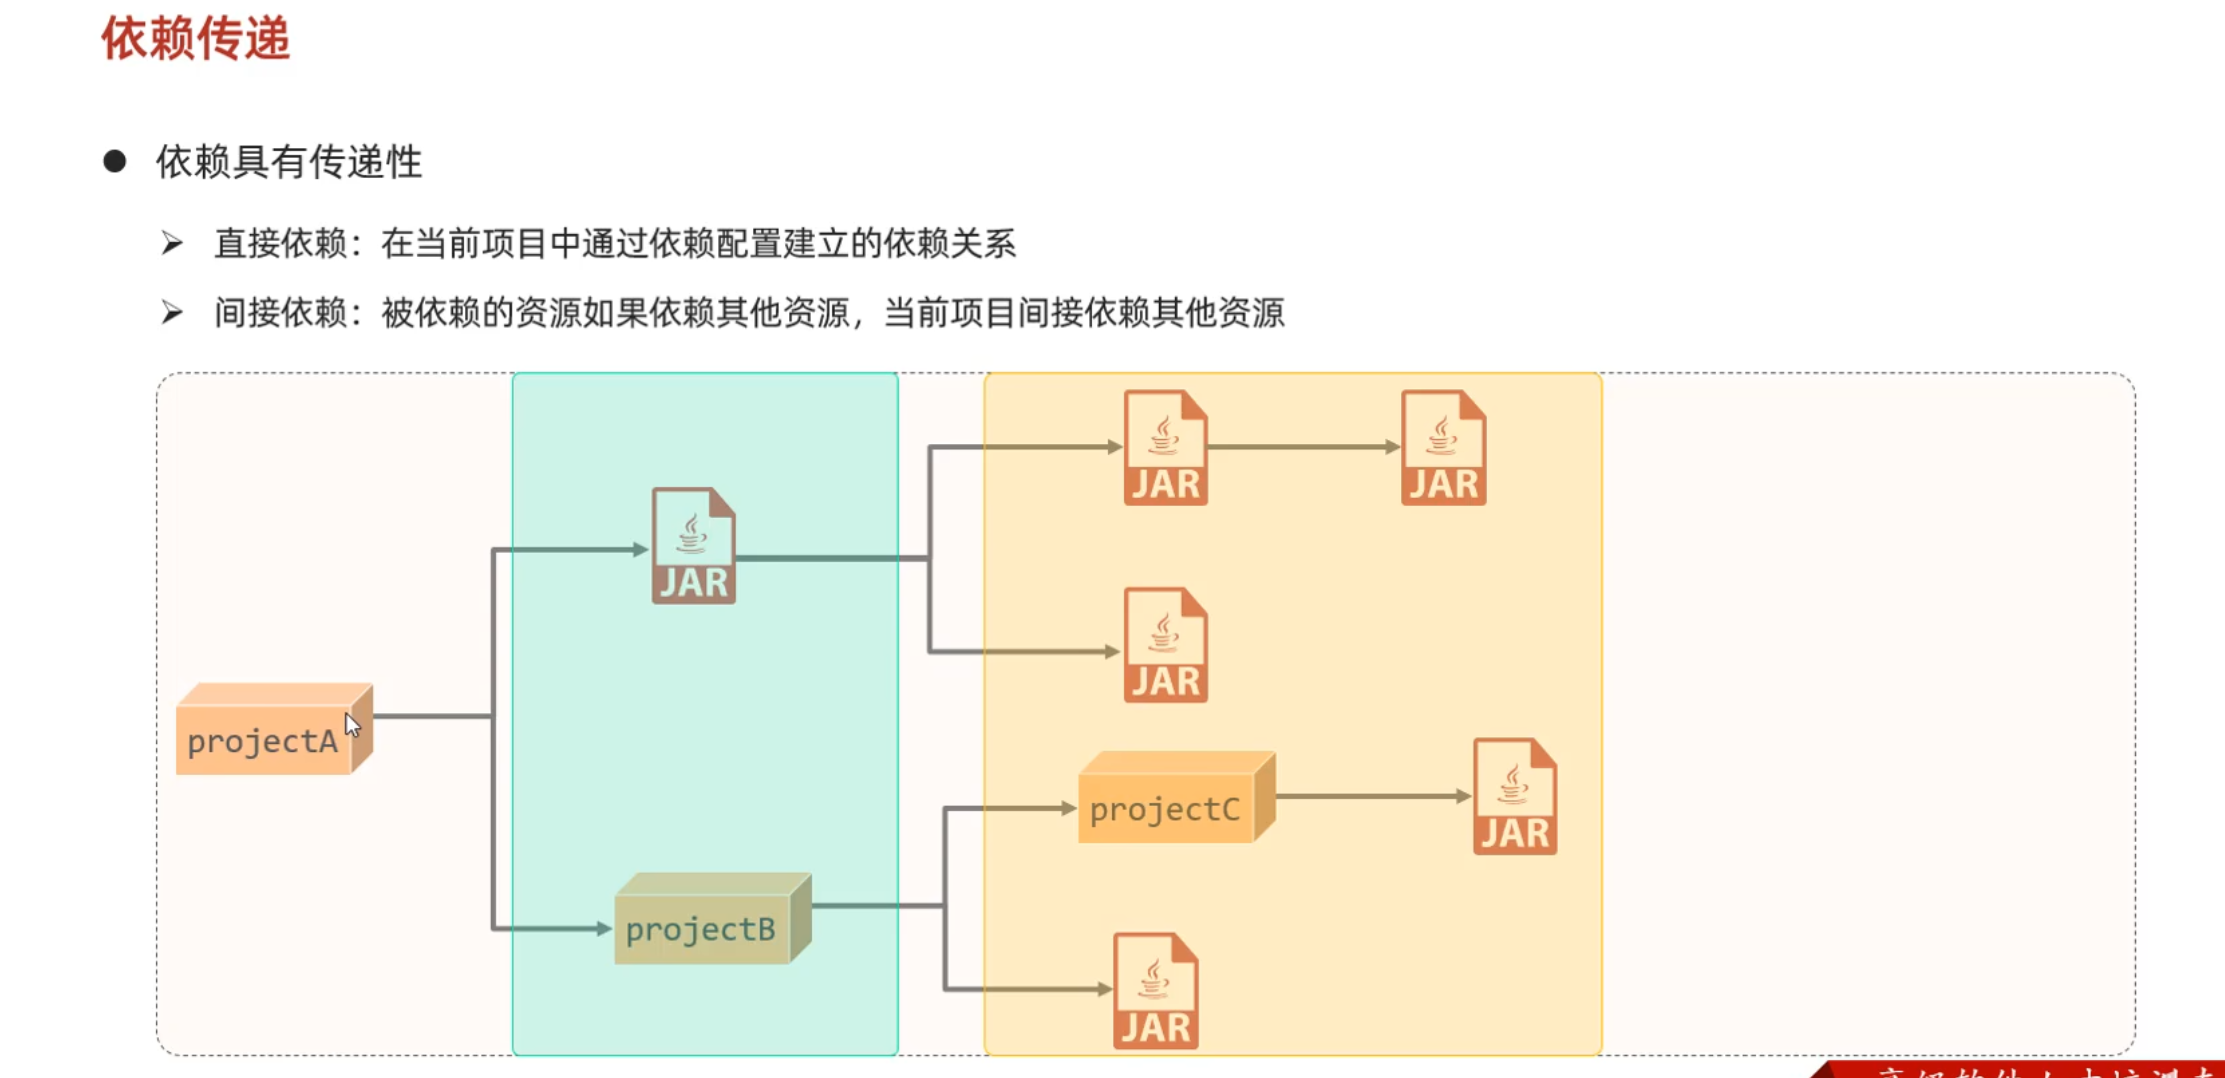
依赖传递
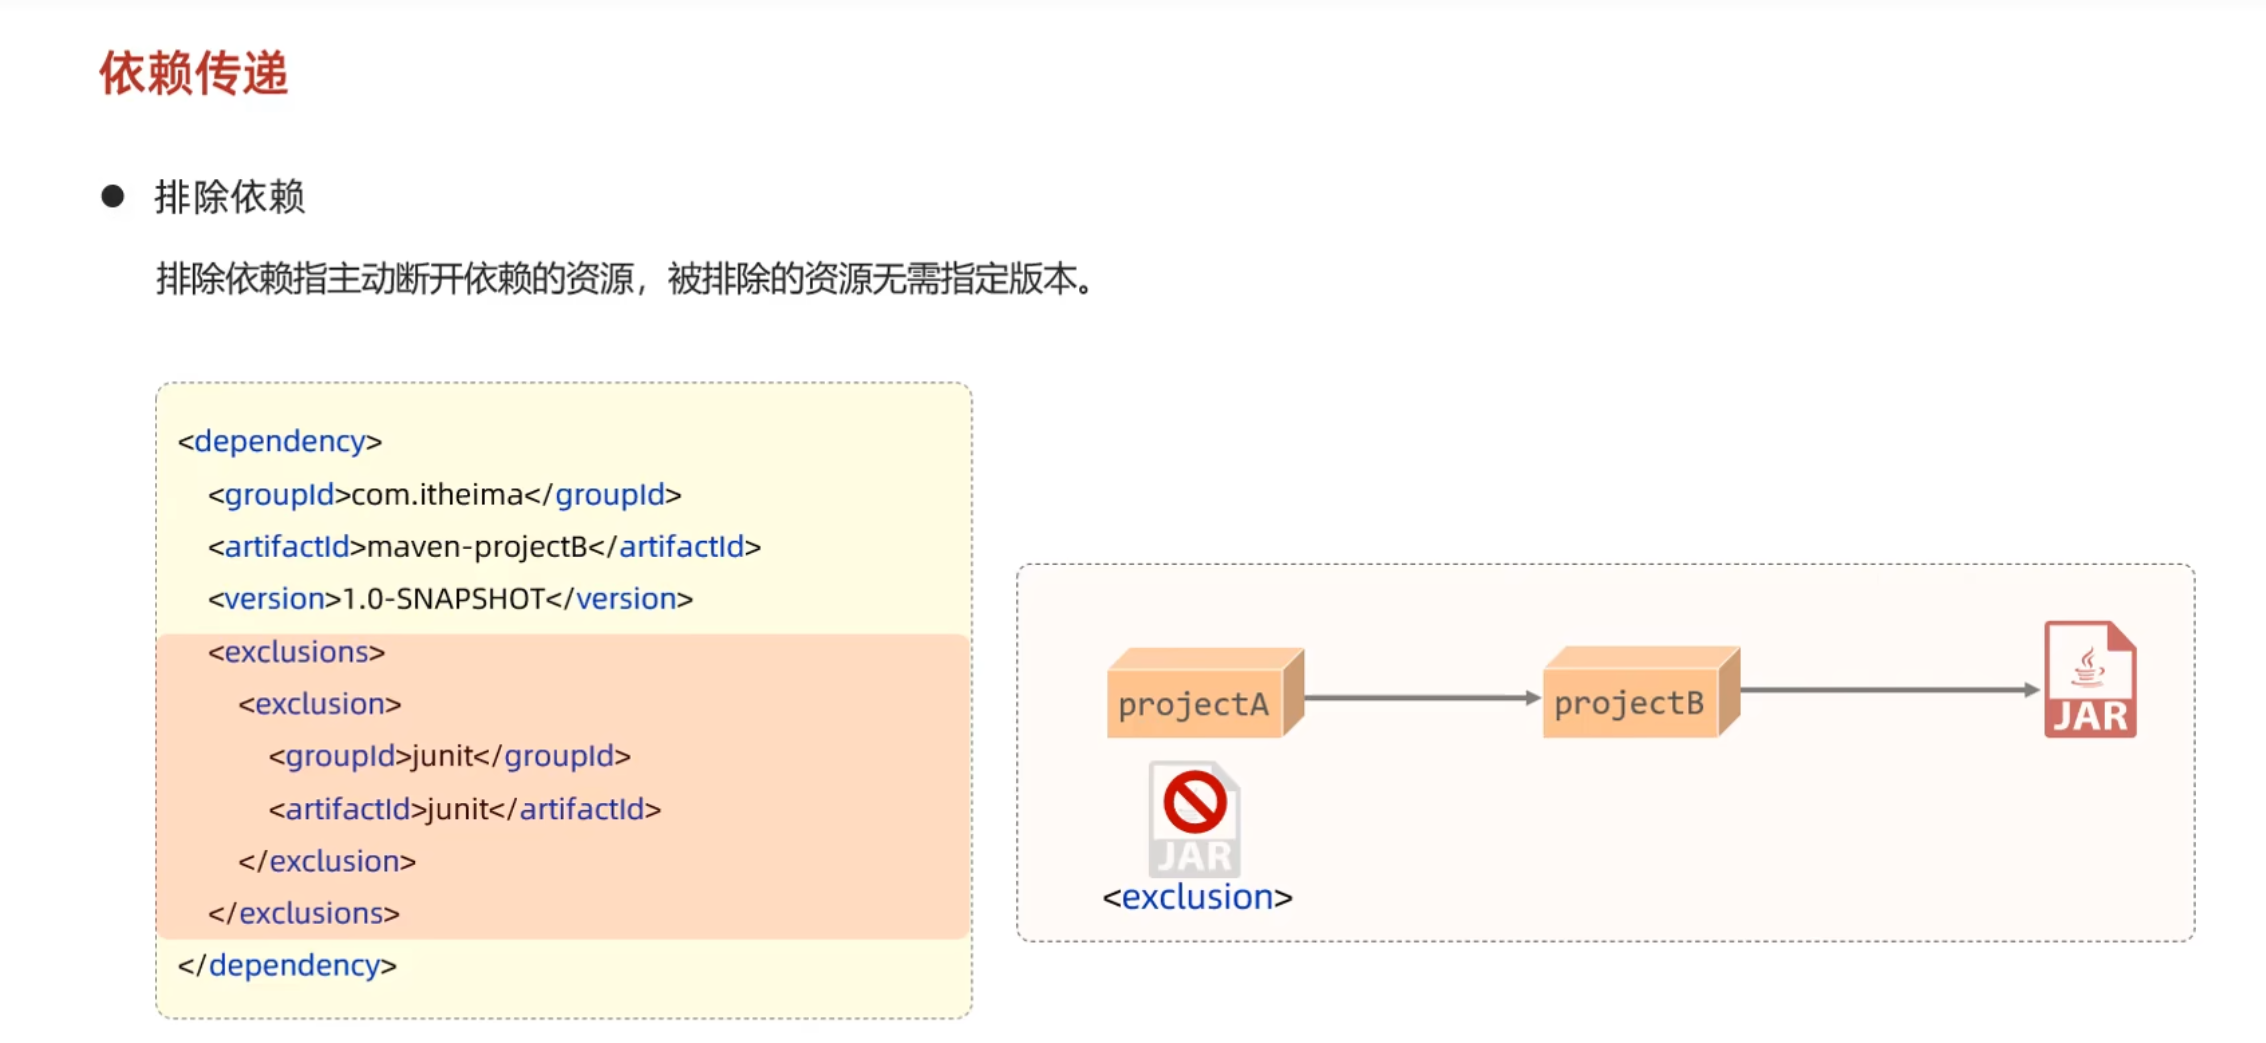
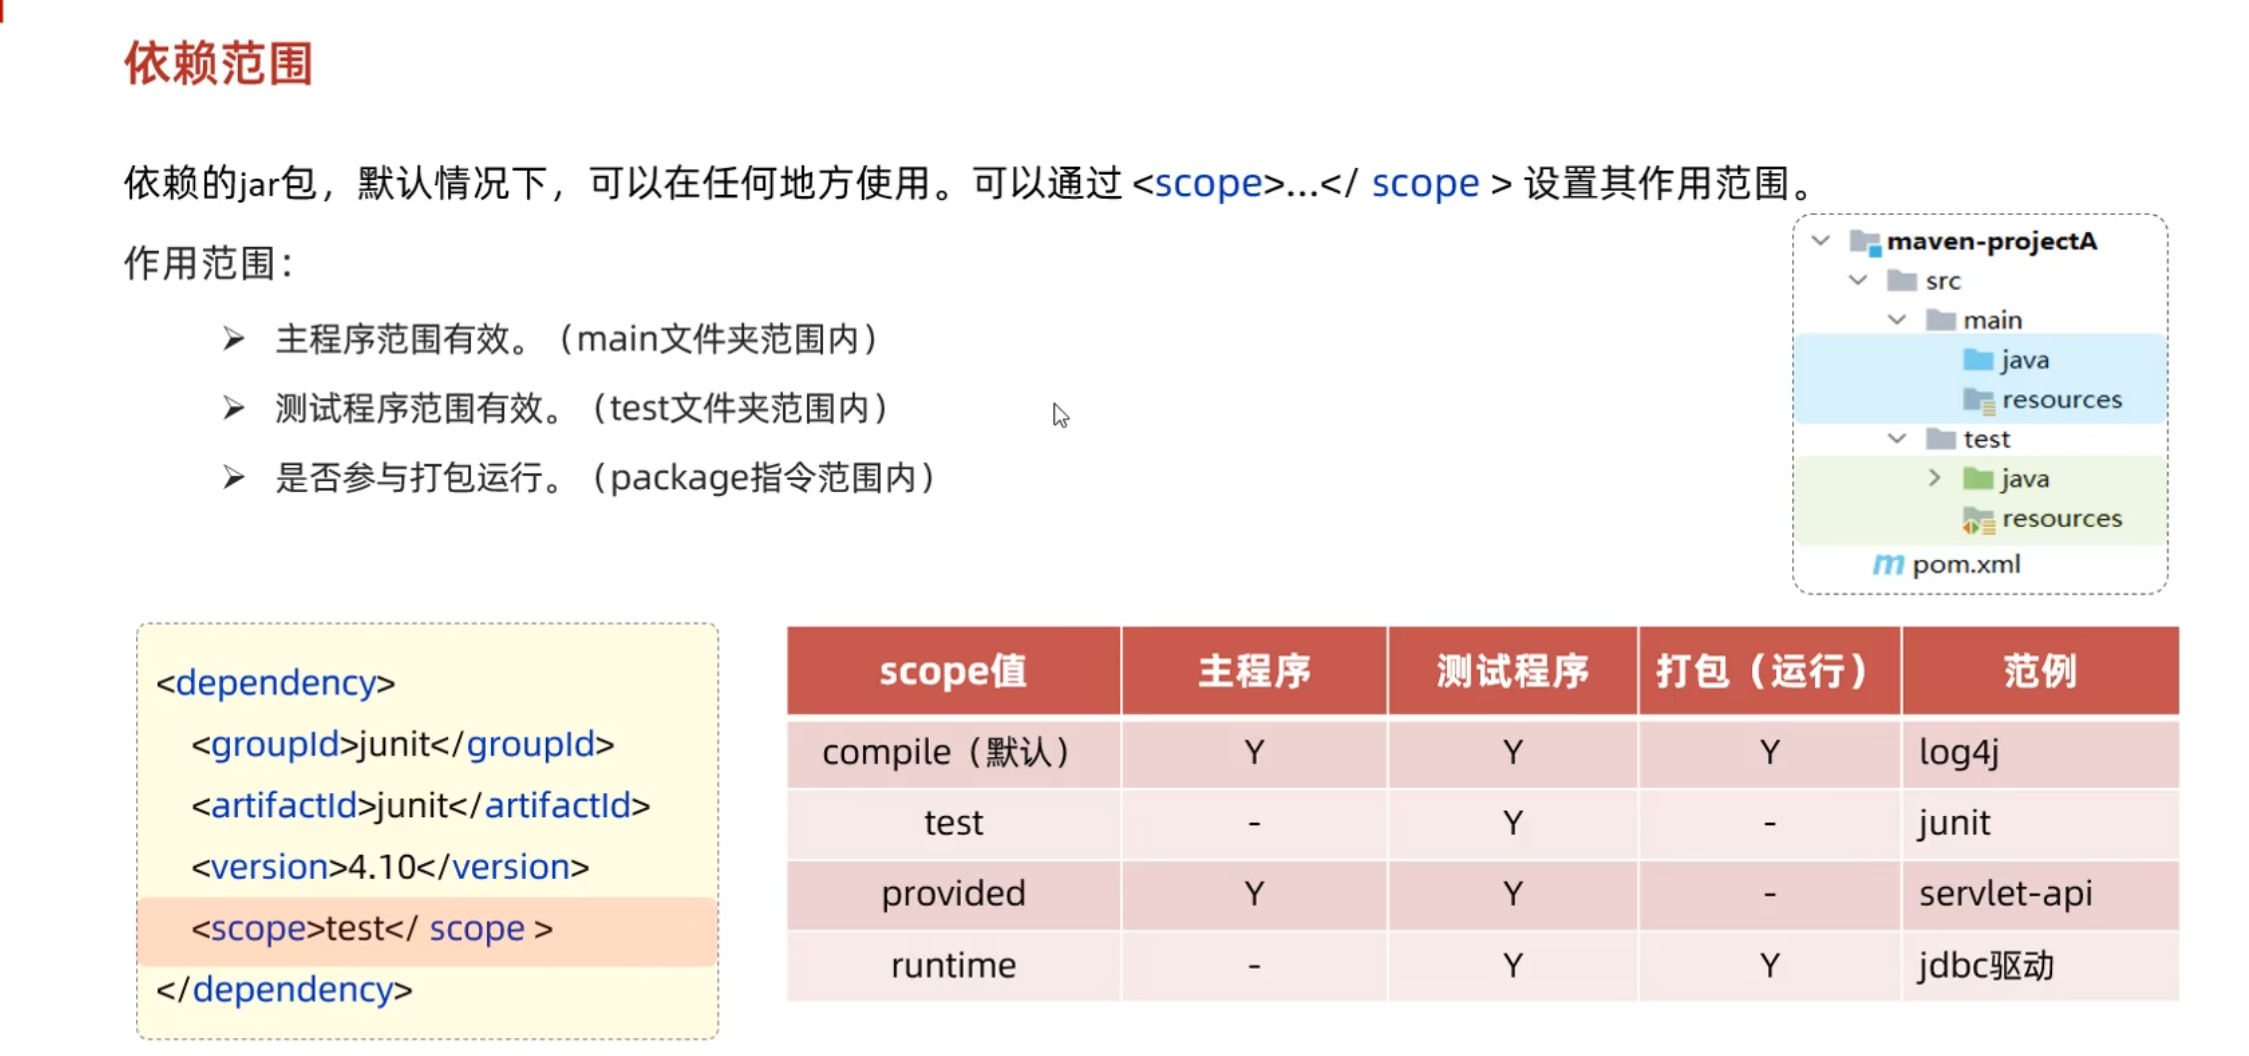
排除依赖 依赖范围
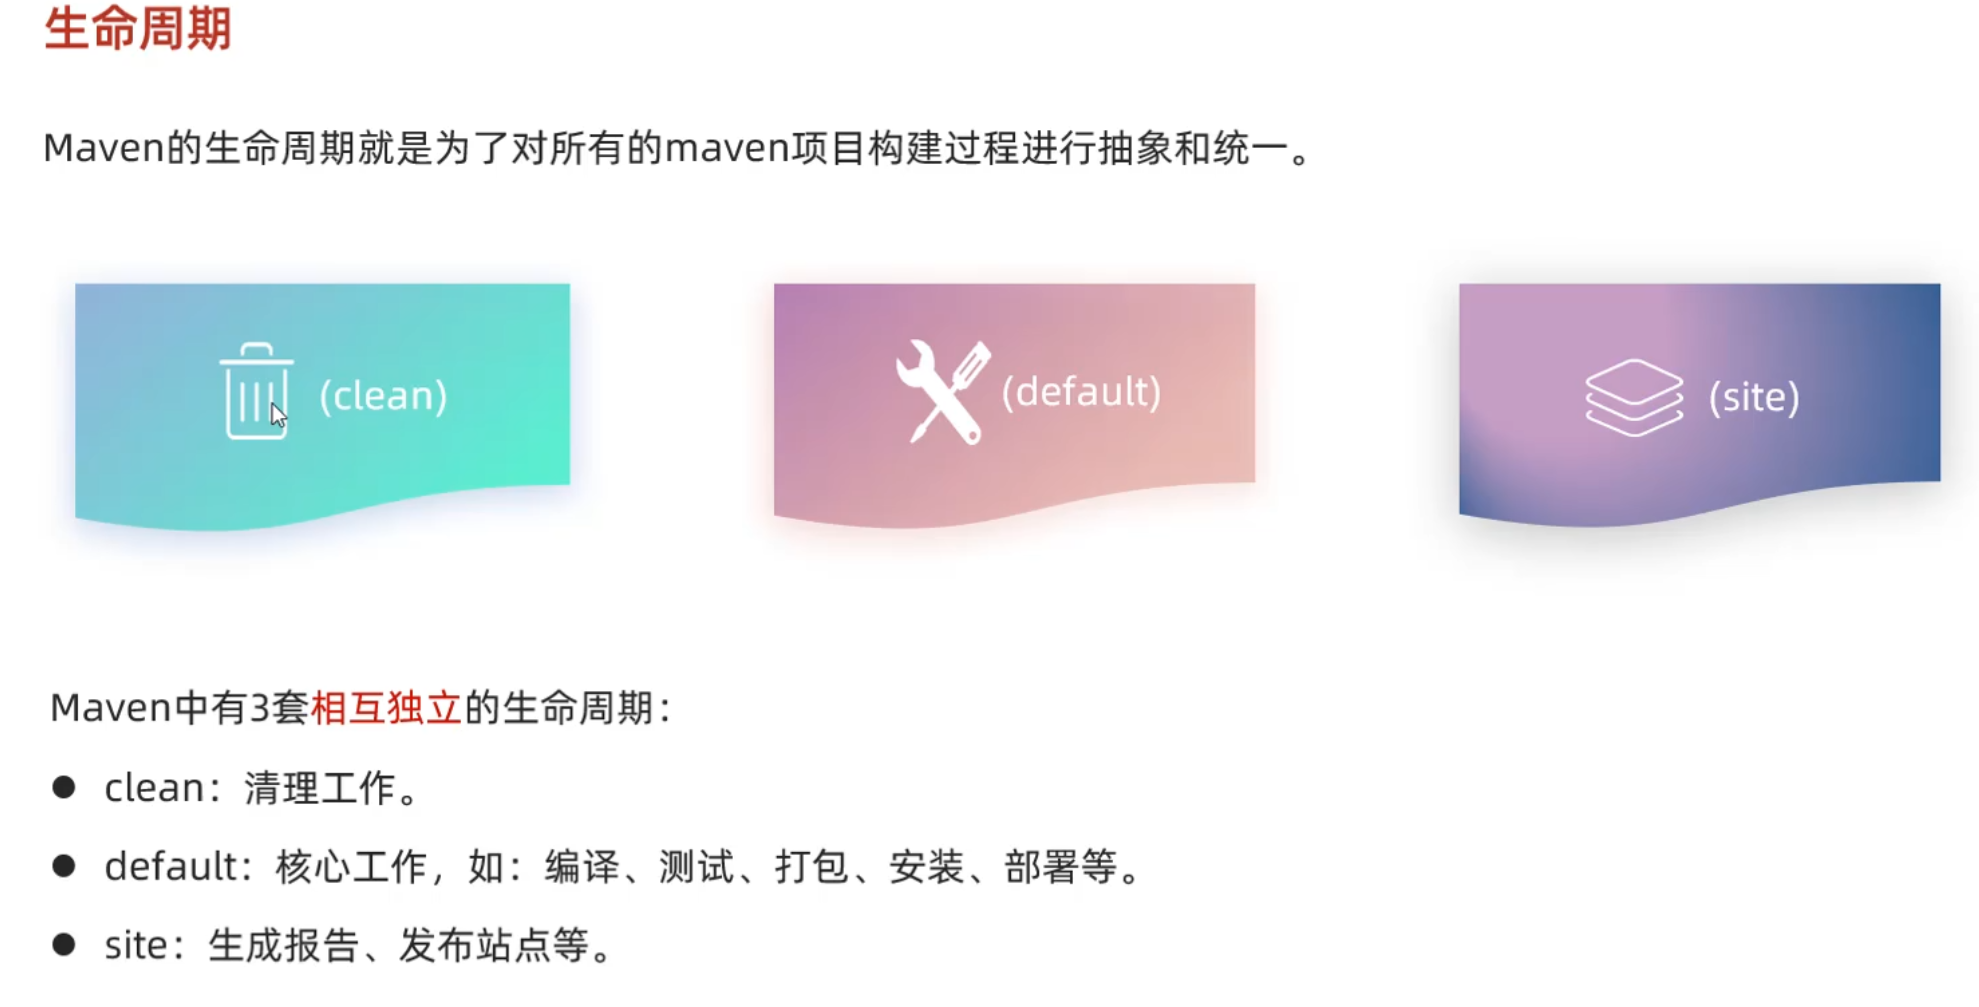
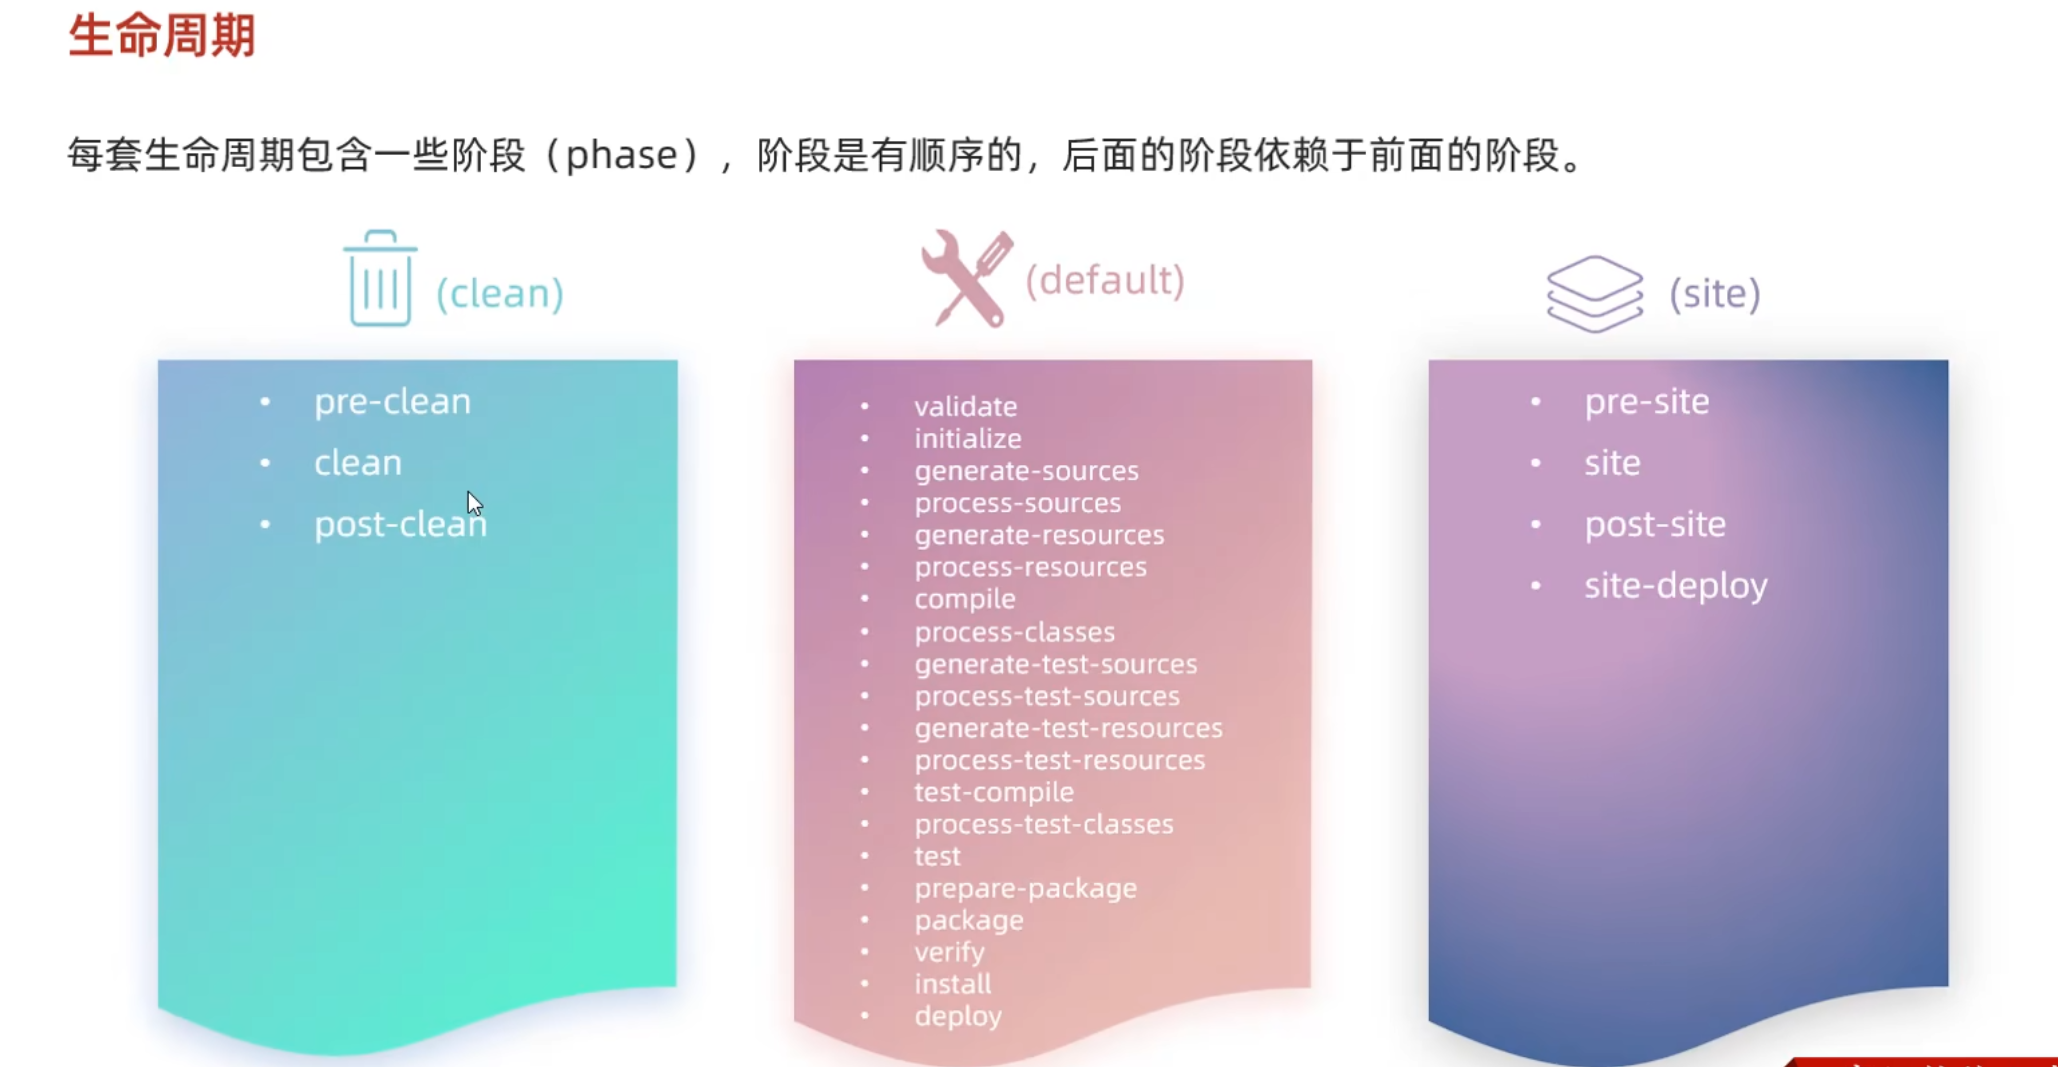
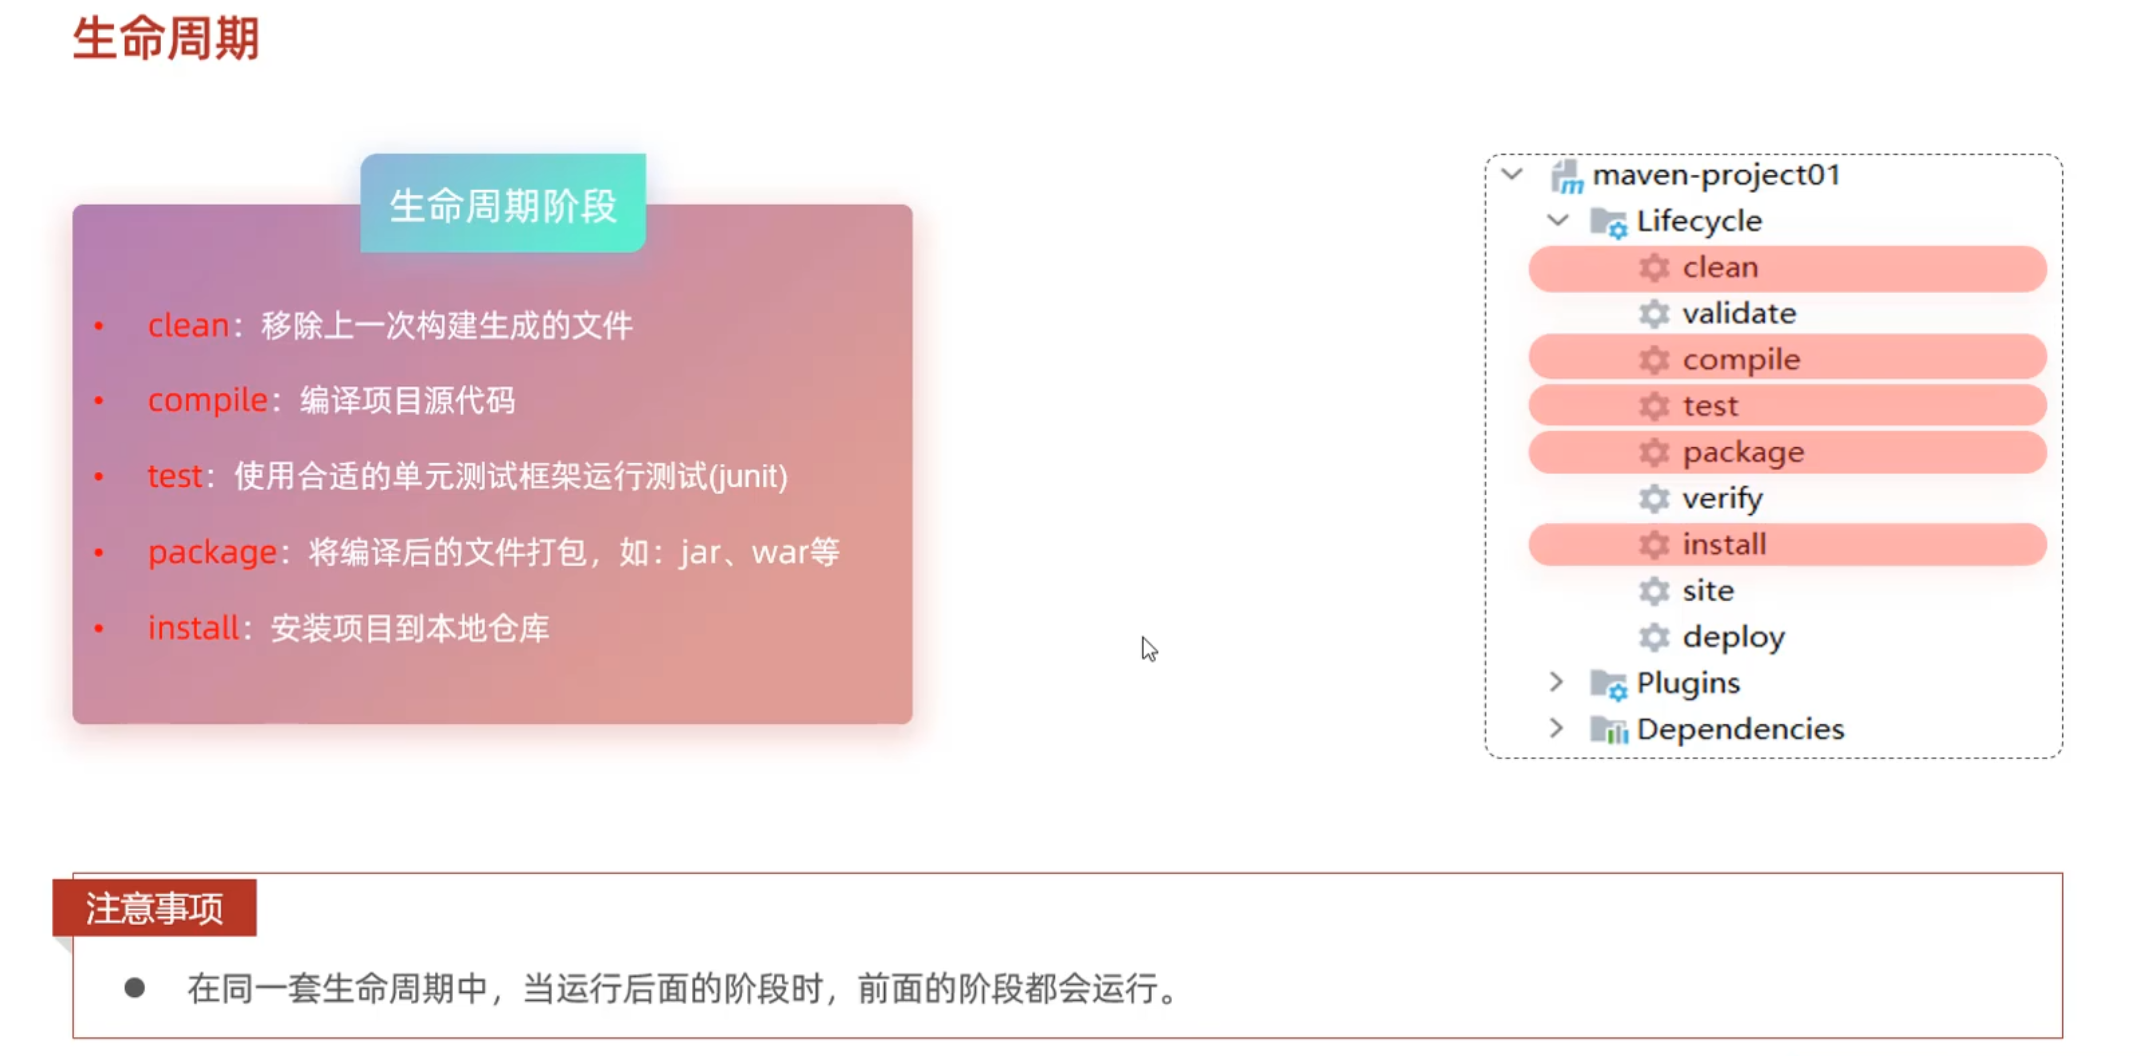
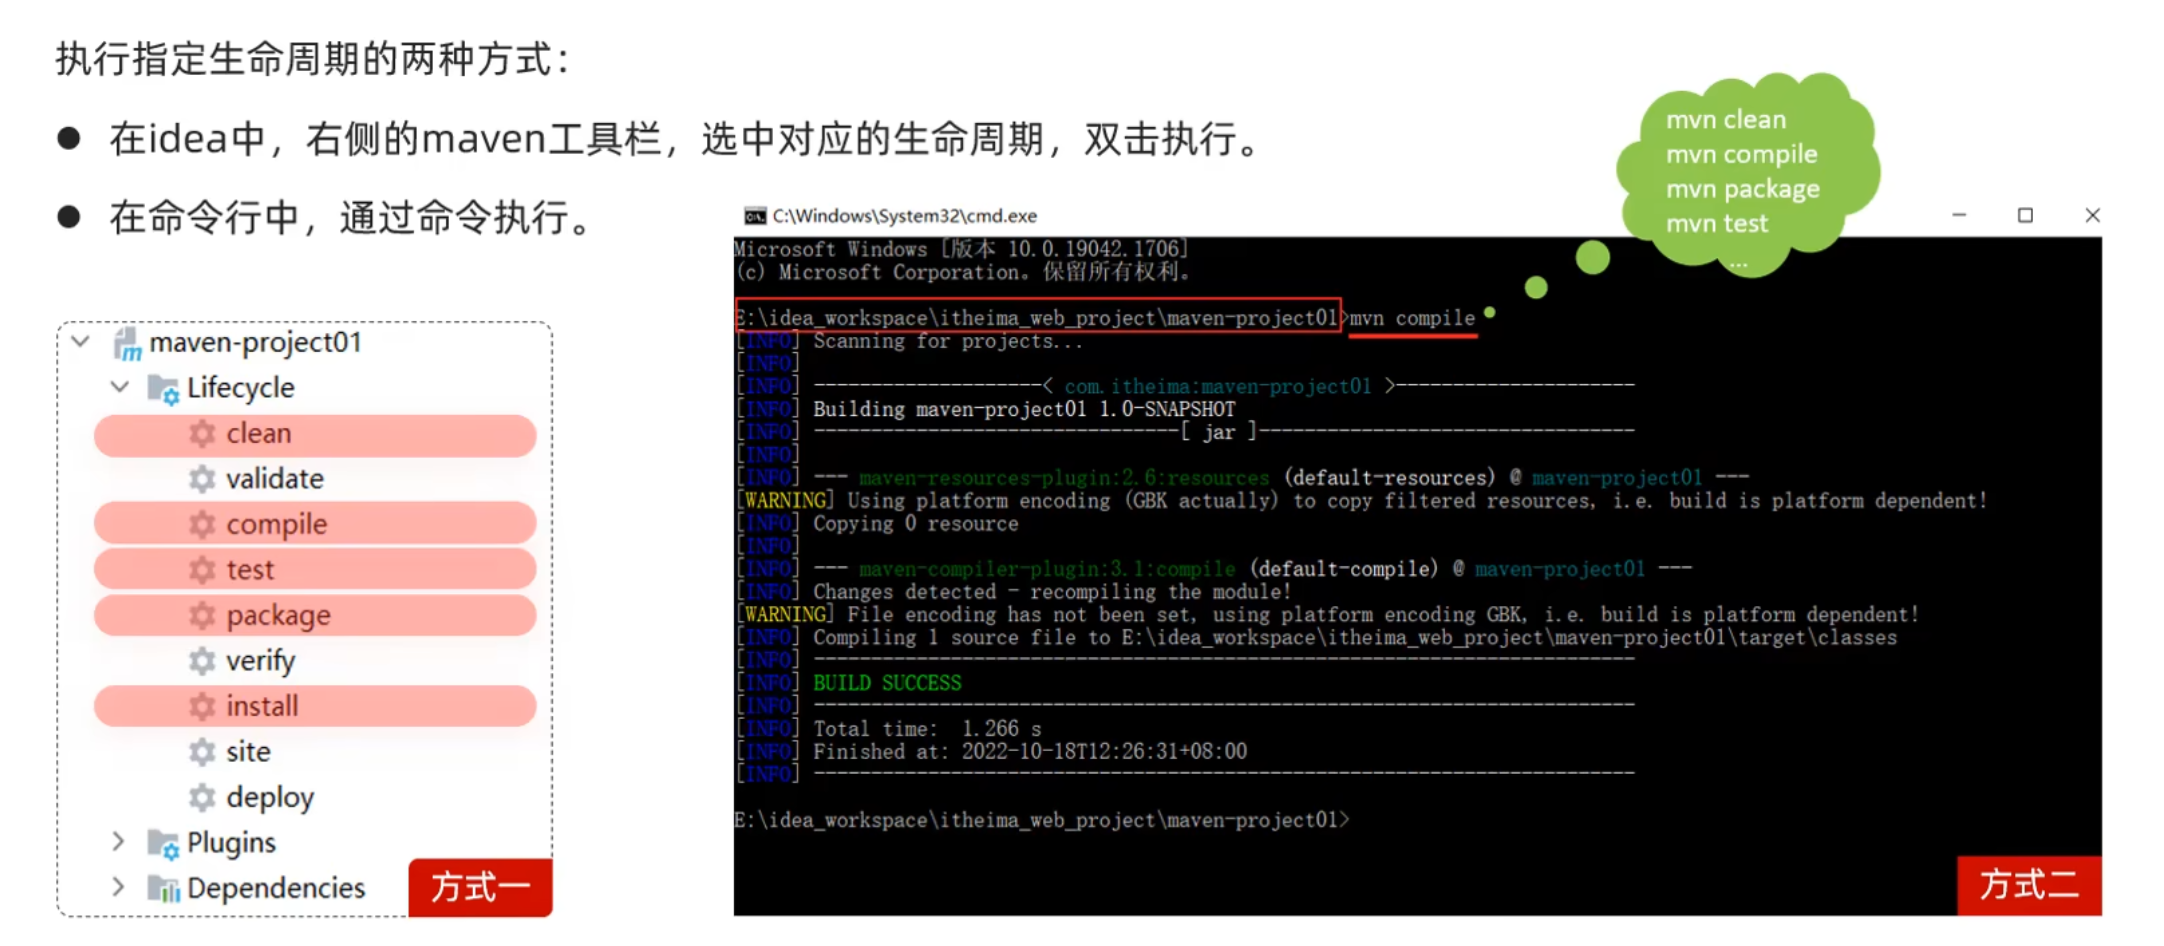
生命周期
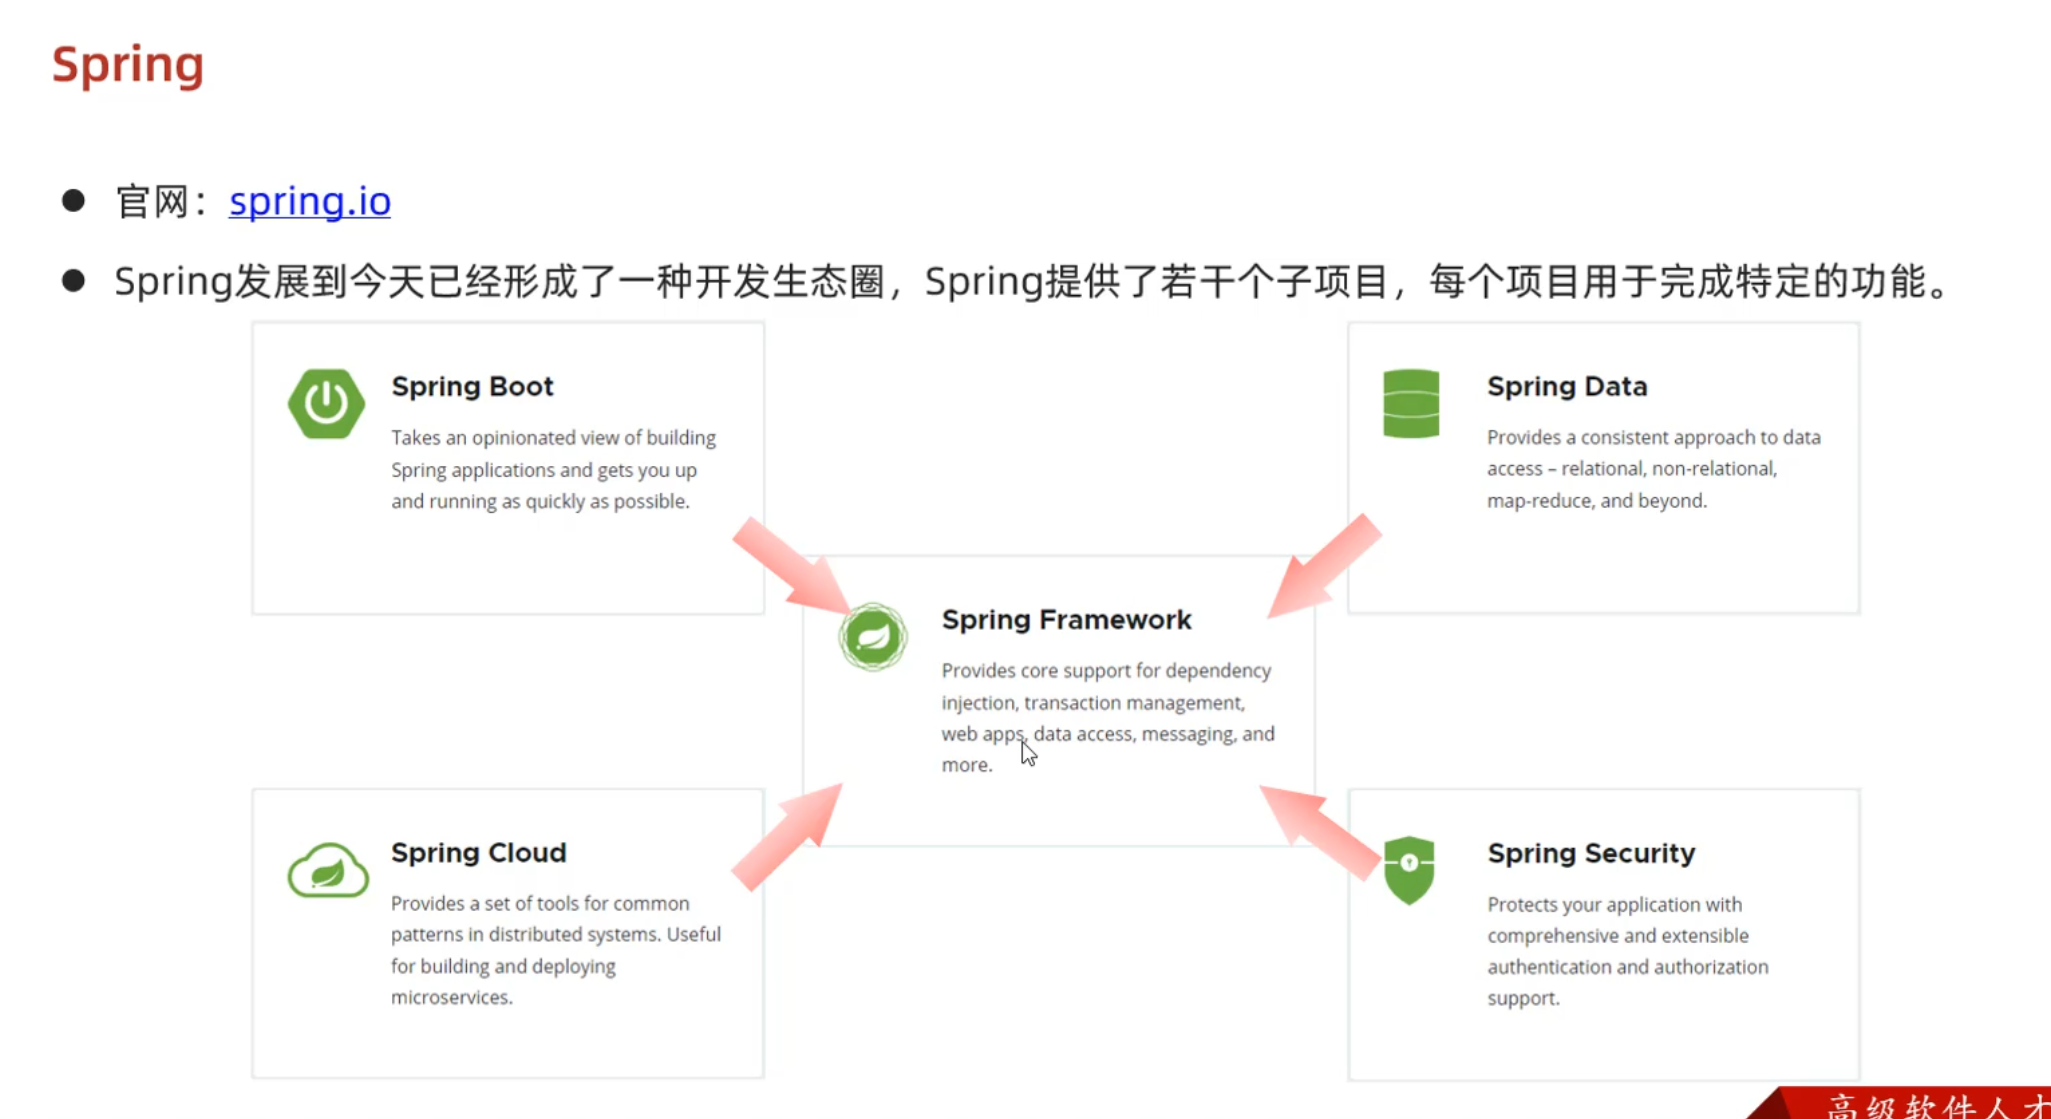
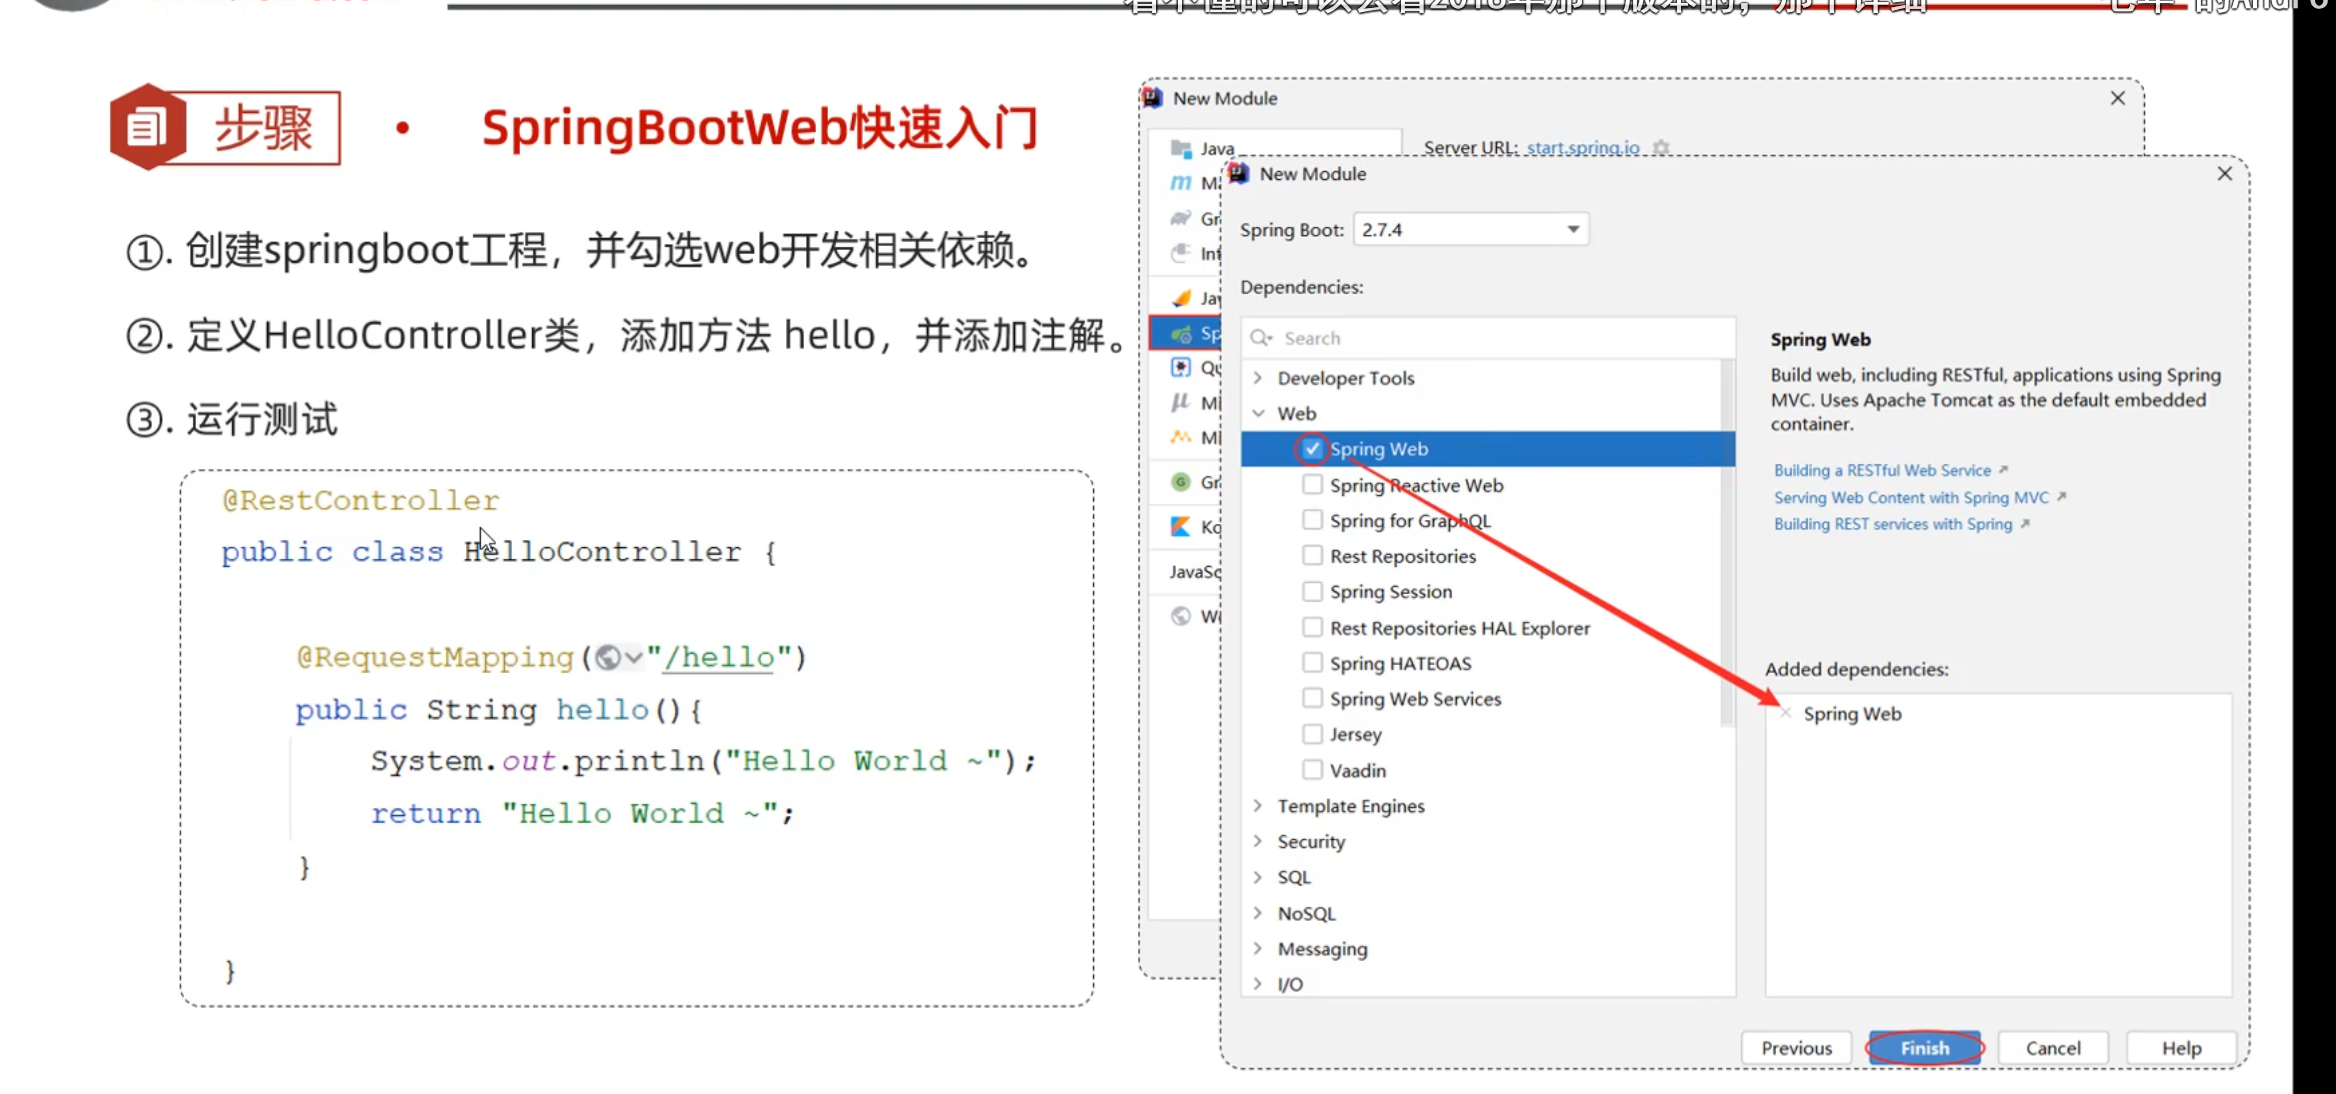
SpringBoot
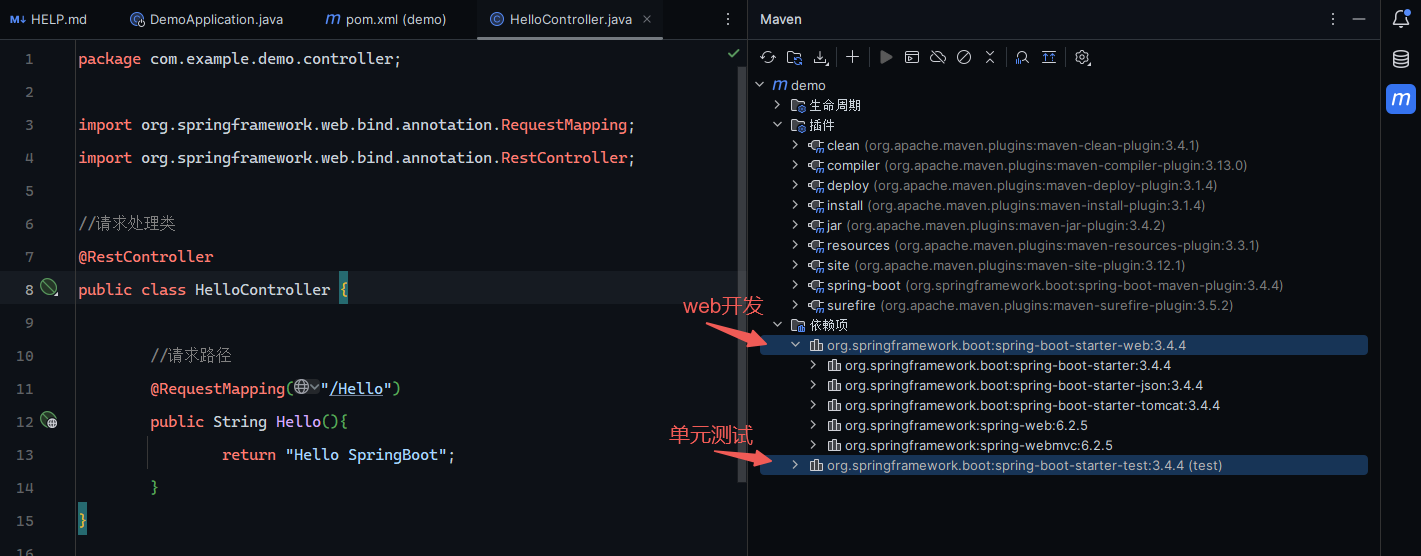
@RestController @RestController 通常用于创建 REST API,其中每个方法的返回值都是 HTTP 响应体的一部分。这使得开发人员可以专注于业务逻辑,而不必担心视图解析和模型数据的填充。
@RequestMapping()注解 1 在 Java 的 Spring 框架中,@RequestMapping注解用于将 HTTP 请求映射到控制器的处理方法上。这个注解可以用于类或方法上,用于定义请求的 URL 模式、HTTP 方法(如 GET、POST)、请求参数、头部信息等。
1 2 3 4 5 6 7 8 9 10 11 12 13 14 15 16 package com.example.demo.controller;import org.springframework.web.bind.annotation.RequestMapping;import org.springframework.web.bind.annotation.RestController;@RestController public class HelloController { @RequestMapping("/Hello") public String Hello () { return "Hello SpringBoot" ; } }
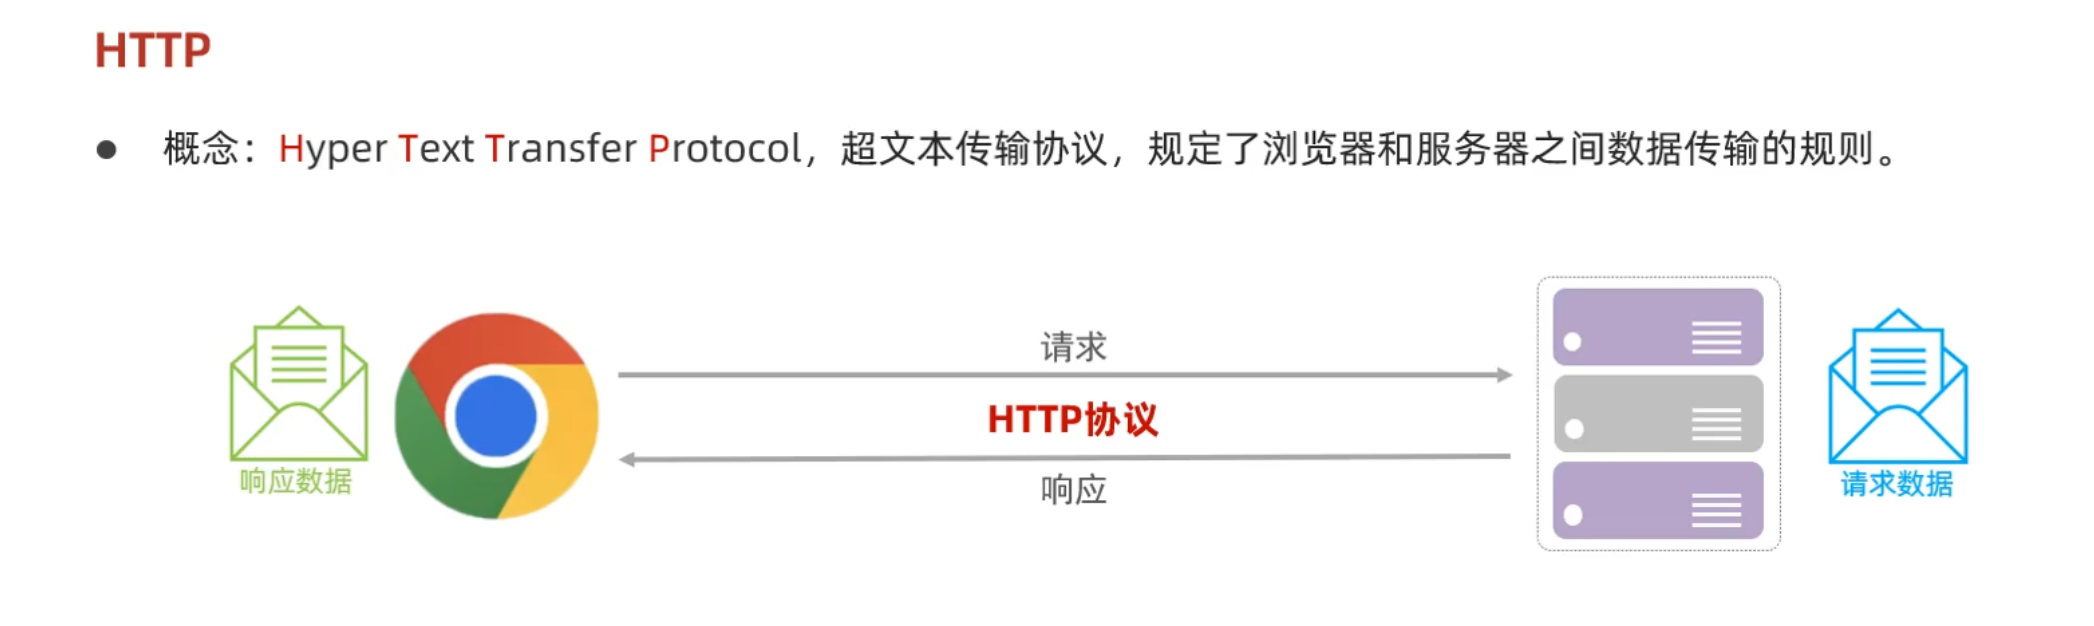
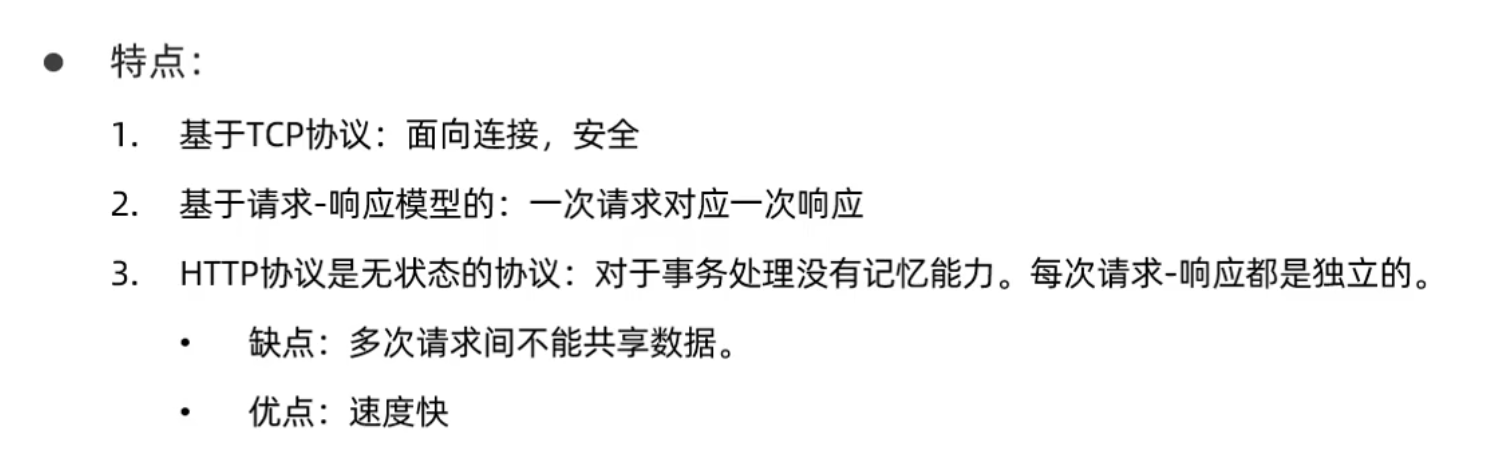
HTTP协议
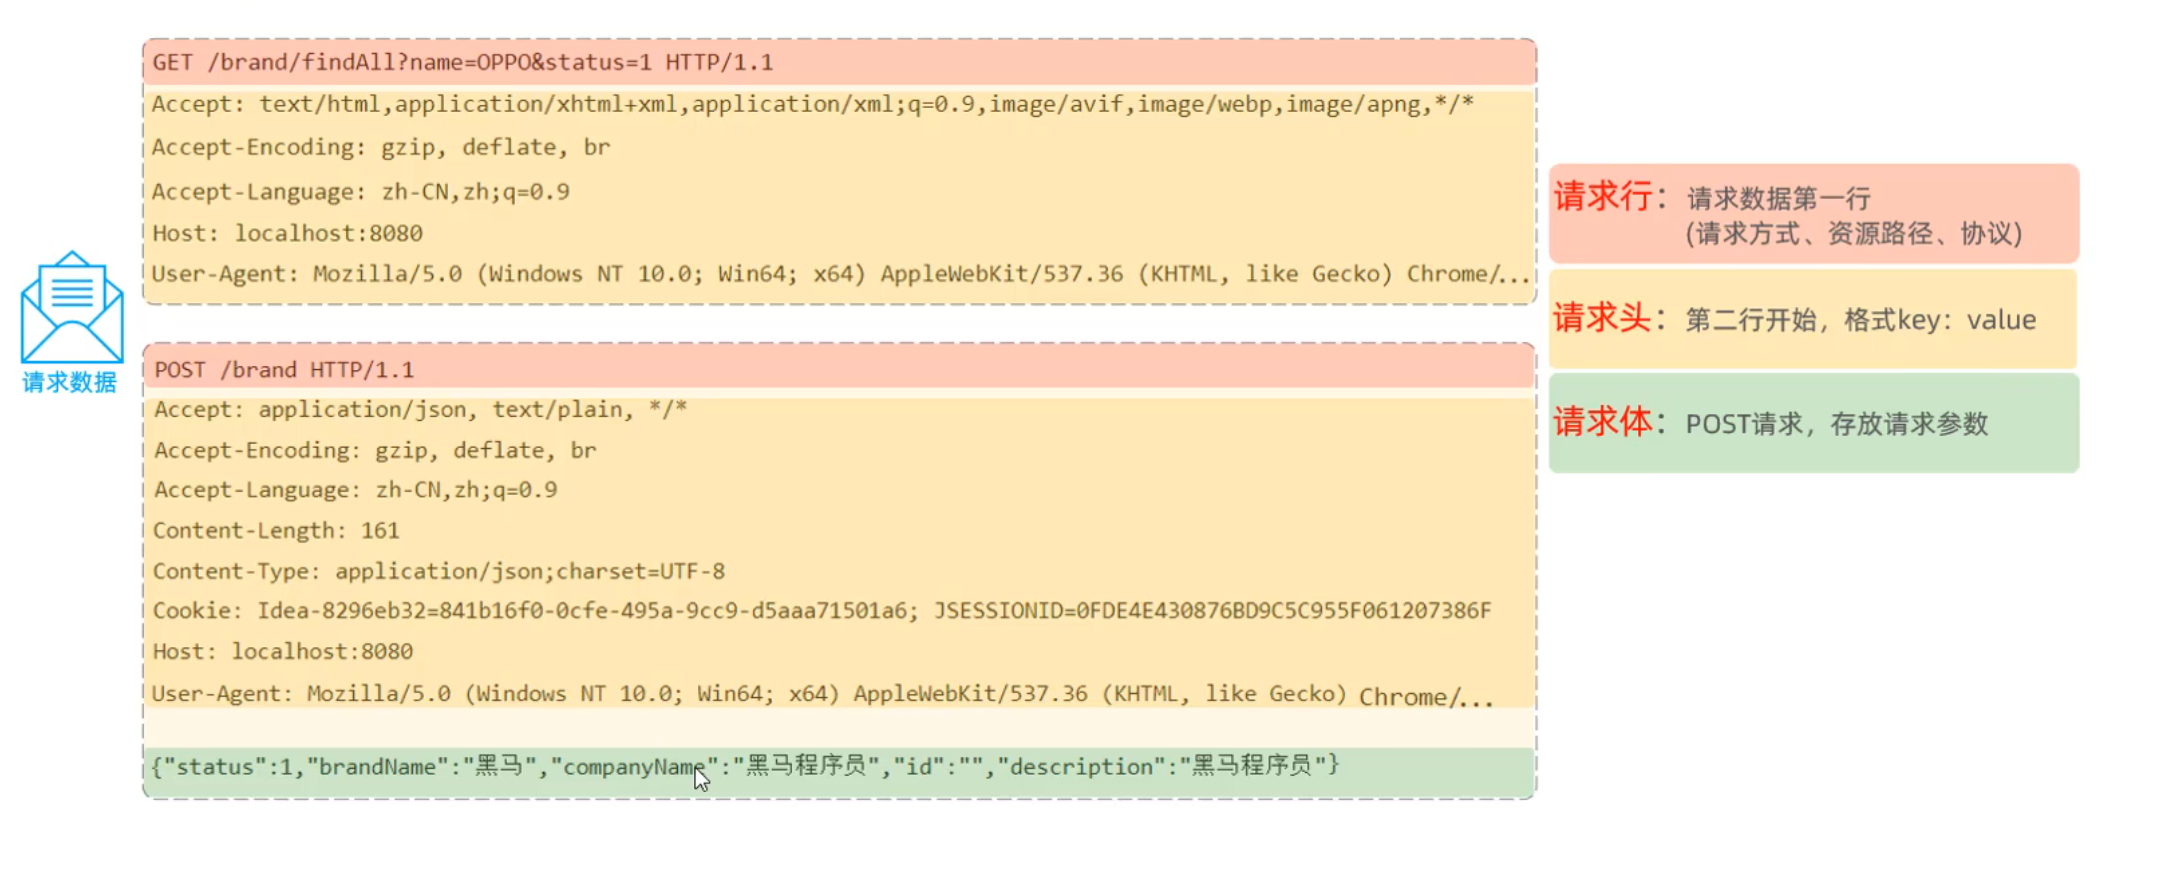
请求数据格式 请求行,请求头,请求体
请求头与请求体之间用空行隔开
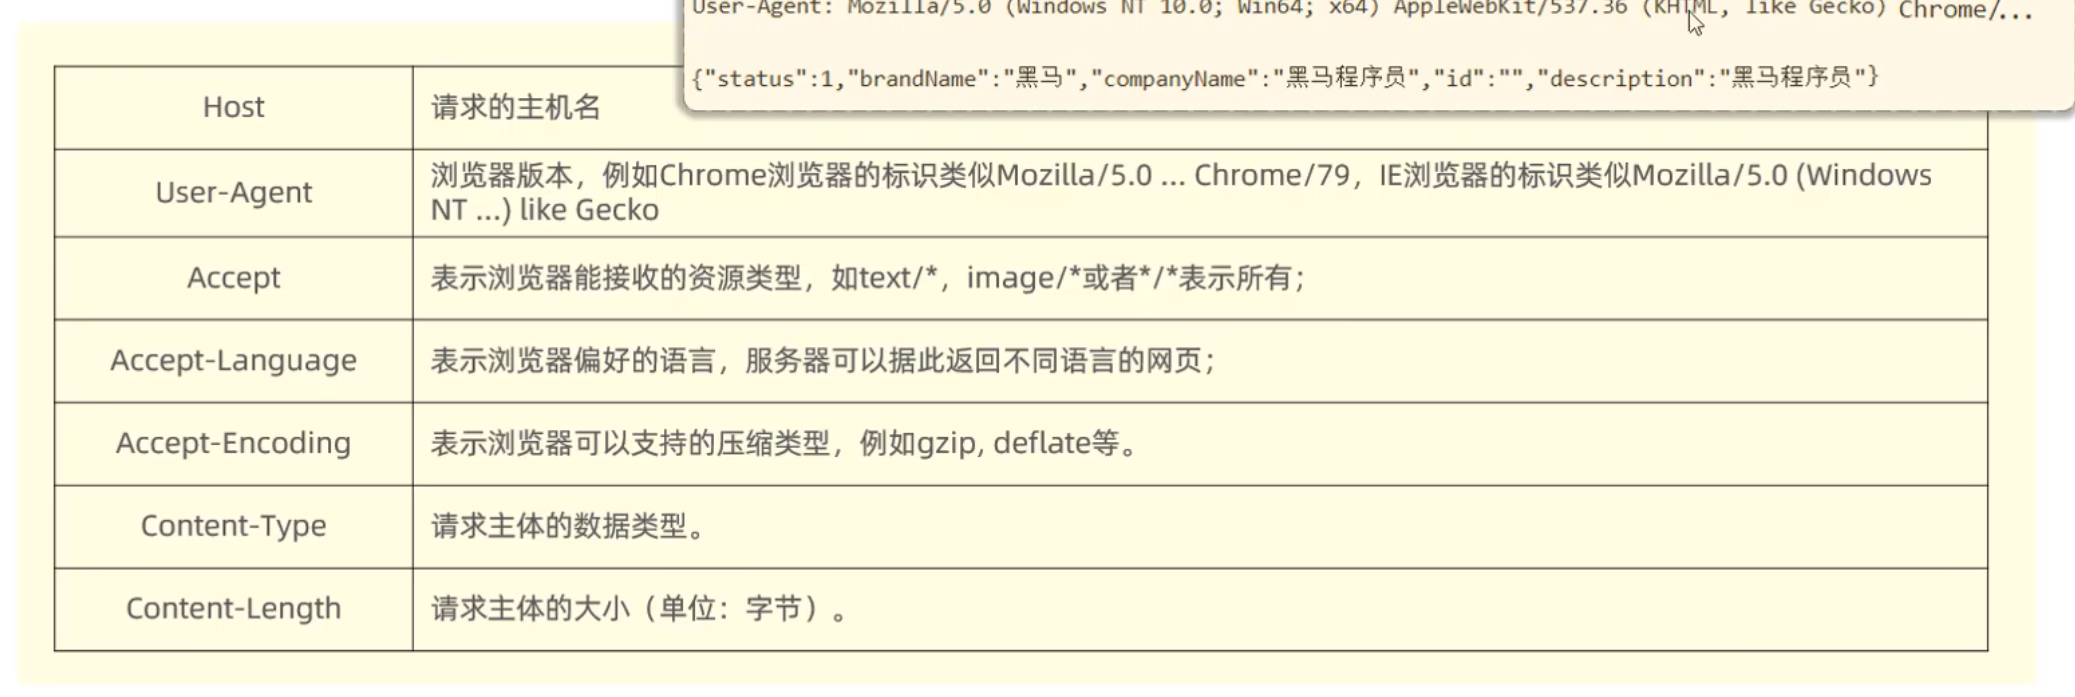
常见请求头:
User-Agent用于浏览器兼容性处理
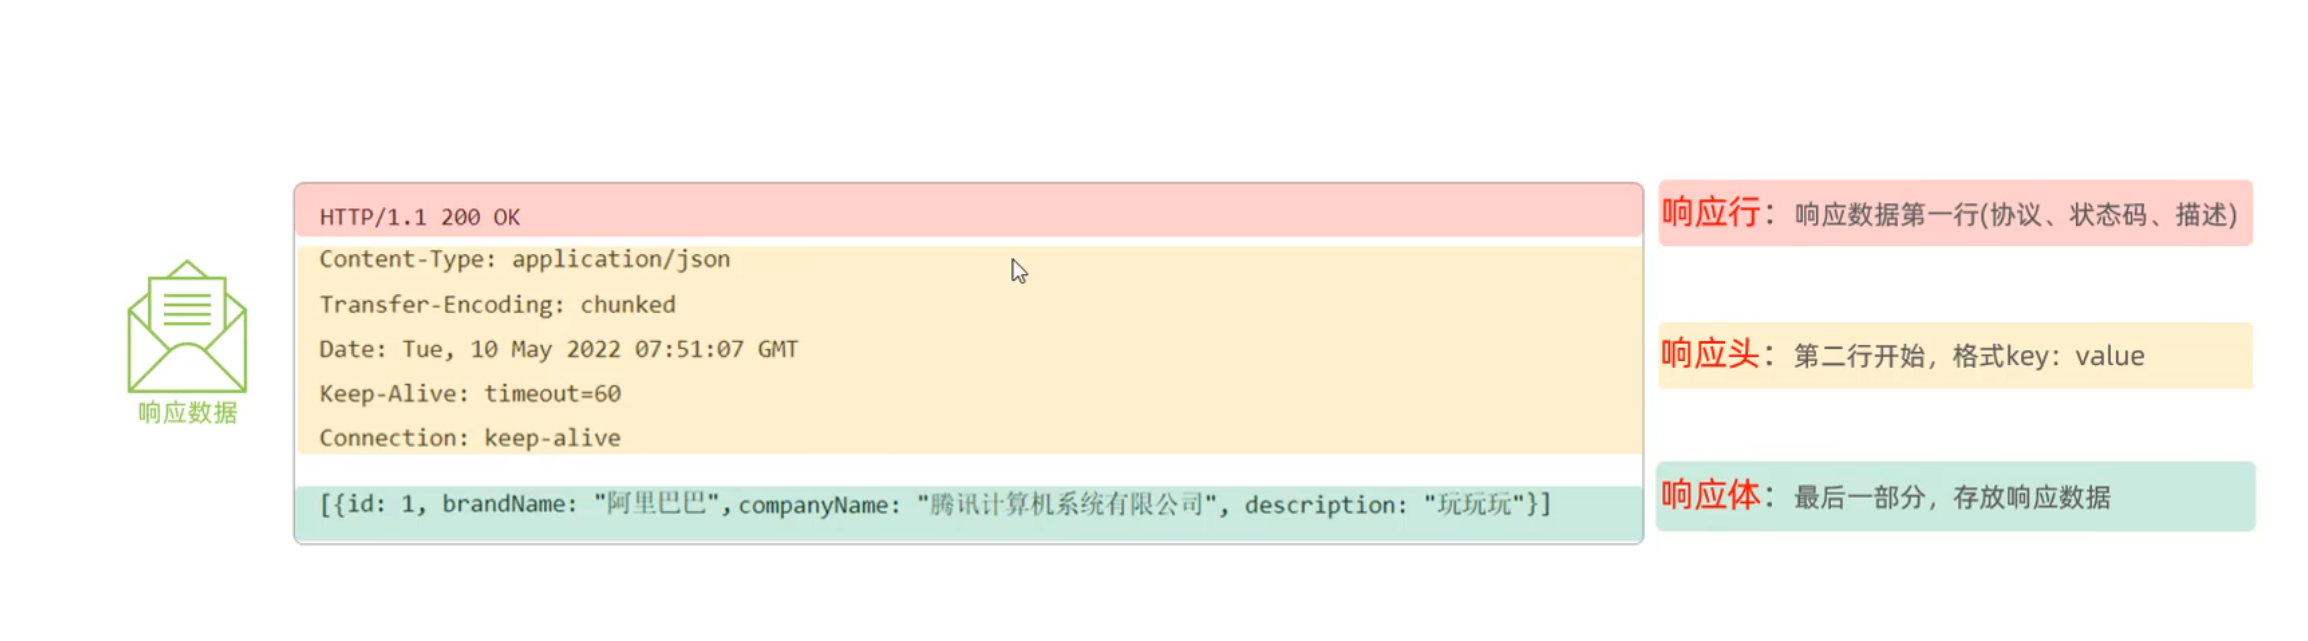
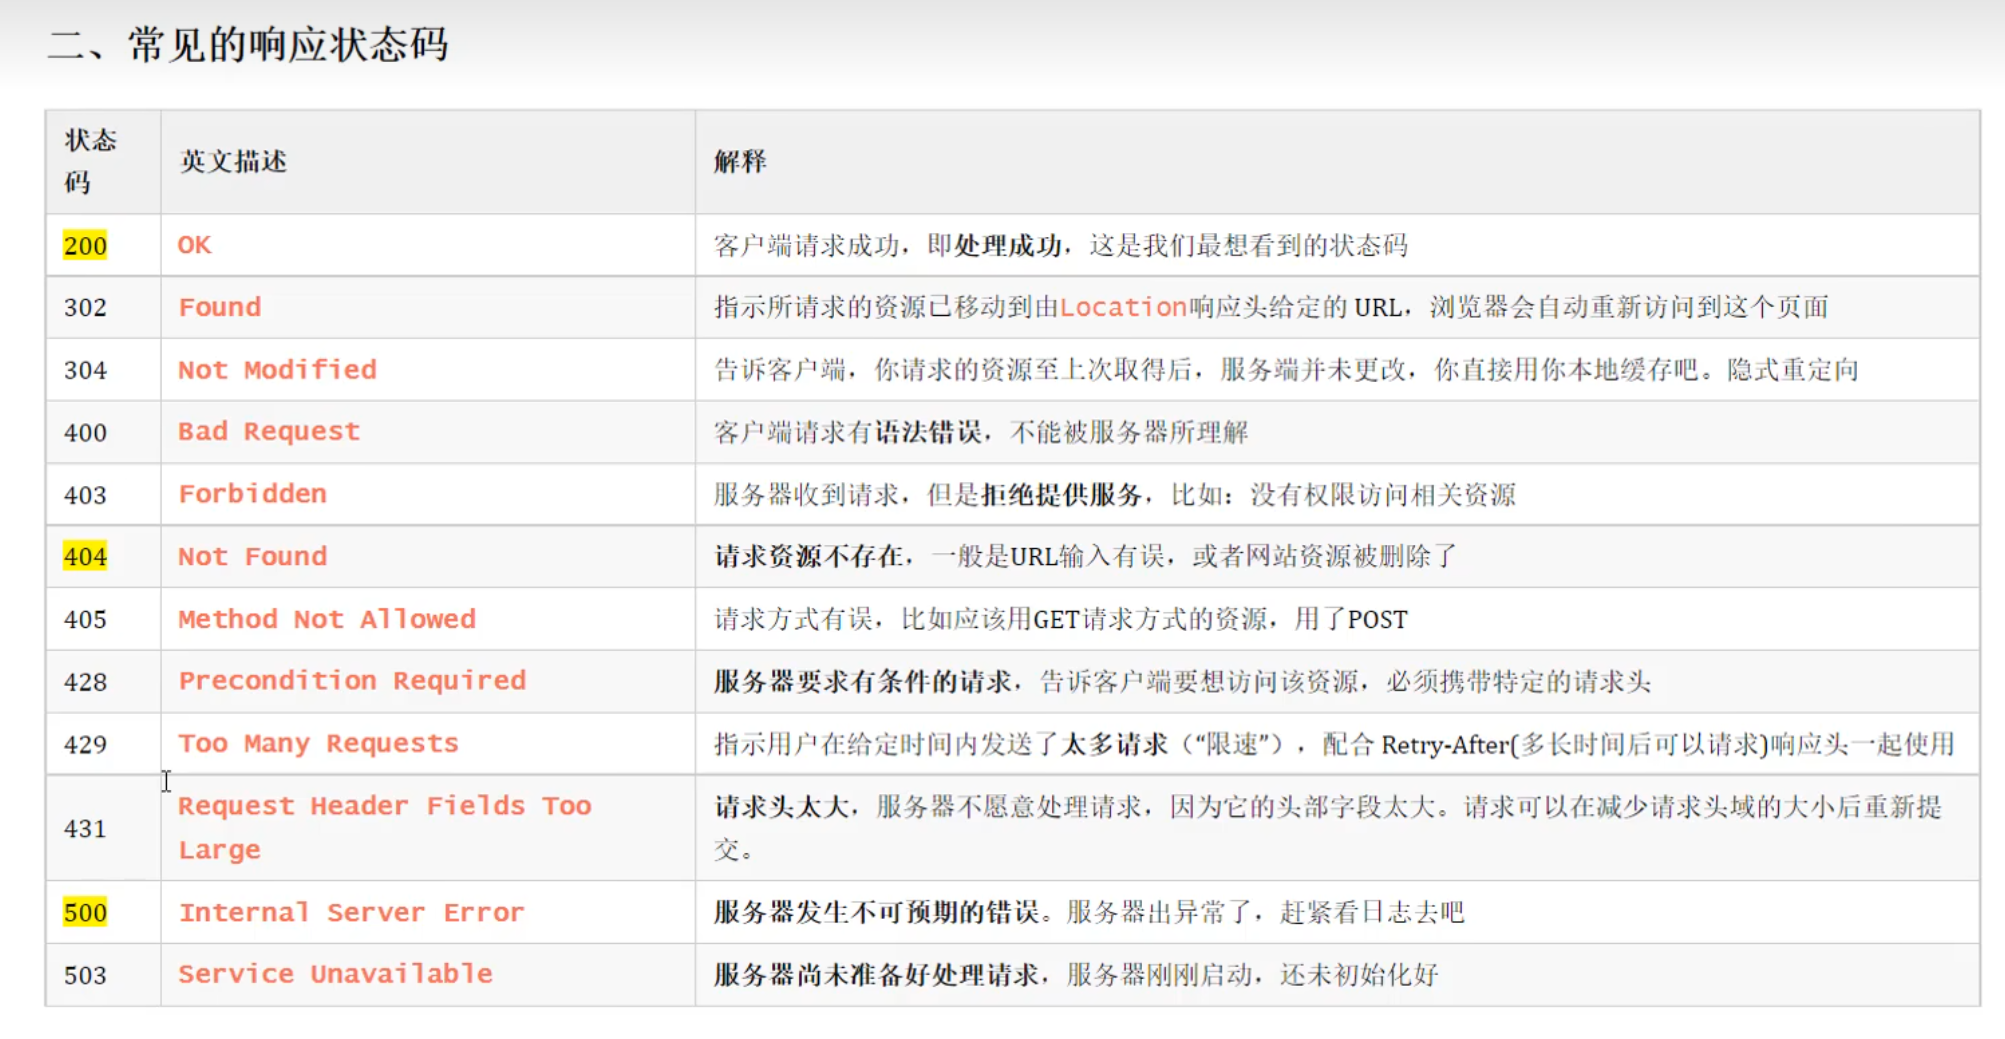
响应数据格式 相应行,响应头,响应体/响应正文
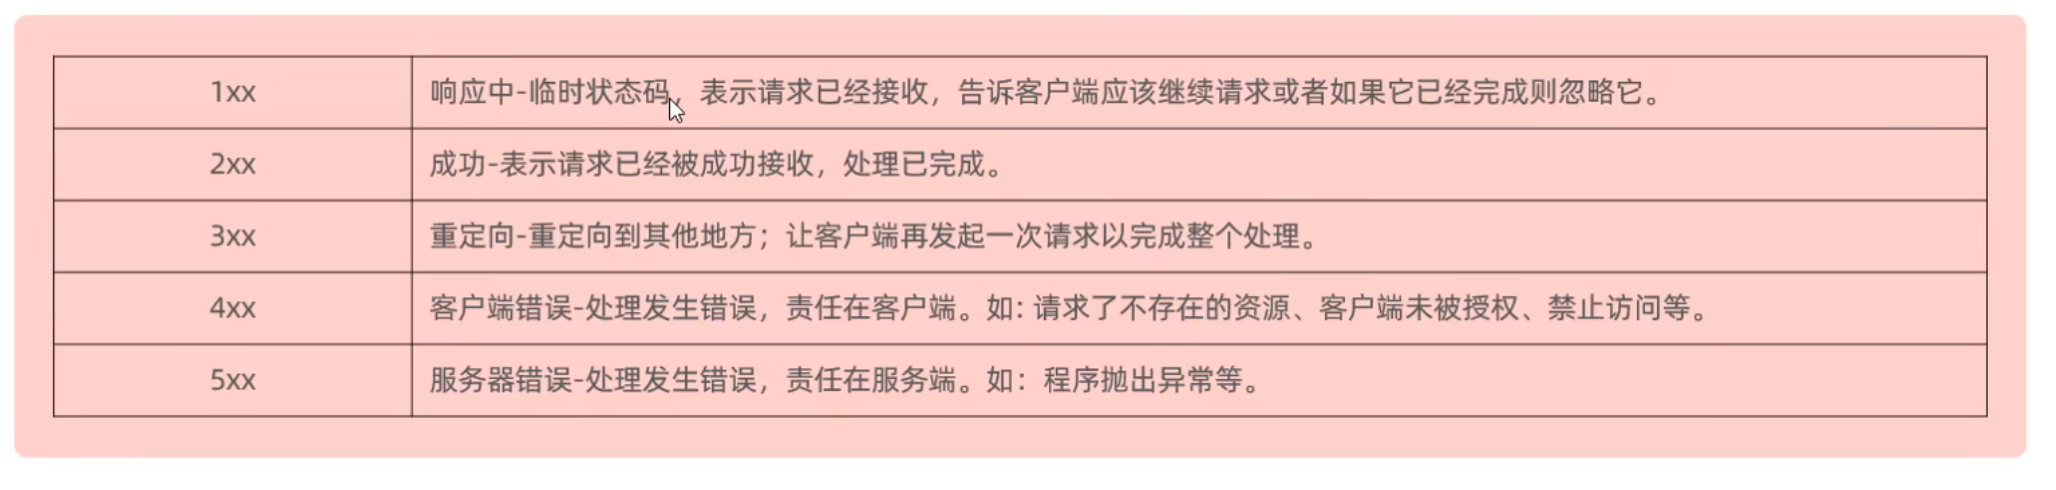
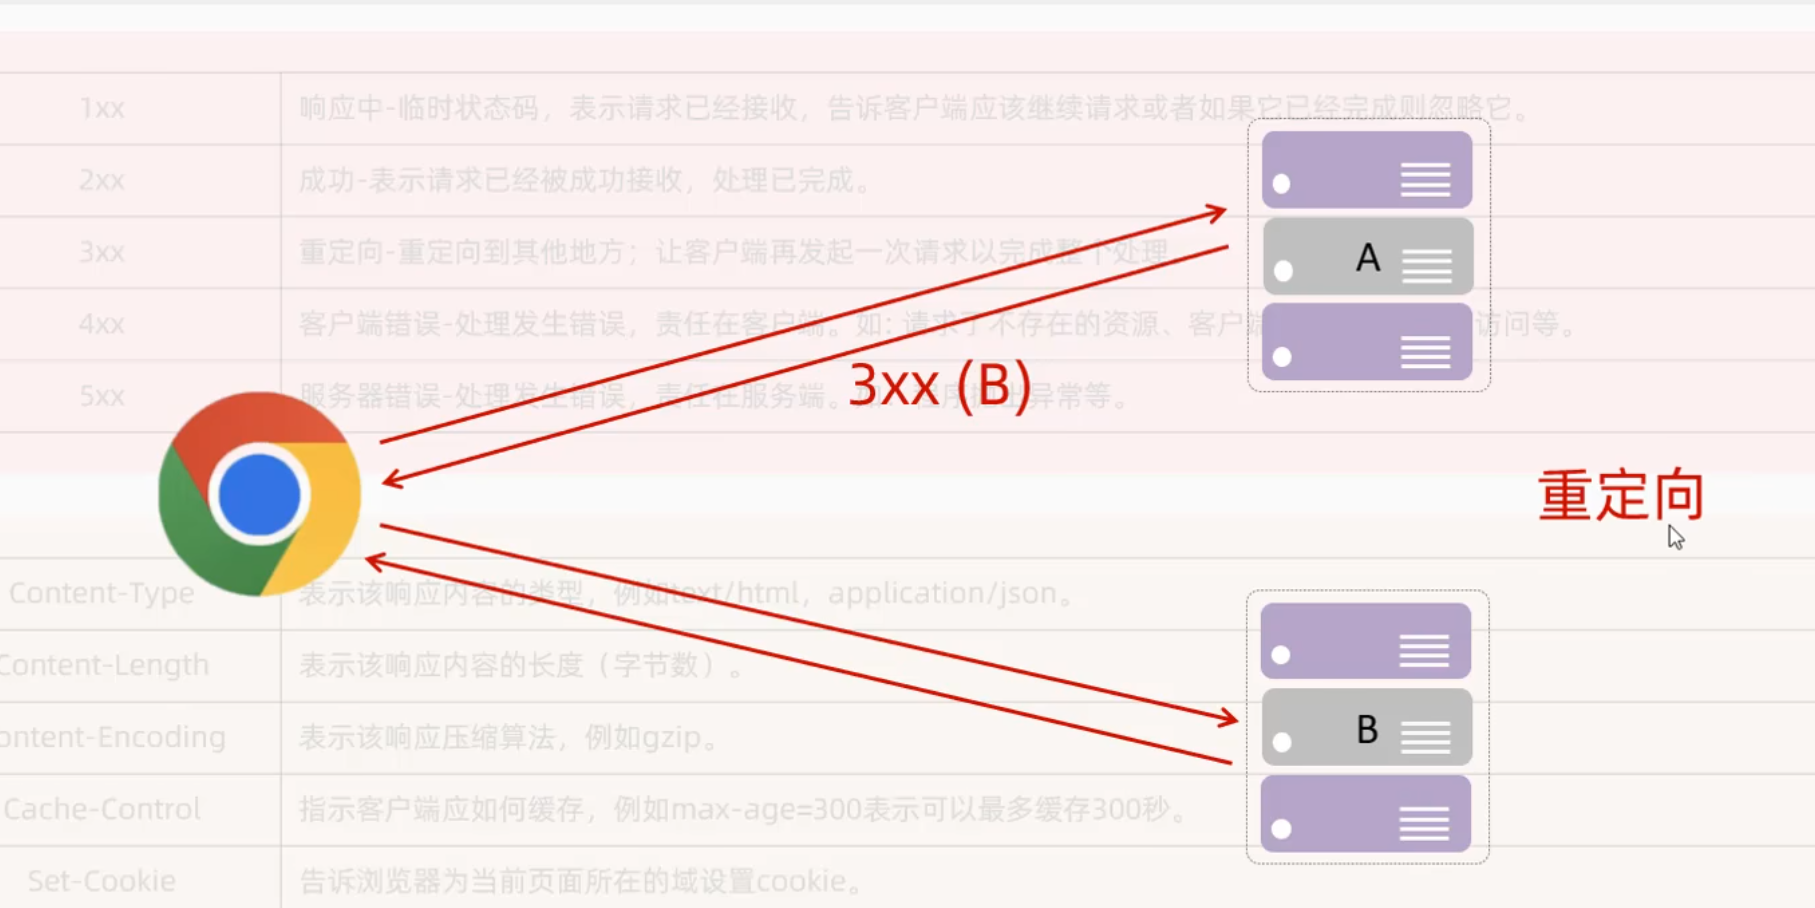
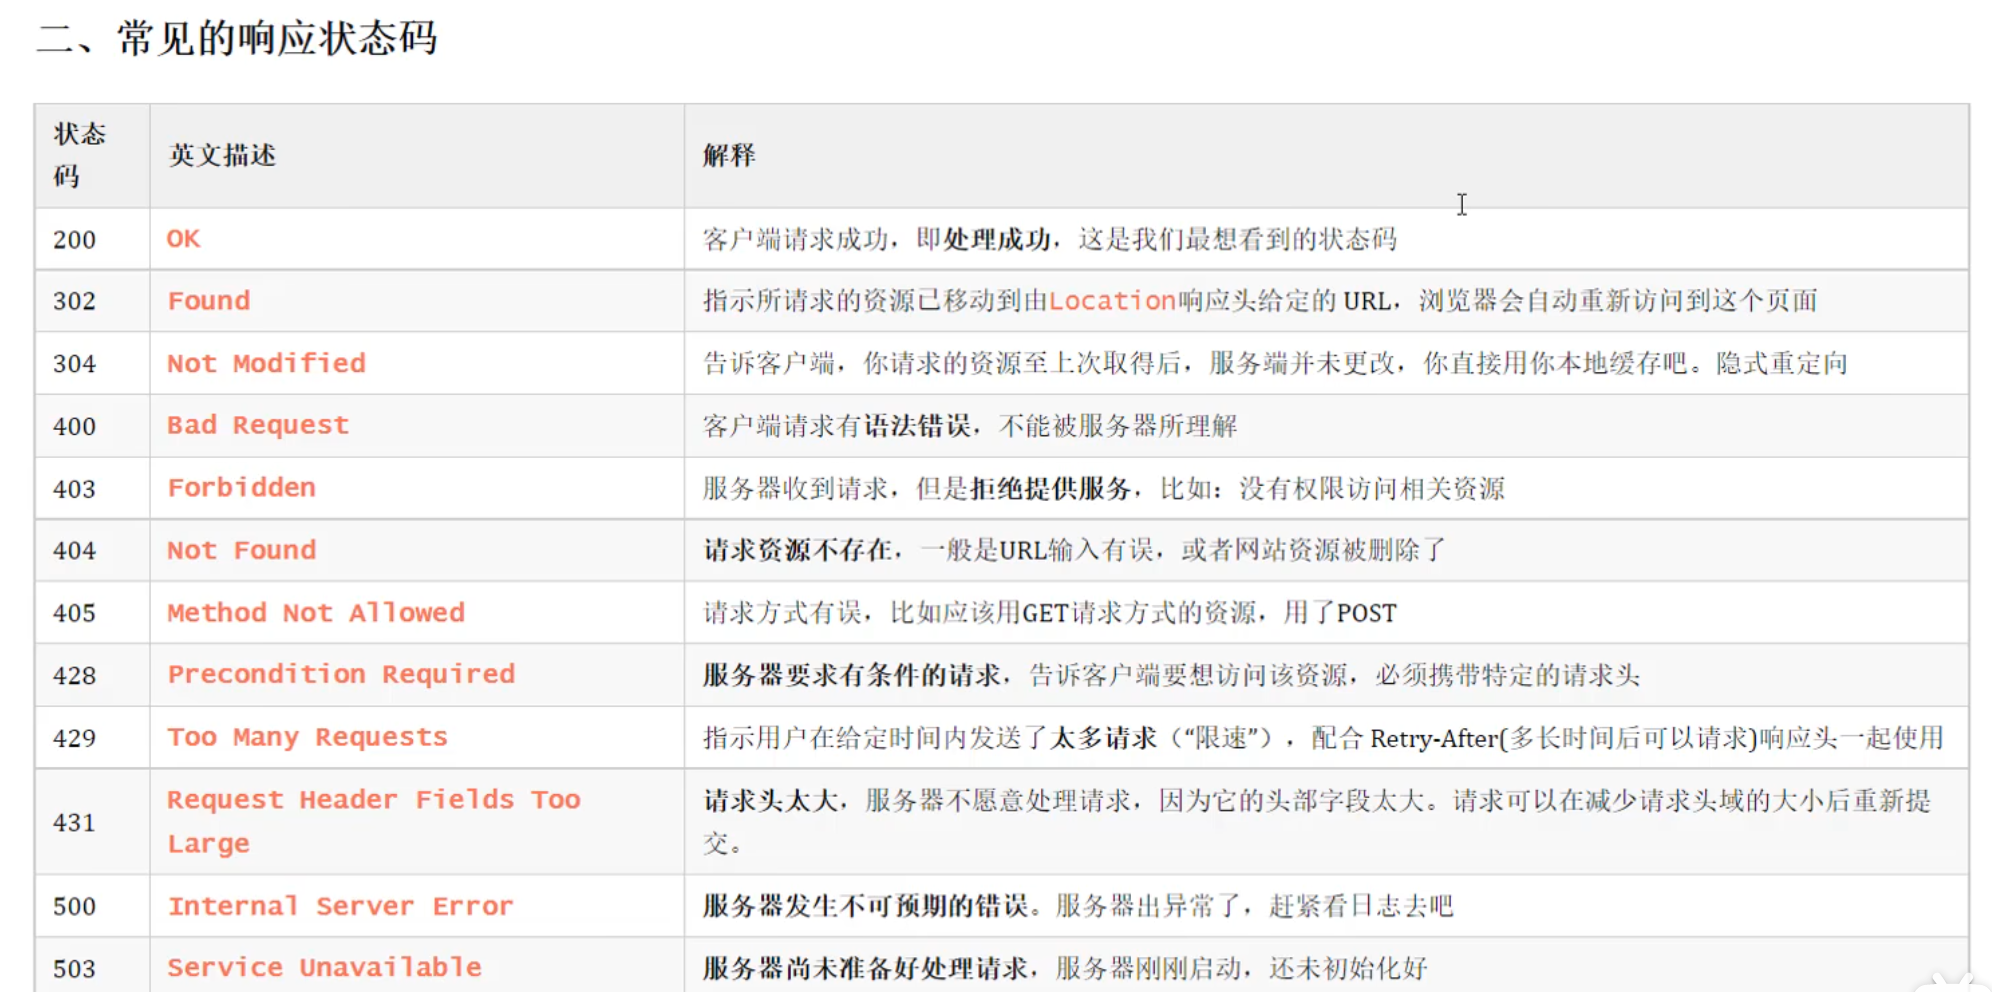
状态码
最常见:
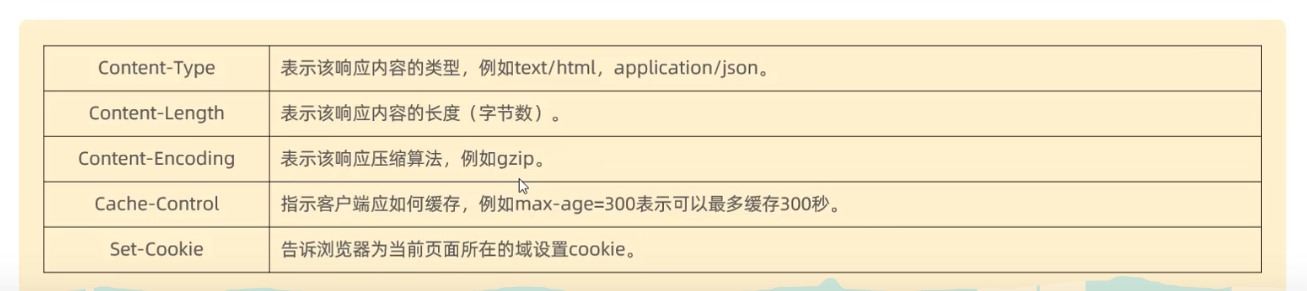
常见响应头
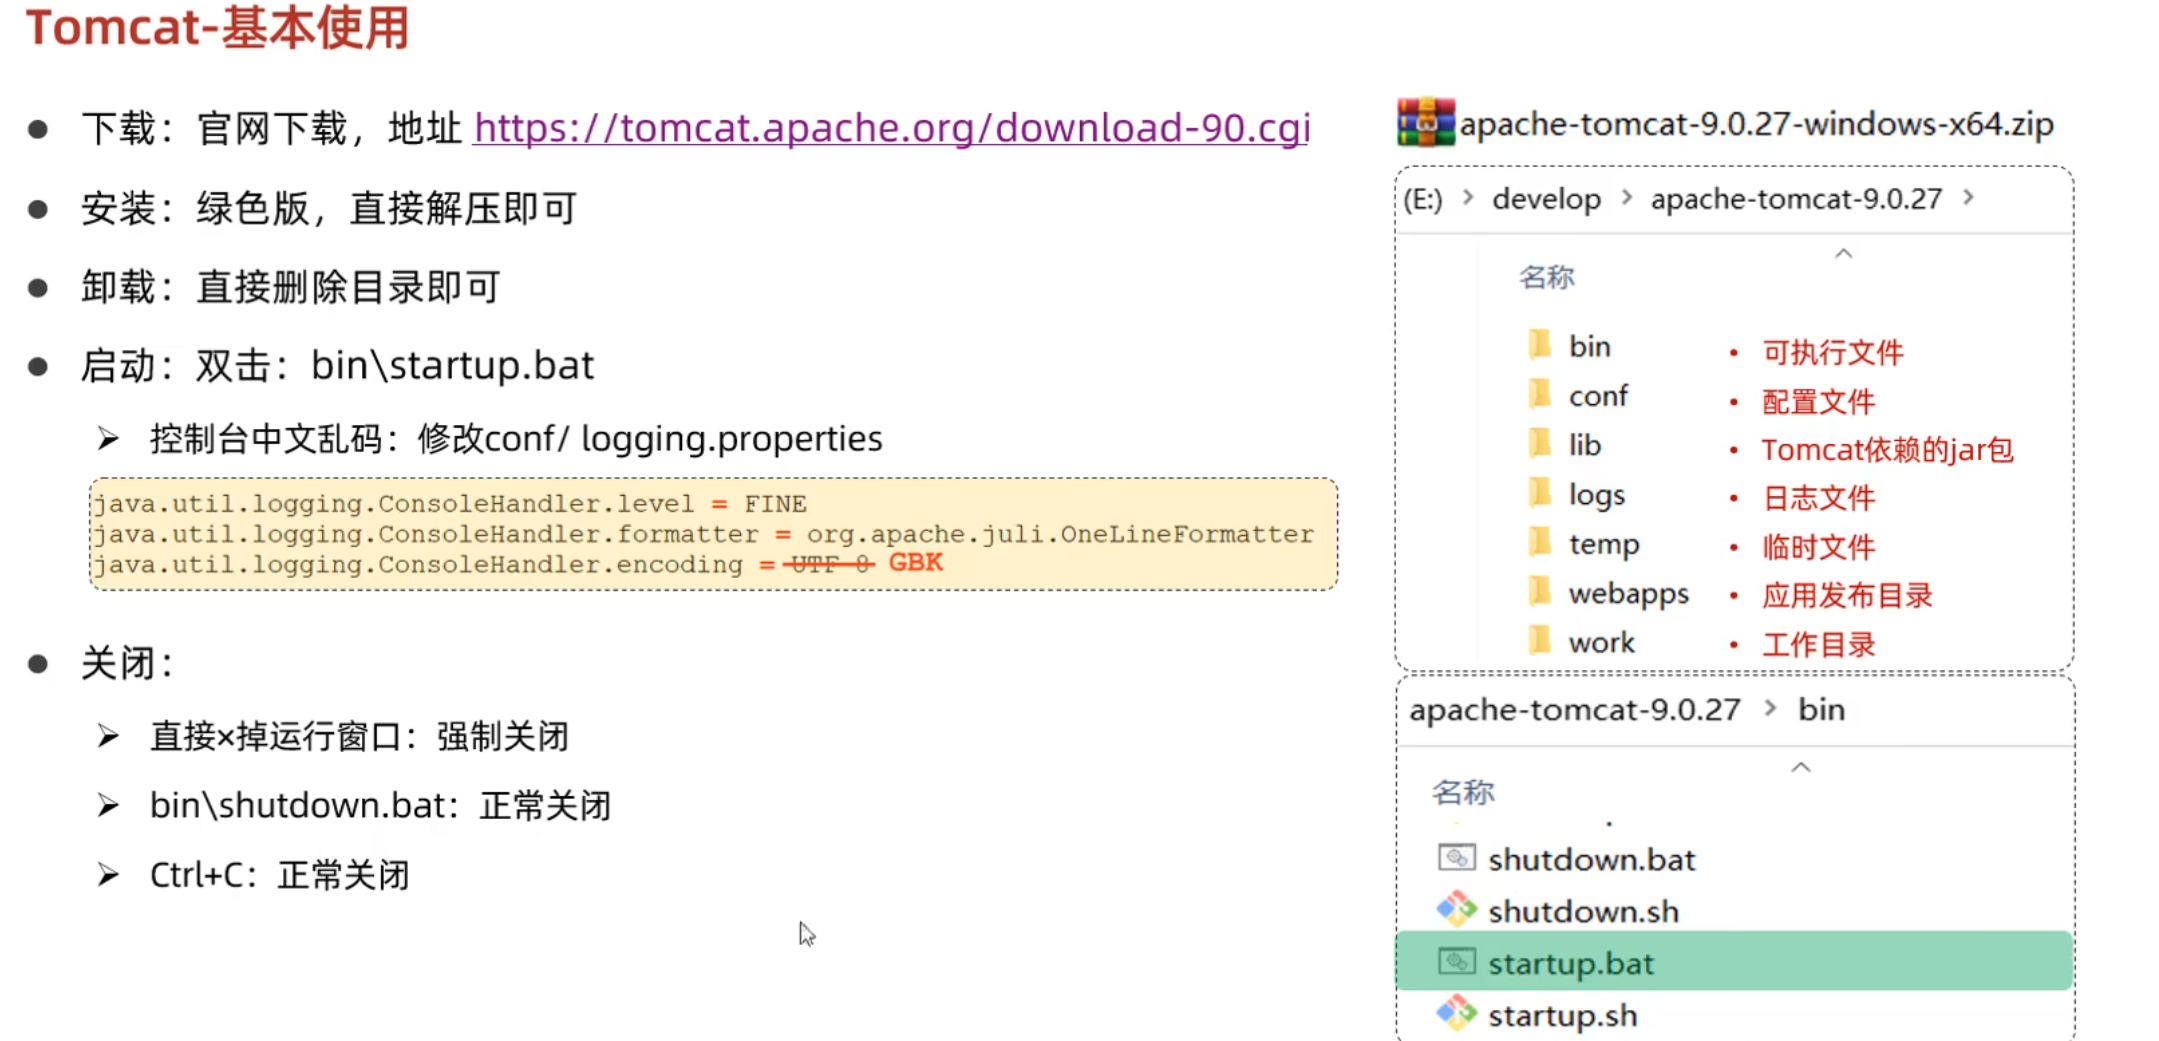
Web服务器-Tomcat
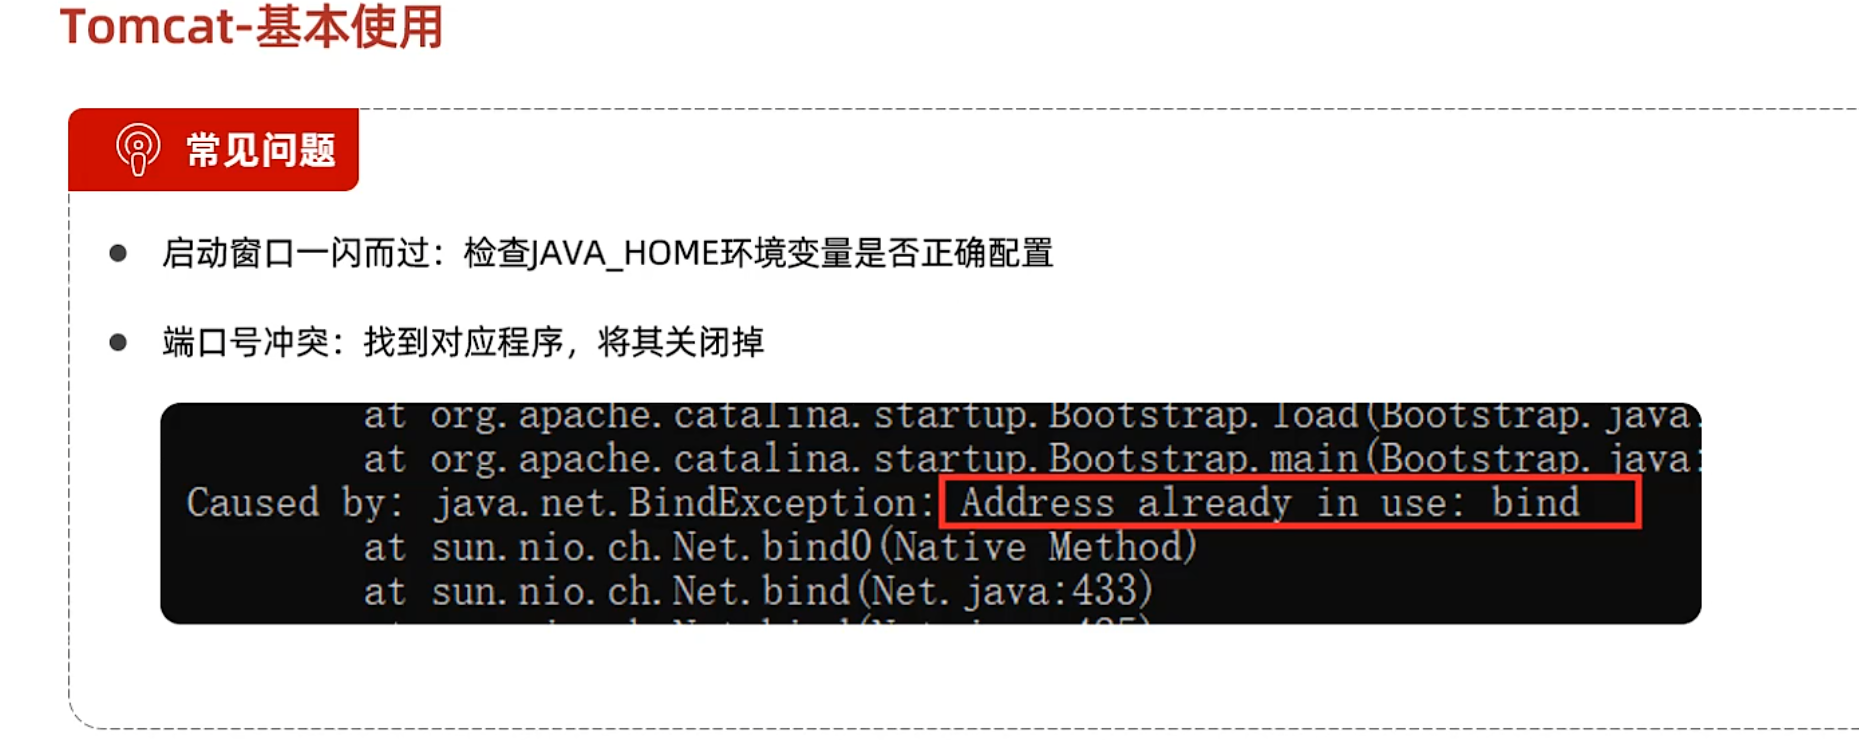
基本使用
端口冲突解决:
程序解析
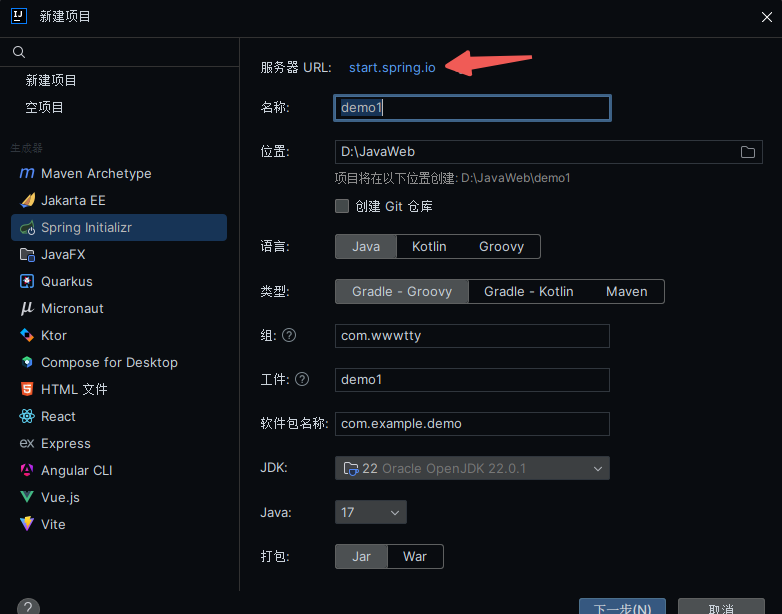
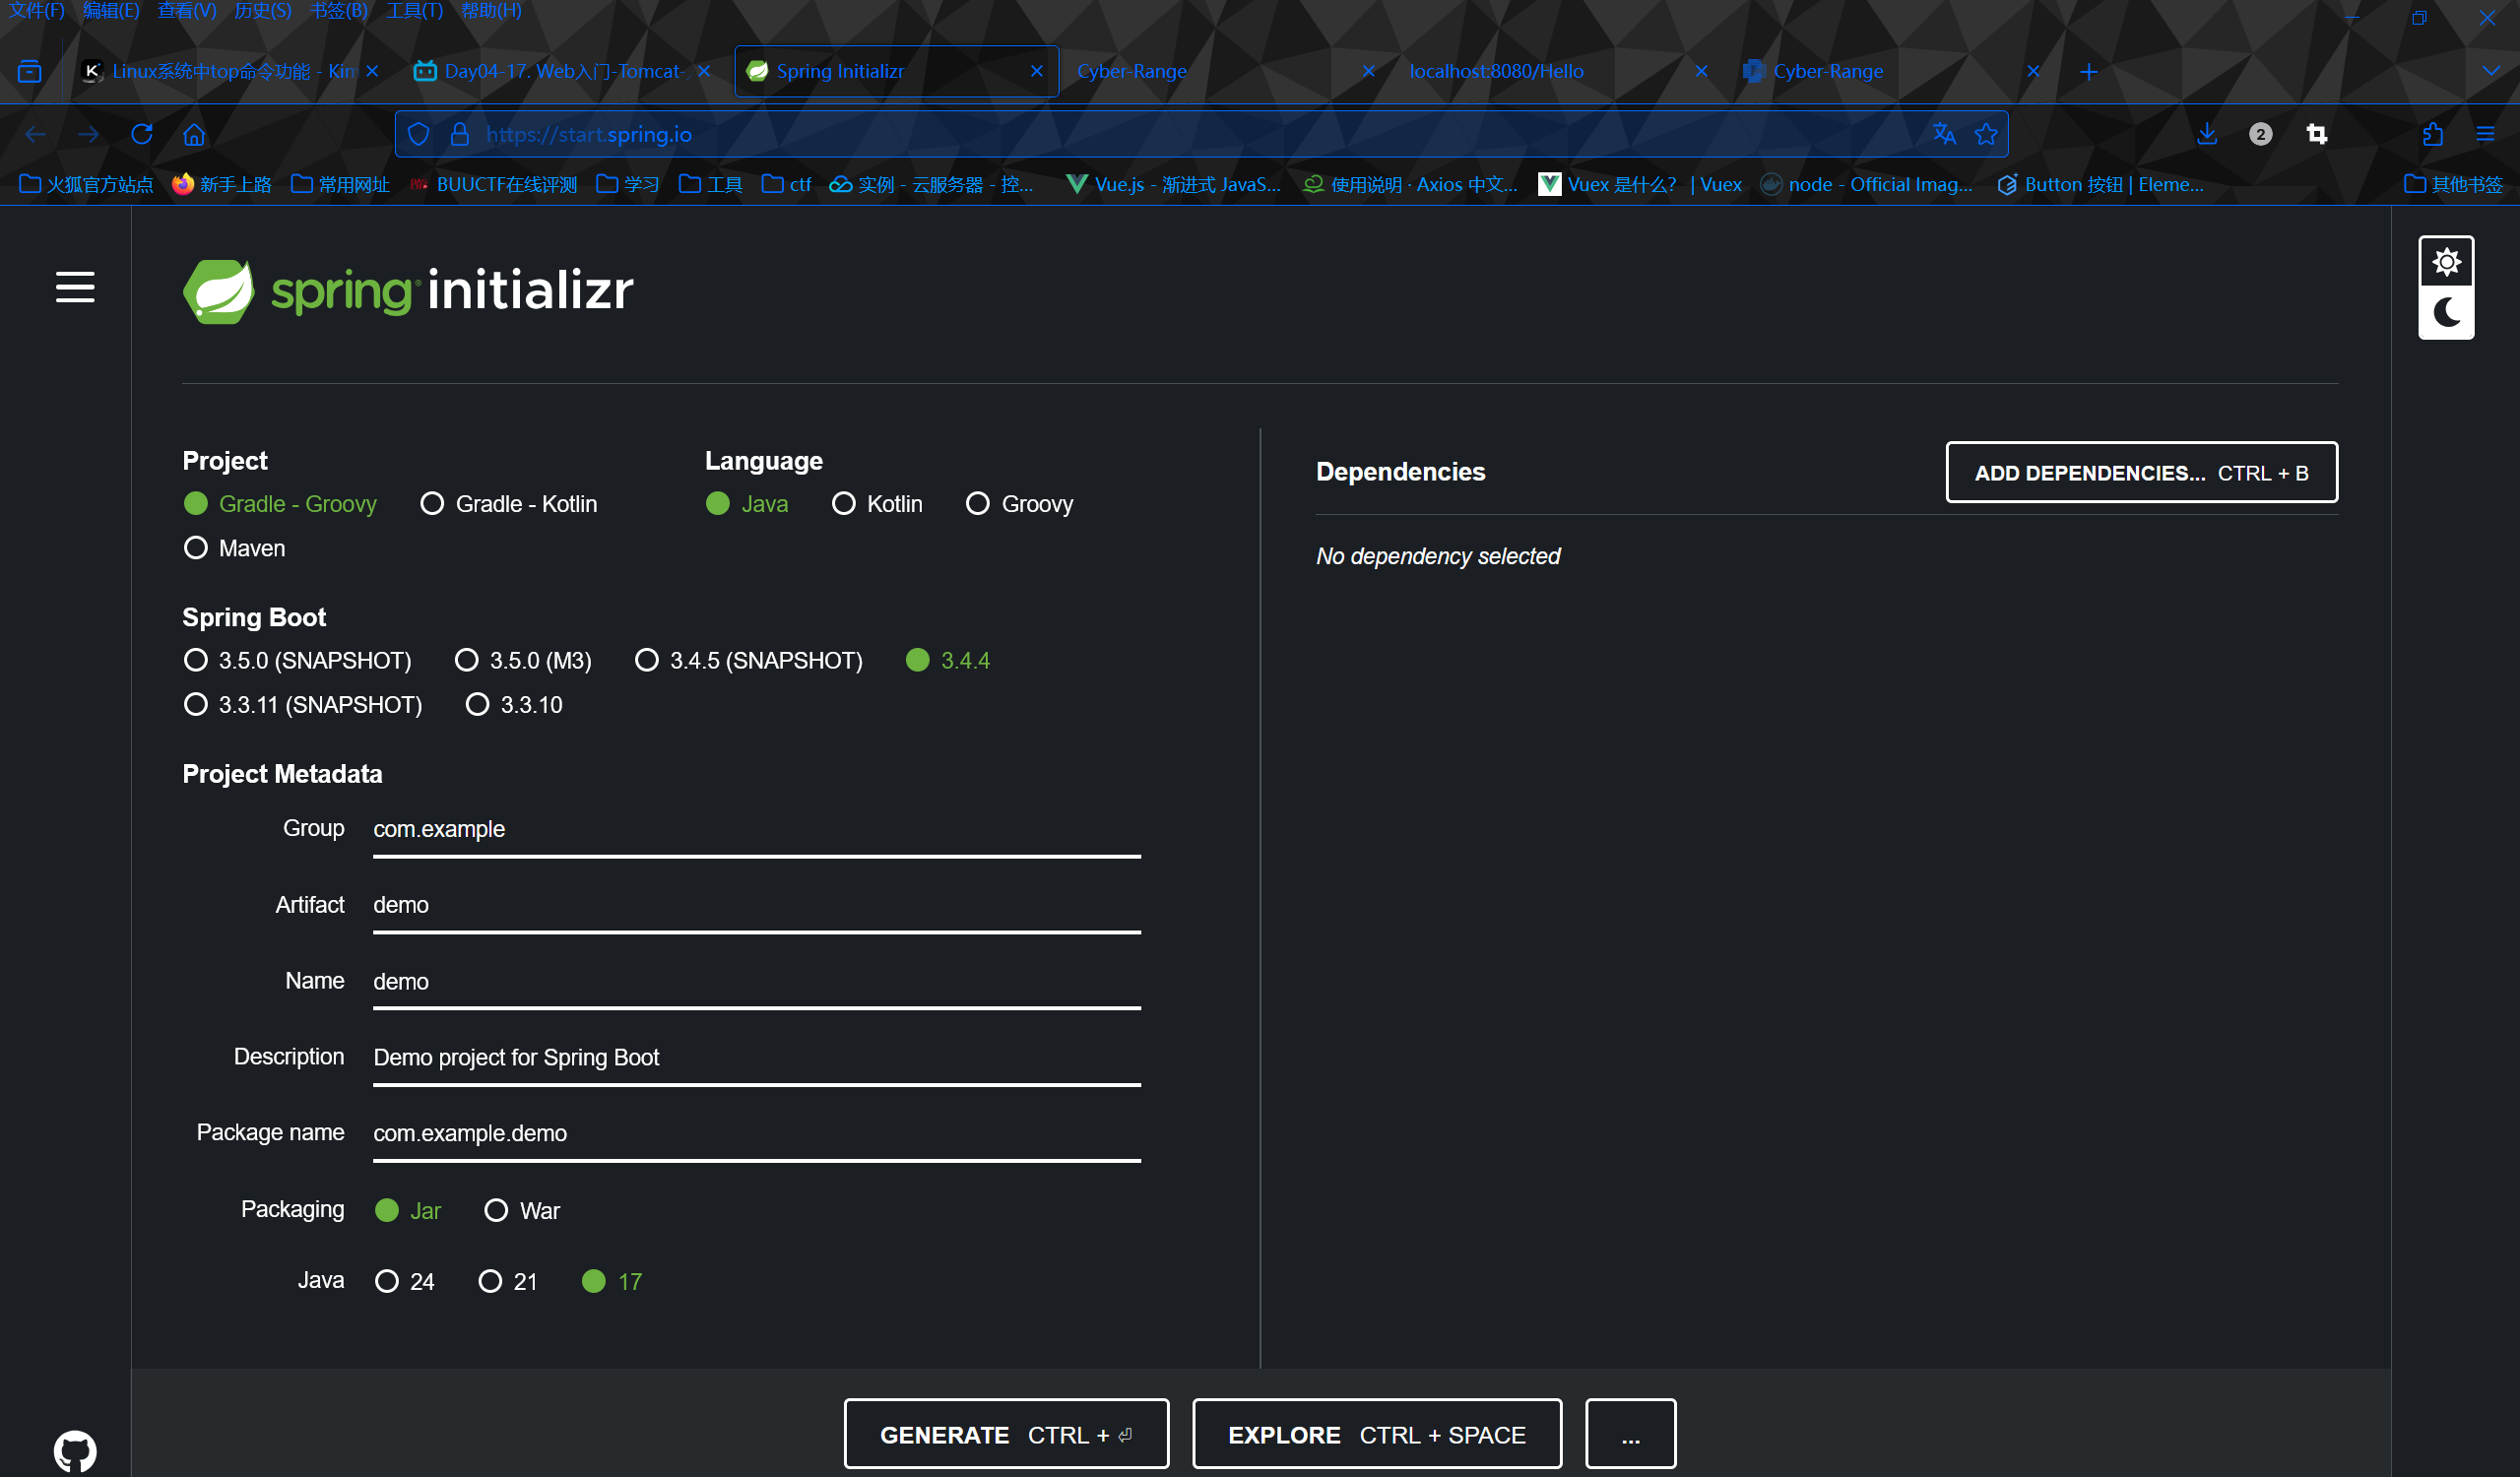
创建springboot项目时要关联start.spring.io,所以创建时需要联网
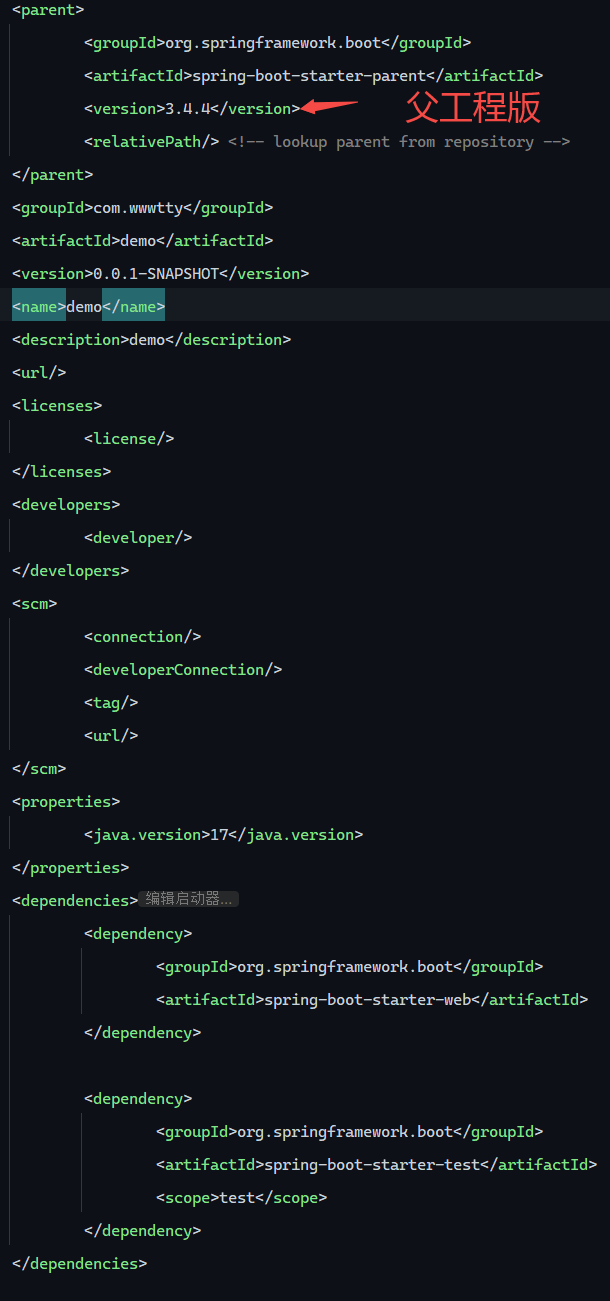
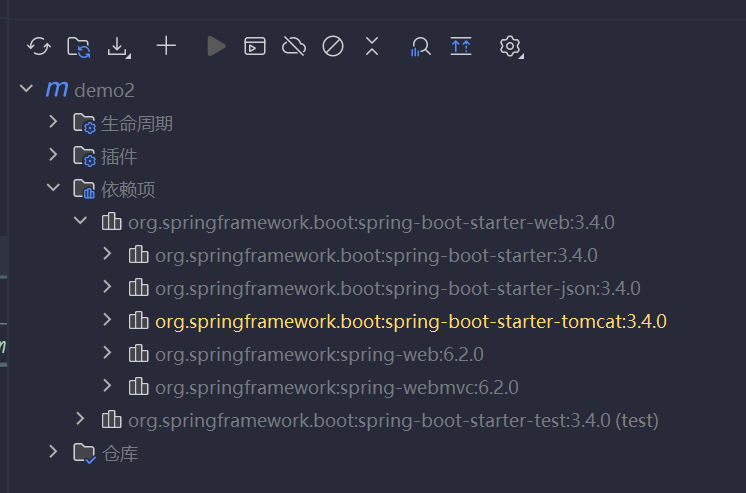
起步依赖的版本依赖于父工程,版本依赖于父工程版本
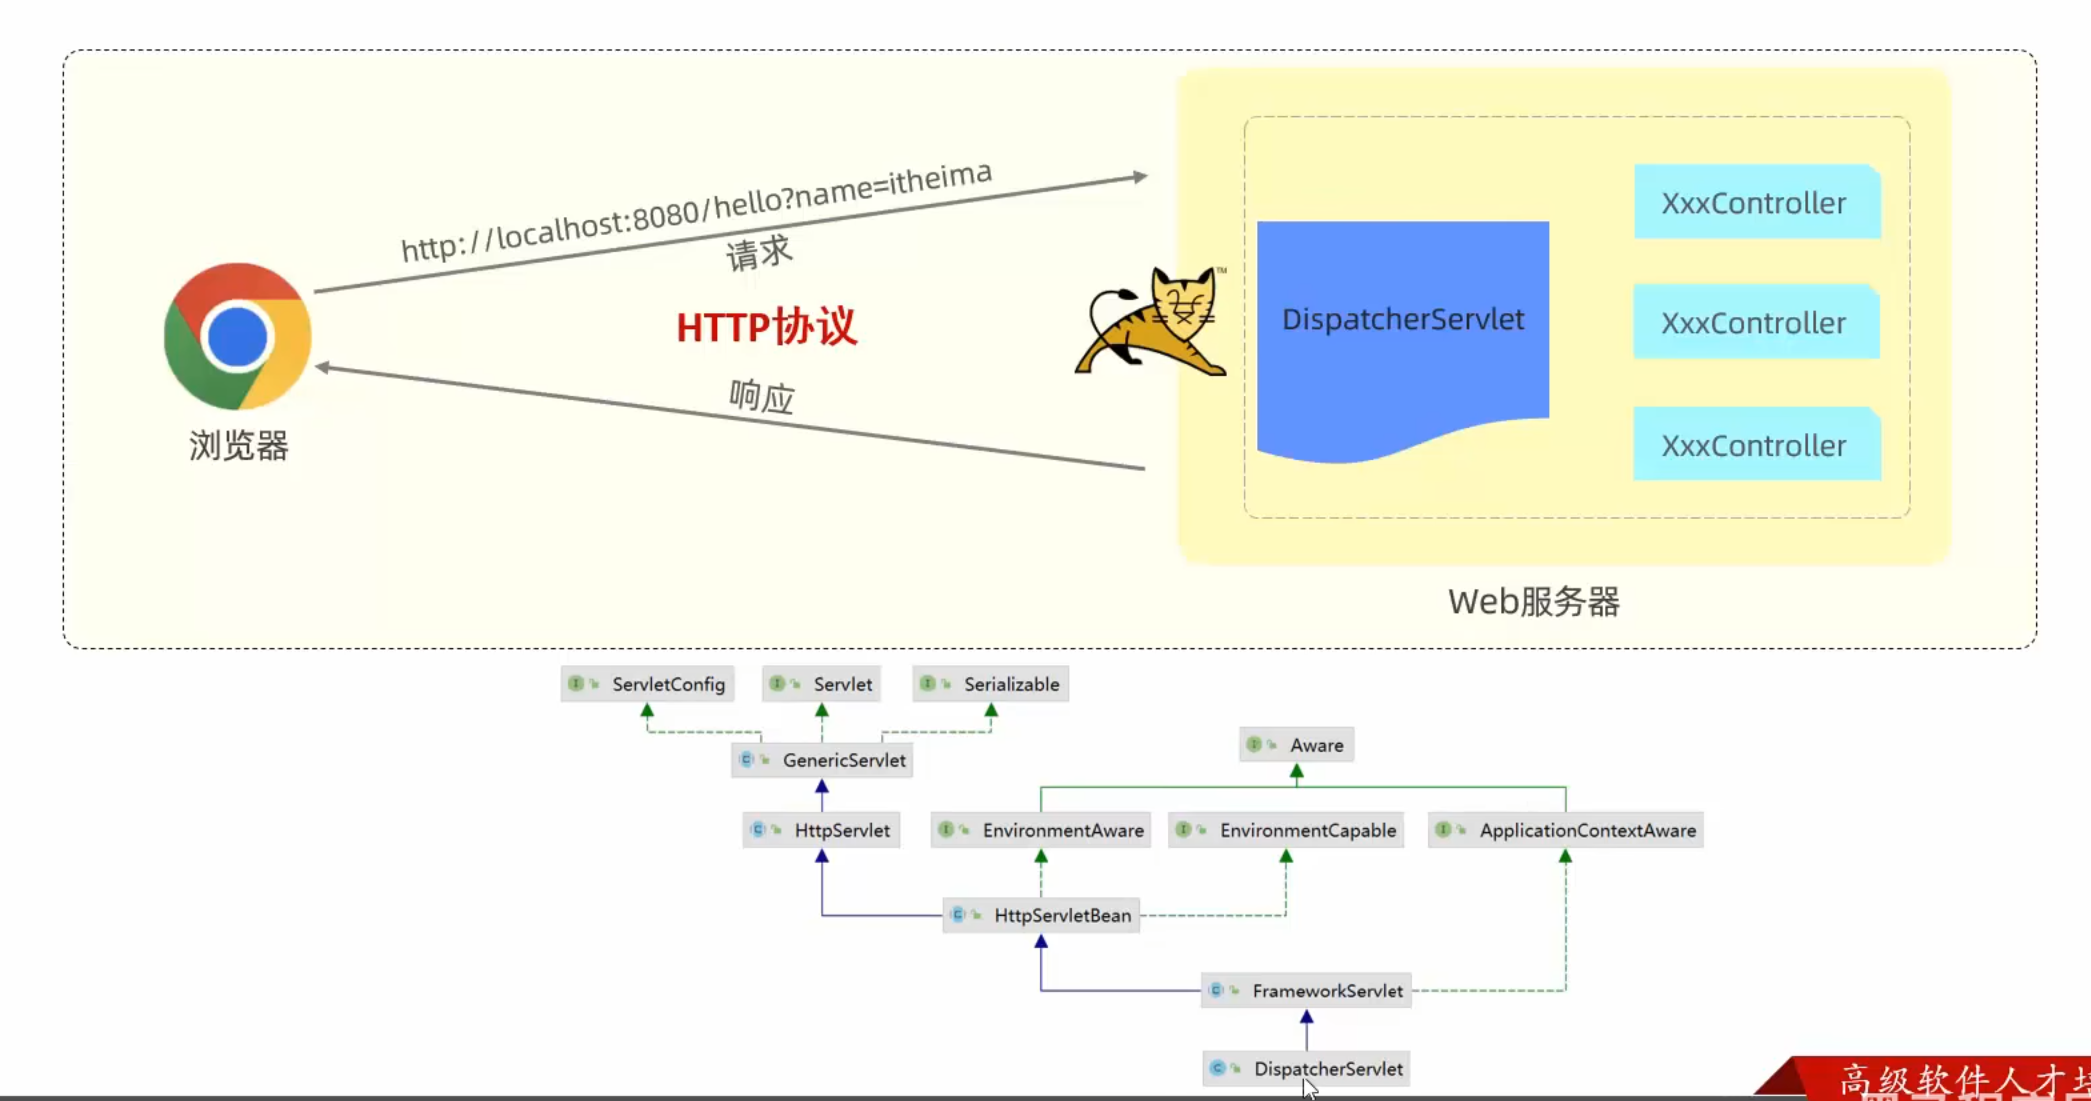
Spring Boot-Web的maven依赖中已经内嵌了tomcat
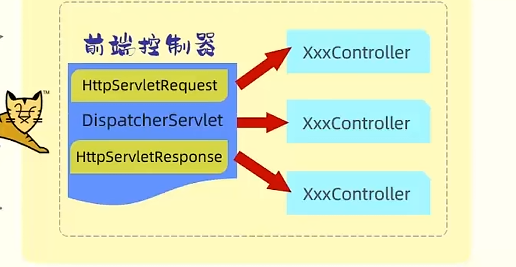
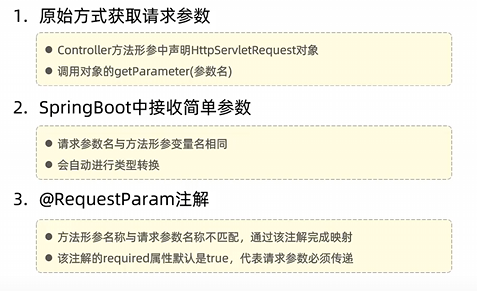
请求响应 请求
HttpServletRequest称为请求对象
HttpServletResponse称为响应对象
DispatcherServlet称为前端控制器/核心控制器
postman工具
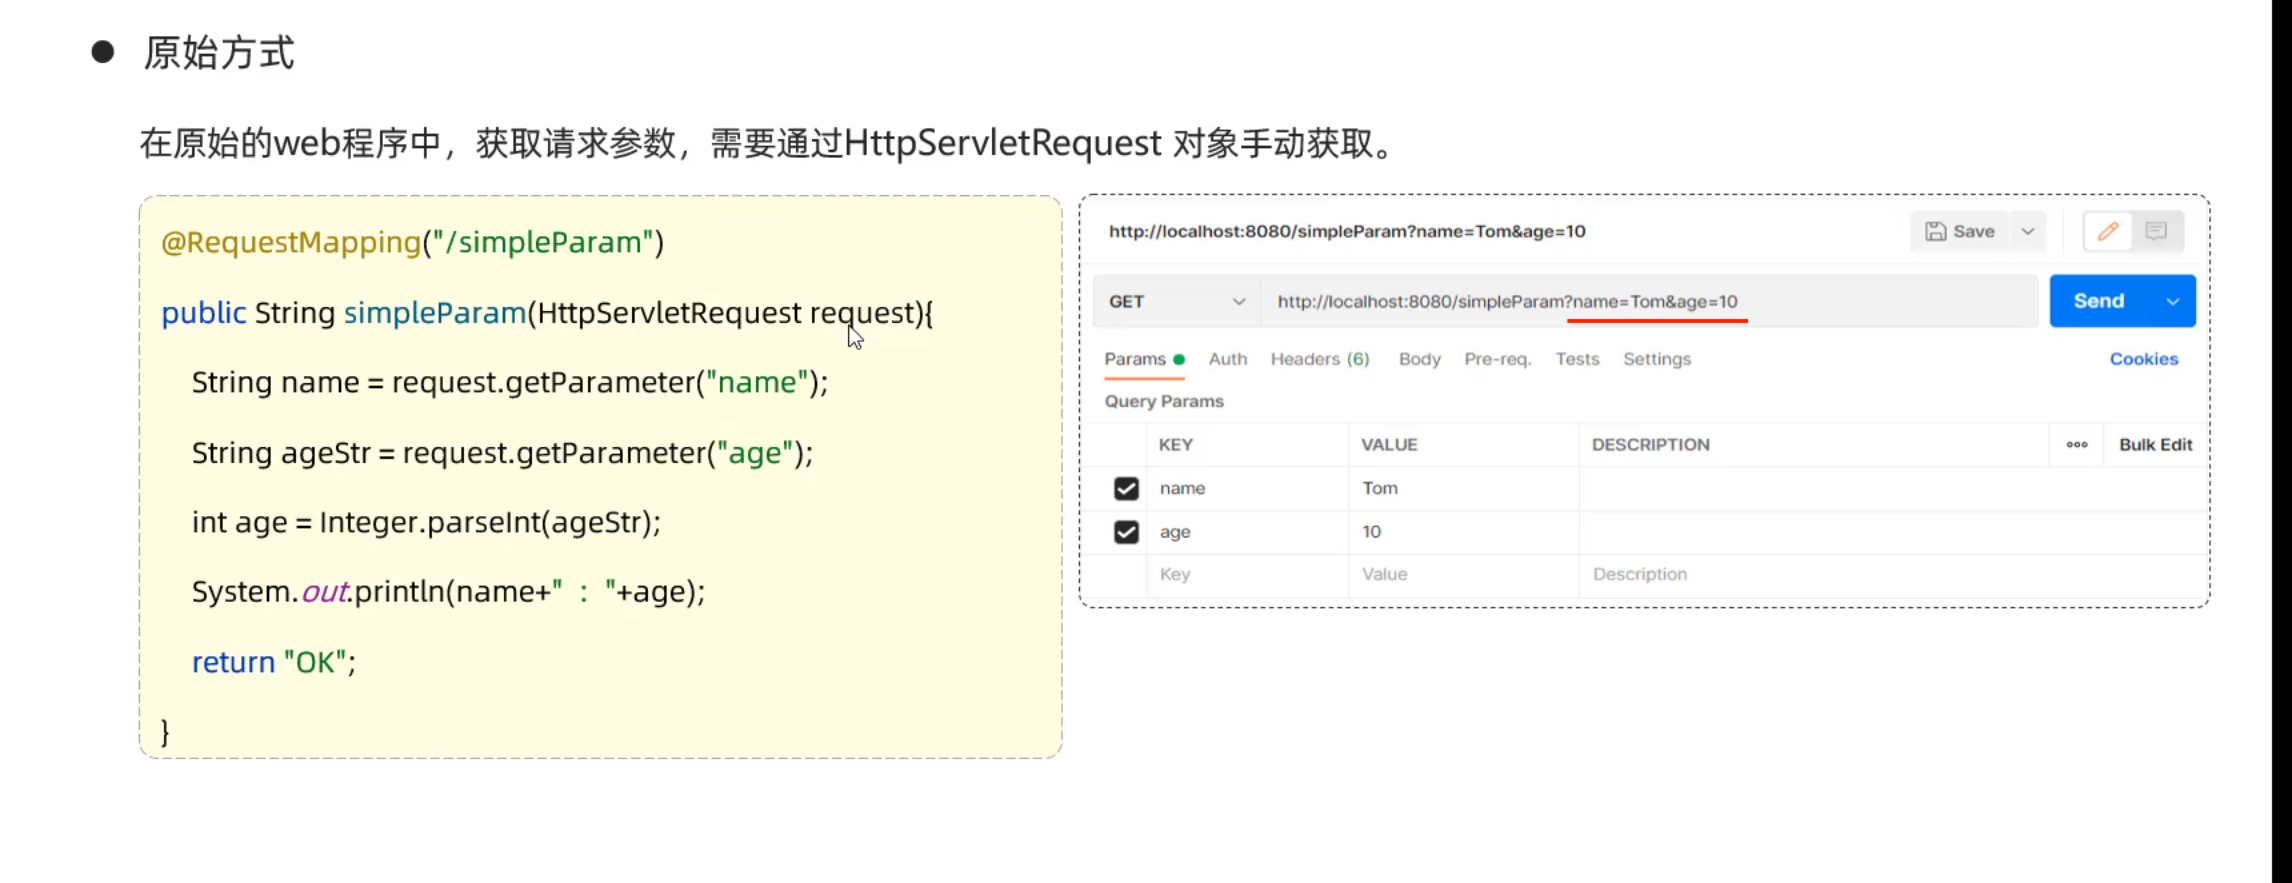
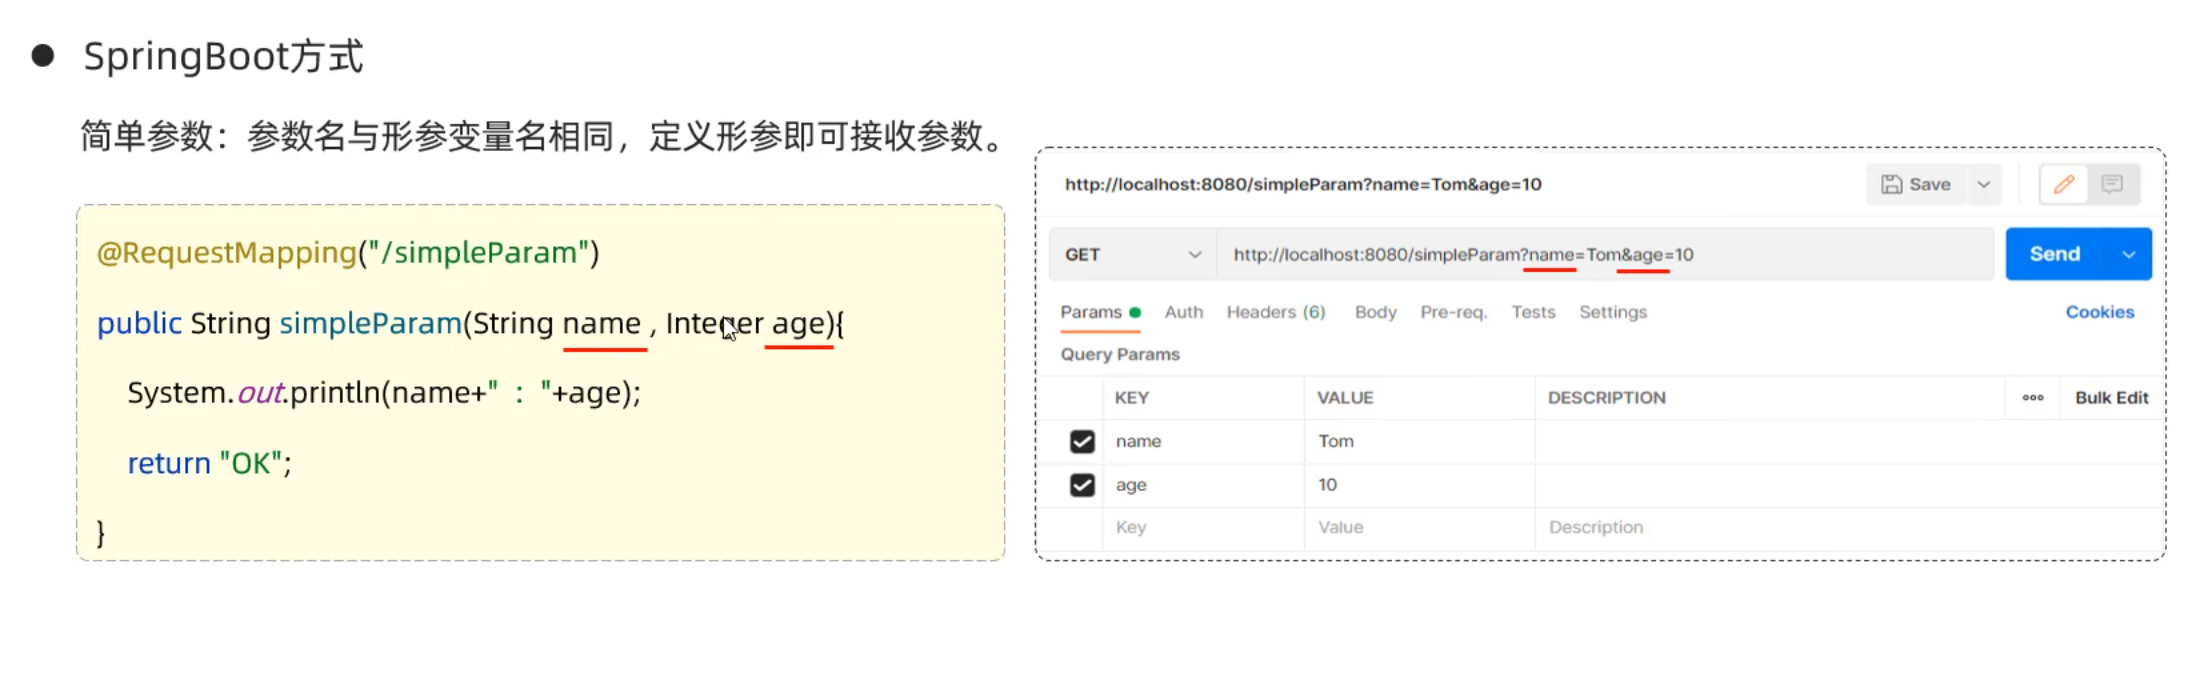
简单参数
1 2 3 4 5 6 7 8 9 10 11 12 13 14 15 package com.example.demo.controller;import org.springframework.web.bind.annotation.RequestMapping;import org.springframework.web.bind.annotation.RestController;@RestController public class RequestController { @RequestMapping("/Args") public String RequestController (String name,String passwd) { String response = name+':' +passwd; System.out.println(response); return response; } }
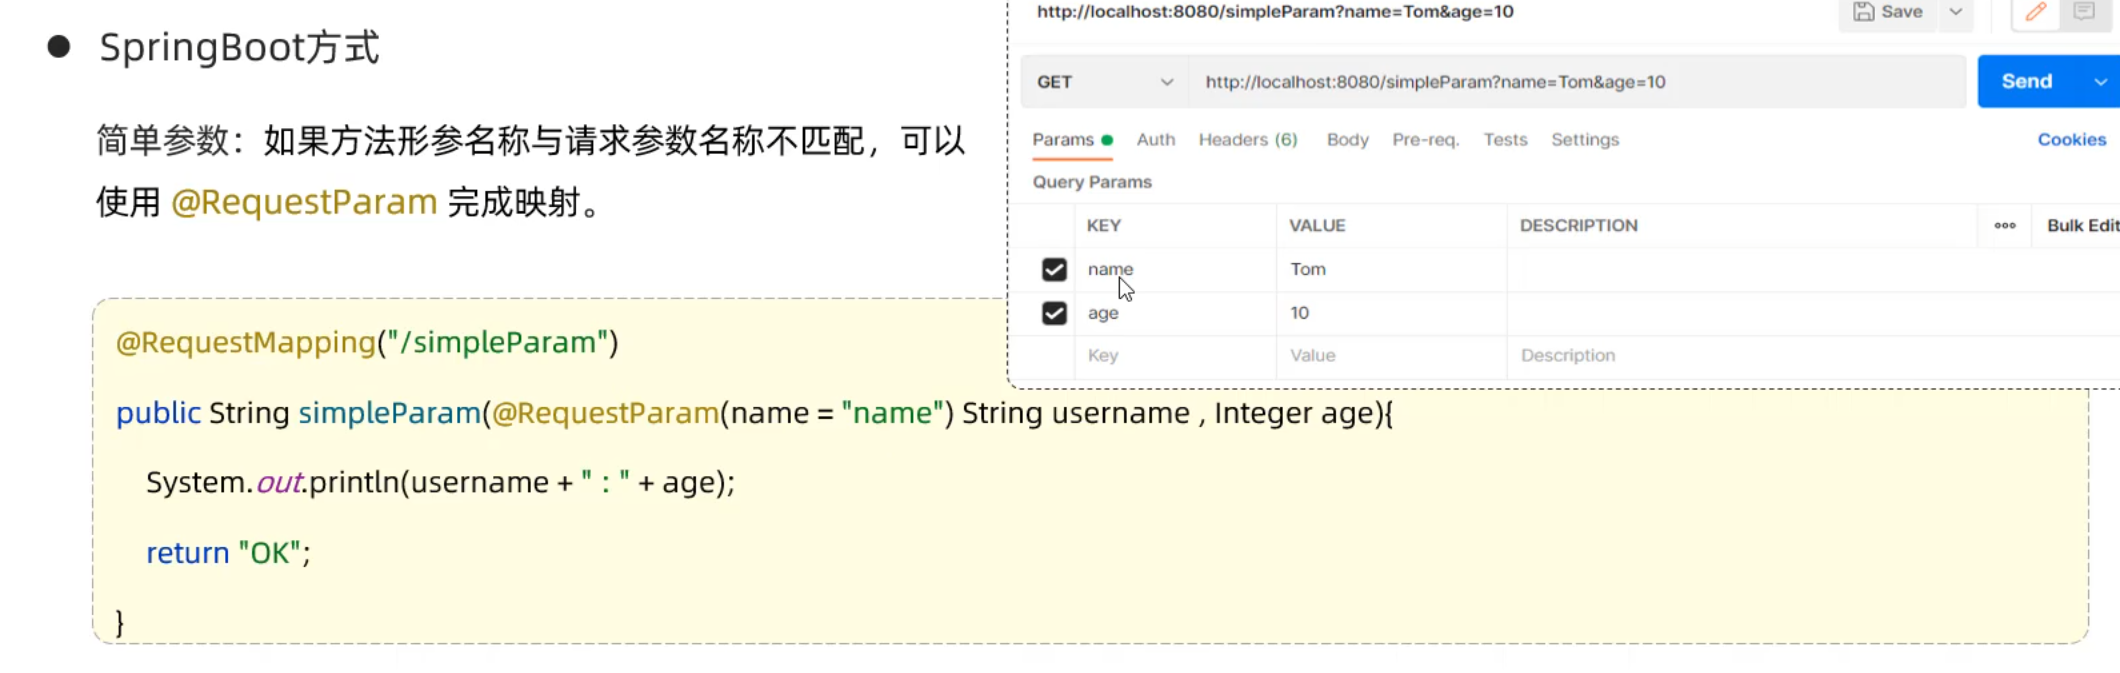
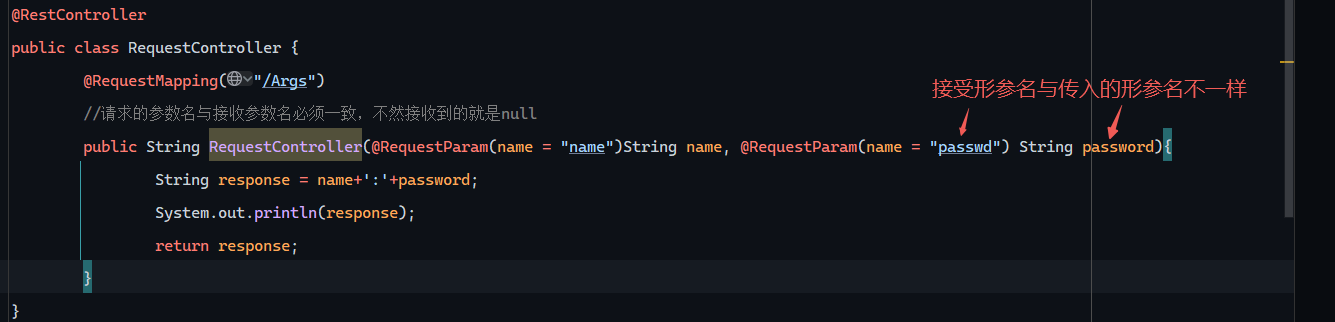
1 2 3 4 5 6 7 8 9 10 11 12 13 14 15 16 package com.example.demo.controller;import org.springframework.web.bind.annotation.RequestMapping;import org.springframework.web.bind.annotation.RequestParam;import org.springframework.web.bind.annotation.RestController;@RestController public class RequestController { @RequestMapping("/Args") public String RequestController (@RequestParam(name = "name",required = true) String name, @RequestParam(name = "passwd") String password) { String response = name+':' +password; System.out.println(response); return response; } }
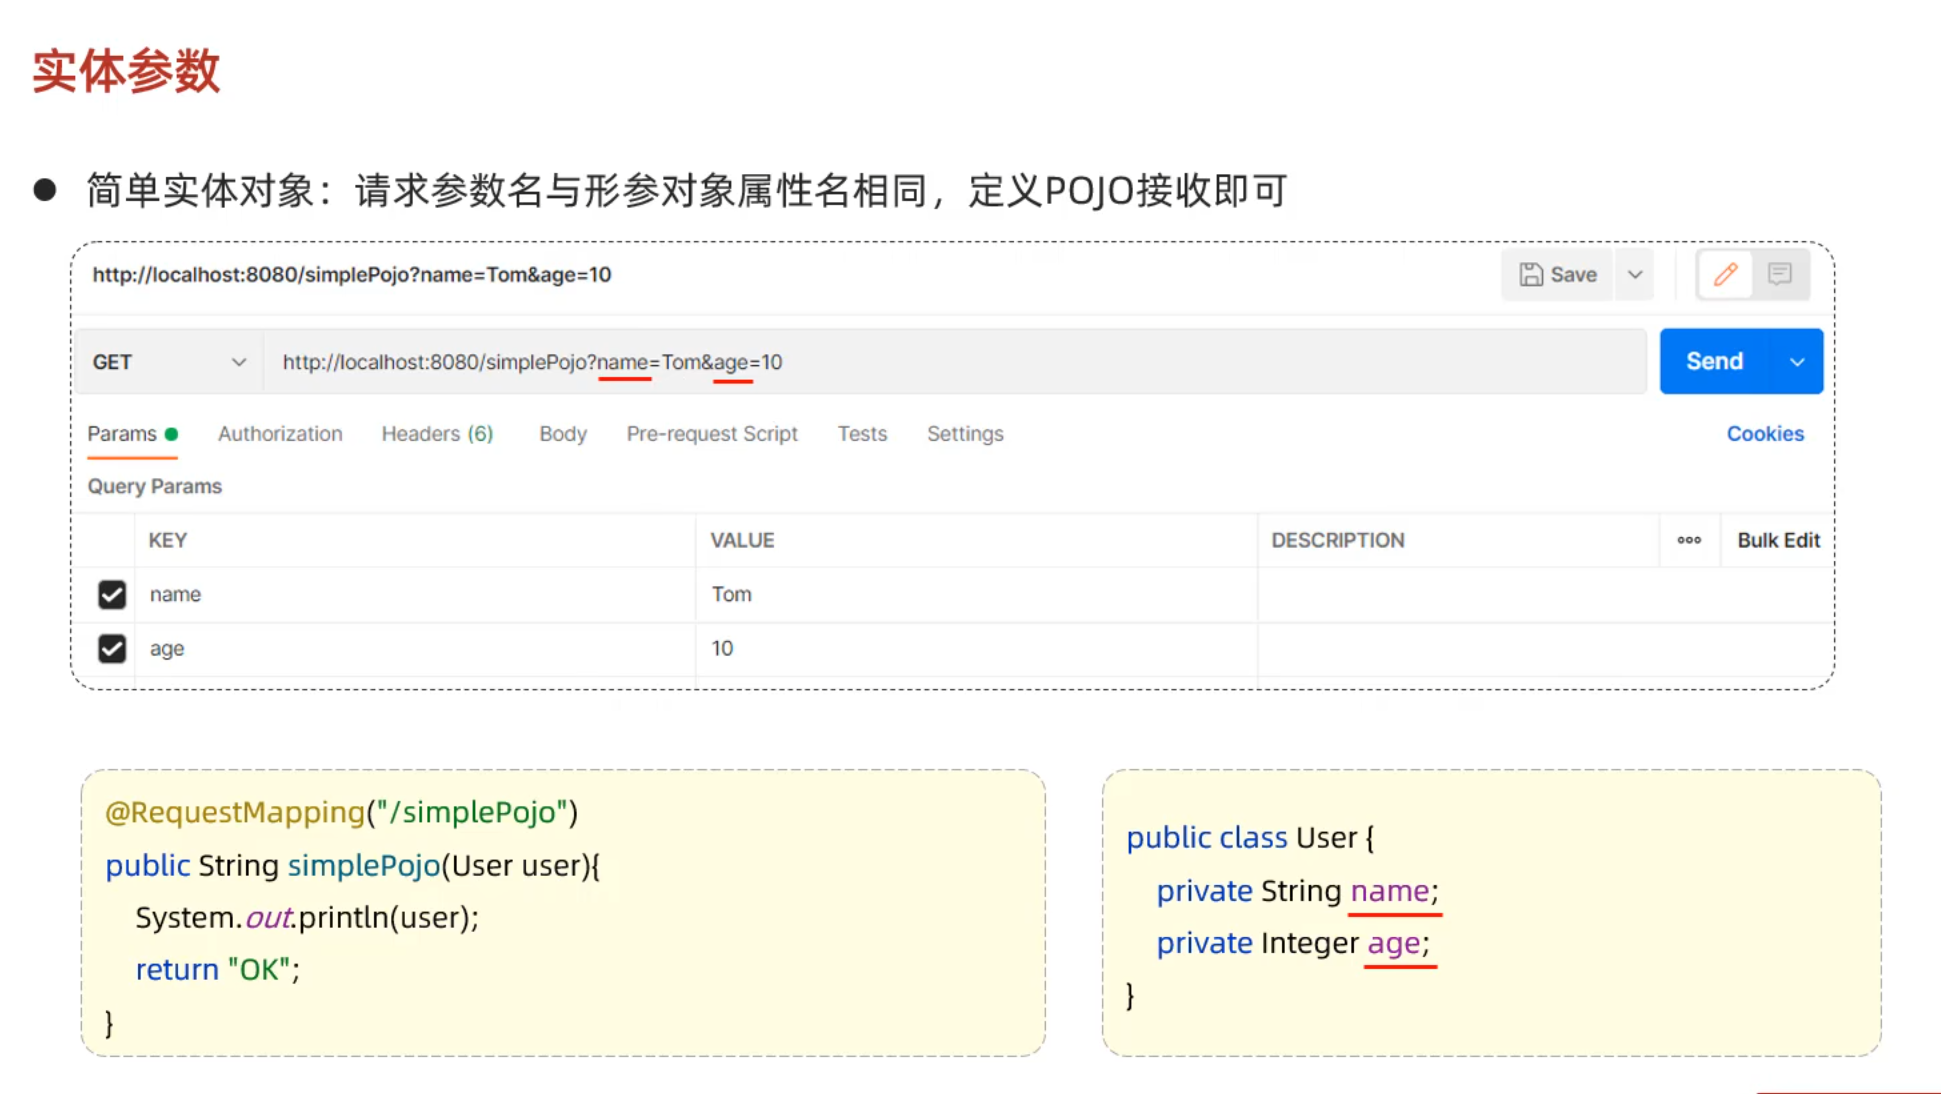
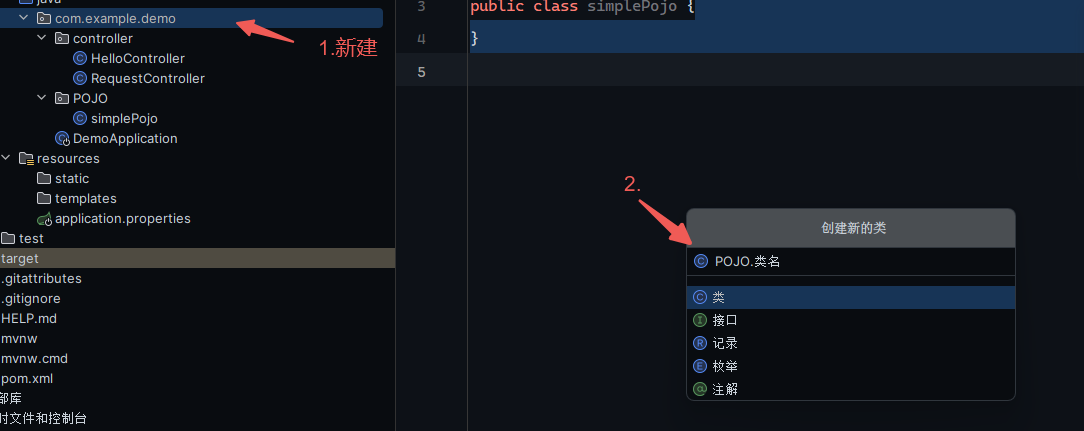
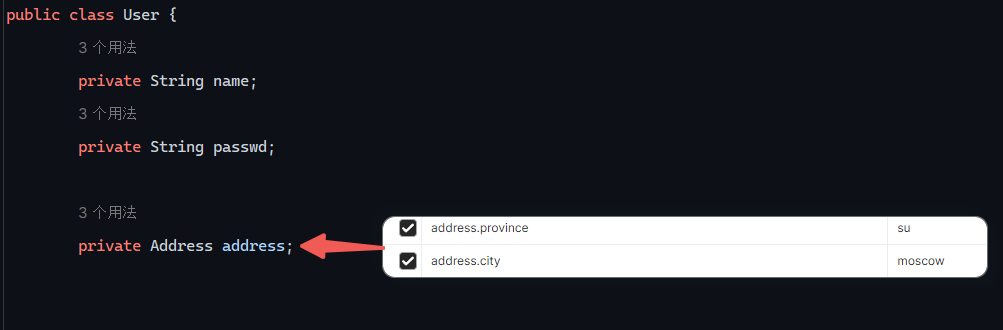
实体参数
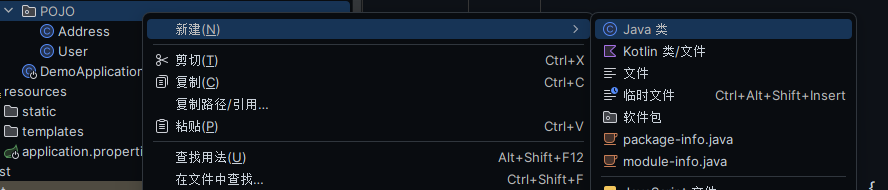
实体都放在pojo下(自己建目录)
至少要有请求参数
1 2 3 4 5 @RequestMapping("/simplePojo") public String simplyPojo (User user) { System.out.println(user); return "OK" ; }
如果改变参数名字就不能封装进去,参数值为null
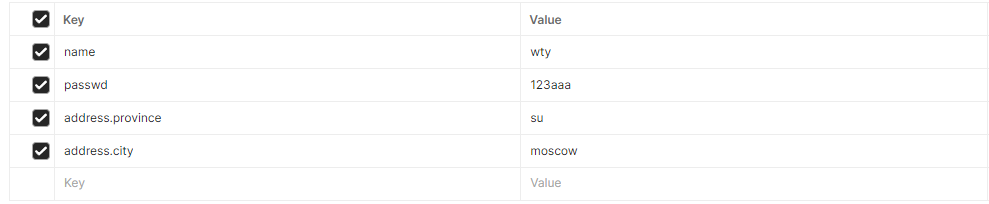
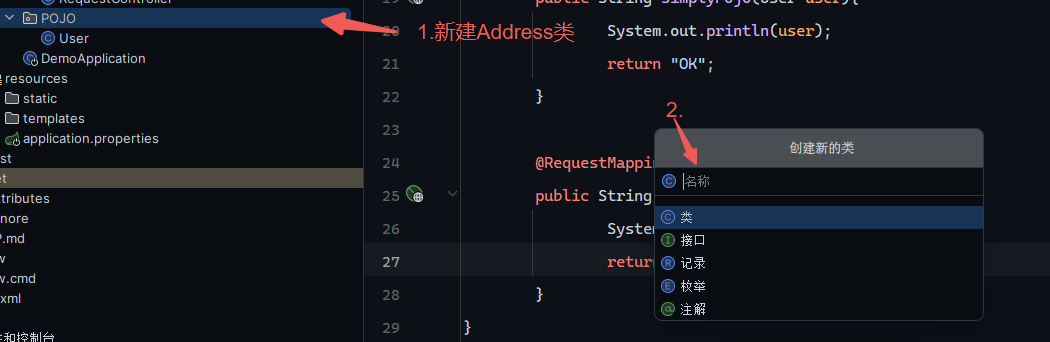
请求如下:
数组参数
1 2 3 4 5 @RequestMapping("/arrayParam") public String arrayParam (String[] param) { System.out.println(Arrays.toString(param)); return "OK" ; }
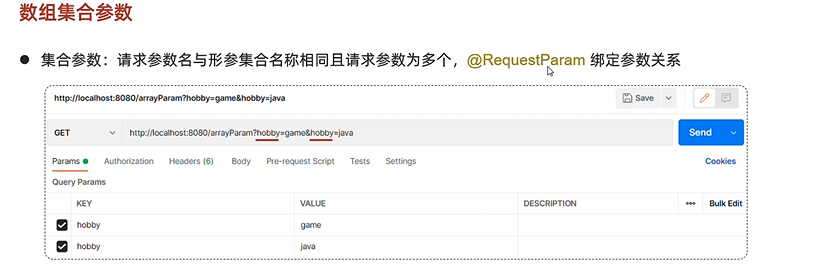
集合参数
不用@RequestParam会被解释成数组而非集合
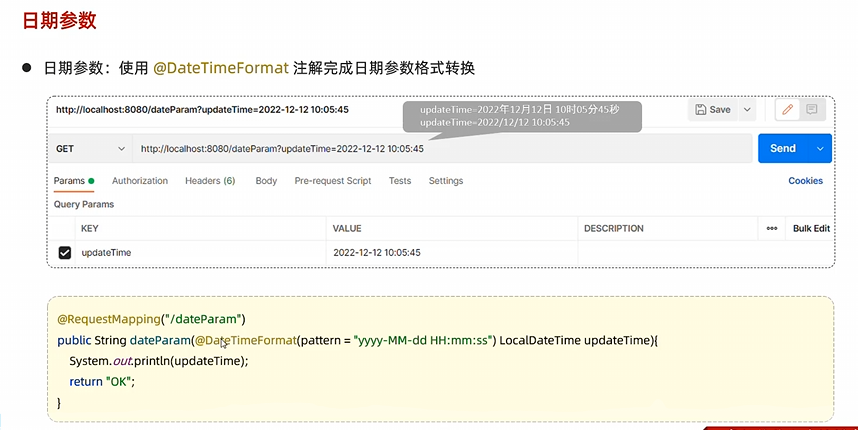
日期参数
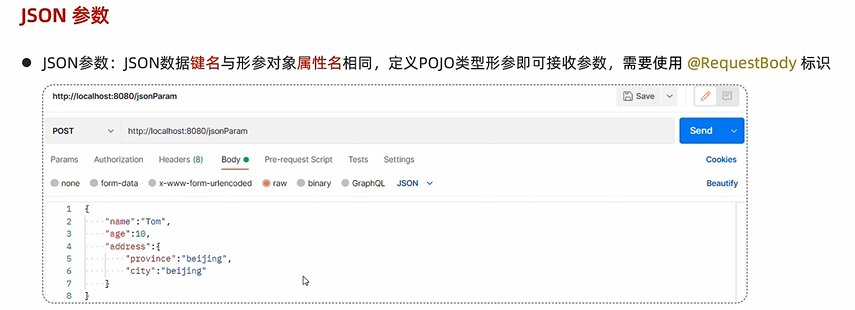
json参数
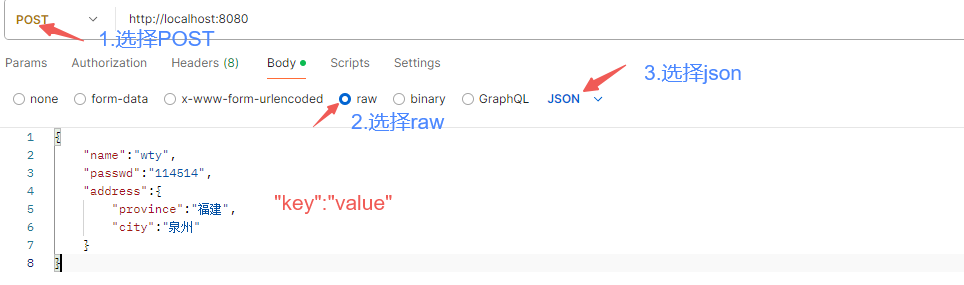
postman请求json参数方法:
url中要加上请求路径,否则报错
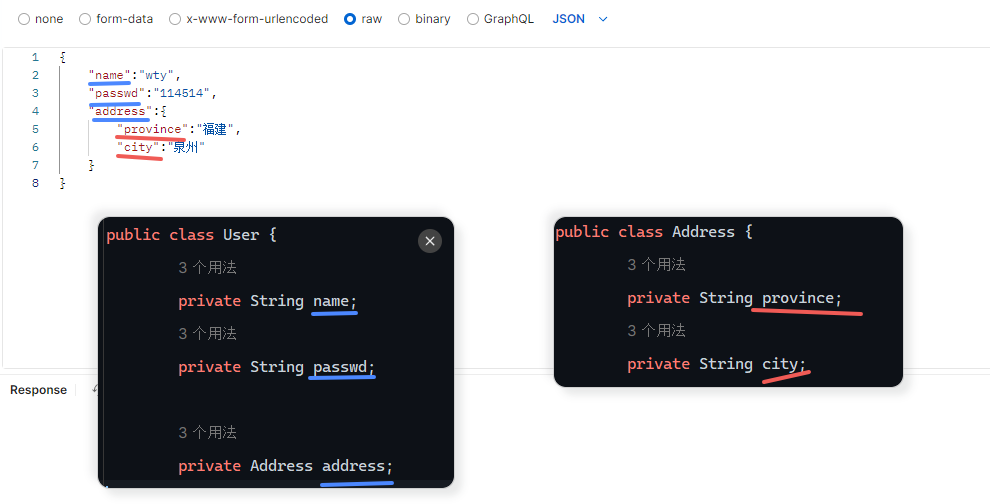
键名与形参对象属性名相同
使用@RequestBody标识
1 2 3 4 5 @RequestMapping("/jsonParam") public String jsonParam (@RequestBody User user) { System.out.println(user); return "OK" ; }
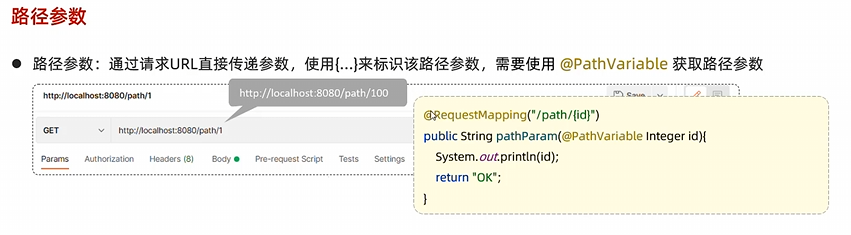
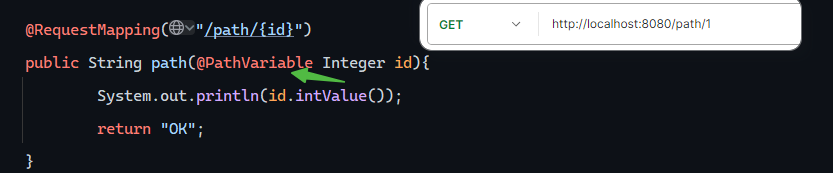
路径参数 单个路径
多个路径
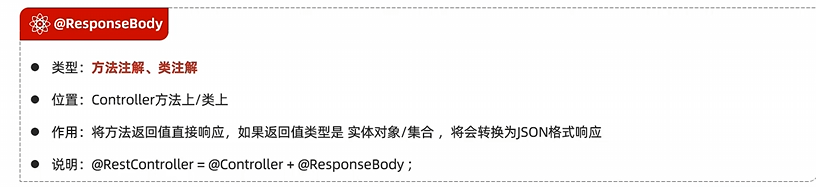
响应 @ResponseBody注解
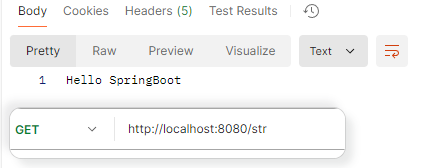
响应字符串 1 2 3 4 @RequestMapping("/str") public String stringResponse () { return "Hello SpringBoot" ; }
响应对象 响应格式为json
1 2 3 4 5 6 7 @RequestMapping("/obj") public Address objResponse () { Address address = new Address (); address.setProvince("福建" ); address.setCity("泉州" ); return address; }
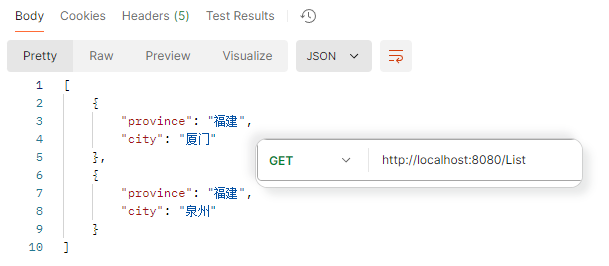
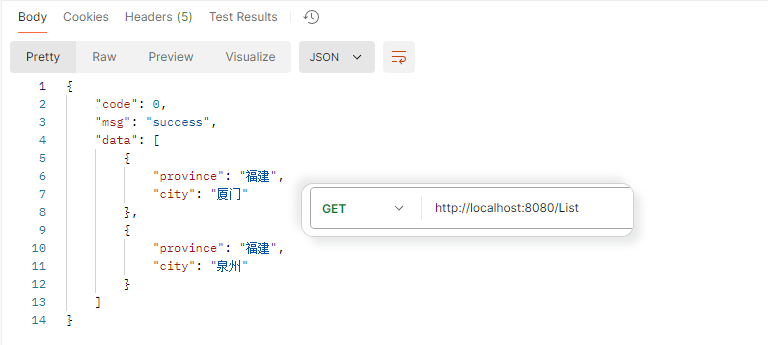
响应集合 响应格式为json数组
1 2 3 4 5 6 7 8 9 10 11 12 13 14 15 @RequestMapping("/List") public List<Address> listResponse () { Address address = new Address (); address.setProvince("福建" ); address.setCity("泉州" ); Address address2 = new Address (); address2.setProvince("福建" ); address2.setCity("厦门" ); List<Address> list = new ArrayList <>(); list.add(address2); list.add(address); return list; }
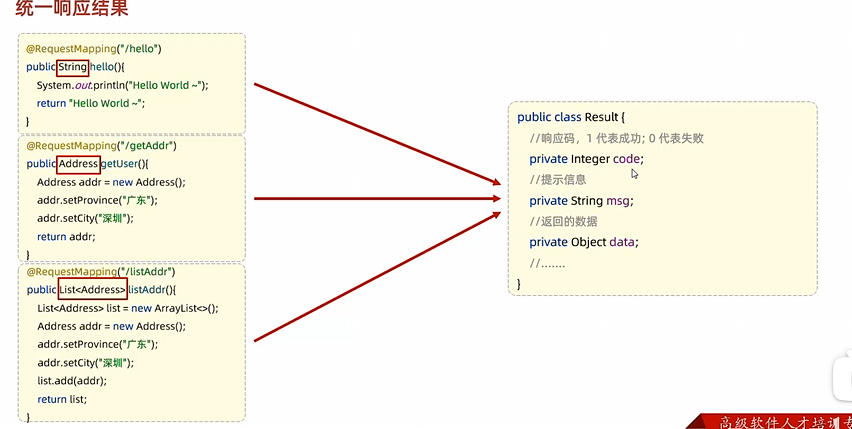
统一响应结果 上面三种响应格式都不同,不便于前后端开发
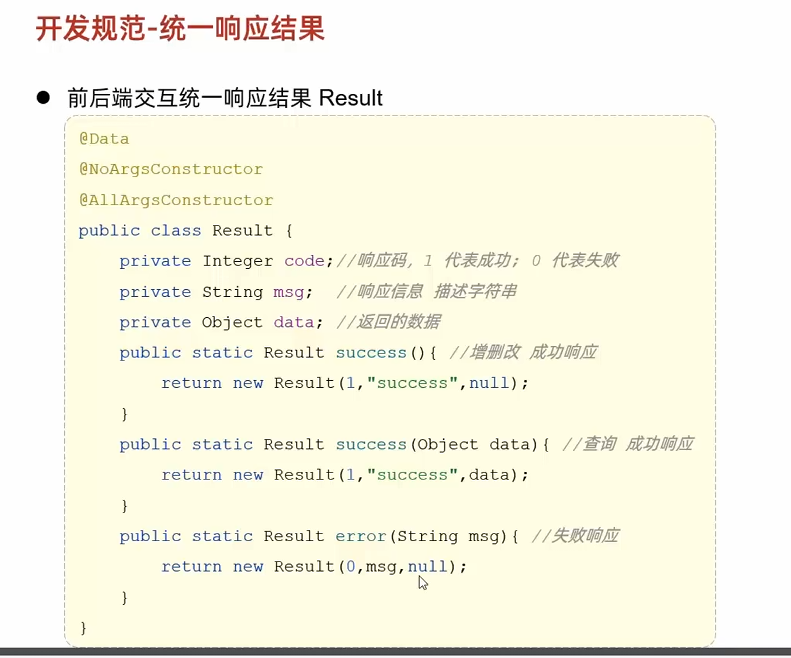
1 2 3 4 5 6 7 8 9 10 11 12 13 14 15 16 17 18 19 20 21 22 23 24 25 26 27 28 29 30 31 32 33 34 35 36 37 38 39 40 41 42 43 44 45 46 47 48 49 50 51 52 53 54 55 56 57 58 59 60 61 62 63 64 package com.example.demo.POJO;public class Result { private Integer code; private String msg; private Object data; public Result () { } public Result (Integer code, String msg, Object data) { this .code = code; this .msg = msg; this .data = data; } public Integer getCode () { return code; } public void setCode (Integer code) { this .code = code; } public String getMsg () { return msg; } public void setMsg (String msg) { this .msg = msg; } public Object getData () { return data; } public void setData (Object data) { this .data = data; } @Override public String toString () { return "Result{" + "code=" + code + ", msg='" + msg + '\'' + ", data=" + data + '}' ; } public static Result success (Object data) { return new Result (0 ,"success" ,data); } public static Result success () { return new Result (0 ,"success" ,null ); } public static Result error (String errMsg) { return new Result (-1 ,errMsg,null ); } }
static方法用于快速构建Result对象
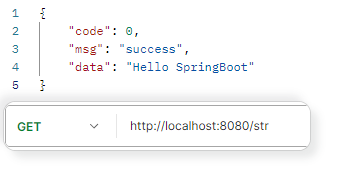
响应字符串 1 2 3 4 5 @RequestMapping("/str") public Result stringResponse () { return Result.success("Hello SpringBoot" ); }
响应对象 响应格式为json
1 2 3 4 5 6 7 8 @RequestMapping("/obj") public Result objResponse () { Address address = new Address (); address.setProvince("福建" ); address.setCity("泉州" ); return Result.success(address); }
响应集合 响应格式为json数组
1 2 3 4 5 6 7 8 9 10 11 12 13 14 15 16 @RequestMapping("/List") public Result listResponse () { Address address = new Address (); address.setProvince("福建" ); address.setCity("泉州" ); Address address2 = new Address (); address2.setProvince("福建" ); address2.setCity("厦门" ); List<Address> list = new ArrayList <>(); list.add(address2); list.add(address); return Result.success(list); }
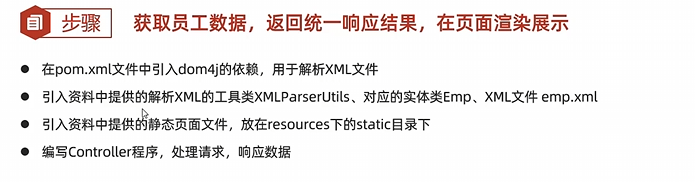
案例
pom.xml中添加坐标 1 2 3 4 5 <dependency > <groupId > org.dom4j</groupId > <artifactId > dom4j</artifactId > <version > 2.1.3</version > </dependency >
工具类XmlParserUtils
1 2 3 4 5 6 7 8 9 10 11 12 13 14 15 16 17 18 19 20 21 22 23 24 25 26 27 28 29 30 31 32 33 34 35 36 37 38 39 40 41 42 43 44 45 46 47 48 49 50 51 52 53 54 55 56 57 58 59 60 61 62 63 64 65 66 67 68 69 70 71 72 73 74 75 76 77 78 79 80 81 82 83 84 package com.example.demo.Utils;import org.dom4j.Document;import org.dom4j.DocumentException;import org.dom4j.Element;import org.dom4j.io.SAXReader;import java.io.File;import java.lang.reflect.Constructor;import java.util.ArrayList;import java.util.List;public class XmlParserUtils { public static <T> List<T> parse (String file, Class<T> targetClass) throws DocumentException { SAXReader reader = new SAXReader (); Document document = reader.read(new File (file)); Element rootElement = document.getRootElement(); List<Element> elements = rootElement.elements("emp" ); List<T> list = new ArrayList <>(); try { for (Element element : elements) { String name = element.element("name" ).getText(); String age = element.element("age" ).getText(); String image = element.element("image" ).getText(); String gender = element.element("gender" ).getText(); String job = element.element("job" ).getText(); Constructor<T> constructor = targetClass.getDeclaredConstructor( String.class, Integer.class, String.class, String.class, String.class ); constructor.setAccessible(true ); T object = constructor.newInstance( name, Integer.parseInt(age), image, gender, job ); list.add(object); } } catch (Exception e) { throw new RuntimeException ("XML解析为对象失败" , e); } return list; } }
Emp类 1 2 3 4 5 6 7 8 9 10 11 12 13 14 15 16 17 18 19 20 21 22 23 24 25 26 27 28 29 30 31 32 33 34 35 36 37 38 39 40 41 42 43 44 45 46 47 48 49 50 51 52 53 54 55 56 57 58 public class Emp { private String name; private Integer age; private String image; private String gender; private String job; public Emp () { } public Emp (String name, Integer age, String image, String gender, String job) { this .name = name; this .age = age; this .image = image; this .gender = gender; this .job = job; } public String getName () { return name; } public void setName (String name) { this .name = name; } public Integer getAge () { return age; } public void setAge (Integer age) { this .age = age; } public String getImage () { return image; } public void setImage (String image) { this .image = image; } public String getGender () { return gender; } public void setGender (String gender) { this .gender = gender; } public String getJob () { return job; } public void setJob (String job) { this .job = job; } }
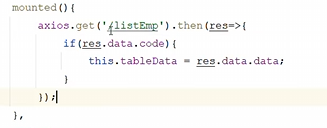
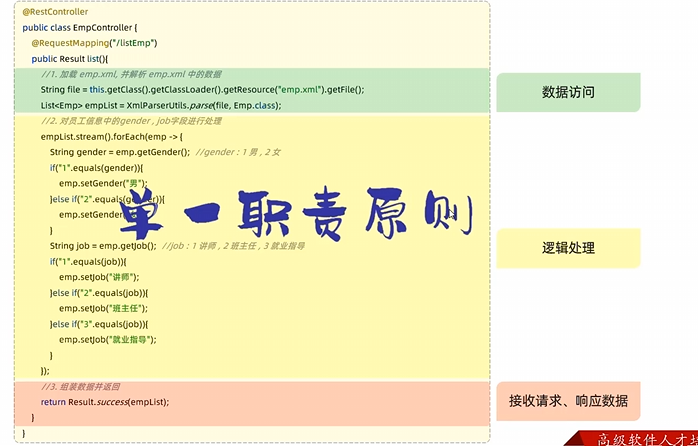
处理请求类EmpController 假设前端请求路径如下:
那么@RequestMapping中的路径就为”/listEmp”
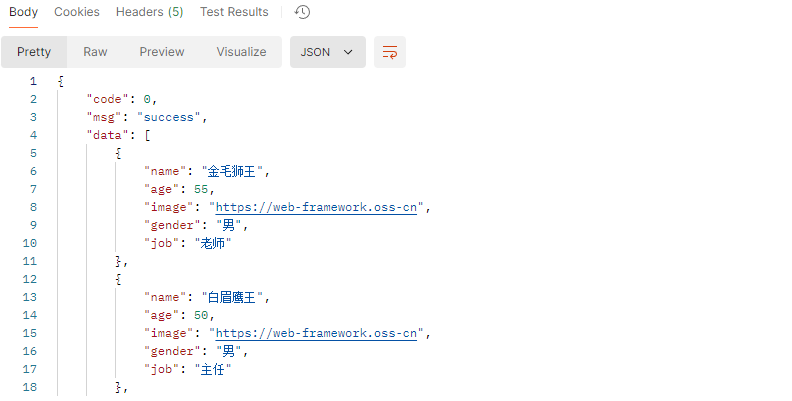
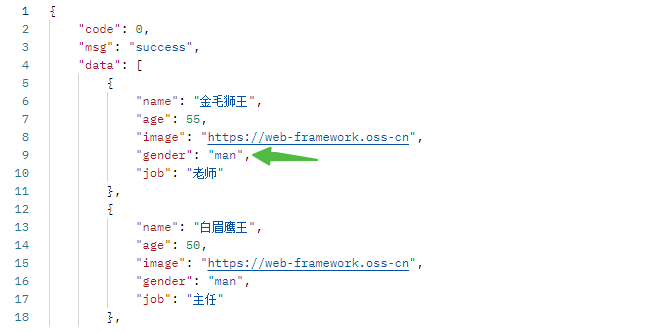
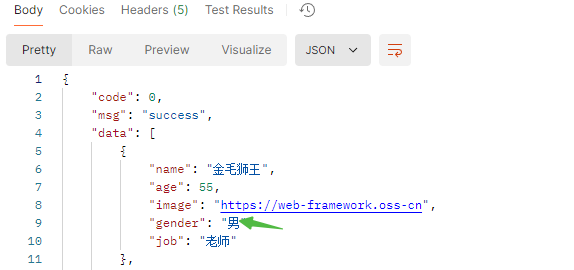
1 2 3 4 5 6 7 8 9 10 11 12 13 14 15 16 17 18 19 20 21 22 23 24 25 26 27 28 29 30 31 32 33 34 35 36 37 38 39 40 41 42 package com.example.demo.controller;import com.example.demo.POJO.Emp;import com.example.demo.POJO.Result;import com.example.demo.Utils.XmlParserUtils;import org.dom4j.DocumentException;import org.springframework.web.bind.annotation.RequestMapping;import org.springframework.web.bind.annotation.RestController;import java.util.List;@RestController public class EmpController { @RequestMapping("/listEmp") public Result list () throws DocumentException { String file = this .getClass().getClassLoader().getResource("emp.xml" ).getFile(); List<Emp> empList = XmlParserUtils.parse(file, Emp.class); empList.stream().forEach(emp -> { String gender = emp.getGender(); if ("1" .equals(gender)) { emp.setGender("男" ); } else if ("2" .equals(gender)) { emp.setGender("女" ); } String job = emp.getJob(); if ("1" .equals(job)) { emp.setJob("老师" ); } else if ("2" .equals(job)) { emp.setJob("主任" ); }else if ("3" .equals(job)){ emp.setJob("就业指导" ); } }); return Result.success(empList); } }
响应结果:
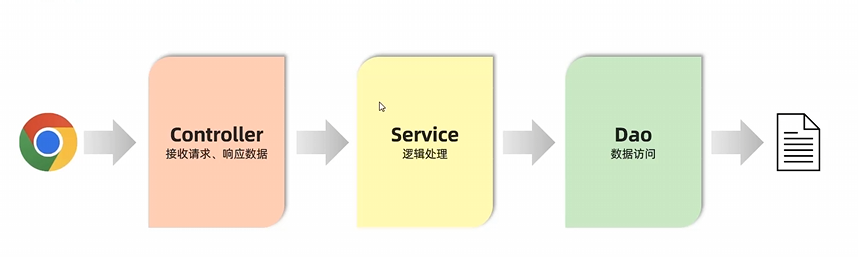
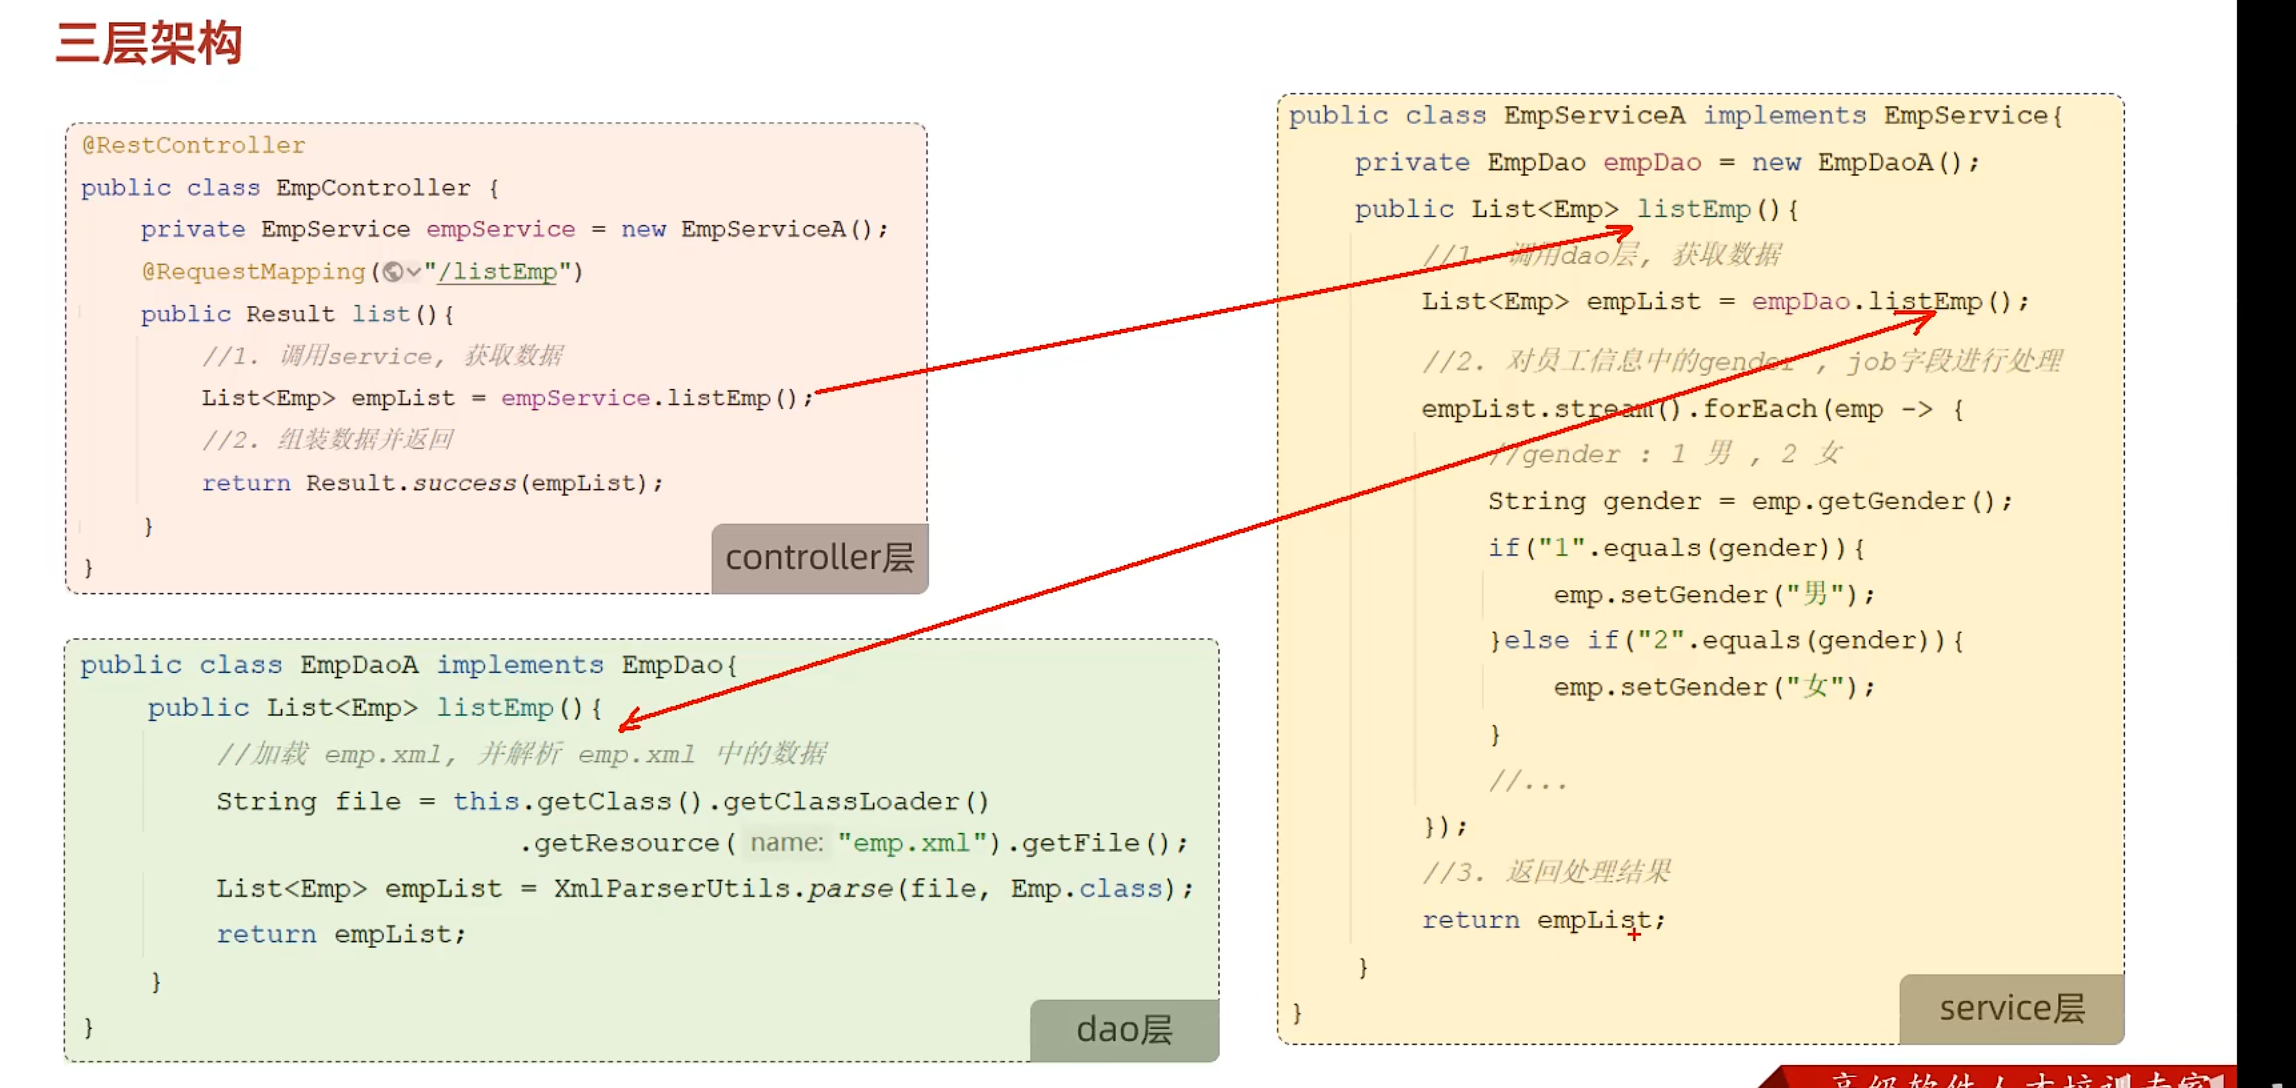
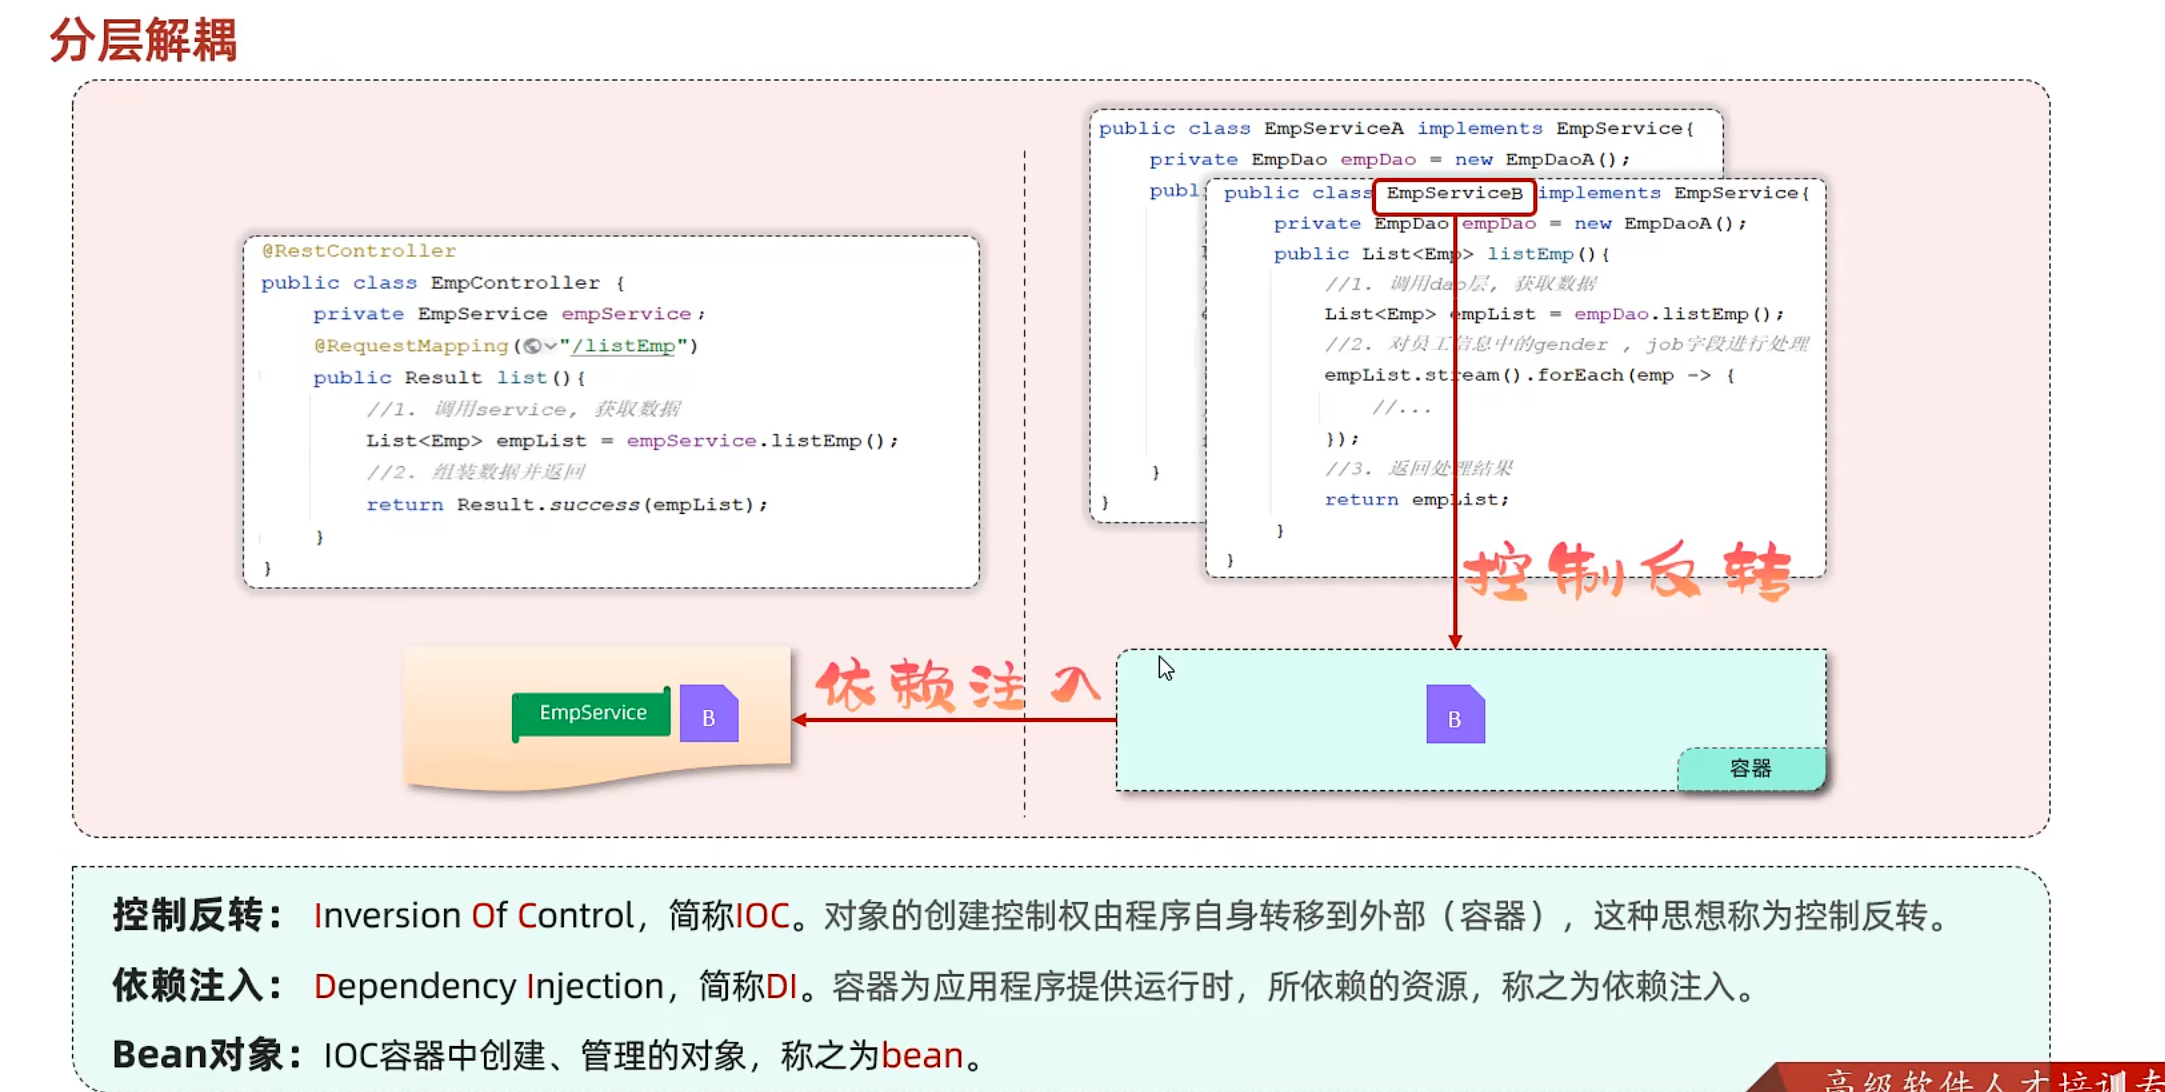
分层解耦 三层架构
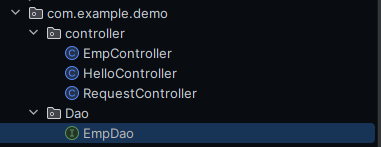
Dao层-数据访问 Dao对数据的访问方式很多(文件,数据库等),想要灵活处理需要使用接口
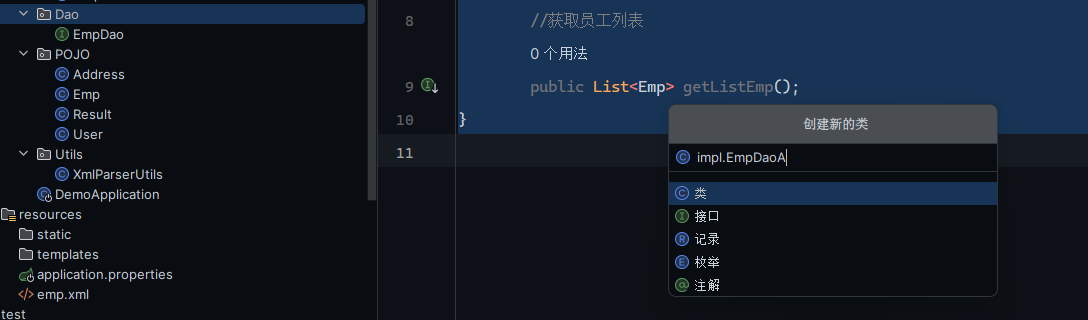
1 2 3 4 5 6 7 8 9 10 package com.example.demo.Dao;import com.example.demo.POJO.Emp;import java.util.List;public interface EmpDao { public List<Emp> getListEmp () ; }
它的实现类A:
1 2 3 4 5 6 7 8 9 10 11 12 13 14 15 16 17 18 package com.example.demo.Dao.impl;import com.example.demo.Dao.EmpDao;import com.example.demo.POJO.Emp;import com.example.demo.Utils.XmlParserUtils;import org.dom4j.DocumentException;import java.util.List;public class EmpDaoA implements EmpDao { @Override public List<Emp> getListEmp () throws DocumentException { String file = this .getClass().getClassLoader().getResource("emp.xml" ).getFile(); return XmlParserUtils.parse(file, Emp.class); } }
Service层-业务逻辑处理 与Dao层类似,想要灵活处理,使用接口
1 2 3 4 5 6 7 8 9 10 package com.example.demo.service;import com.example.demo.POJO.Emp;import java.util.List;public interface EmpService { public List<Emp> ListEmp () ; }
它的实现类:
要处理数据,需要从Dao层获取,那么需要定义Dao对象
1 2 3 4 5 6 7 8 9 10 11 12 13 14 15 16 17 18 19 20 21 22 23 24 25 26 27 28 29 30 31 32 33 34 35 36 37 package com.example.demo.service.impl;import com.example.demo.Dao.EmpDao;import com.example.demo.Dao.impl.EmpDaoA;import com.example.demo.POJO.Emp;import com.example.demo.service.EmpService;import org.dom4j.DocumentException;import java.util.List;public class EmpServiceA implements EmpService { private EmpDao empDao = new EmpDaoA (); @Override public List<Emp> ListEmp () throws DocumentException { List<Emp> empList = empDao.getListEmp(); empList.stream().forEach(emp -> { String gender = emp.getGender(); if ("1" .equals(gender)) { emp.setGender("男" ); } else if ("2" .equals(gender)) { emp.setGender("女" ); } String job = emp.getJob(); if ("1" .equals(job)) { emp.setJob("老师" ); } else if ("2" .equals(job)) { emp.setJob("主任" ); } else if ("3" .equals(job)) { emp.setJob("就业指导" ); } }); return empList; } }
Controller层-接收请求,响应数据 需要调底下1层的接口
1 2 3 4 5 6 7 8 9 10 11 12 13 14 15 16 17 18 19 20 21 22 23 24 25 26 package com.example.demo.controller;import com.example.demo.Dao.EmpDao;import com.example.demo.POJO.Emp;import com.example.demo.POJO.Result;import com.example.demo.Utils.XmlParserUtils;import com.example.demo.service.EmpService;import com.example.demo.service.impl.EmpServiceA;import org.dom4j.DocumentException;import org.springframework.web.bind.annotation.RequestMapping;import org.springframework.web.bind.annotation.RestController;import java.util.List;@RestController public class EmpController { private EmpService empService = new EmpServiceA (); @RequestMapping("/listEmp") public Result list () throws DocumentException { List<Emp> empList = empService.ListEmp(); return Result.success(empList); } }
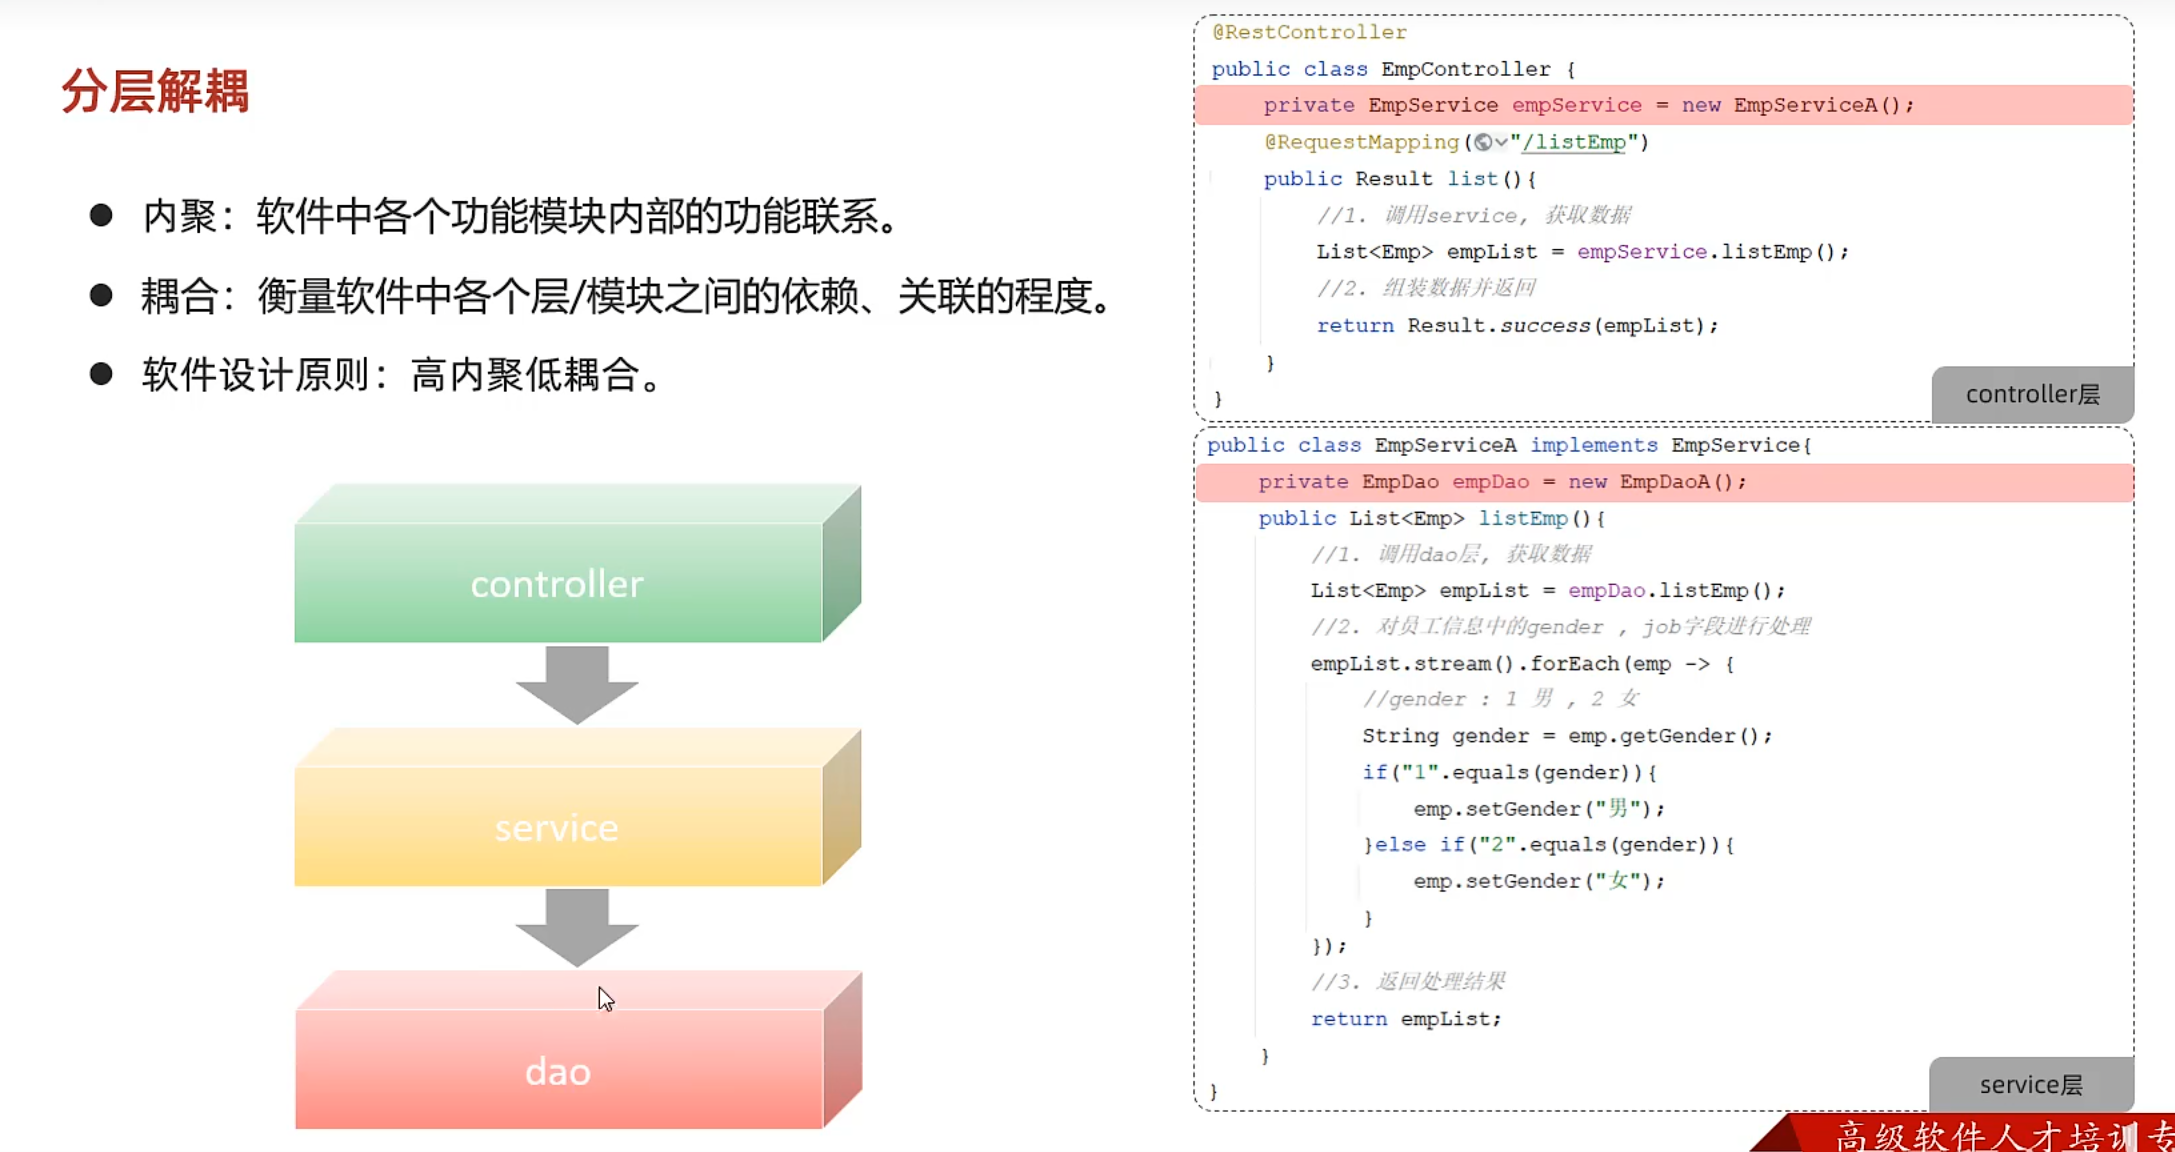
分层解耦
EmpController中的empService是Service层实现类的实例,说明这两层耦合
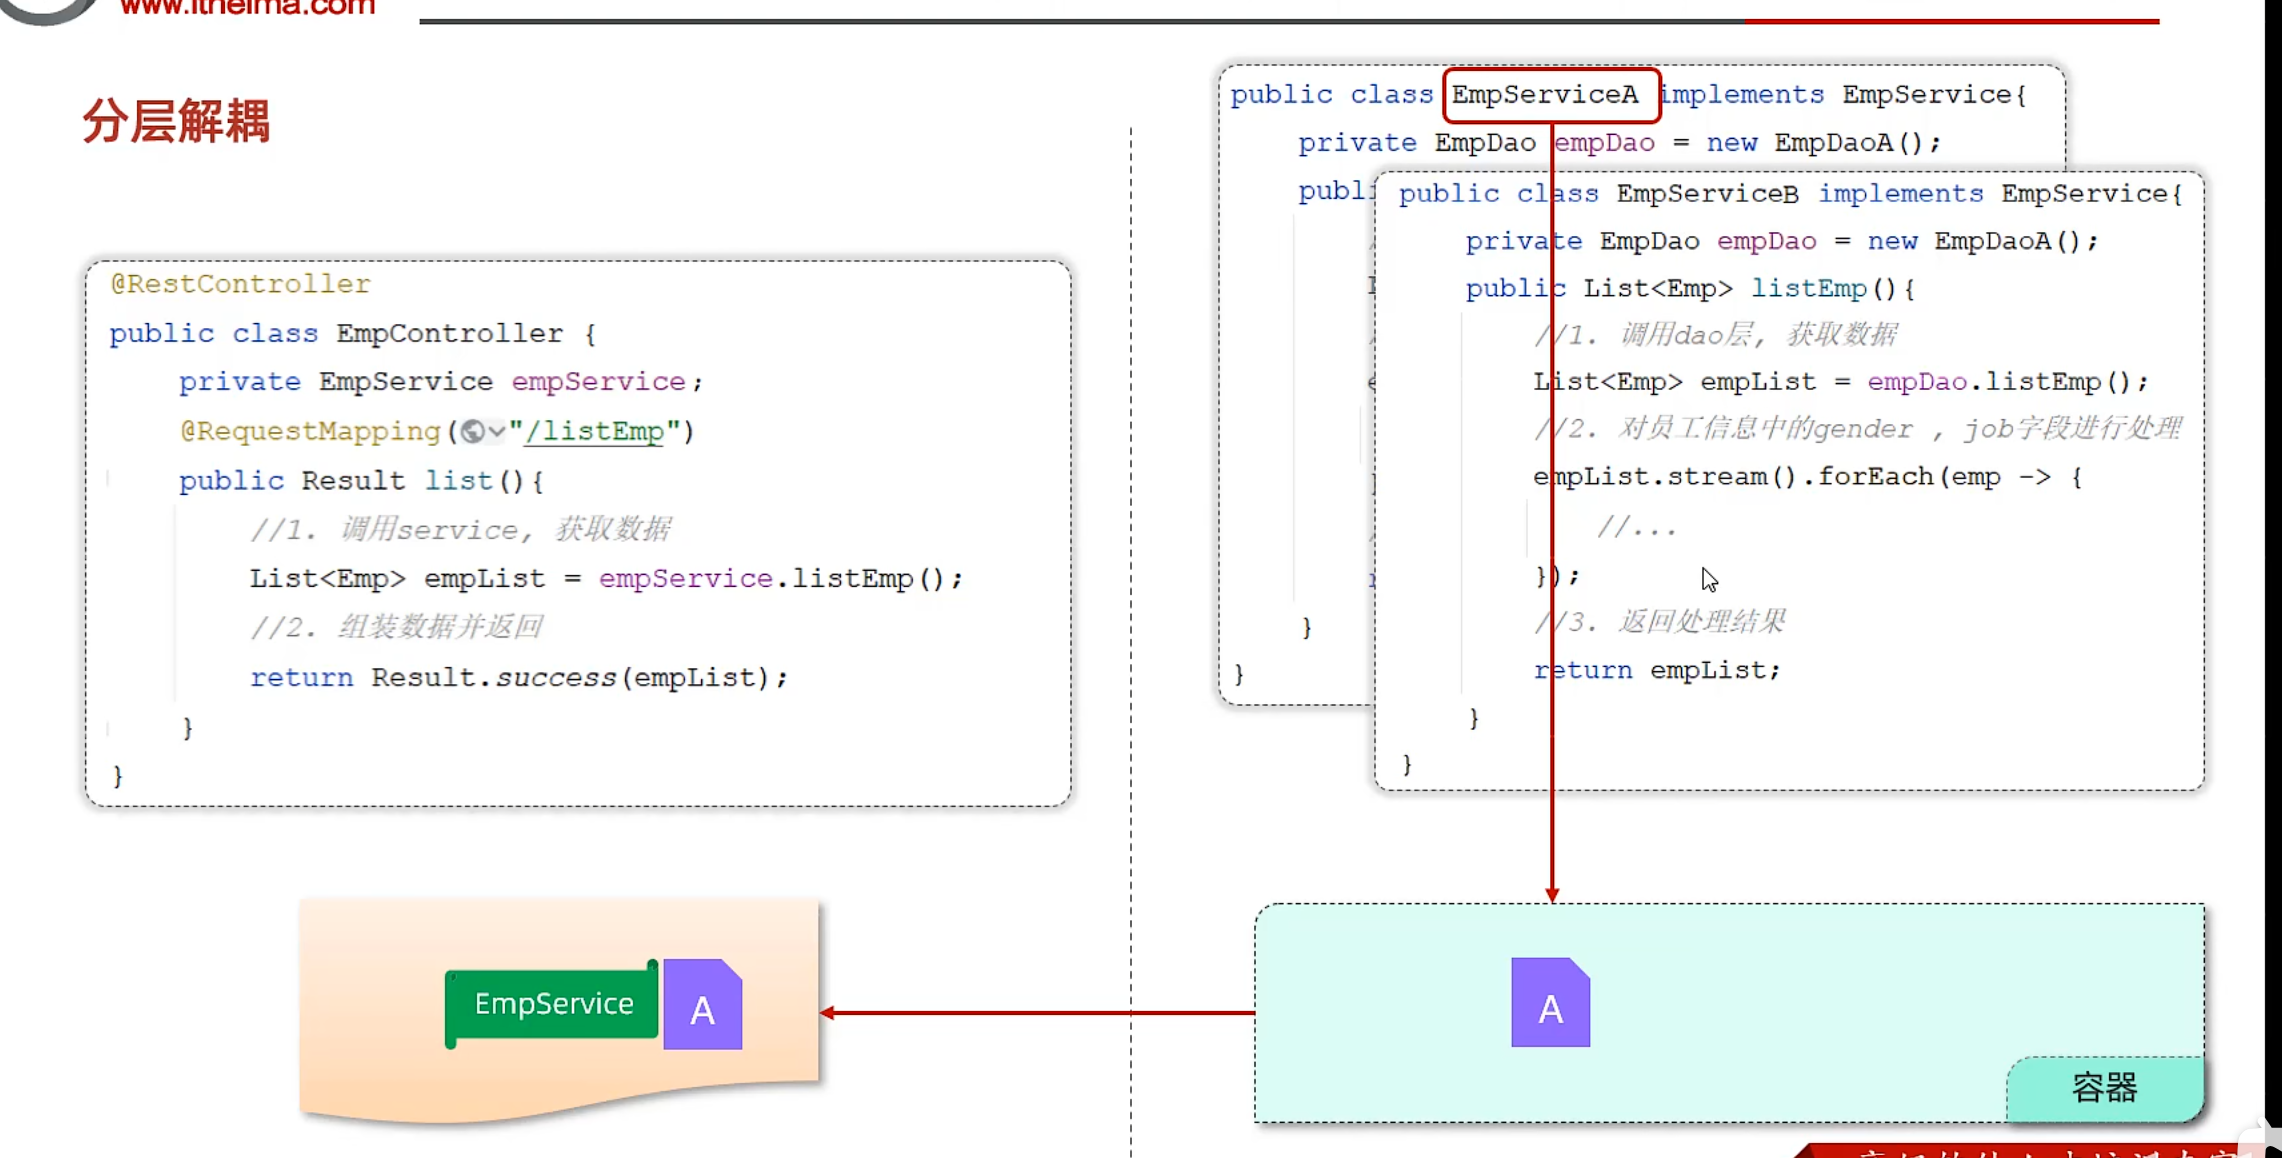
解决方法:容器
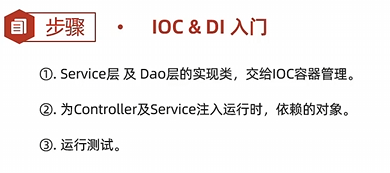
步骤
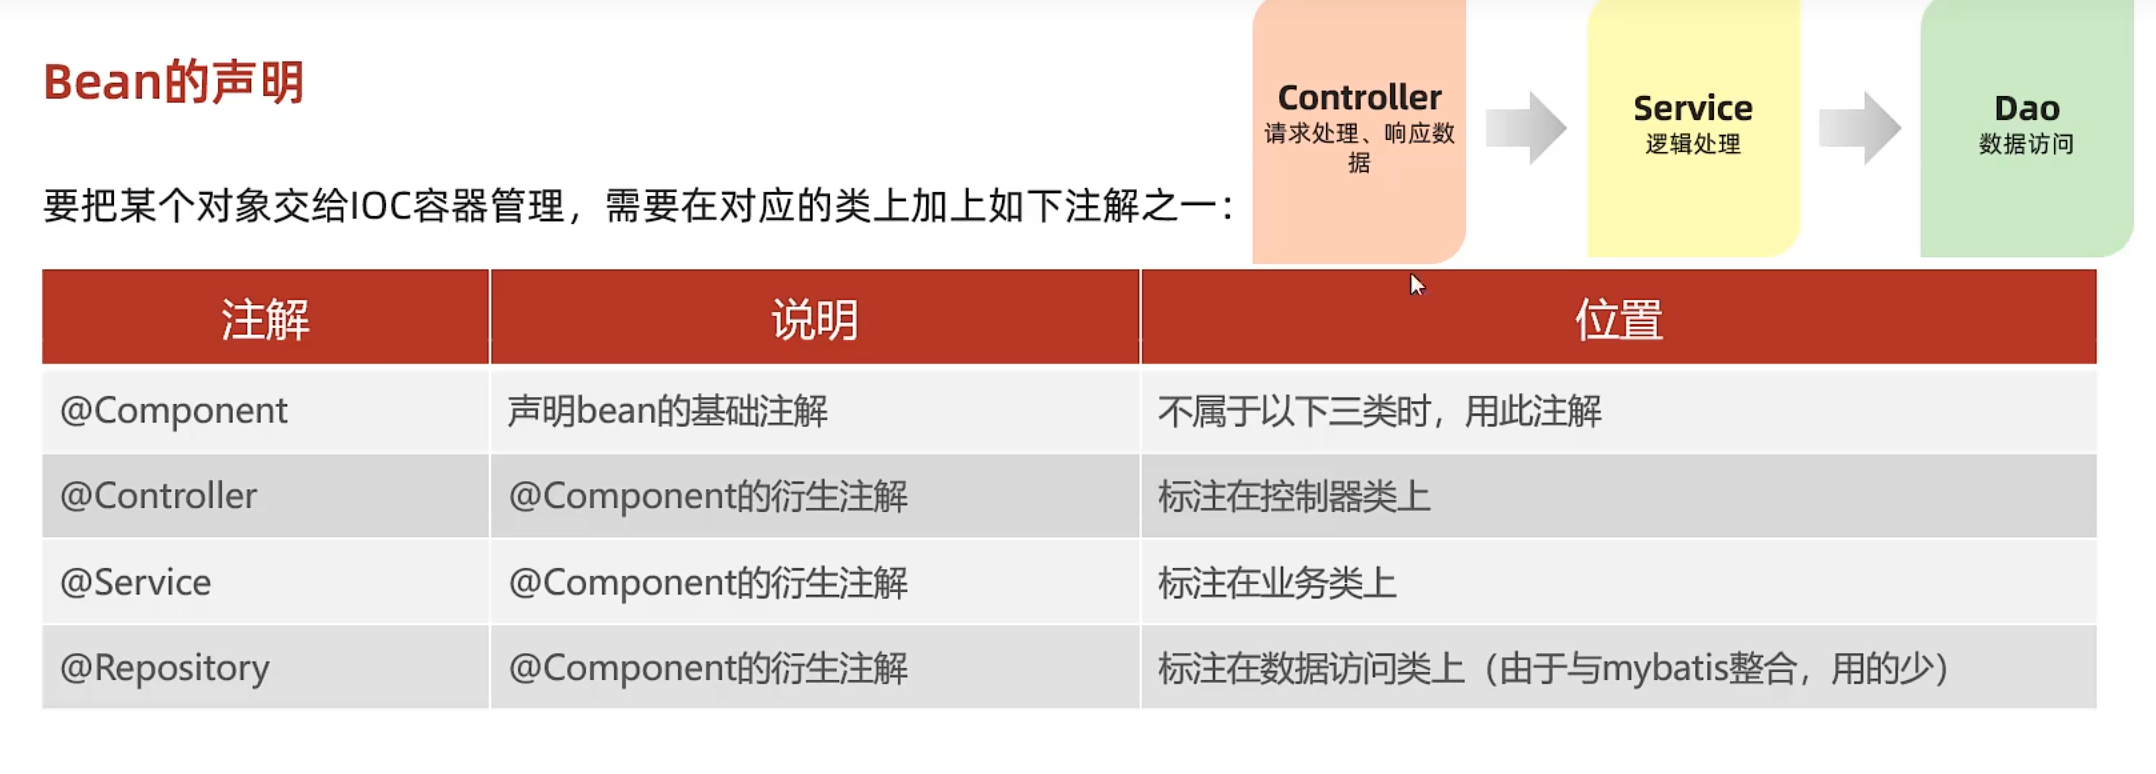
@Component注解 在Dao层、Service实现类前加上该注解,表示将该类交给IOC容器管理,成为IOC容器中的bean
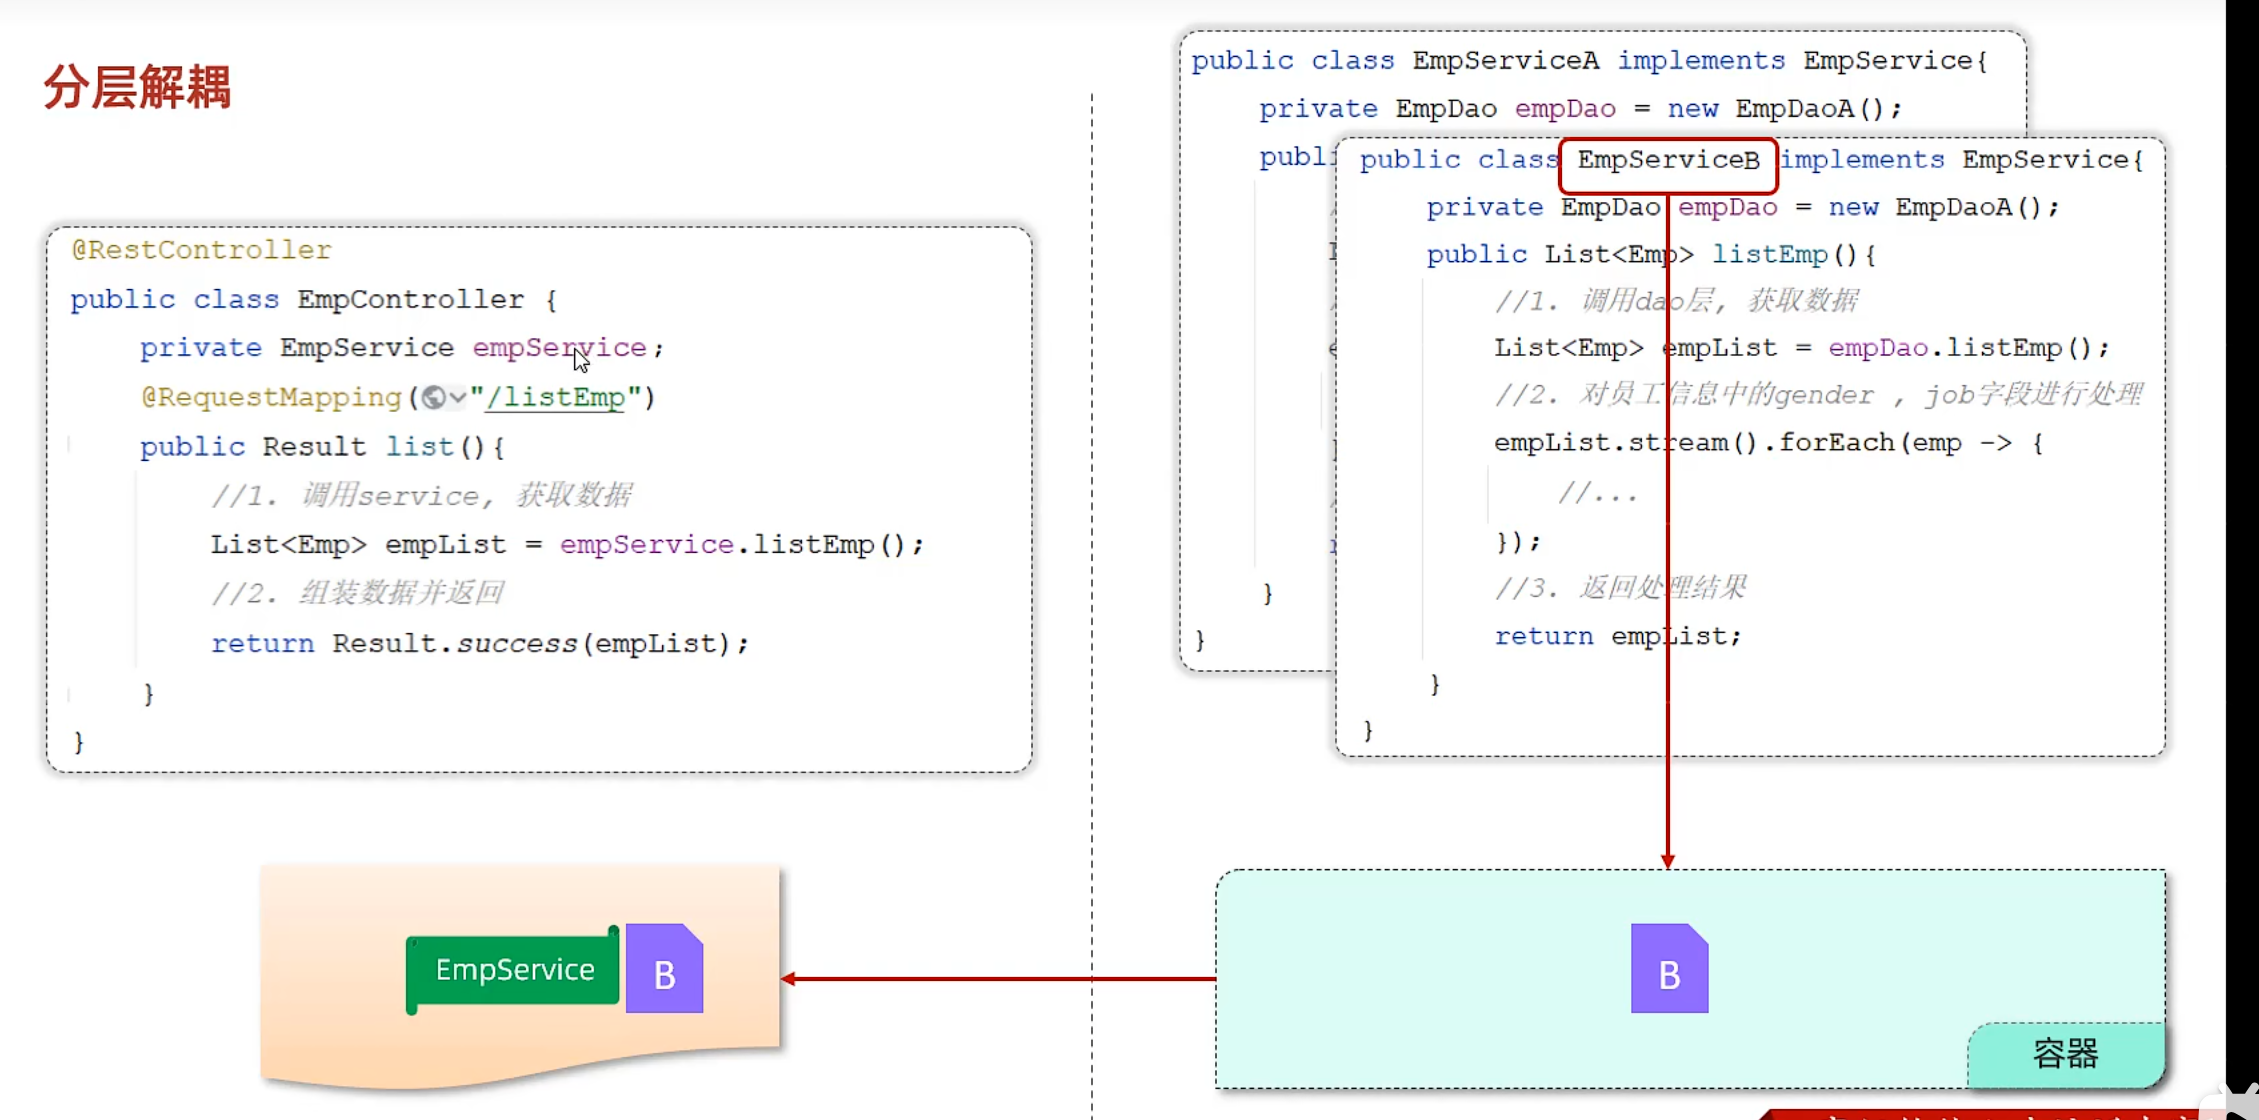
这样一来Controller层想要切换底层,直接更改@Component作用的类就行
1 2 3 4 5 6 7 8 9 10 @Component public class EmpDaoA implements EmpDao { @Override public List<Emp> getListEmp () throws DocumentException { String file = this .getClass().getClassLoader().getResource("emp.xml" ).getFile(); return XmlParserUtils.parse(file, Emp.class); } }
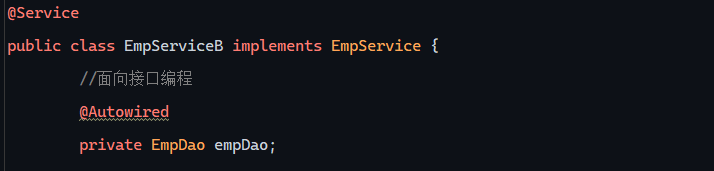
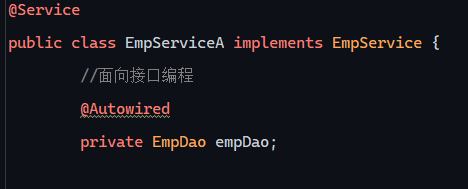
@Autowired注解 运行时,IOC容器会提供该类型的bean对象,并赋值给该变量 - 依赖注入
1 2 3 4 5 6 7 8 9 10 11 12 13 @RestController public class EmpController { @Autowired private EmpService empService; @RequestMapping("/listEmp") public Result list () throws DocumentException { List<Emp> empList = empService.ListEmp(); return Result.success(empList); } }
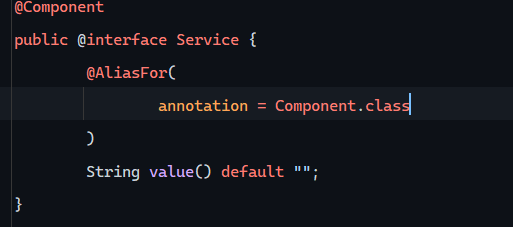
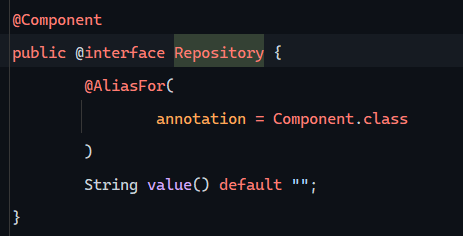
IOC详解 Bean的声明
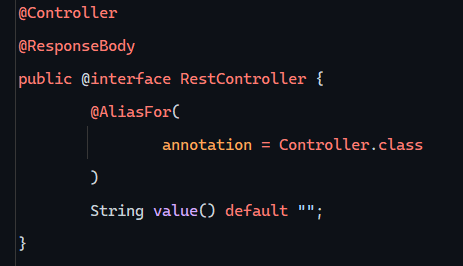
Controller层不用再加@Controller,因为@RestController=@Repository+@Controller
为什么称之为@Component的衍生类?
注意事项
Bean组件扫描
规范:将Dao放在启动类所在包
不规范:找不到包
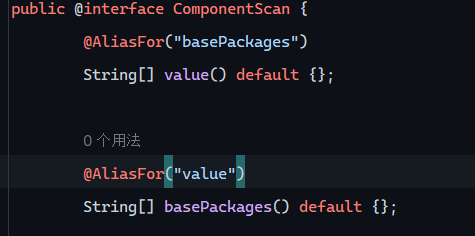
就需要在启动类上使用@ComponentScan
源码显示,@ComponentScan需要接受String数组作为所在包
1 2 3 4 5 6 7 8 9 10 11 12 13 14 15 package com.example.demo;import org.springframework.boot.SpringApplication;import org.springframework.boot.autoconfigure.SpringBootApplication;import org.springframework.context.annotation.ComponentScan;@ComponentScan({"Dao","com.example.demo"}) @SpringBootApplication public class DemoApplication { public static void main (String[] args) { SpringApplication.run(DemoApplication.class, args); } }
我们为什么数组中传入两个包呢?
@SpringBootApplication中集成的@ComponentScan扫描的是启动类所在的包;
在@ComponentScan中声明其他的包会覆盖掉启动类所在的包,所以需要重新声明启动类所在的包
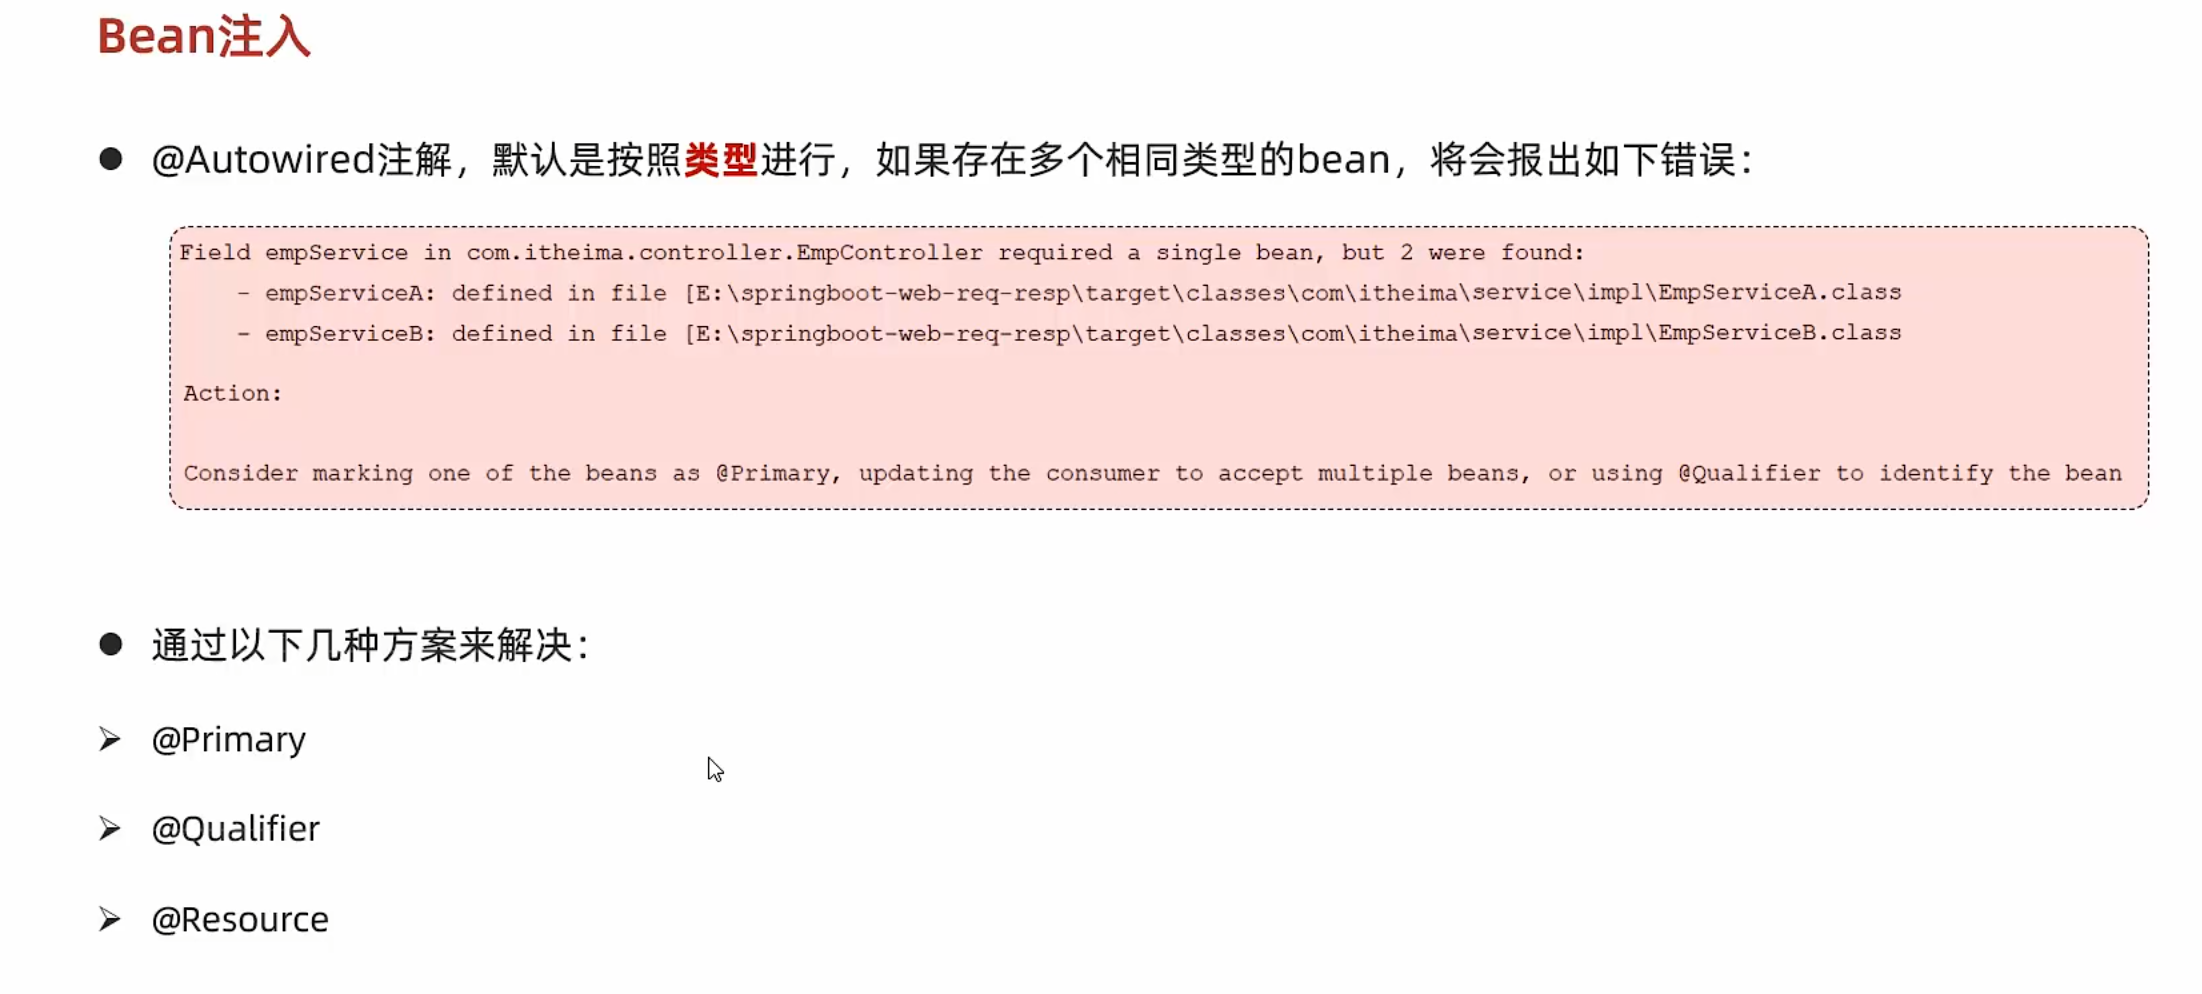
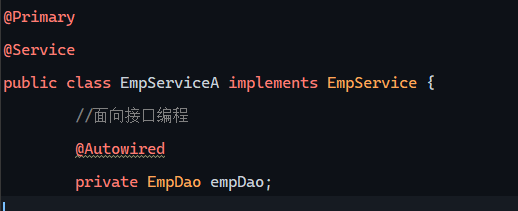
DI详解 如果有多个相同类型的Bean:
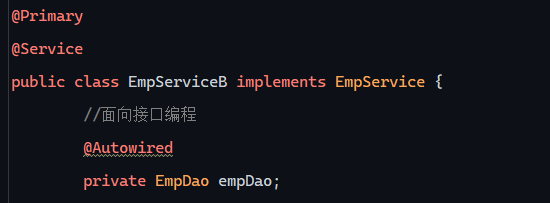
@Primary 多个相同类型的Bean,加上@Primary的那个生效
@Qualifier 在@AutoWired前加上@Qualifier(“Bean名字”)
1 2 3 4 5 6 7 8 9 10 11 12 13 14 15 16 17 18 19 20 21 22 23 24 25 26 27 28 package com.example.demo.controller;import com.example.demo.POJO.Emp;import com.example.demo.POJO.Result;import com.example.demo.service.EmpService;import org.dom4j.DocumentException;import org.springframework.beans.factory.annotation.Autowired;import org.springframework.beans.factory.annotation.Qualifier;import org.springframework.web.bind.annotation.RequestMapping;import org.springframework.web.bind.annotation.RestController;import java.util.List;@RestController public class EmpController { @Qualifier("empServiceA") @Autowired private EmpService empService; @RequestMapping("/listEmp") public Result list () throws DocumentException { List<Emp> empList = empService.ListEmp(); return Result.success(empList); } }
@Resource 与@Qualifier的区别:
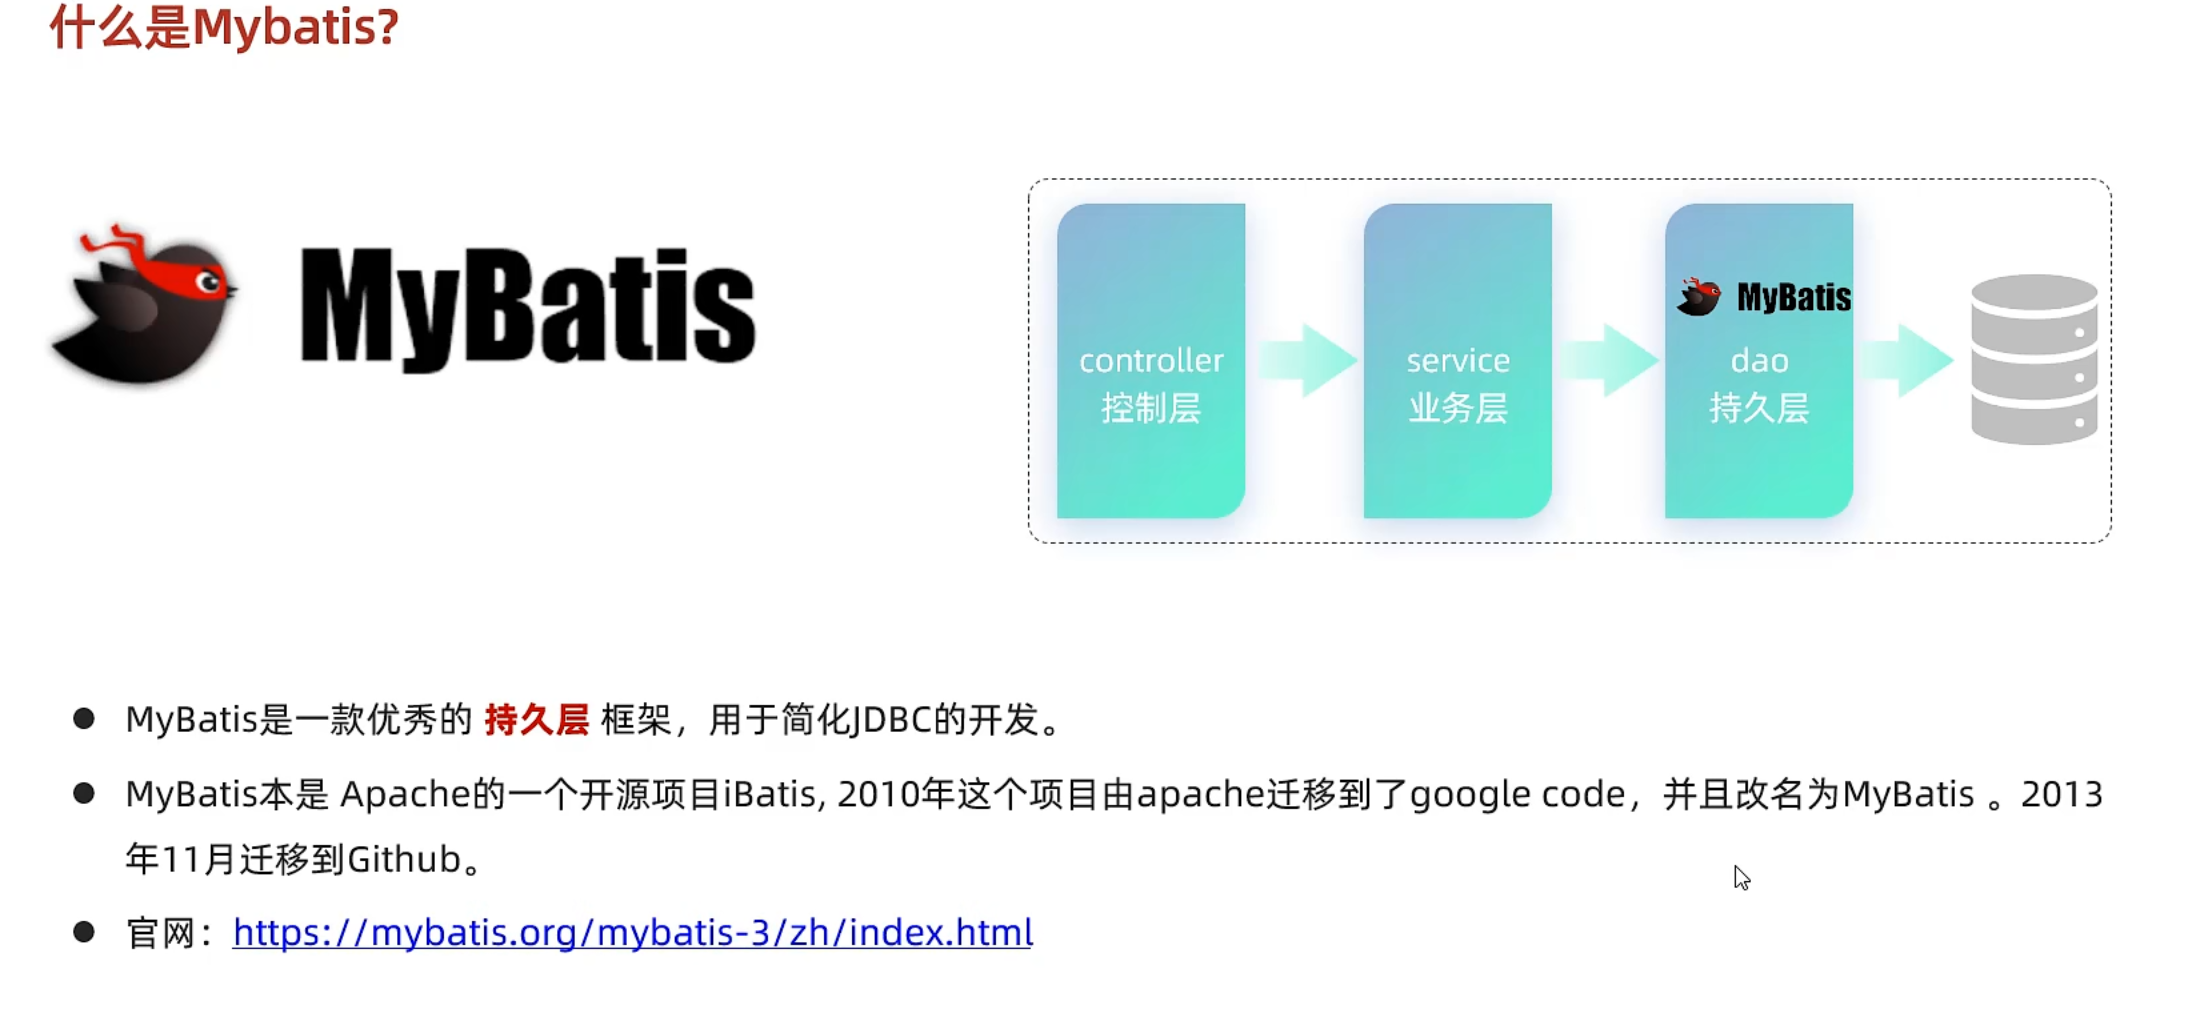
Mybatis
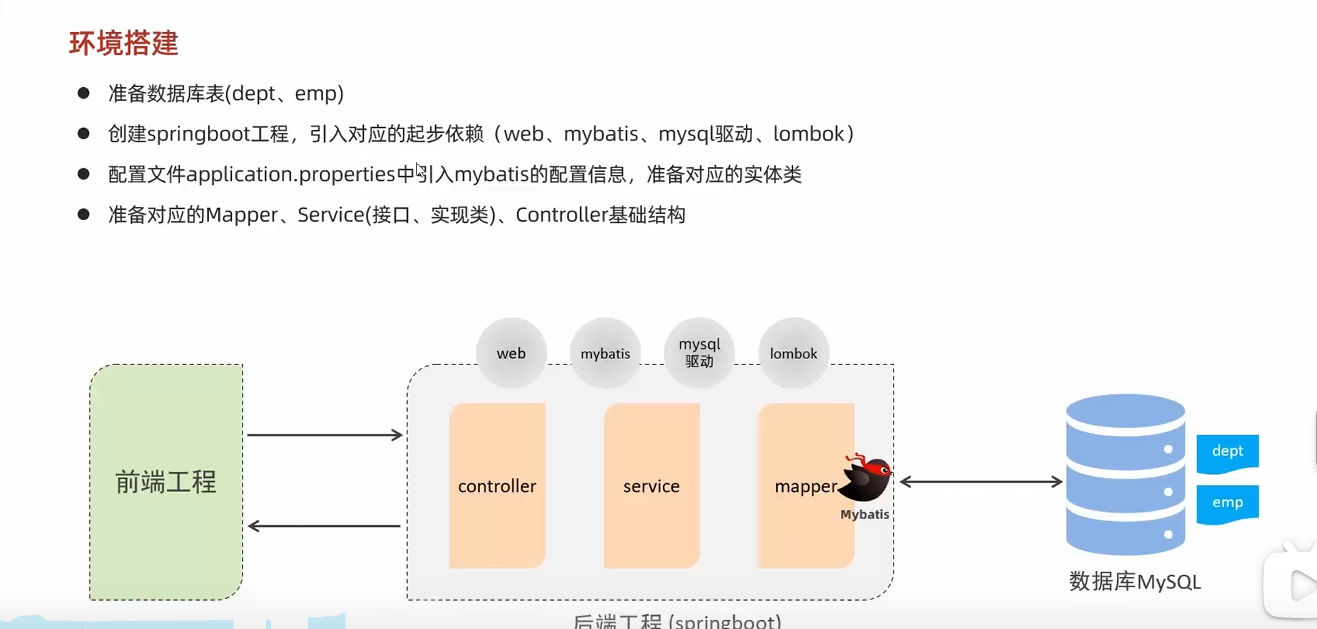
准备工作
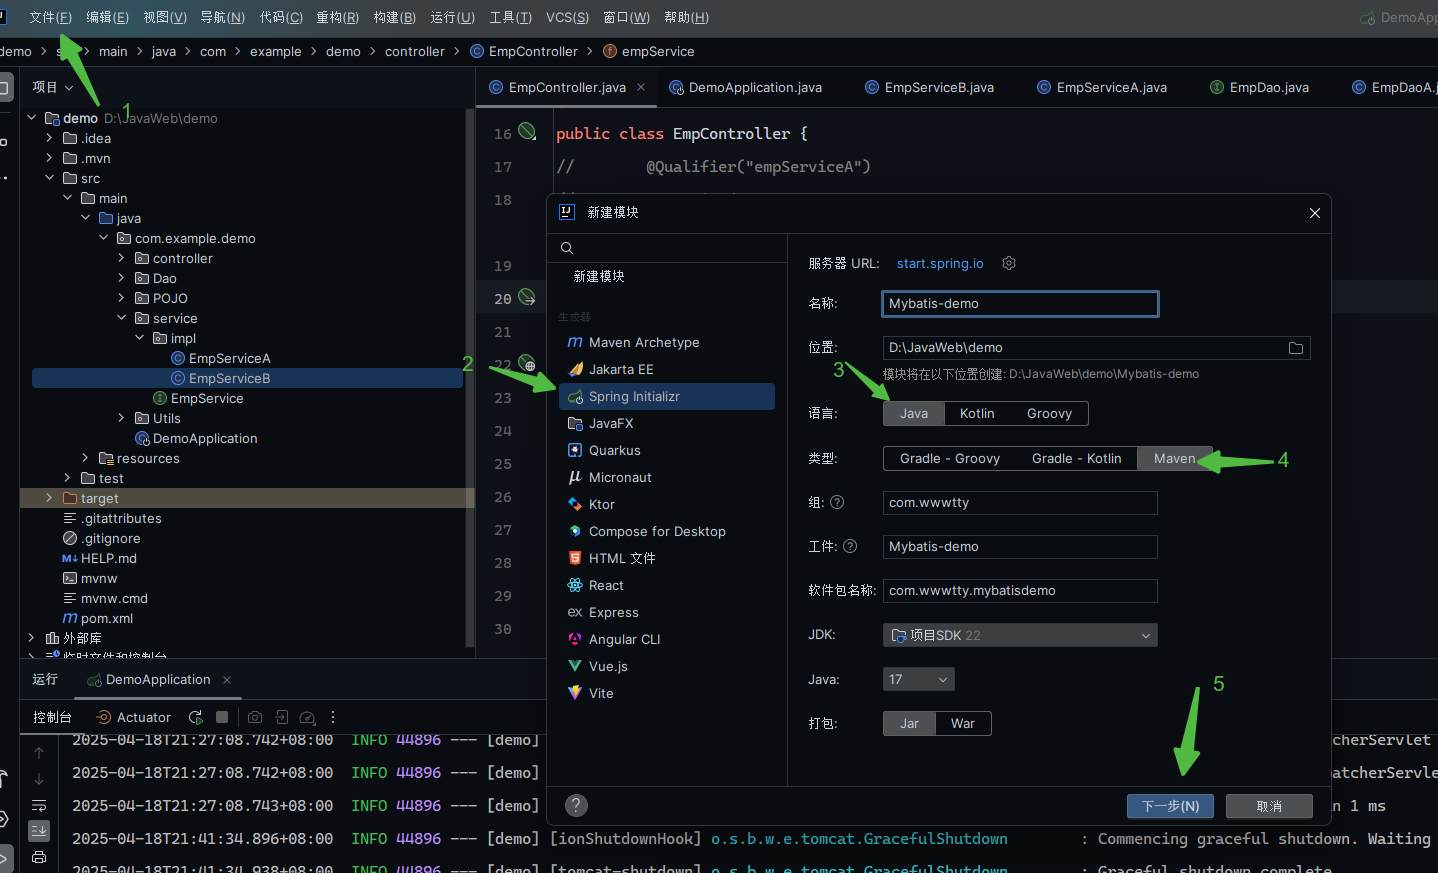
springboot工程
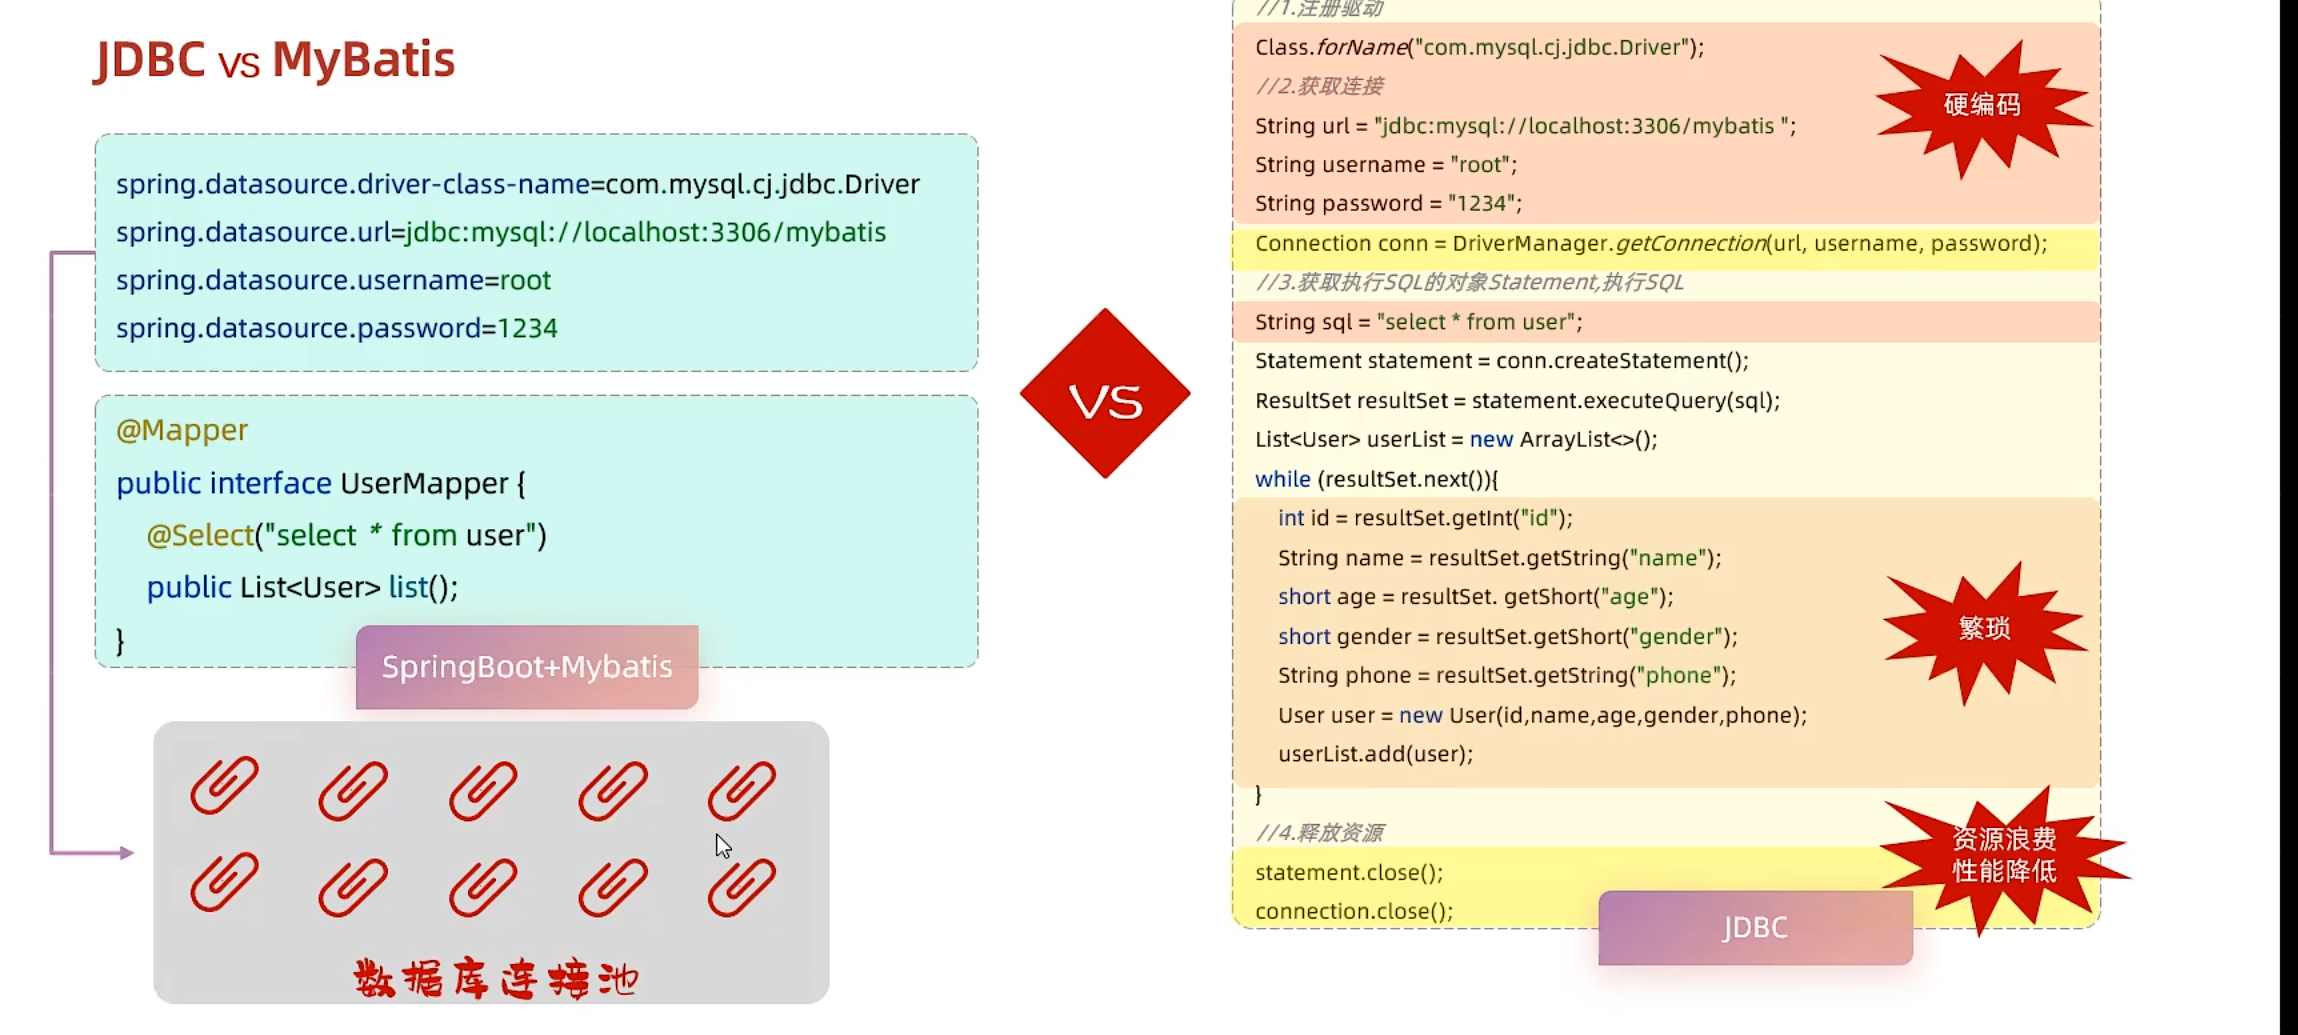
配置文件 1 2 3 4 5 6 7 8 spring.application.name =Mybatis-demo spring.datasource.driver-class-name =com.mysql.cj.jdbc.Driver spring.datasource.url =jdbc:mysql://localhost:3306/mybatis spring.datasource.username =root spring.datasource.password =114514
@Mapper注解 Mybatis中Mapper层其实就和Dao层差不多
在运行时,会自动生成该接口的实现类对象(代理对象),并且将该对象交给IOC容器管理
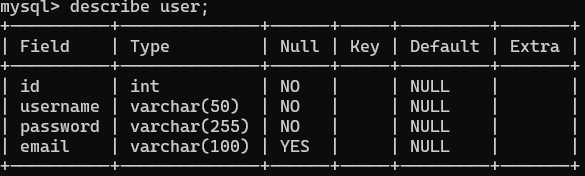
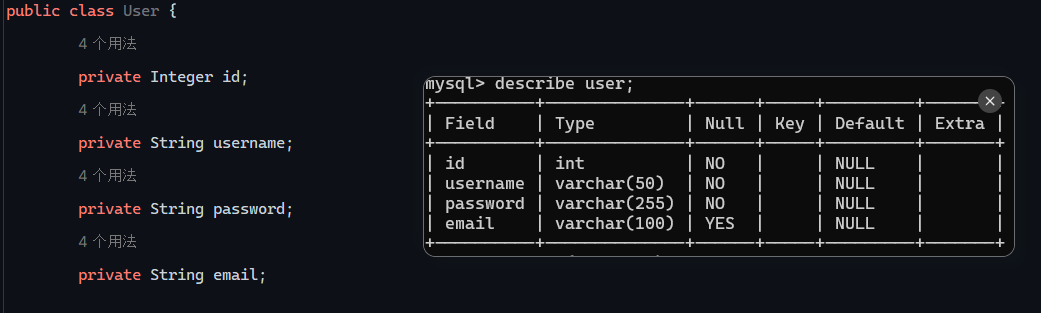
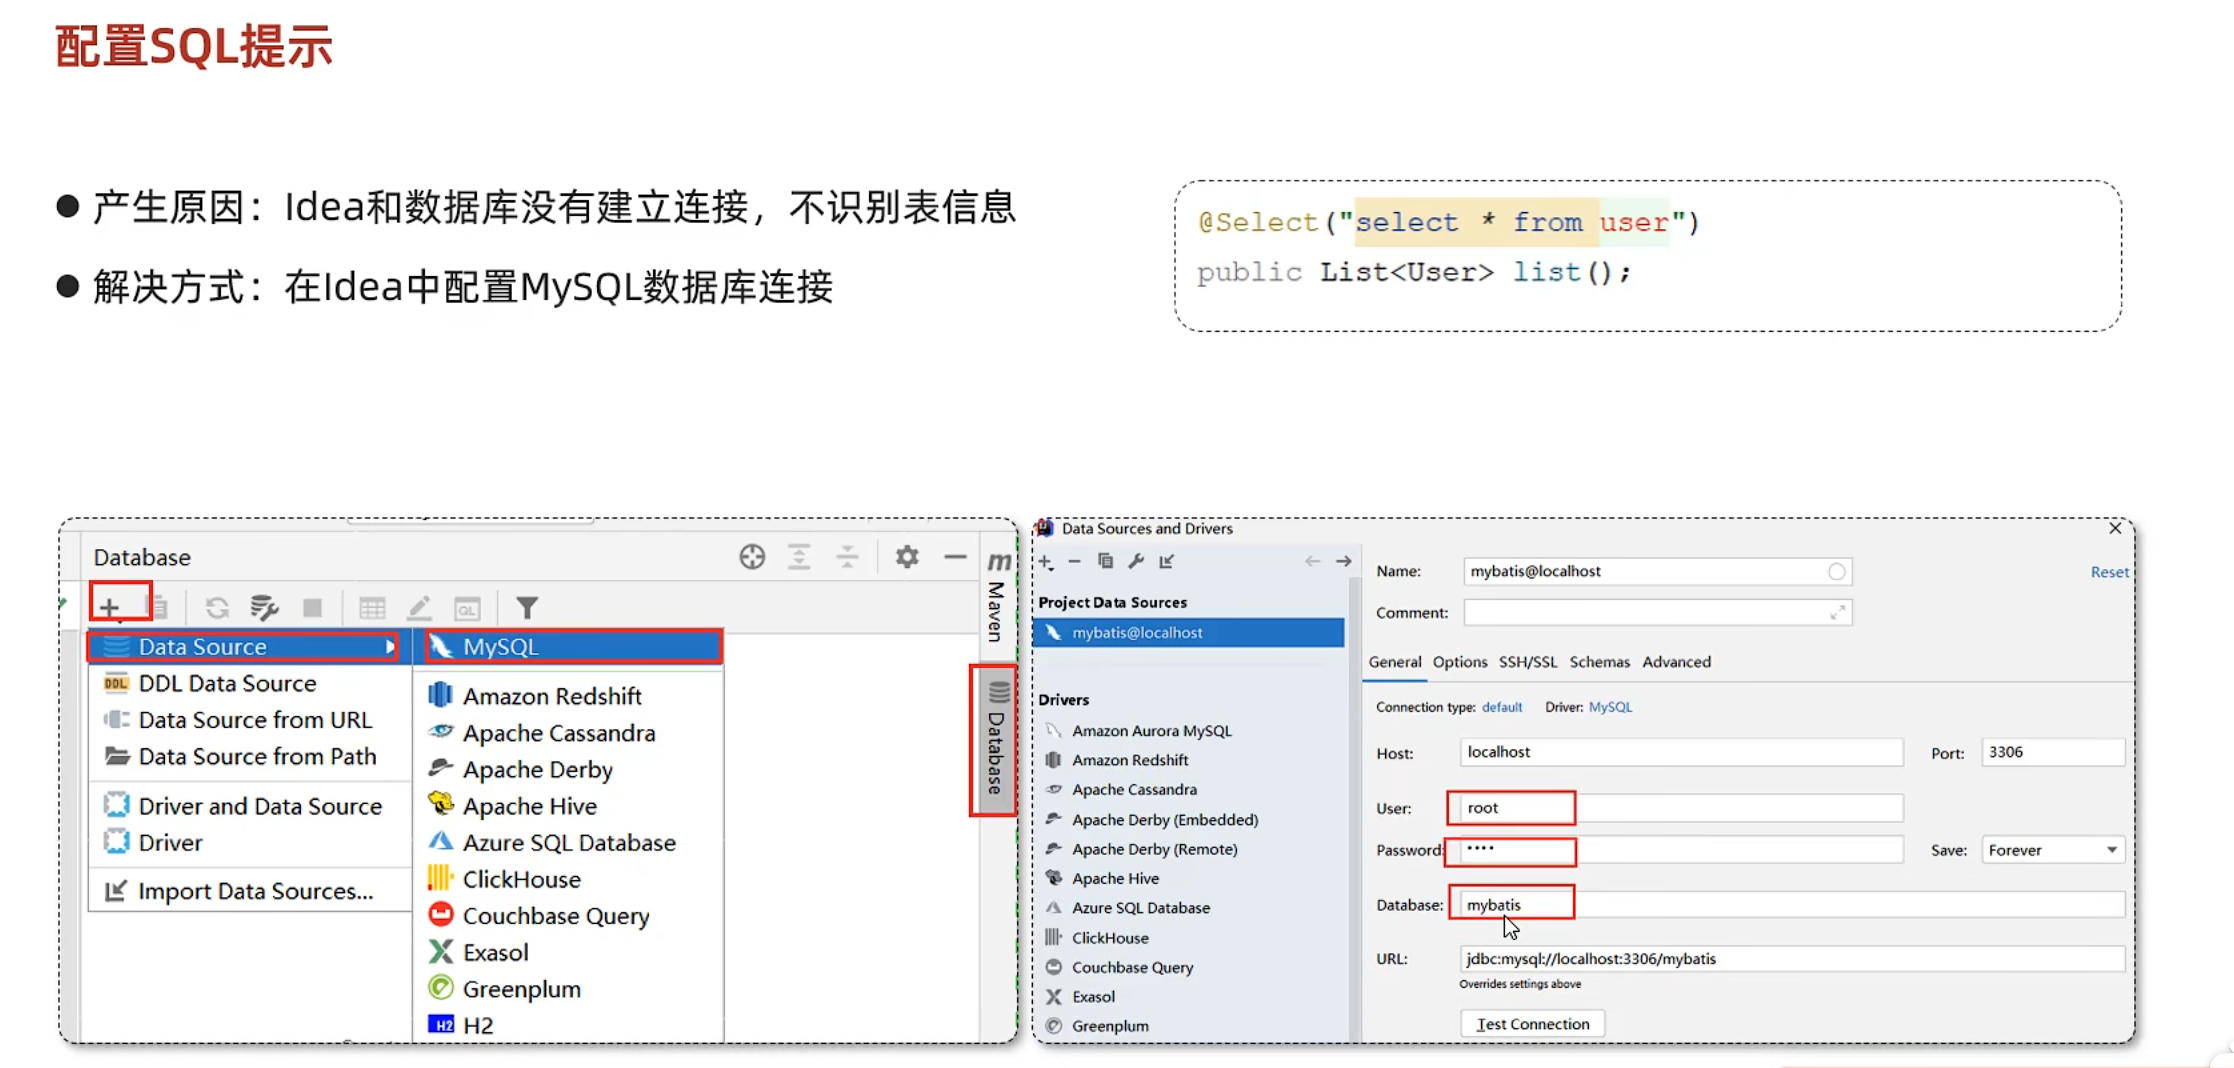
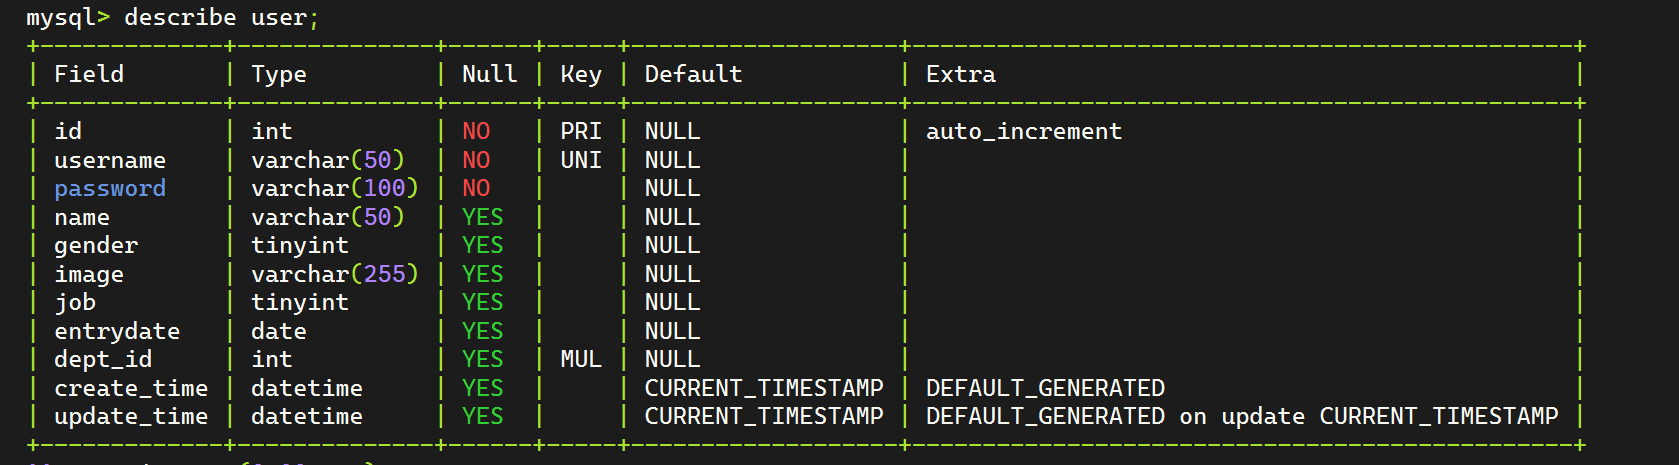
1 2 3 4 5 6 7 8 9 10 11 12 13 package com.wwwtty.mybatisdemo.mapper;import com.wwwtty.mybatisdemo.pojo.User;import org.apache.ibatis.annotations.Mapper;import org.apache.ibatis.annotations.Select;import java.util.List;@Mapper public interface UserMapper { @Select("select* from user") public List<User> list () ; }
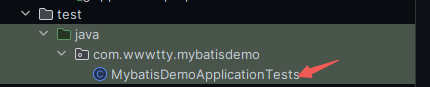
进行单元测试
1 2 3 4 5 6 7 8 9 10 11 12 13 14 15 16 17 18 19 20 21 22 23 24 package com.wwwtty.mybatisdemo;import com.wwwtty.mybatisdemo.mapper.UserMapper;import com.wwwtty.mybatisdemo.pojo.User;import org.junit.jupiter.api.Test;import org.springframework.beans.factory.annotation.Autowired;import org.springframework.boot.test.context.SpringBootTest;import java.util.List;@SpringBootTest class MybatisDemoApplicationTests { @Autowired UserMapper userMapper; @Test public void UserListTest () { List<User> list = userMapper.list(); list.stream().forEach(user ->{ System.out.println(user); }); } }
@SpringBootTest进行单元测试时,也会加载整个springboot环境
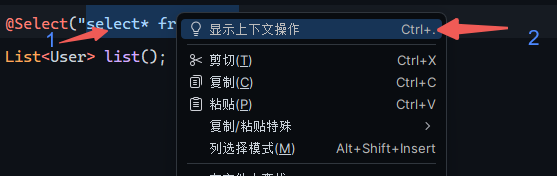
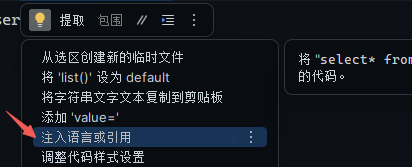
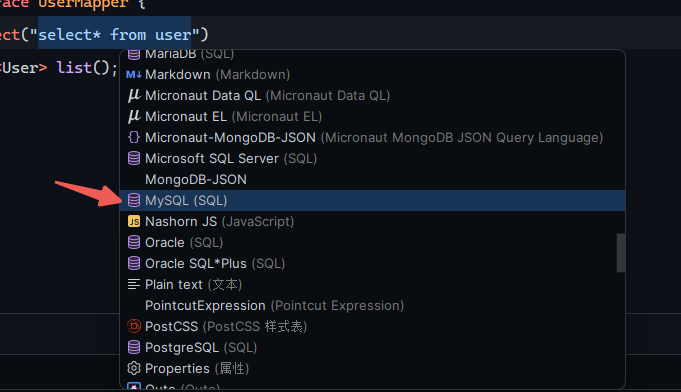
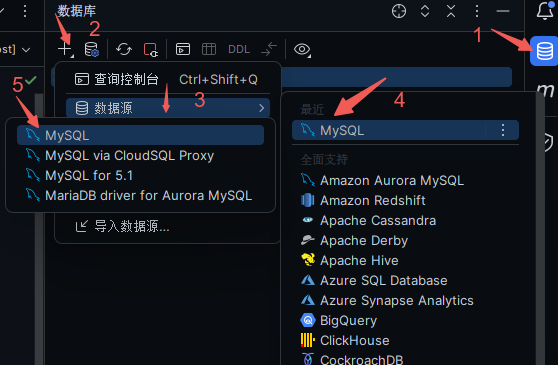
配置sql提示
功能强大qaq:
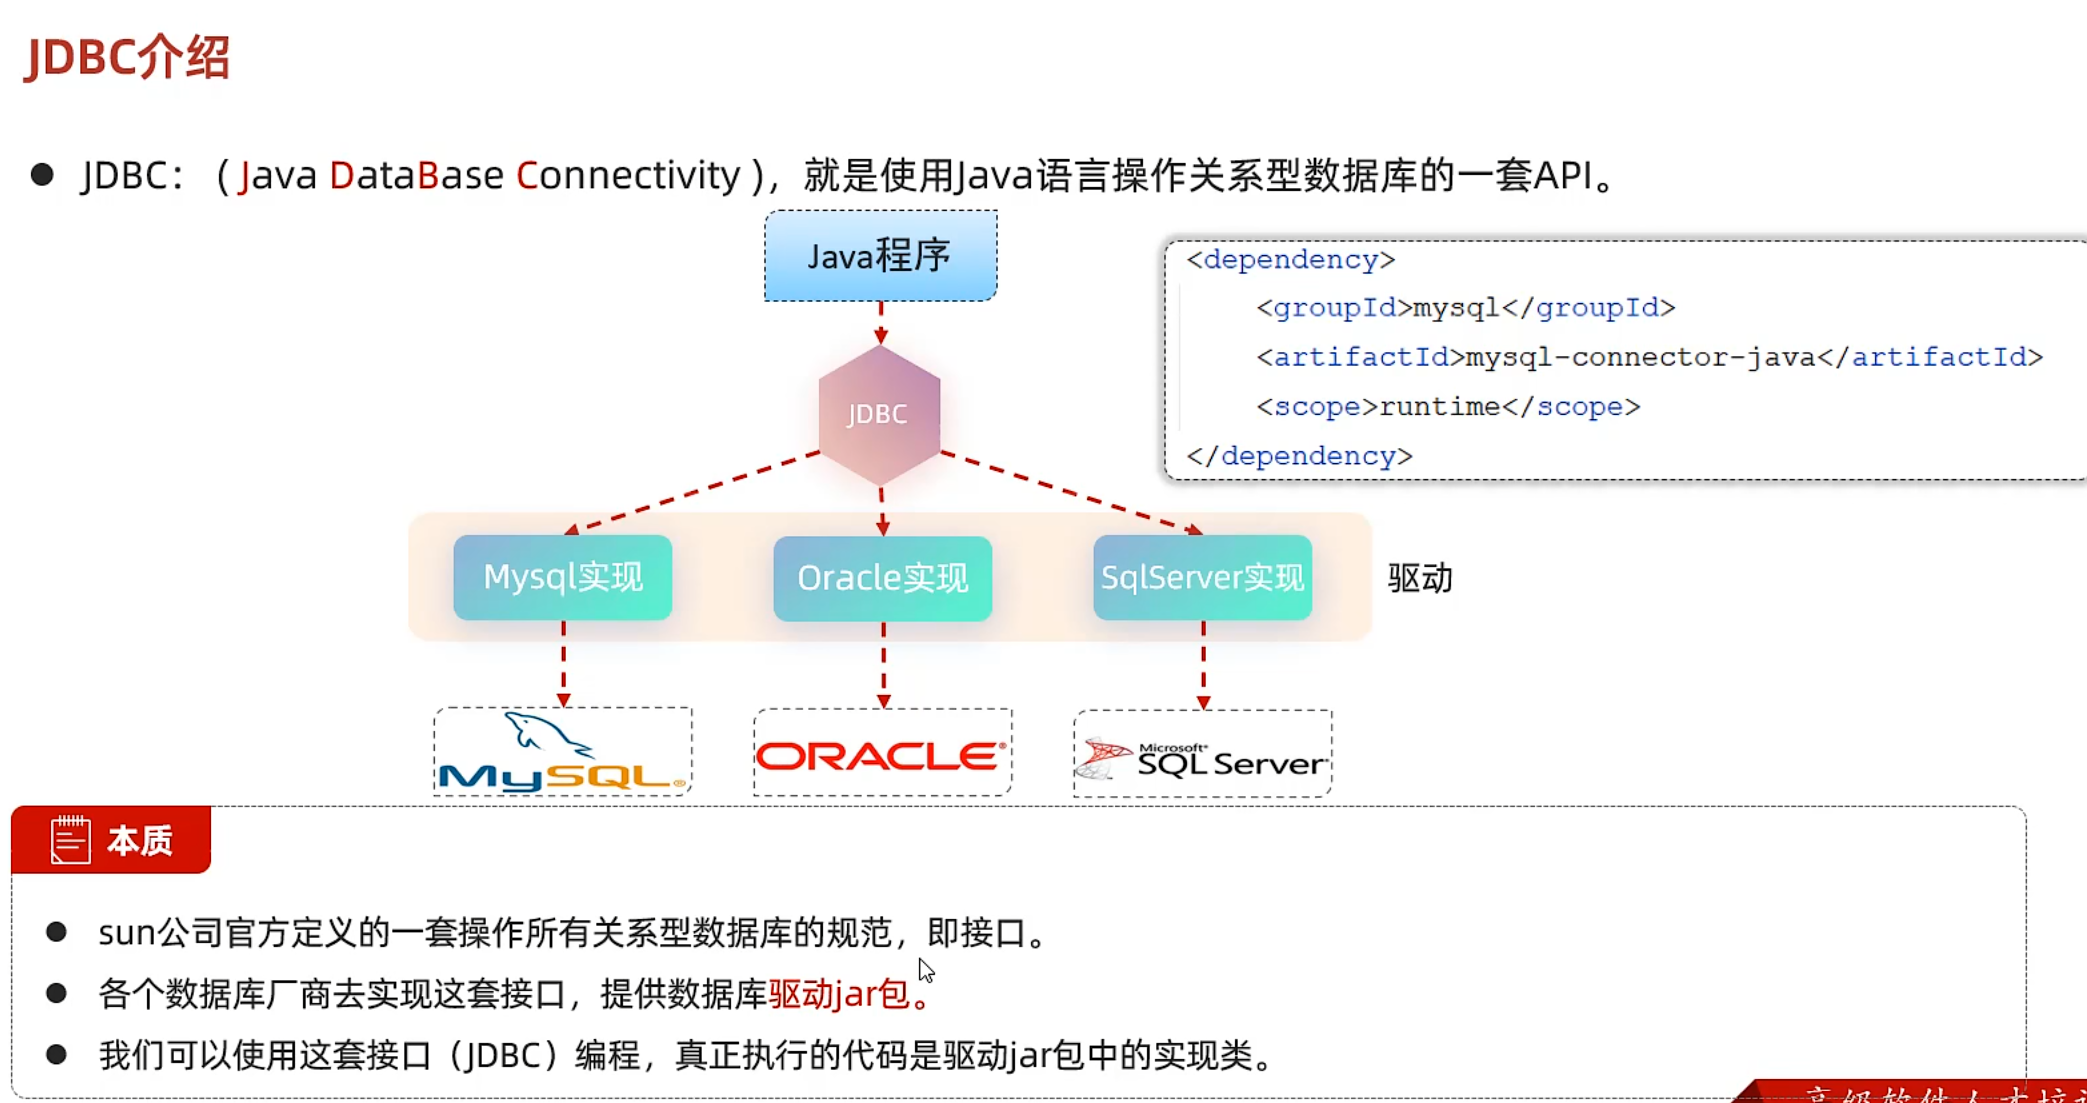
JDBC (面向接口编程)
JDBC只提供接口,由数据库厂商实现具体方法
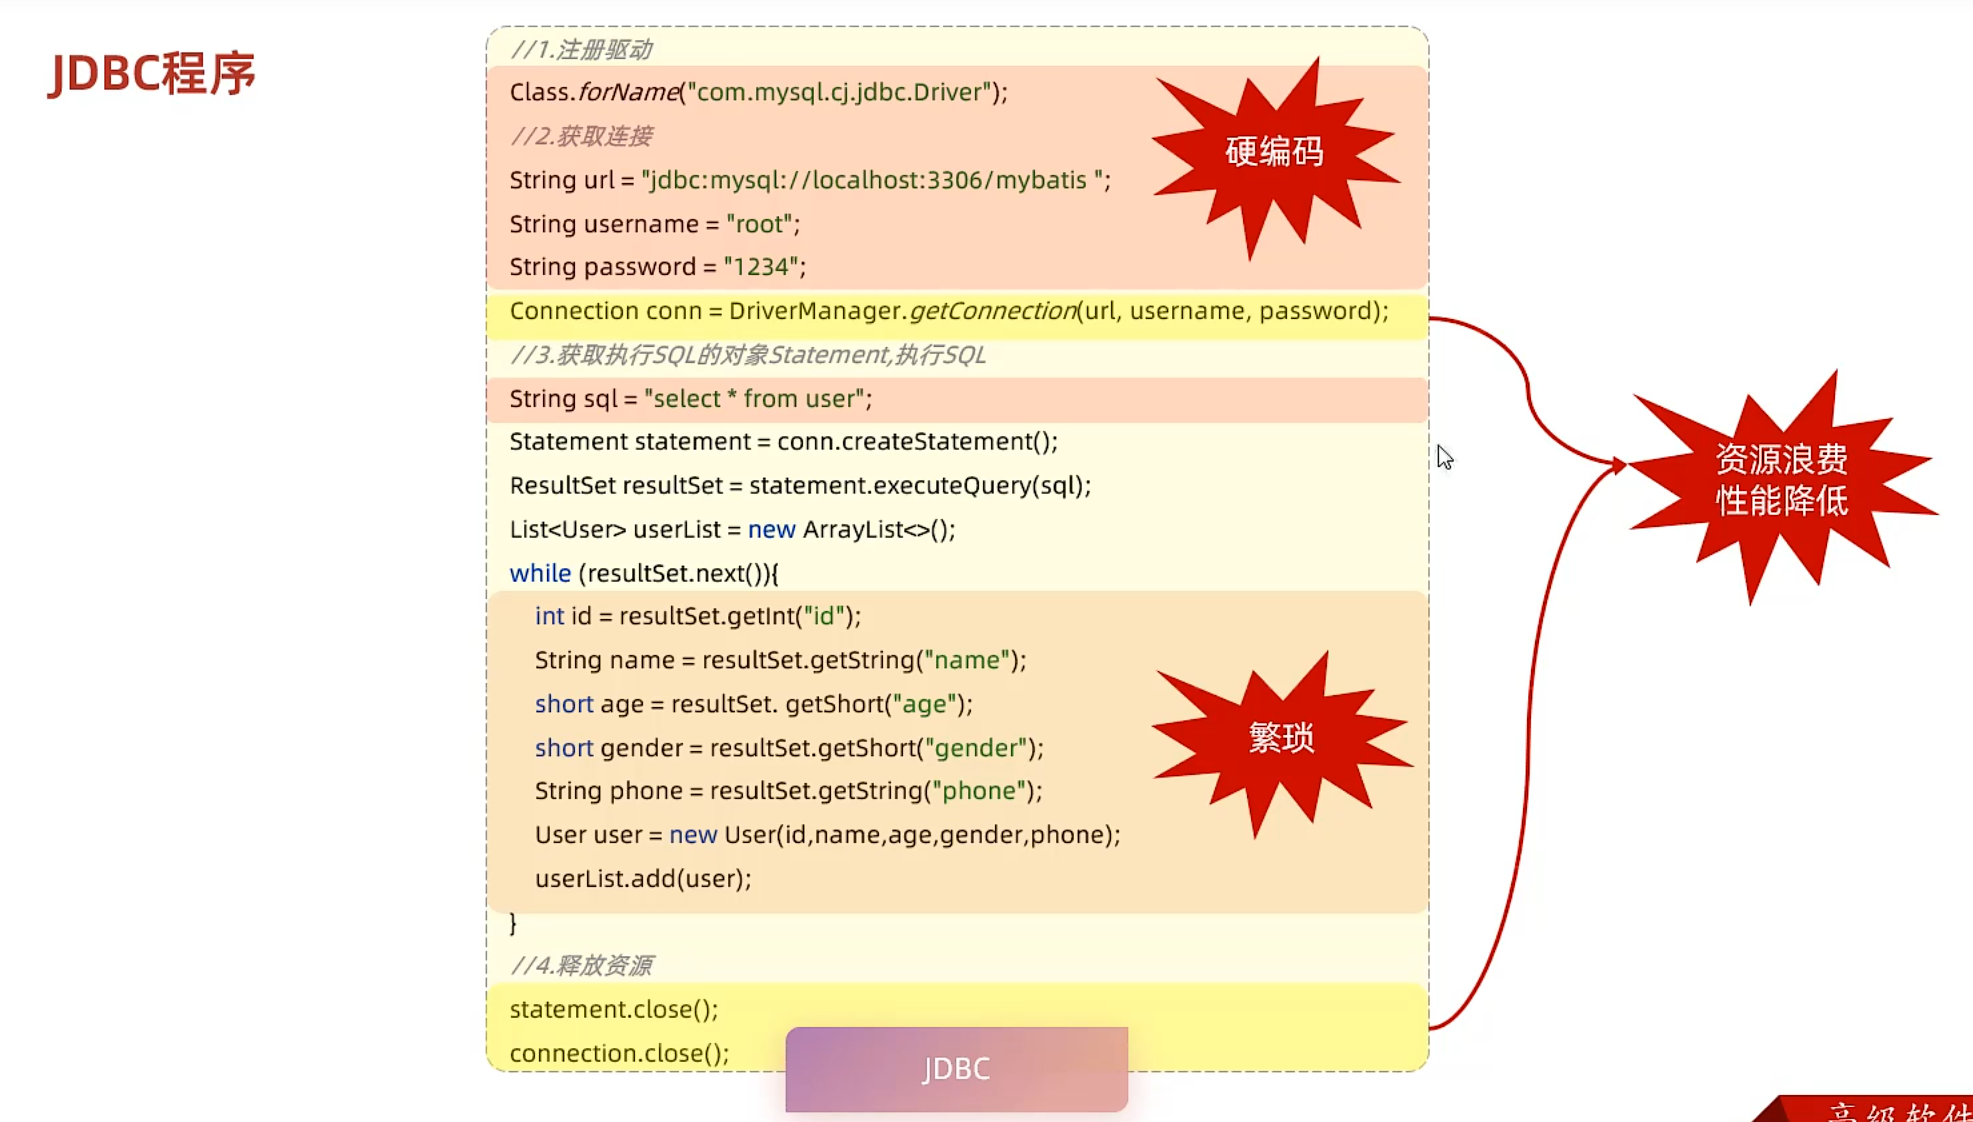
缺点:
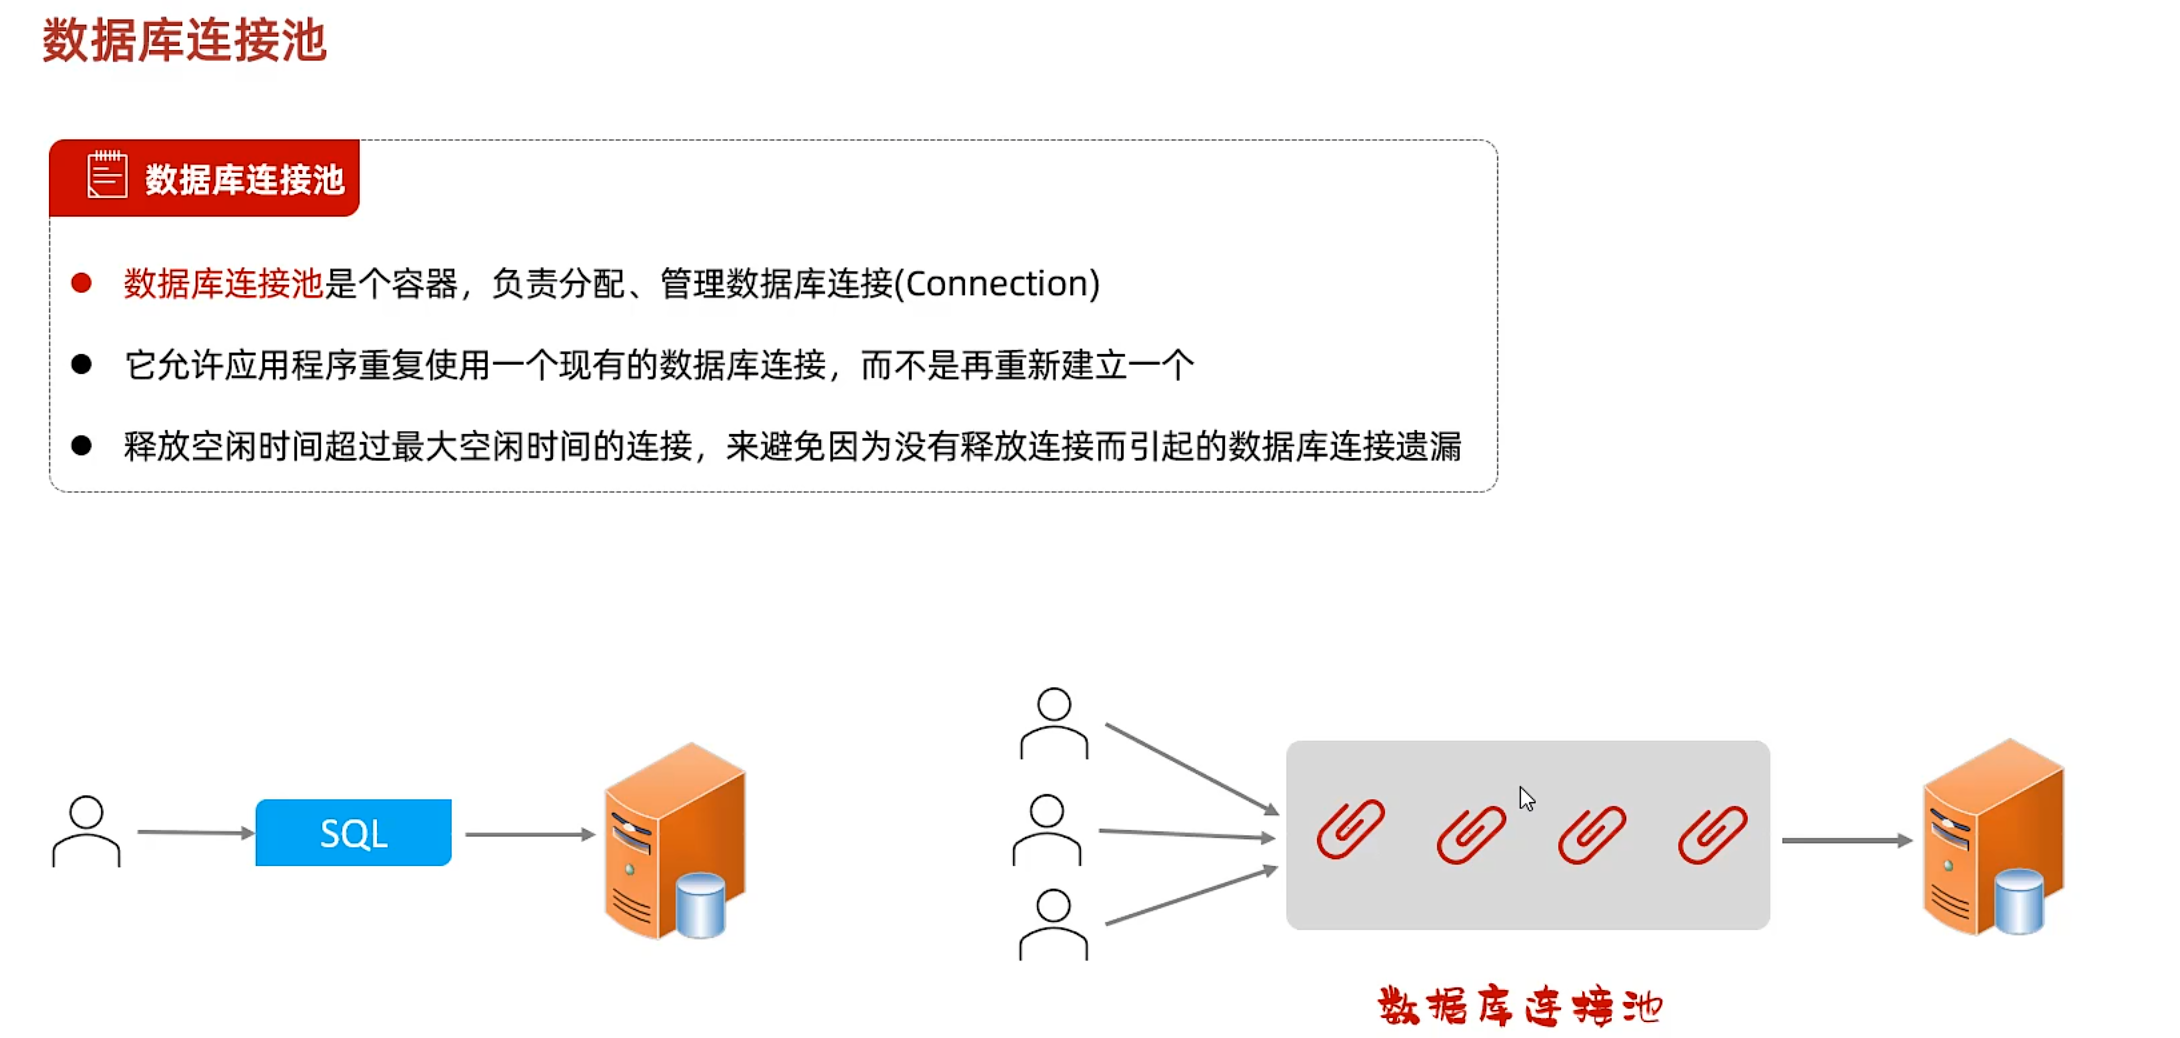
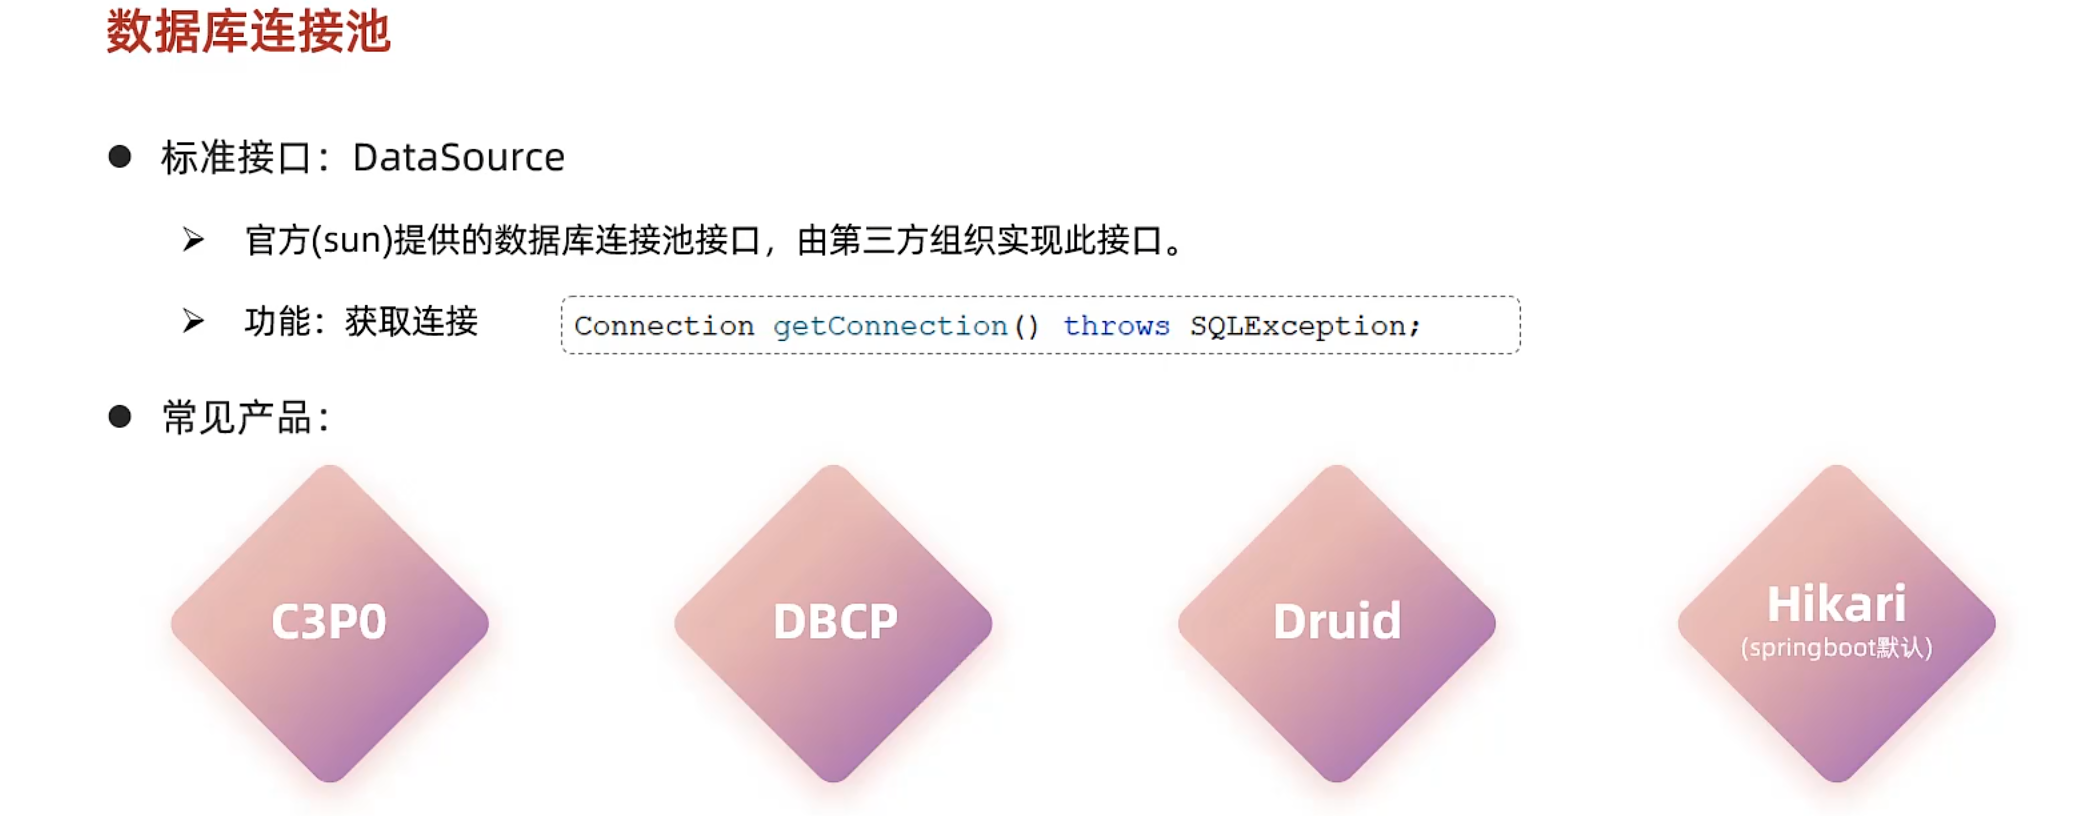
数据库连接池
实现了DataSource接口
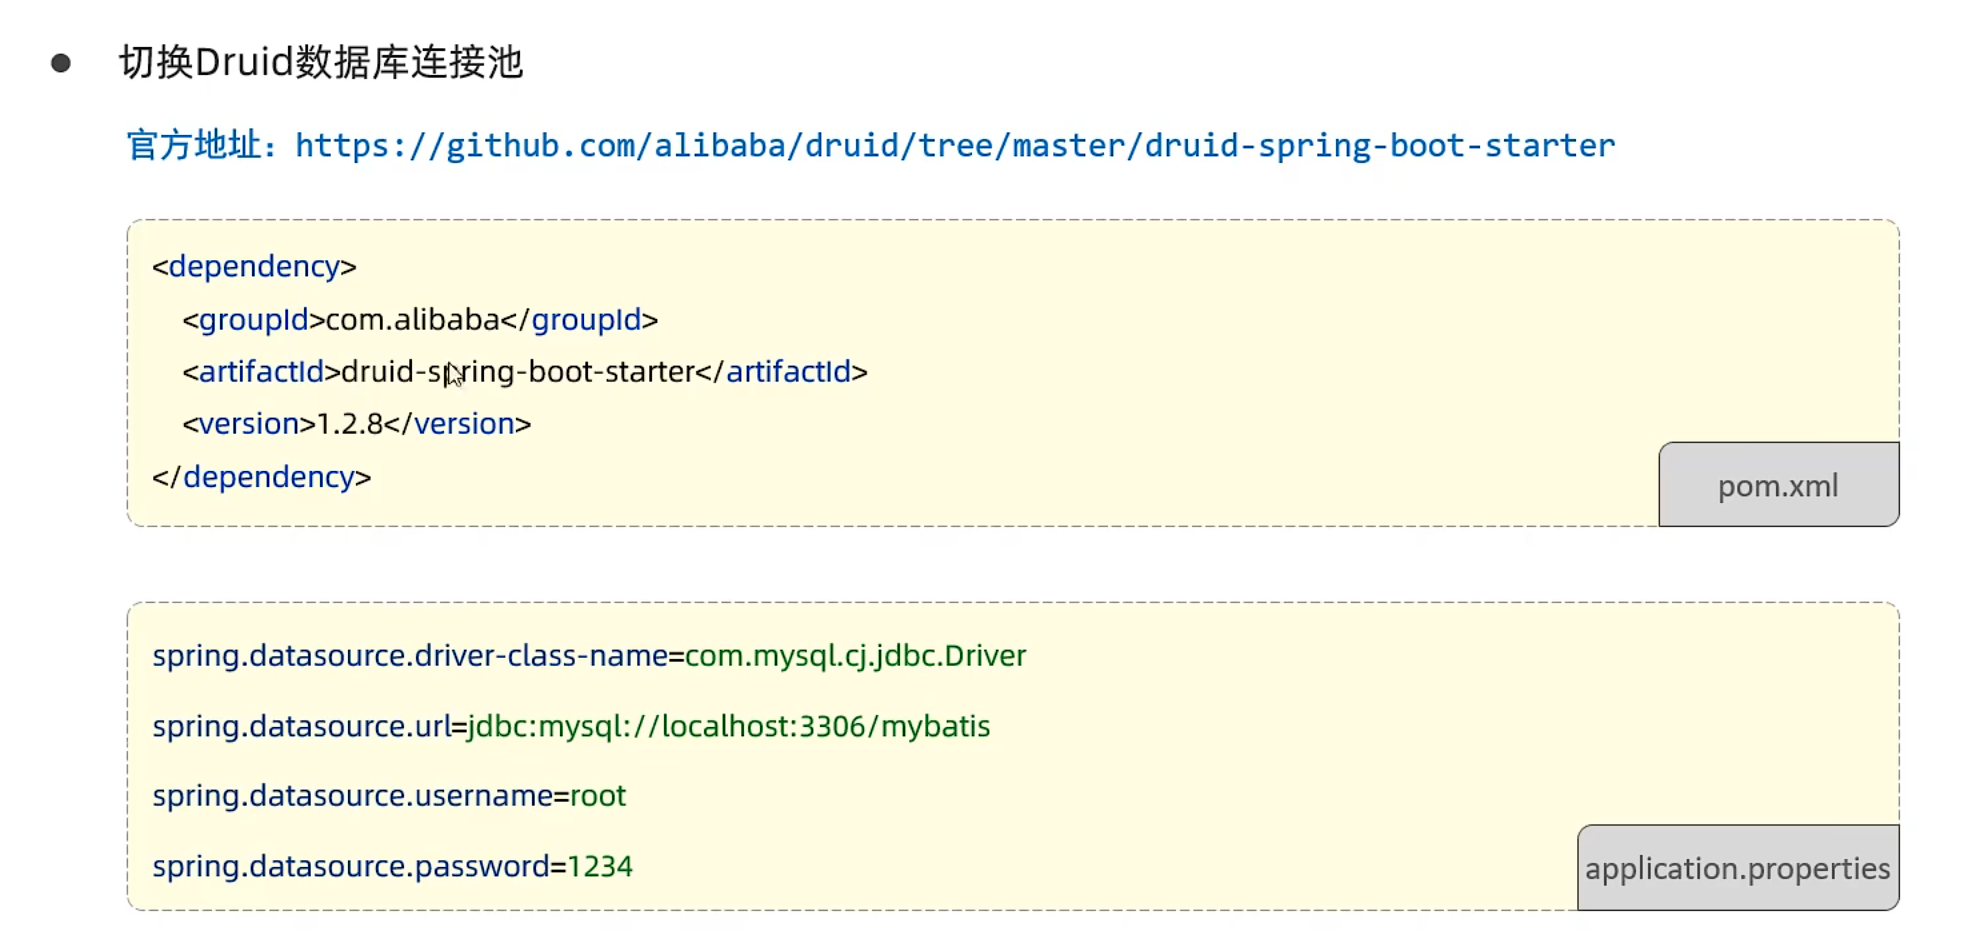
切换连接池 只需要引入maven依赖
1 2 3 4 5 <dependency > <groupId > com.alibaba</groupId > <artifactId > druid-spring-boot-starter</artifactId > <version > 1.2.8</version > </dependency >
本地测试还得在properties文件加上:
1 spring.datasource.type =com.alibaba.druid.pool.DruidDataSource
才能:
或者:
由于我的springboot版本为:
因此坐标中的druid-spring-boot-starter应该改成druid-spring-boot-3-starter
1 2 3 4 5 <dependency > <groupId > com.alibaba</groupId > <artifactId > druid-spring-boot-3-starter</artifactId > <version > 1.2.22</version > </dependency >
另一种配置方式
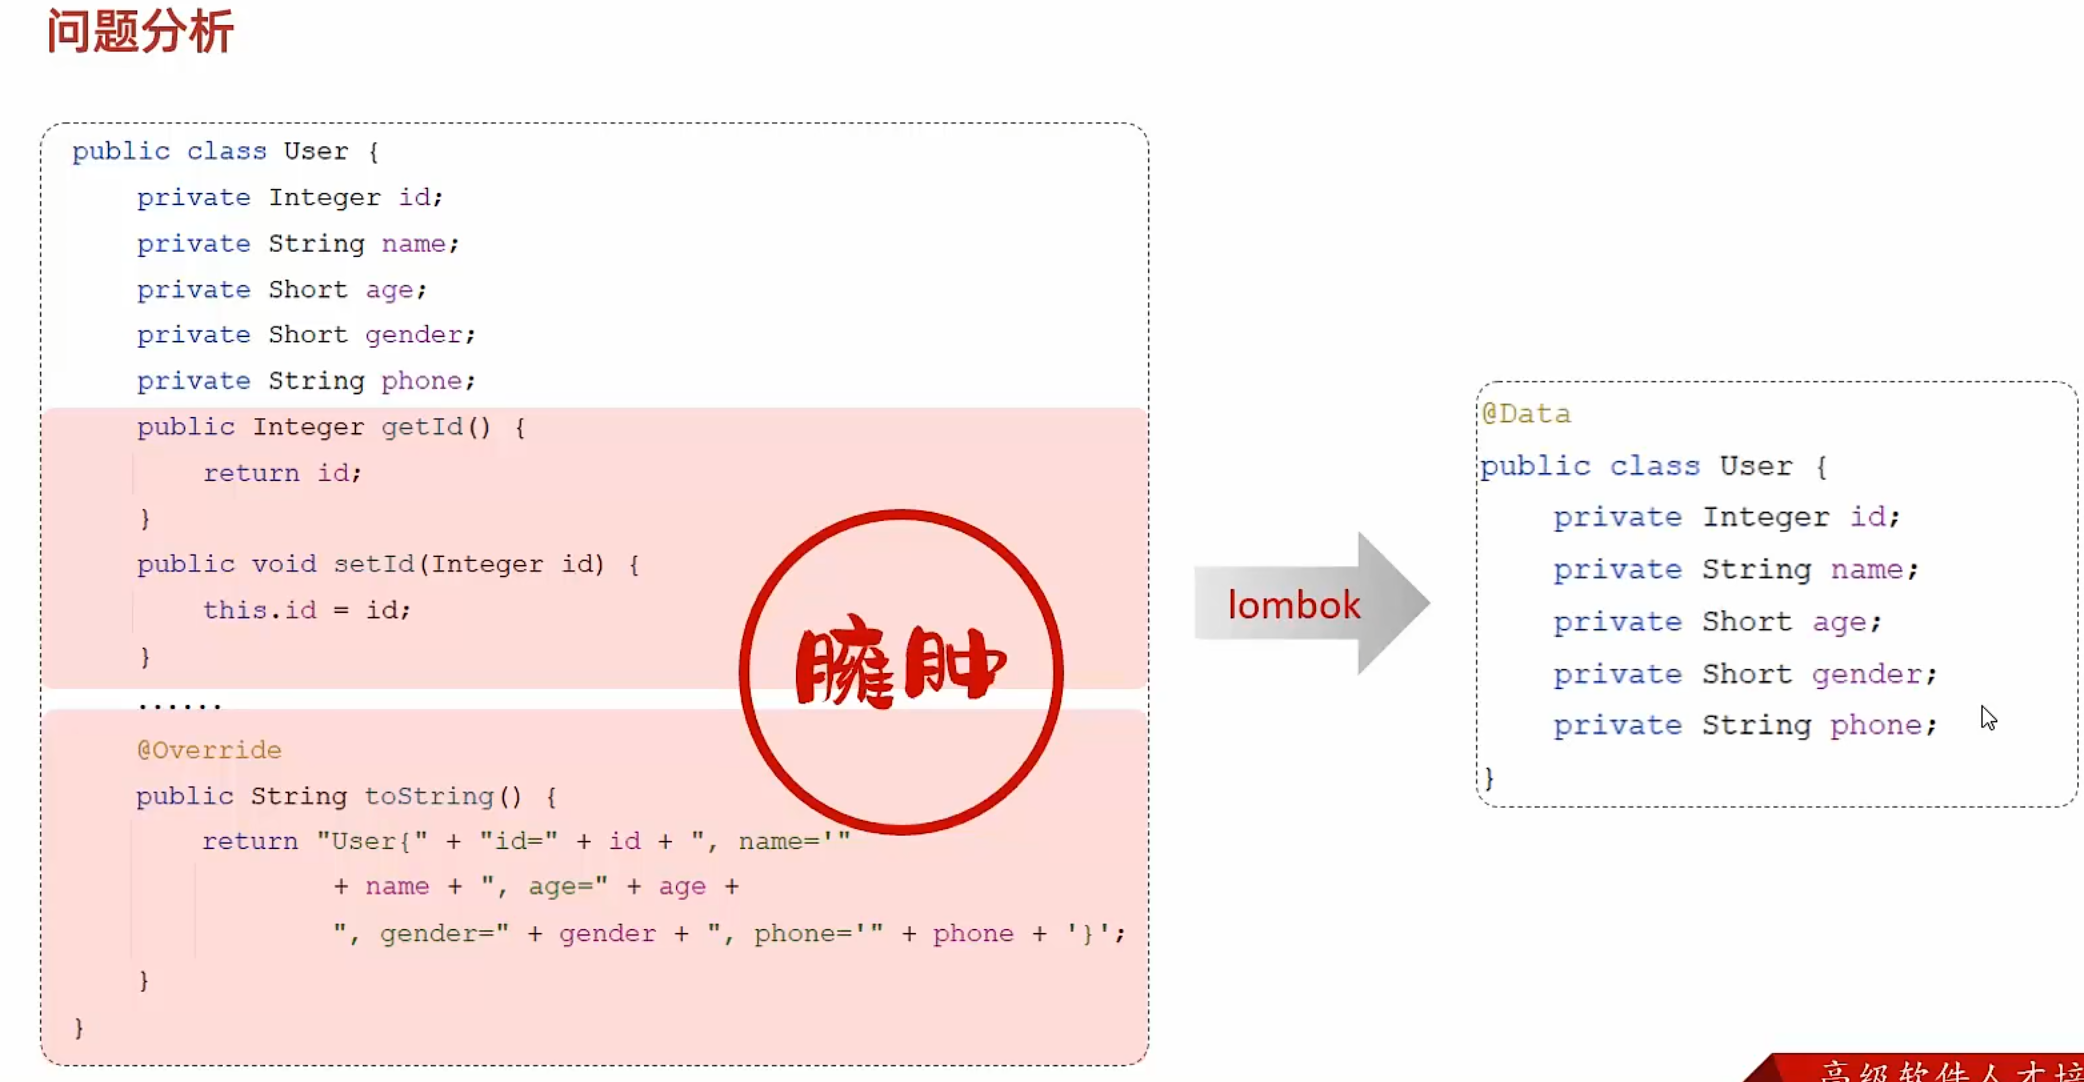
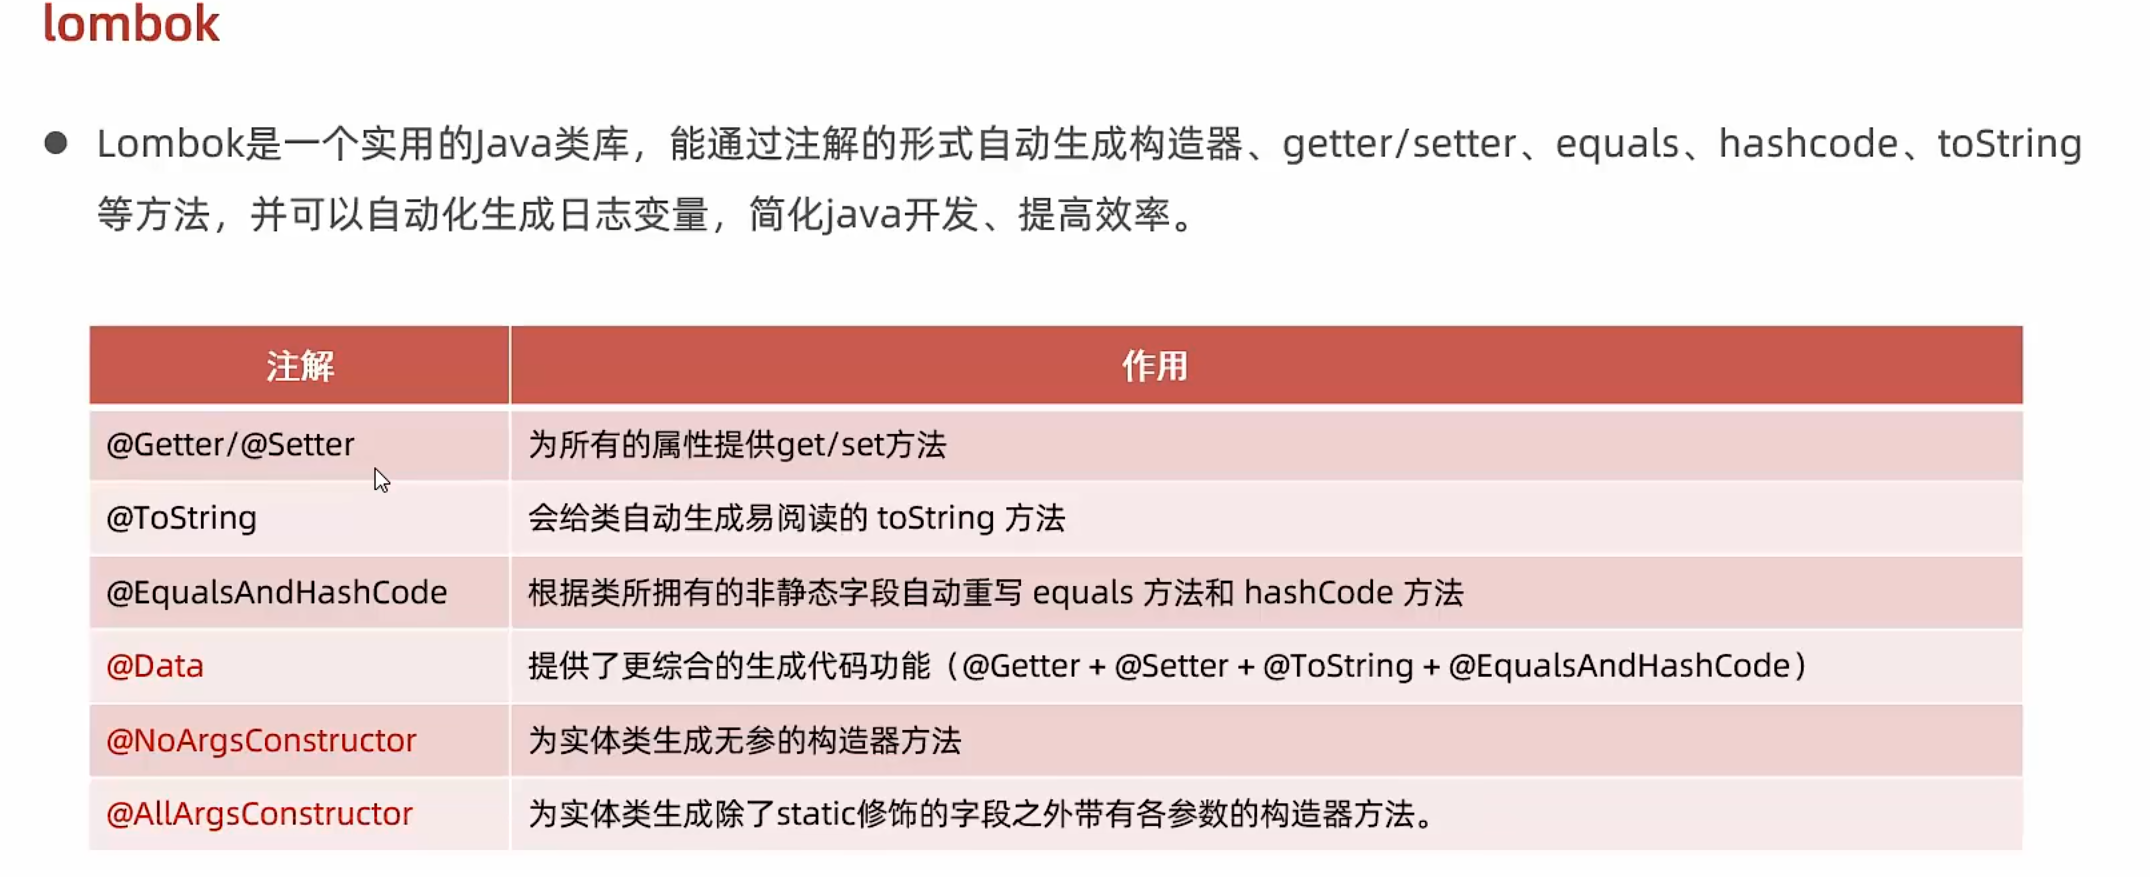
lombok pojo类算上getter/setter等方法之后,太过于臃肿
引入依赖 1 2 3 4 <dependency > <groupId > org.projectlombok</groupId > <artifactId > lombok</artifactId > </dependency >
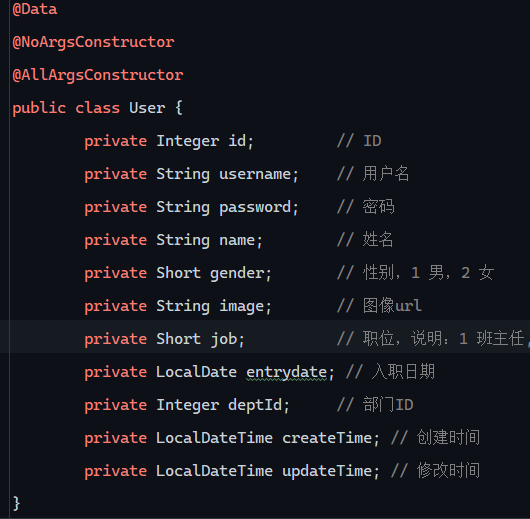
@Data 包含了@Getter,@Setter,@ToString,@EqualsAndHashCode
不包含构造器
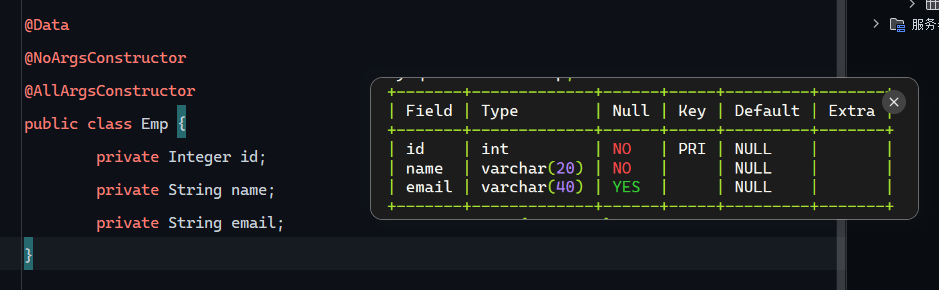
1
2
3
4
5
6
7
8
9
10
11
12
13
14
15
16
package com.wwwtty.mybatisdemo.pojo;import lombok.AllArgsConstructor;import lombok.Data;import lombok.Getter;import lombok.NoArgsConstructor;@Data @NoArgsConstructor @AllArgsConstructor public class User { private Integer id; private String username; private String password; private String email; }
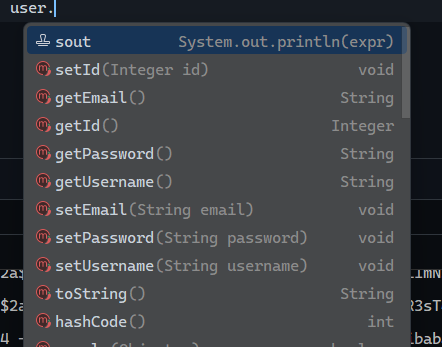
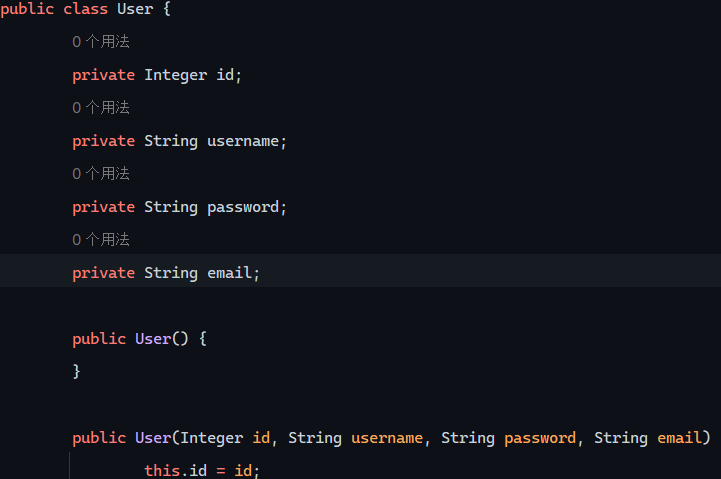
上述注解的作用在于根据注解生成一系列方法
User的字节码文件反编译:
Mybatis基础操作 删除操作 @Delete 1 2 3 4 5 6 7 8 9 10 package com.wwwtty.basic_op.Mapper;import org.apache.ibatis.annotations.Delete;import org.apache.ibatis.annotations.Mapper;@Mapper public interface EmpMapper { @Delete("delete from emp where id = 1") void delete () ; }
这么做的局限性是,id是静态的,但是前端传进来的id参数肯定是动态的
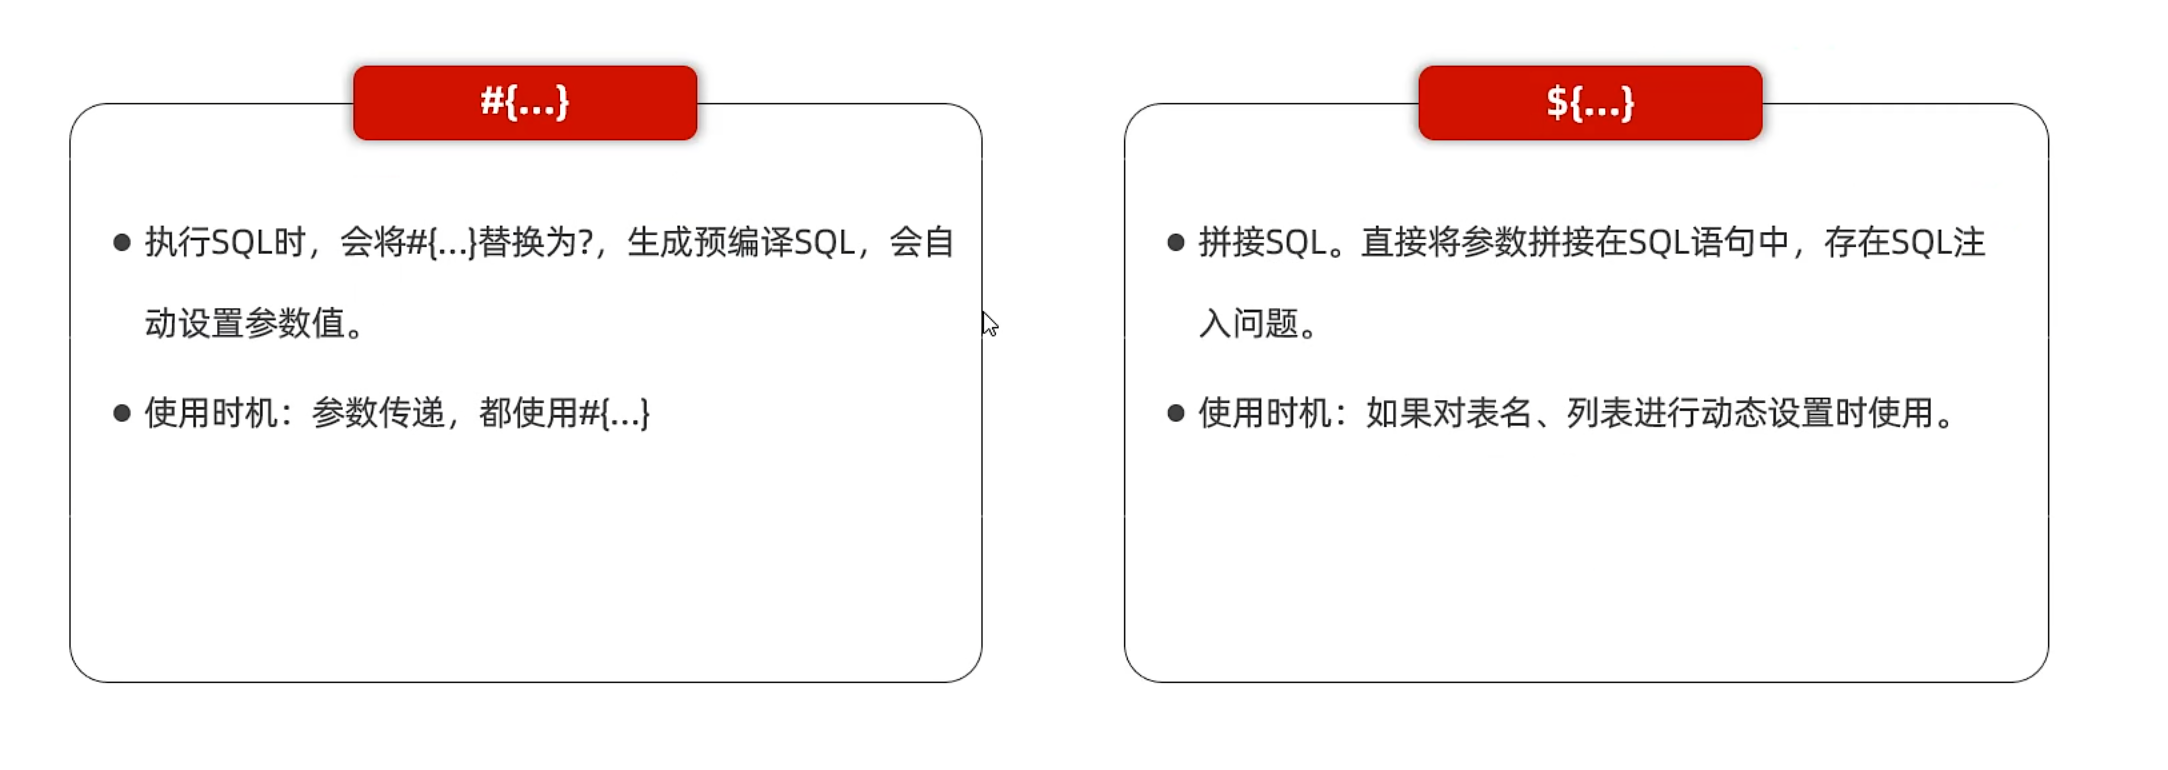
传递参数 在@Delete中将参数用#{}包围
1 2 3 4 5 6 7 8 9 10 package com.wwwtty.basic_op.Mapper;import org.apache.ibatis.annotations.Delete;import org.apache.ibatis.annotations.Mapper;@Mapper public interface EmpMapper { @Delete("delete from emp where id = #{id}") void delete (Integer id) ; }
如何拿到影响的记录数呢,改一下返回值就可以
1 2 3 4 5 6 7 8 9 10 package com.wwwtty.basic_op.Mapper;import org.apache.ibatis.annotations.Delete;import org.apache.ibatis.annotations.Mapper;@Mapper public interface EmpMapper { @Delete("delete from emp where id = 1") Integer delete () ; }
1 2 3 4 @Test void contextLoads () { System.out.println(empMapper.delete(5 )); }
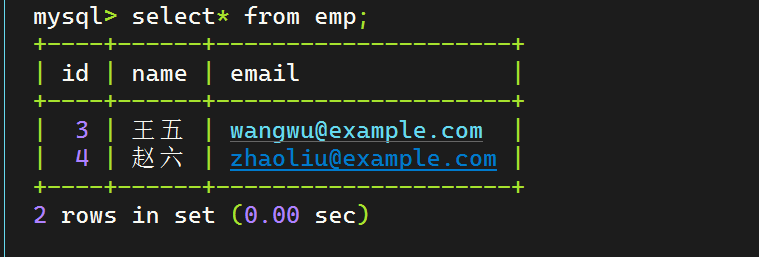
测试 表内容如下:
用@Autowired注入
1 2 3 4 5 6 7 8 9 10 11 12 13 14 15 16 package com.wwwtty.basic_op;import com.wwwtty.basic_op.Mapper.EmpMapper;import org.junit.jupiter.api.Test;import org.springframework.beans.factory.annotation.Autowired;import org.springframework.boot.test.context.SpringBootTest;@SpringBootTest class BasicOpApplicationTests { @Autowired private EmpMapper empMapper; @Test void contextLoads () { empMapper.delete(5 ); } }
Mybatis日志输出 1 2 mybatis.configuration.log-impl =org.apache.ibatis.logging.stdout.StdOutImpl
运行结果:
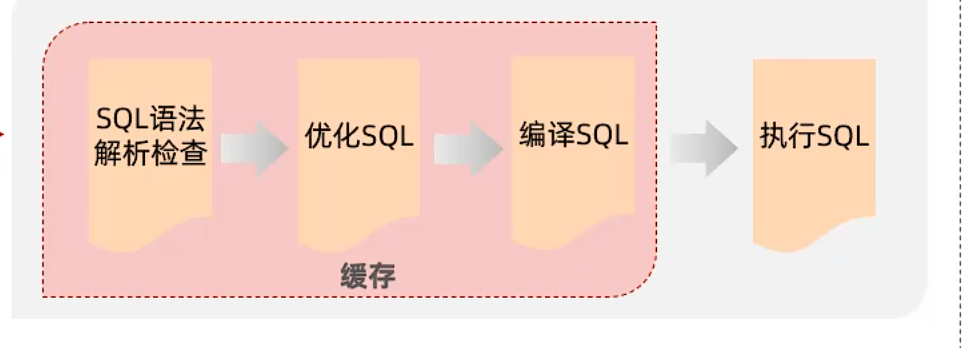
使用了参数化查询技术(预编译查询)
预编译SQL优势
参数占位符
新增操作 @Insert insert中的字段太多,可以直接封装成一个对象
用lombok封装getter/setter等方法
1 2 3 4 5 6 7 8 9 10 11 package com.wwwtty.mybatis_insert.Mapper;import com.wwwtty.mybatis_insert.pojo.Emp;import org.apache.ibatis.annotations.Insert;import org.apache.ibatis.annotations.Mapper;@Mapper public interface EmpMapper { @Insert("insert into emp (id,name,email) values (#{id},#{name},#{email})") void Insert (Emp emp) ; }
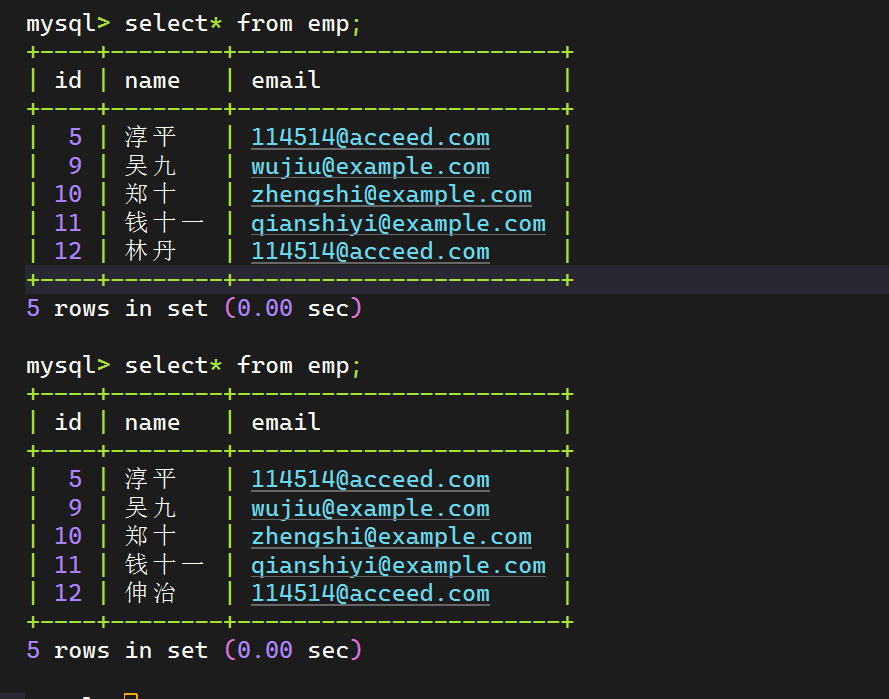
1 2 3 4 5 6 7 8 9 10 11 12 13 14 15 16 17 18 19 20 21 22 package com.wwwtty.mybatis_insert;import com.wwwtty.mybatis_insert.Mapper.EmpMapper;import com.wwwtty.mybatis_insert.pojo.Emp;import org.junit.jupiter.api.Test;import org.springframework.beans.factory.annotation.Autowired;import org.springframework.boot.test.context.SpringBootTest;@SpringBootTest class MybatisInsertApplicationTests { @Autowired EmpMapper empMapper; @Test void contextLoads () { Emp emp = new Emp (); emp.setId(5 ); emp.setEmail("114514@acceed.com" ); emp.setName("淳平" ); empMapper.Insert(emp); } }
日志输出:
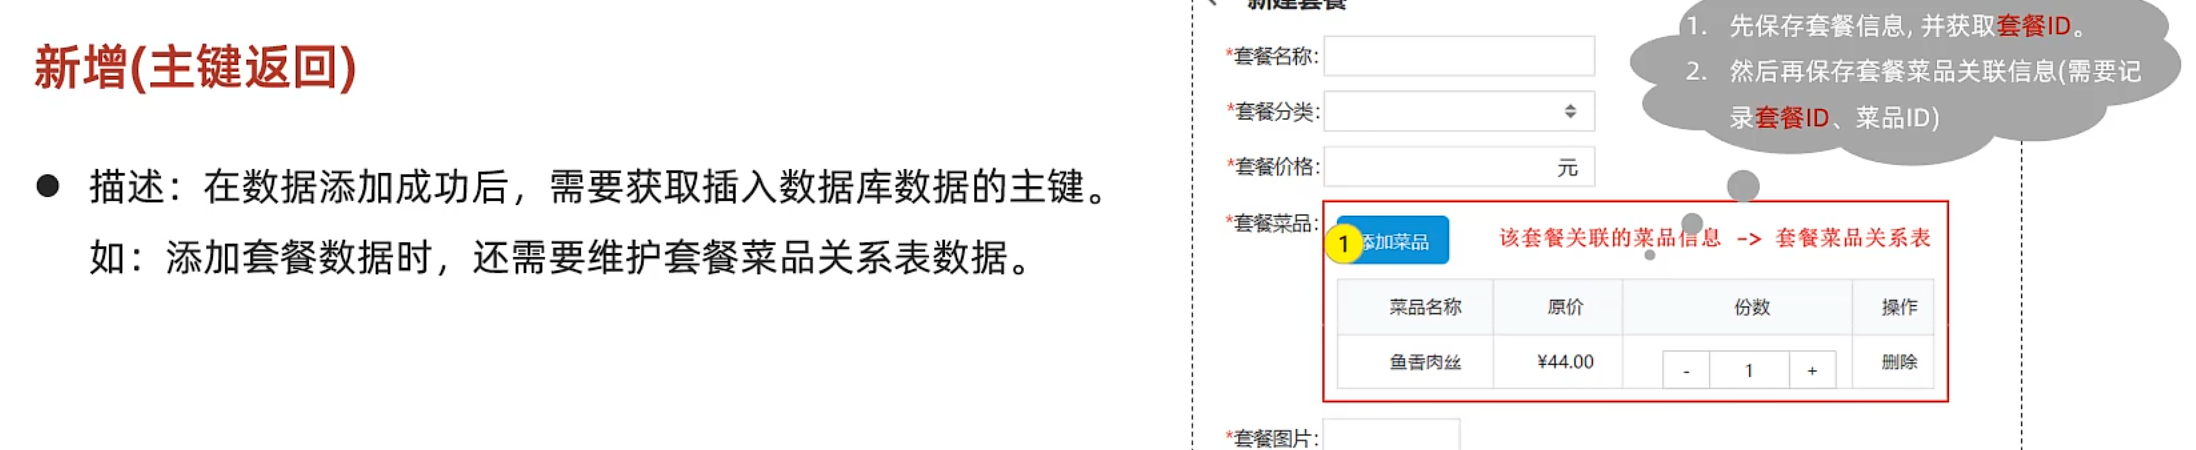
主键返回
@Options 1 2 3 4 5 6 7 8 9 10 11 12 13 14 15 16 17 18 package com.wwwtty.mybatis_insert.Mapper;import com.wwwtty.mybatis_insert.pojo.Emp;import org.apache.ibatis.annotations.Insert;import org.apache.ibatis.annotations.Mapper;import org.apache.ibatis.annotations.Options;@Mapper public interface EmpMapper { @Options(keyProperty = "id", useGeneratedKeys = true) @Insert("insert into emp (name,email) values (#{name},#{email})") void Insert (Emp emp) ; }
这样一来getId()就不会返回null
1 2 3 4 5 6 7 8 9 10 11 12 13 14 15 16 17 18 19 20 21 22 23 package com.wwwtty.mybatis_insert;import com.wwwtty.mybatis_insert.Mapper.EmpMapper;import com.wwwtty.mybatis_insert.pojo.Emp;import org.junit.jupiter.api.Test;import org.springframework.beans.factory.annotation.Autowired;import org.springframework.boot.test.context.SpringBootTest;@SpringBootTest class MybatisInsertApplicationTests { @Autowired EmpMapper empMapper; @Test void contextLoads () { Emp emp = new Emp (); emp.setEmail("114514@acceed.com" ); emp.setName("林丹" ); empMapper.Insert(emp); System.out.println(emp.getId()); } }
更新操作 @Update
1 2 3 4 5 6 7 8 9 10 11 package com.wwwtty.mybatis_update.Mapper;import com.wwwtty.mybatis_update.pojo.Emp;import org.apache.ibatis.annotations.Mapper;import org.apache.ibatis.annotations.Update;@Mapper public interface EmpMapper { @Update("update emp set name=#{name},email=#{email} where id=#{id}") void update (Emp emp) ; }
执行结果:
查询操作 1 2 3 4 5 6 7 8 9 10 11 12 13 package com.wwwtty.mybatis_select.Mapper;import com.wwwtty.mybatis_select.pojo.Emp;import org.apache.ibatis.annotations.Mapper;import org.apache.ibatis.annotations.Select;import java.util.List;@Mapper public interface EmpMapper { @Select("select* from emp where id = #{id}") List<Emp> getById (Integer id) ; }
1 2 3 4 5 6 7 8 9 10 11 12 13 14 15 16 17 18 19 package com.wwwtty.mybatis_select;import com.wwwtty.mybatis_select.Mapper.EmpMapper;import com.wwwtty.mybatis_select.pojo.Emp;import org.junit.jupiter.api.Test;import org.springframework.beans.factory.annotation.Autowired;import org.springframework.boot.test.context.SpringBootTest;@SpringBootTest class MybatisSelectApplicationTests { @Autowired EmpMapper empMapper; @Test void contextLoads () { Emp emp = new Emp (); emp.setId(5 ); System.out.println(empMapper.getById(5 )); } }
运行结果:
数据封装
@Results,@Result 1 2 3 4 5 6 7 8 @Results({ @Result(column = "",property = ""), @Result(column = "",property = "") })
开启mybatis驼峰命名自动映射开关 a_column -> aColumn 1 2 mybatis.configuration.map-underscore-to-camel-case =true
条件查询
1 select * from user where name like '%张%' and gender=1 and entrydate between '2010-01-01' and '2020-01-01' order by update_time desc
这些参数不好封装到一个对象中去,直接传参数
1 2 3 @Select("select * from user where name like '%${name}%' and gender=#{gender} and " + "entrydate between #{begin} and #{end} order by update_time desc") List<User> list (String name, Short gender, LocalDate begin,LocalDate end) ;
进行模糊匹配的时候,要用’%%’的形式,这样就不能用预编译的#{}(占位符不能出现在引号内),需要用拼接sql的${}(不推荐)
1 2 3 4 5 6 7 @Test void test () { List<User> res = empMapper.list("张" , (short ) 1 , LocalDate.of(2010 , 1 , 1 ), LocalDate.of(2020 , 1 , 1 )); res.stream().forEach(user -> { System.out.println(user); }); }
怎么解决拼接的问题
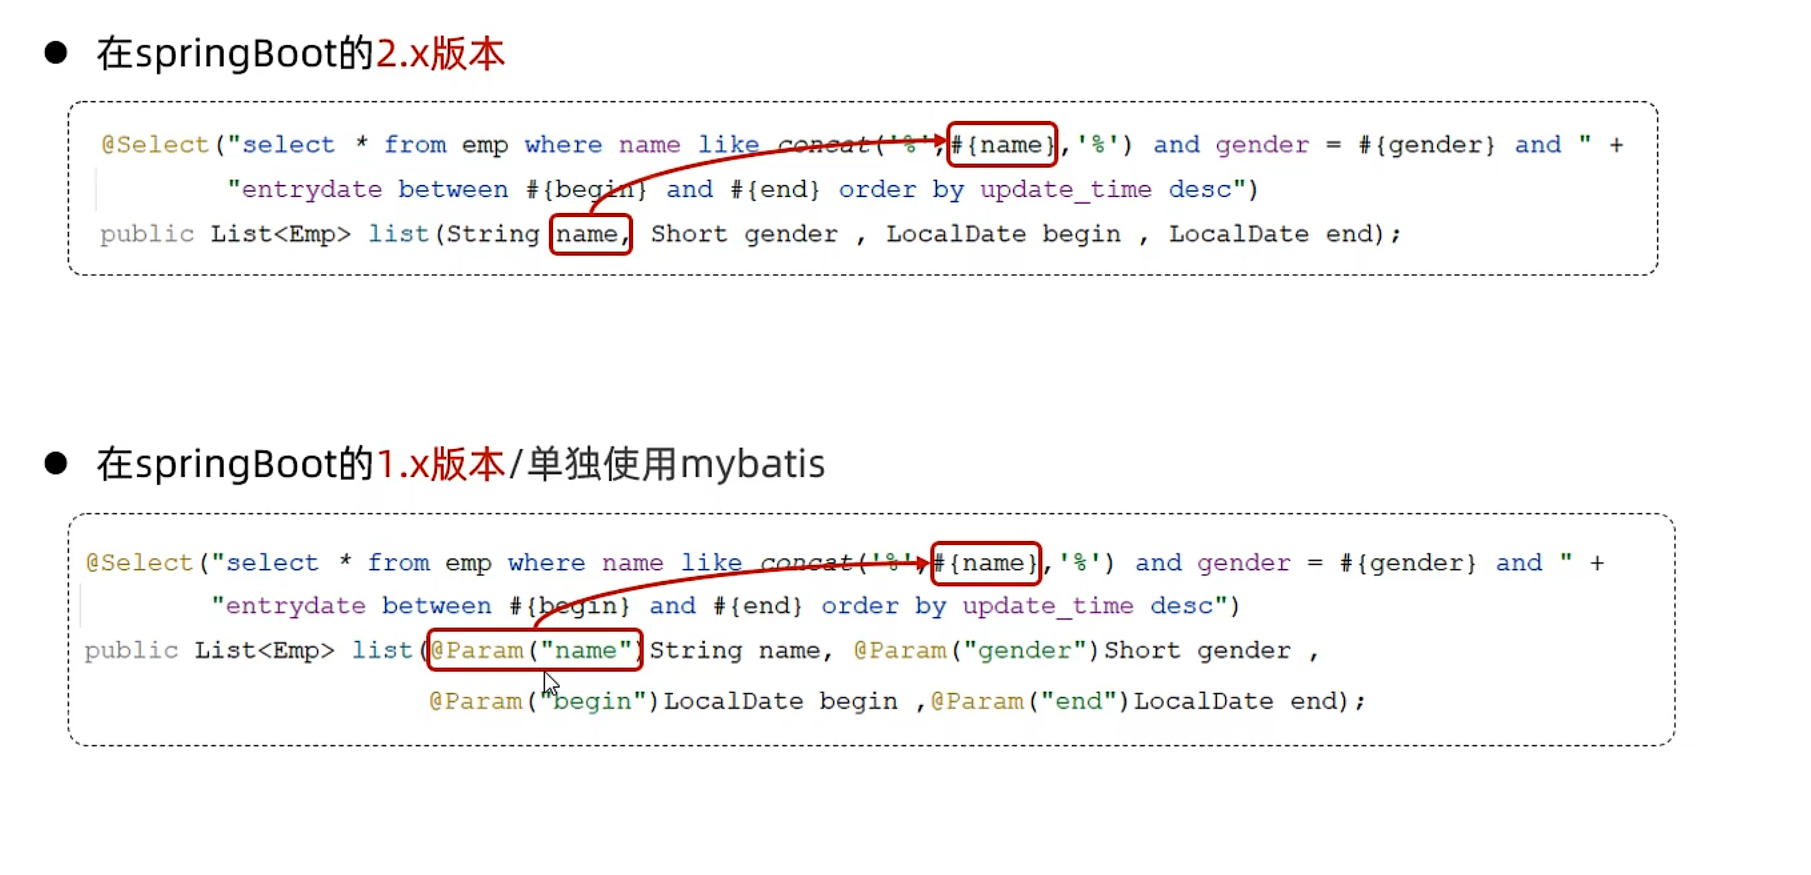
concat() 1 2 3 @Select("select * from user where name like concat('%',#{name},'%') and gender=#{gender} and " + "entrydate between #{begin} and #{end} order by update_time desc") List<User> list (String name, Short gender, LocalDate begin,LocalDate end) ;
早期版本不会保留形参名
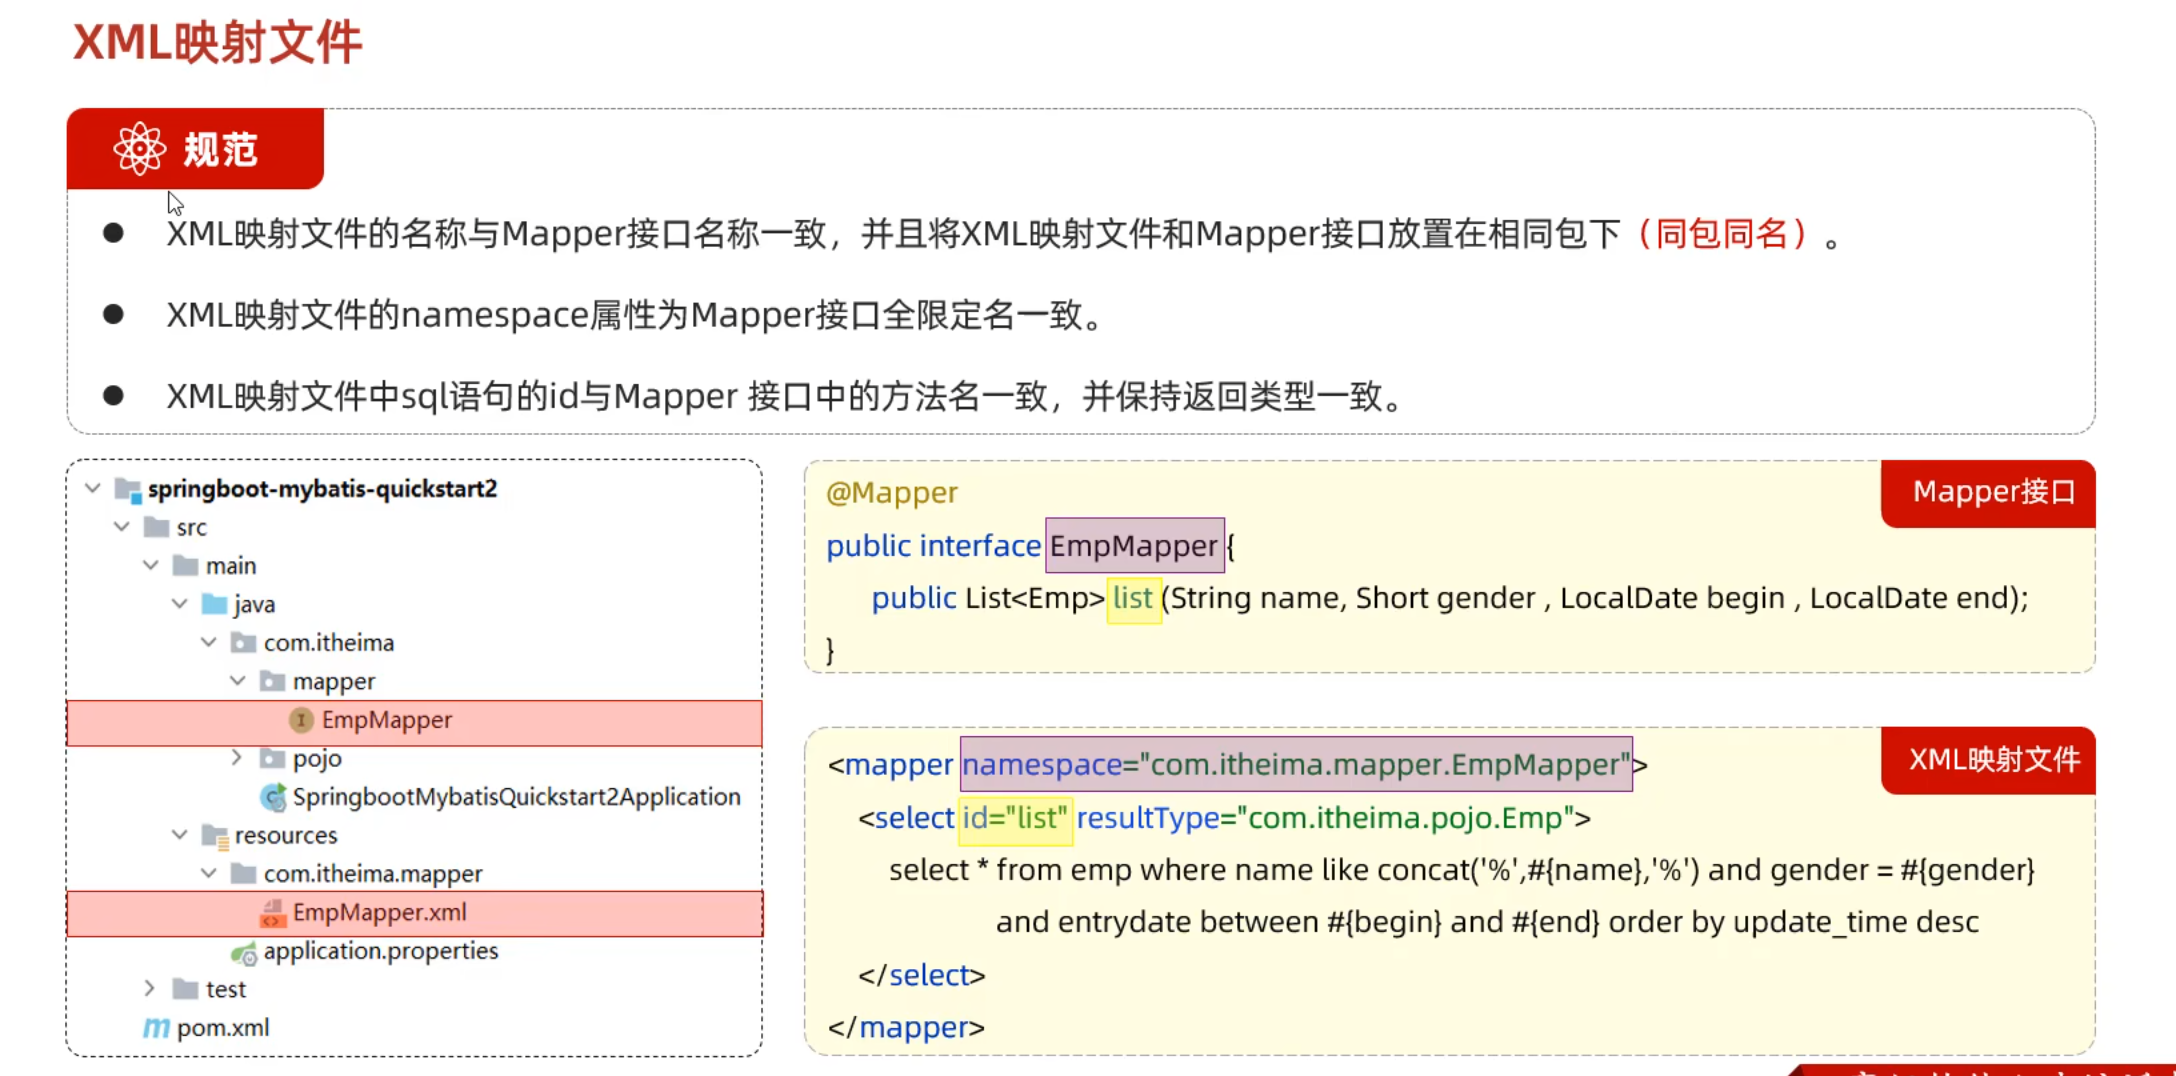
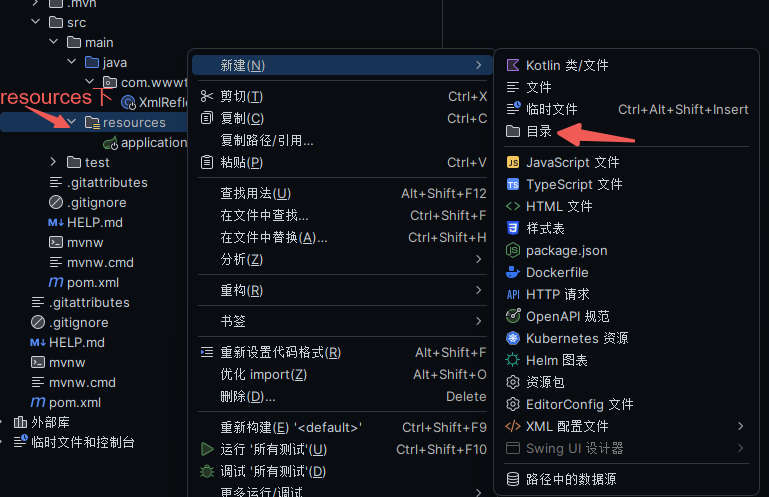
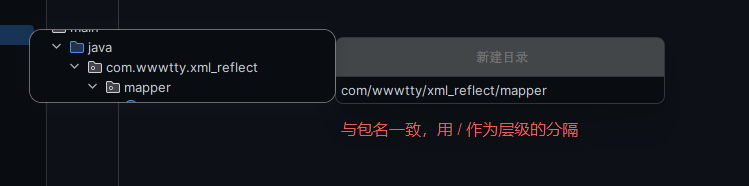
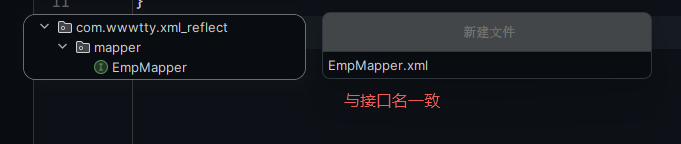
XML映射文件
与包名一致
与接口名一致
xml文件的约束:https://mybatis.p2hp.com/getting-started.html
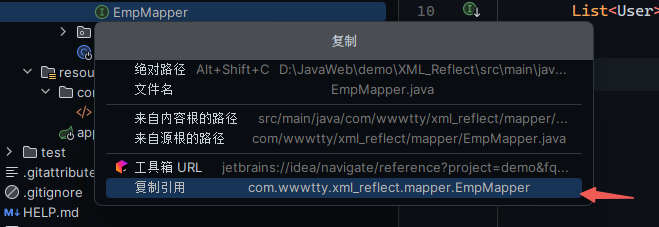
1 2 3 4 5 6 7 8 9 10 11 12 <?xml version="1.0" encoding="UTF-8" ?> <!DOCTYPE mapper PUBLIC "-//mybatis.org//DTD Mapper 3.0//EN" "https://mybatis.org/dtd/mybatis-3-mapper.dtd" > <mapper namespace ="com.wwwtty.xml_reflect.mapper.EmpMapper" > <select id ="list" resultType ="" > </select > </mapper >
获取全类名:
原查询语句:
1 2 3 @Select("select * from user where name like concat('%',#{name},'%') and gender=#{gender} and " + "entrydate between #{begin} and #{end} order by update_time desc") List<User> list (String name, Short gender, LocalDate begin,LocalDate end) ;
改用xml映射的方式:
如果xml中sql语句没有高亮,上下文操作中选择注入语言
1 2 3 4 5 6 7 8 9 10 11 12 13 <?xml version="1.0" encoding="UTF-8" ?> <!DOCTYPE mapper PUBLIC "-//mybatis.org//DTD Mapper 3.0//EN" "https://mybatis.org/dtd/mybatis-3-mapper.dtd" > <mapper namespace ="com.wwwtty.xml_reflect.mapper.EmpMapper" > <select id ="list" resultType ="com.wwwtty.xml_reflect.pojo.User" > select * from user where name like concat('%',#{name},'%') and gender=#{gender} and entrydate between #{begin} and #{end} order by update_time desc </select > </mapper >
xml映射适合于复杂sql
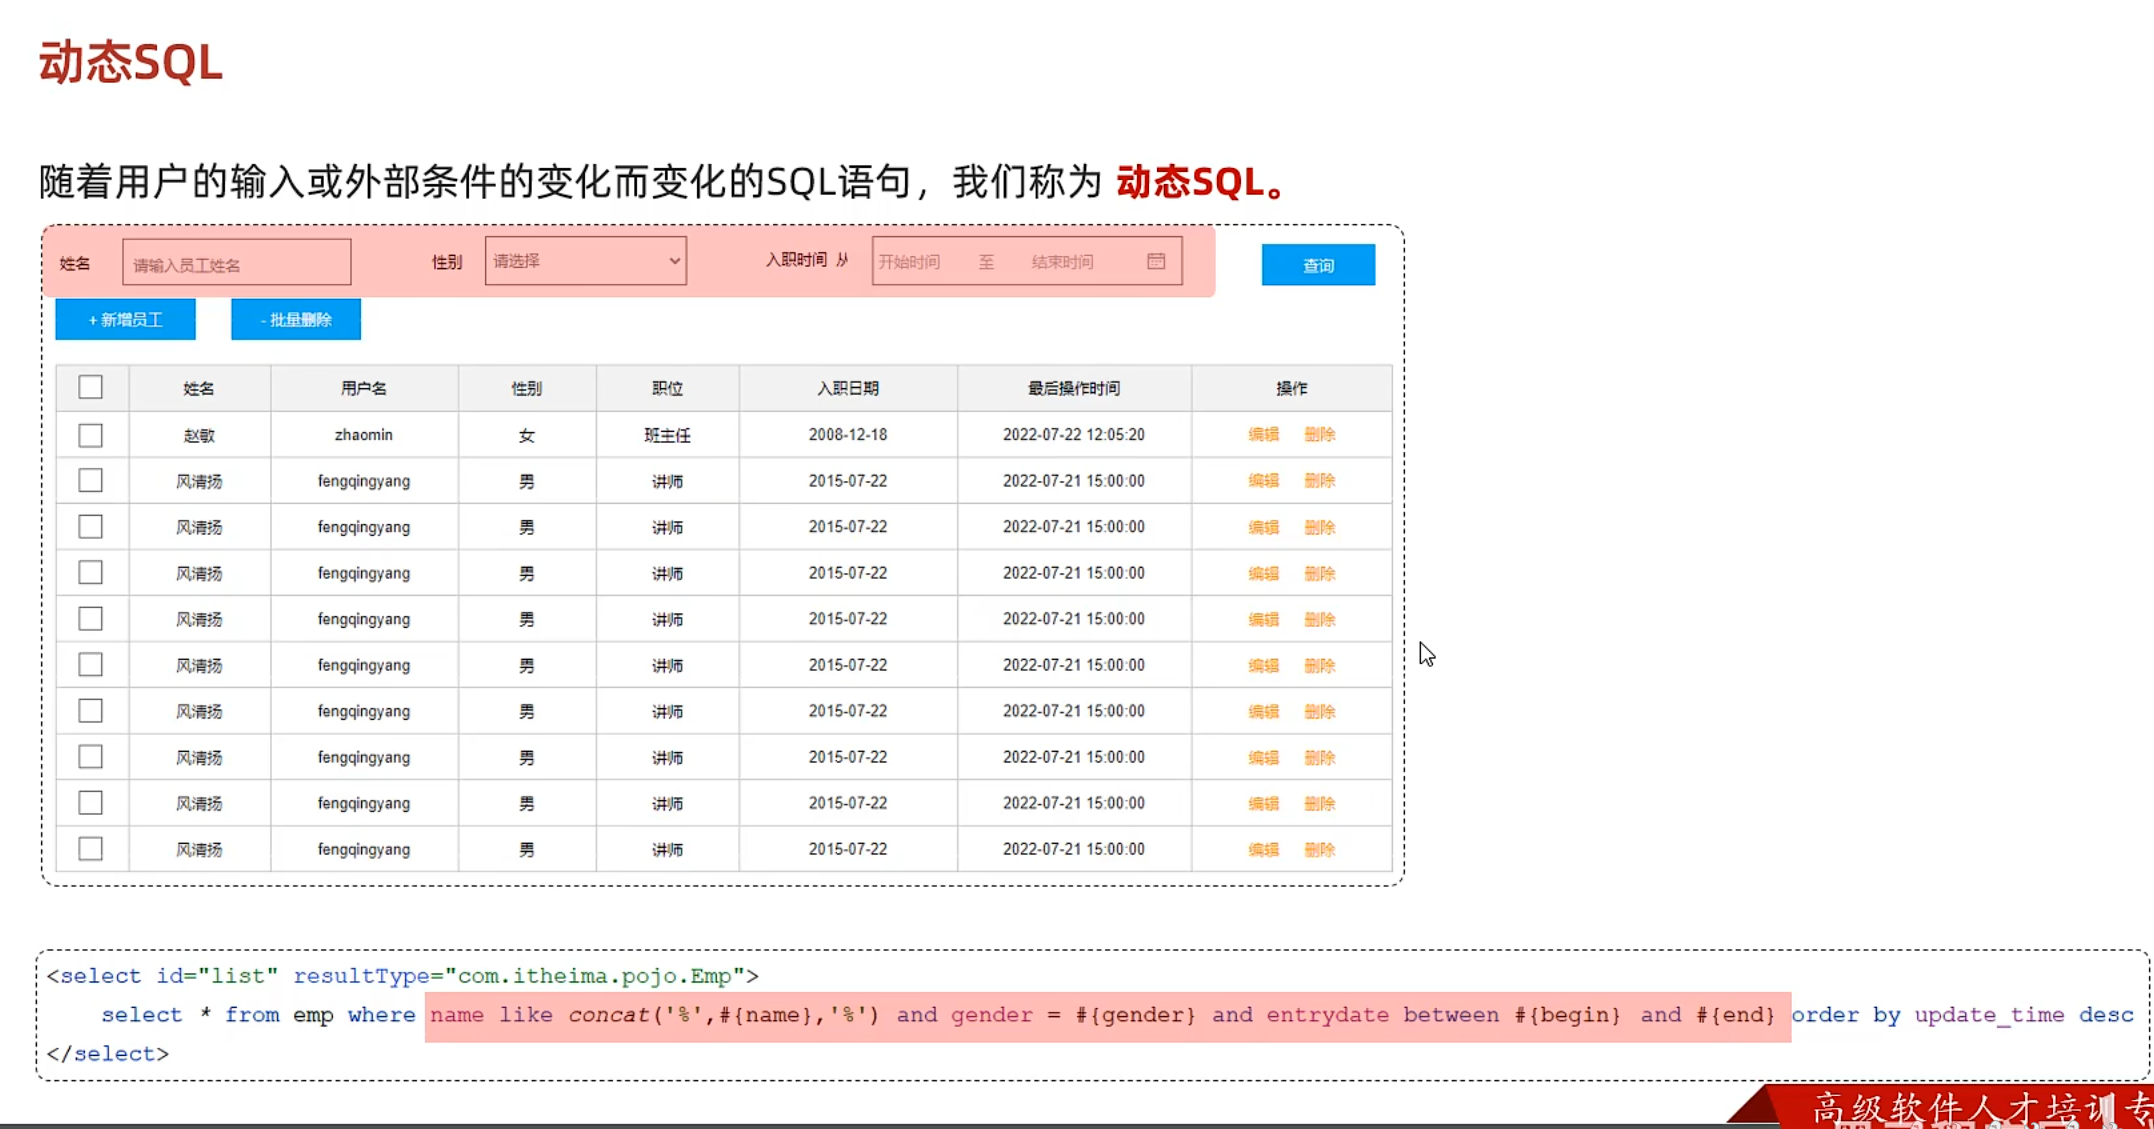
动态sql
< if >
1 2 3 4 5 6 7 8 9 10 11 12 13 14 15 16 17 18 19 20 21 22 23 24 <?xml version="1.0" encoding="UTF-8" ?> <!DOCTYPE mapper PUBLIC "-//mybatis.org//DTD Mapper 3.0//EN" "https://mybatis.org/dtd/mybatis-3-mapper.dtd" > <mapper namespace ="com.wwwtty.xml_reflect.mapper.EmpMapper" > <select id ="list" resultType ="com.wwwtty.xml_reflect.pojo.User" > select * from user where <if test ="name != null" > name like concat('%', #{name}, '%') </if > <if test ="gender != null" > and gender = #{gender} </if > <if test ="begin != null and end != null" > and entrydate between #{begin} and #{end} </if > order by update_time desc </select > </mapper >
1 empMapper.list(name,null ,null ,end);
相应的sql语句:
< where > 在上面的例子中,如果我们只筛选性别:
但是这个and还很不好删除(容易别的地方出错)
作用:根据if的结果(子元素),自动添加/删除where;同时自动删除多余的and和or
使用< where >解决
1 2 3 4 5 6 7 8 9 10 11 12 13 14 15 16 17 18 19 20 21 22 23 24 25 <?xml version="1.0" encoding="UTF-8" ?> <!DOCTYPE mapper PUBLIC "-//mybatis.org//DTD Mapper 3.0//EN" "https://mybatis.org/dtd/mybatis-3-mapper.dtd" > <mapper namespace ="com.wwwtty.xml_reflect.mapper.EmpMapper" > <select id ="list" resultType ="com.wwwtty.xml_reflect.pojo.User" > select * from user <where > <if test ="name != null" > name like concat('%', #{name}, '%') </if > <if test ="gender != null" > and gender = #{gender} </if > <if test ="begin != null and end != null" > and entrydate between #{begin} and #{end} </if > order by update_time desc </where > </select > </mapper >
运行生成的sql:
< set > 去除set中多余的逗号
案例:动态更新 如果我们这样写动态更新的xml配置文件
1 2 3 4 5 6 7 8 9 10 11 12 13 14 15 16 17 18 19 20 21 22 23 24 25 26 27 28 29 30 31 32 33 34 35 36 <update id ="update" > update user set <if test ="username != null" > username=#{username}, </if > <if test ="password != null" > password=#{password}, </if > <if test ="name != null" > name=#{name}, </if > <if test ="gender != null" > gender=#{gender}, </if > <if test ="image != null" > image=#{image}, </if > <if test ="job != null" > job=#{job}, </if > <if test ="entrydate != null" > entrydate=#{entrydate}, </if > <if test ="deptId != null" > dept_id=#{deptId}, </if > <if test ="createDate != null" > create_time=#{createTime}, </if > <if test ="updateTime != null" > update_time=#{updateTime} </if > where id = #{id} </update >
会有多一个逗号的情况
使用 < set >解决
< foreach > 场景:批量删除
1 delete from user where id in (3 ,4 ,5 );
1 void deleteByIds (List<Integer> list) ;
1 2 3 4 5 <delete id ="deleteByIds" > <foreach collection ="" item ="" separator ="" open ="" close ="" > </foreach > </delete >
collection:要遍历的集合
item:遍历出的元素
separator:分隔符
open:遍历开始前拼接的sql片段
close:遍历结束后拼接的sql片段
1 2 3 4 5 6 7 <delete id ="deleteByIds" > delete from user where id in <foreach collection ="list" item ="id" separator ="," open ="(" close =")" > #{id} </foreach > </delete >
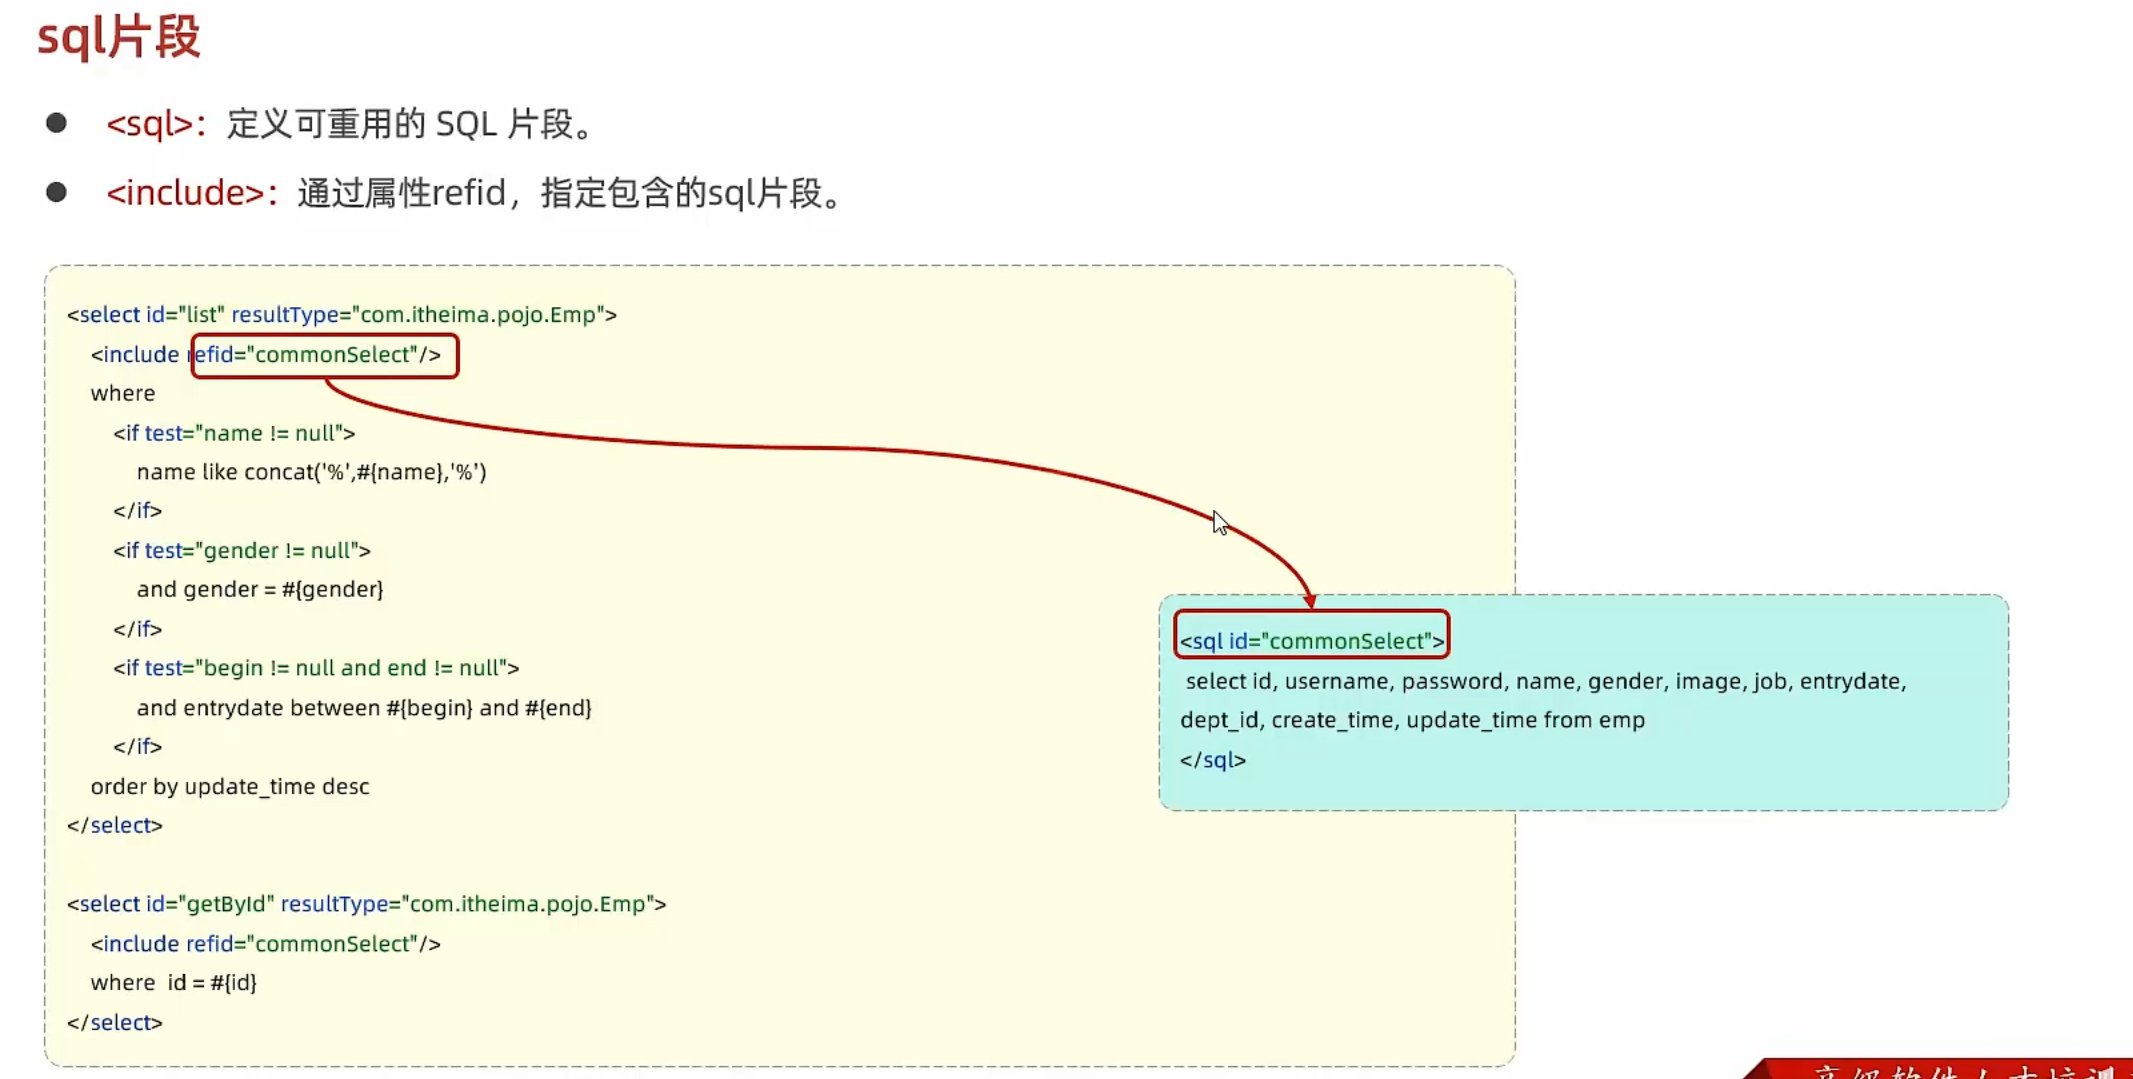
< sql > < sql >用于封装一些重复使用的sql片段,并分配一个唯一的id
< include > 用< include >包含< sql >封装的sql片段,用refid=id从而完成包含
1 2 3 void selectArgs () ;void selectById () ;
1 2 3 4 5 6 7 8 9 10 11 12 13 14 15 16 17 18 19 20 21 22 23 24 25 26 <sql id ="basicSelect" > select username, password, name, gender, id, username, password, name, gender, image, job, entrydate, dept_id, create_time, update_time from user </sql > <select id ="selectArgs" > <include refid ="basicSelect" /> </select > <select id ="selectById" > <include refid ="basicSelect" /> </select >
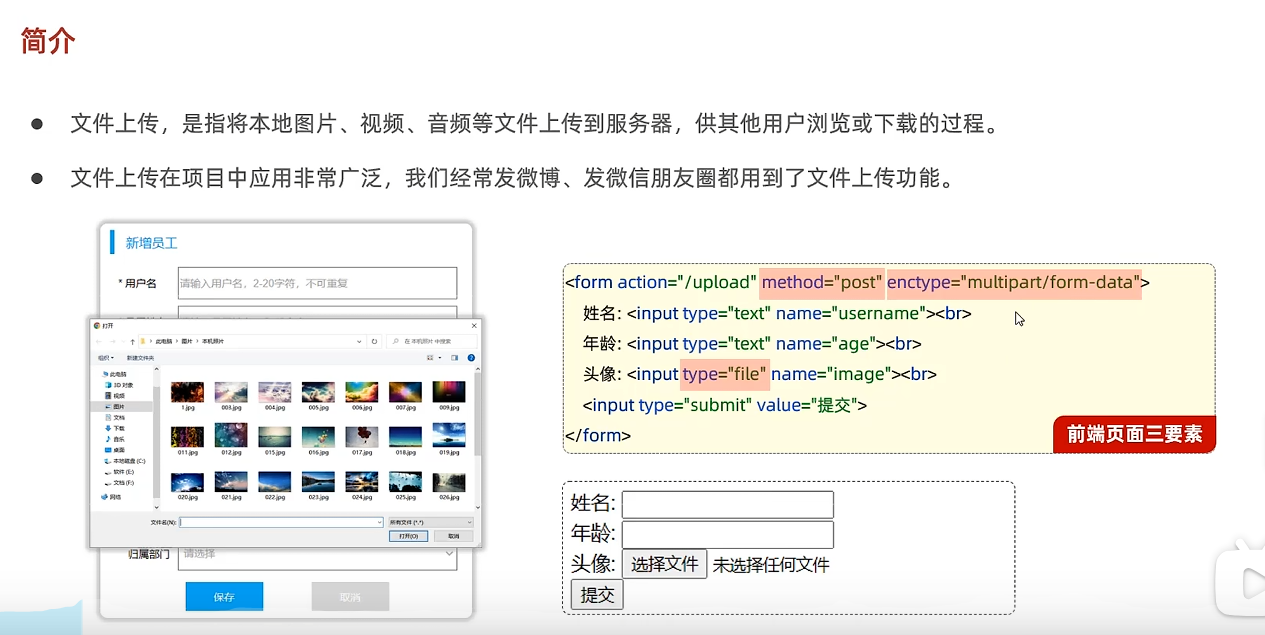
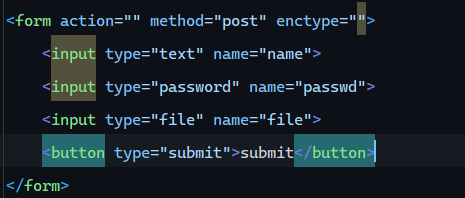
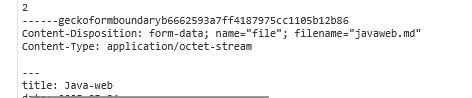
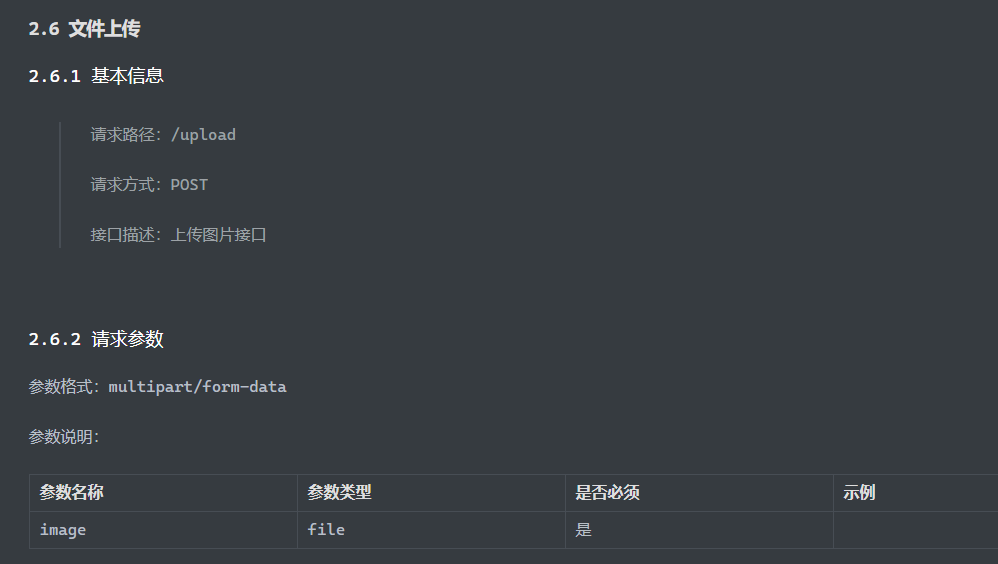
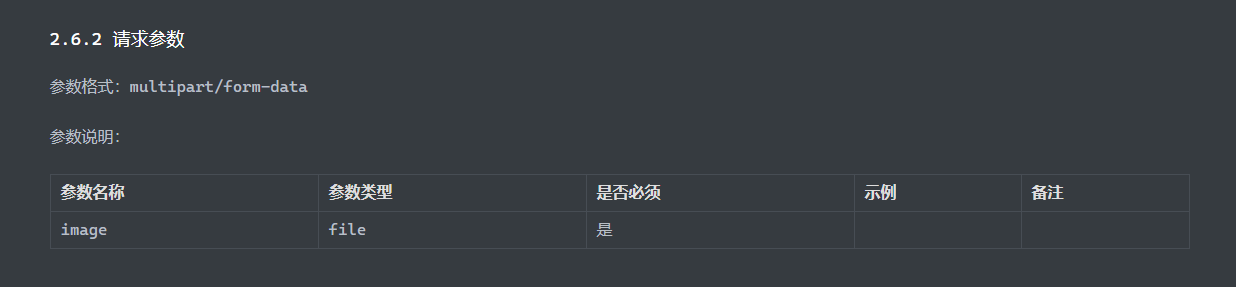
文件上传 前端表单: 1 2 3 4 5 6 <form action ="" method ="post" enctype ="multipart/form-data" > <input type ="text" name ="name" > <input type ="password" name ="passwd" > <input type ="file" name ="file" > <button type ="submit" > submit</button > </form >
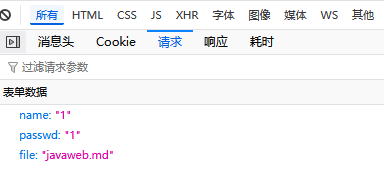
若不指定enctype=”multipart/form-data”,上传时只会上传文件名
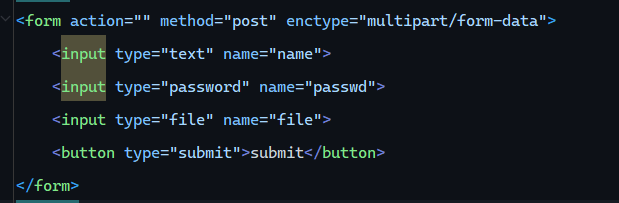
改成enctype=”multipart/form-data”
请求中有了文件内容
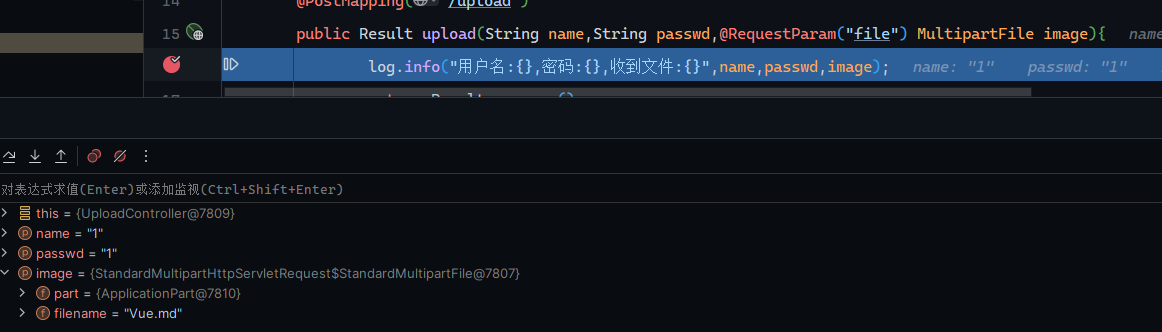
后端: 1 2 3 4 5 6 7 8 9 @Slf4j @RestController public class UploadController { @PostMapping("/upload") public Result upload (String name,String passwd,@RequestParam("file") MultipartFile image) { log.info("用户名:{},密码:{},收到文件:{}" ,name,passwd,image); return Result.success(); } }
进行测试:
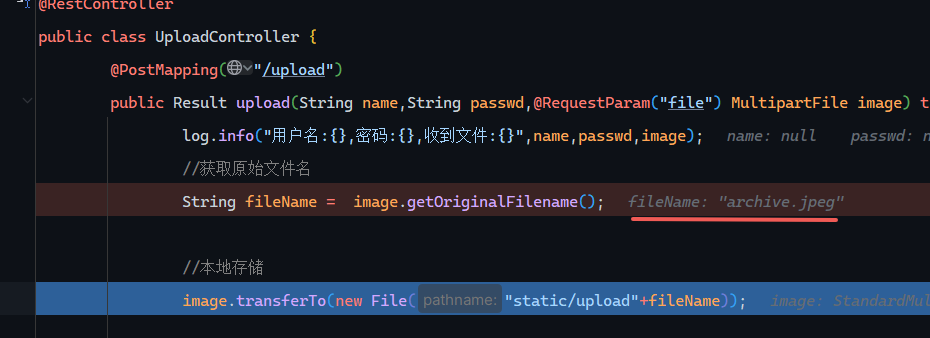
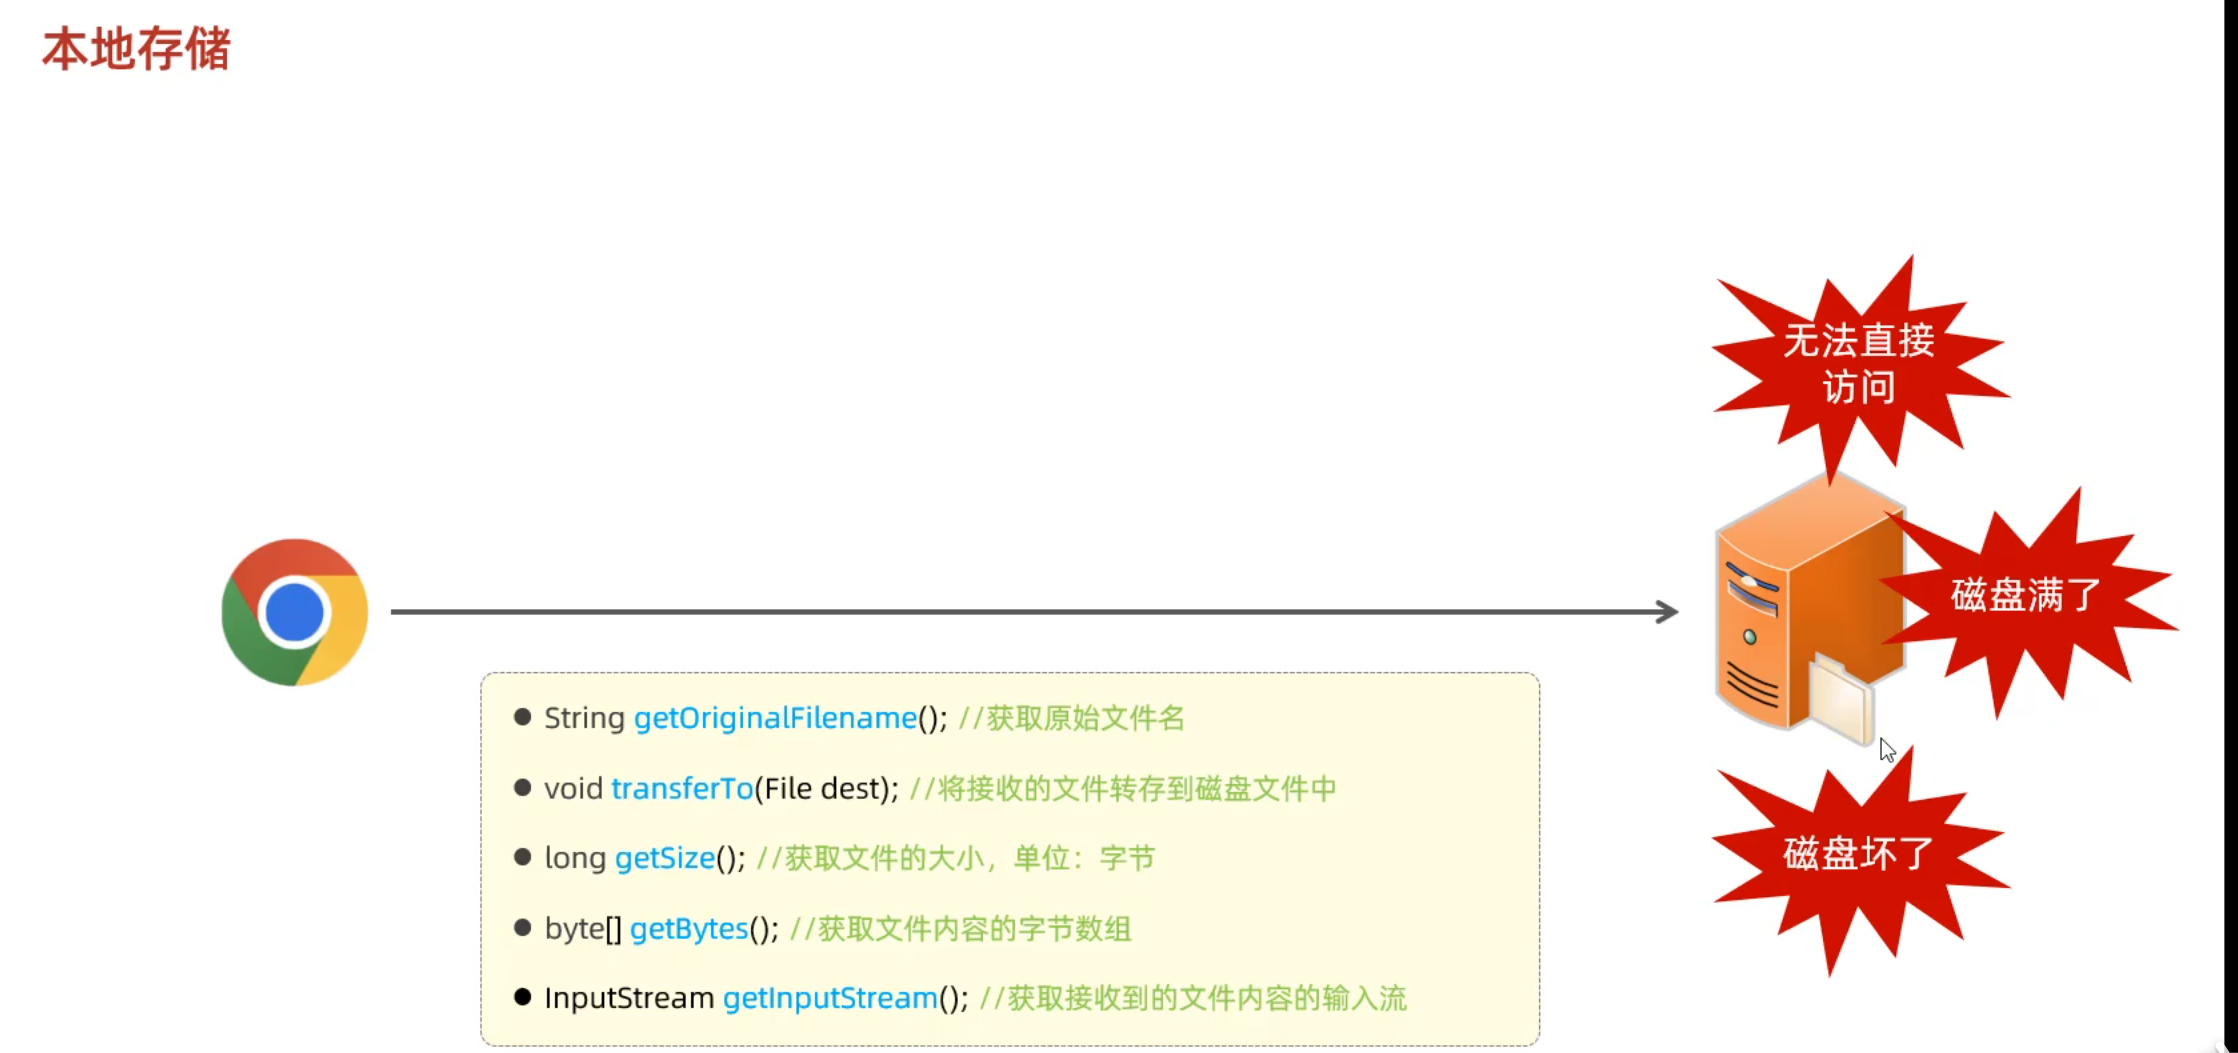
本地存储 服务端,接收到上传的文件后,存储在本地服务器磁盘
demo: 在static目录下新建了一个upload目录
1 2 3 4 5 6 7 8 9 10 11 12 13 14 15 @Slf4j @RestController public class UploadController { @PostMapping("/upload") public Result upload (String name,String passwd,@RequestParam("file") MultipartFile image) throws Exception { log.info("用户名:{},密码:{},收到文件:{}" ,name,passwd,image); String fileName = image.getOriginalFilename(); image.transferTo(new File ("static/upload" +fileName)); return Result.success(); } }
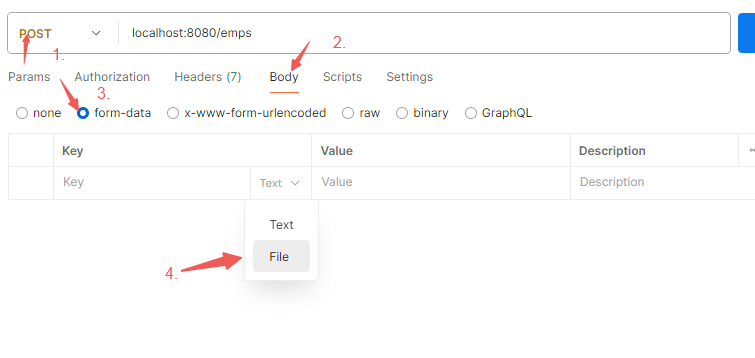
postman测试
存在问题: 如果两个用户上传了相同名字的文件,那么就覆盖了
所以我们需要构造唯一的文件名
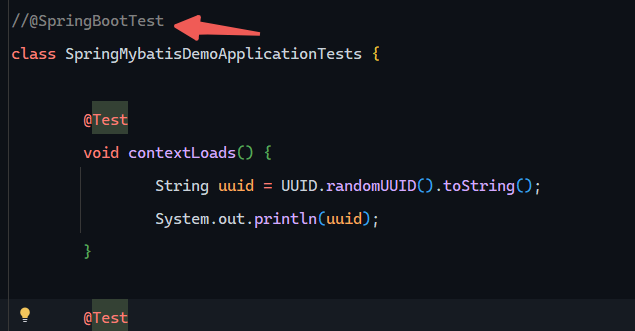
使用uuid 1 2 3 4 5 @Test void contextLoads () { String uuid = UUID.randomUUID().toString(); System.out.println(uuid); }
简单的解决:(这么做有漏洞) 1 2 3 4 5 6 7 8 9 10 11 12 13 14 15 16 17 18 19 20 @PostMapping("/upload") public Result upload (String name,String passwd,@RequestParam("file") MultipartFile image) throws Exception { log.info("用户名:{},密码:{},收到文件:{}" ,name,passwd,image); String originalFilename = image.getOriginalFilename(); int index = originalFilename.lastIndexOf('.' ); String extName = originalFilename.substring(index); String fileName = UUID.randomUUID().toString()+extName; image.transferTo(new File ("D:\\JavaWeb\\Spring-Mybatis-demo\\src\\main\\resources\\static\\upload\\" +fileName)); return Result.success(); }
如果上传一个大文件
这是因为
application.properties中
1 2 3 4 spring.servlet.multipart.max-file-size =10MB spring.servlet.multipart.max-request-size =100MB
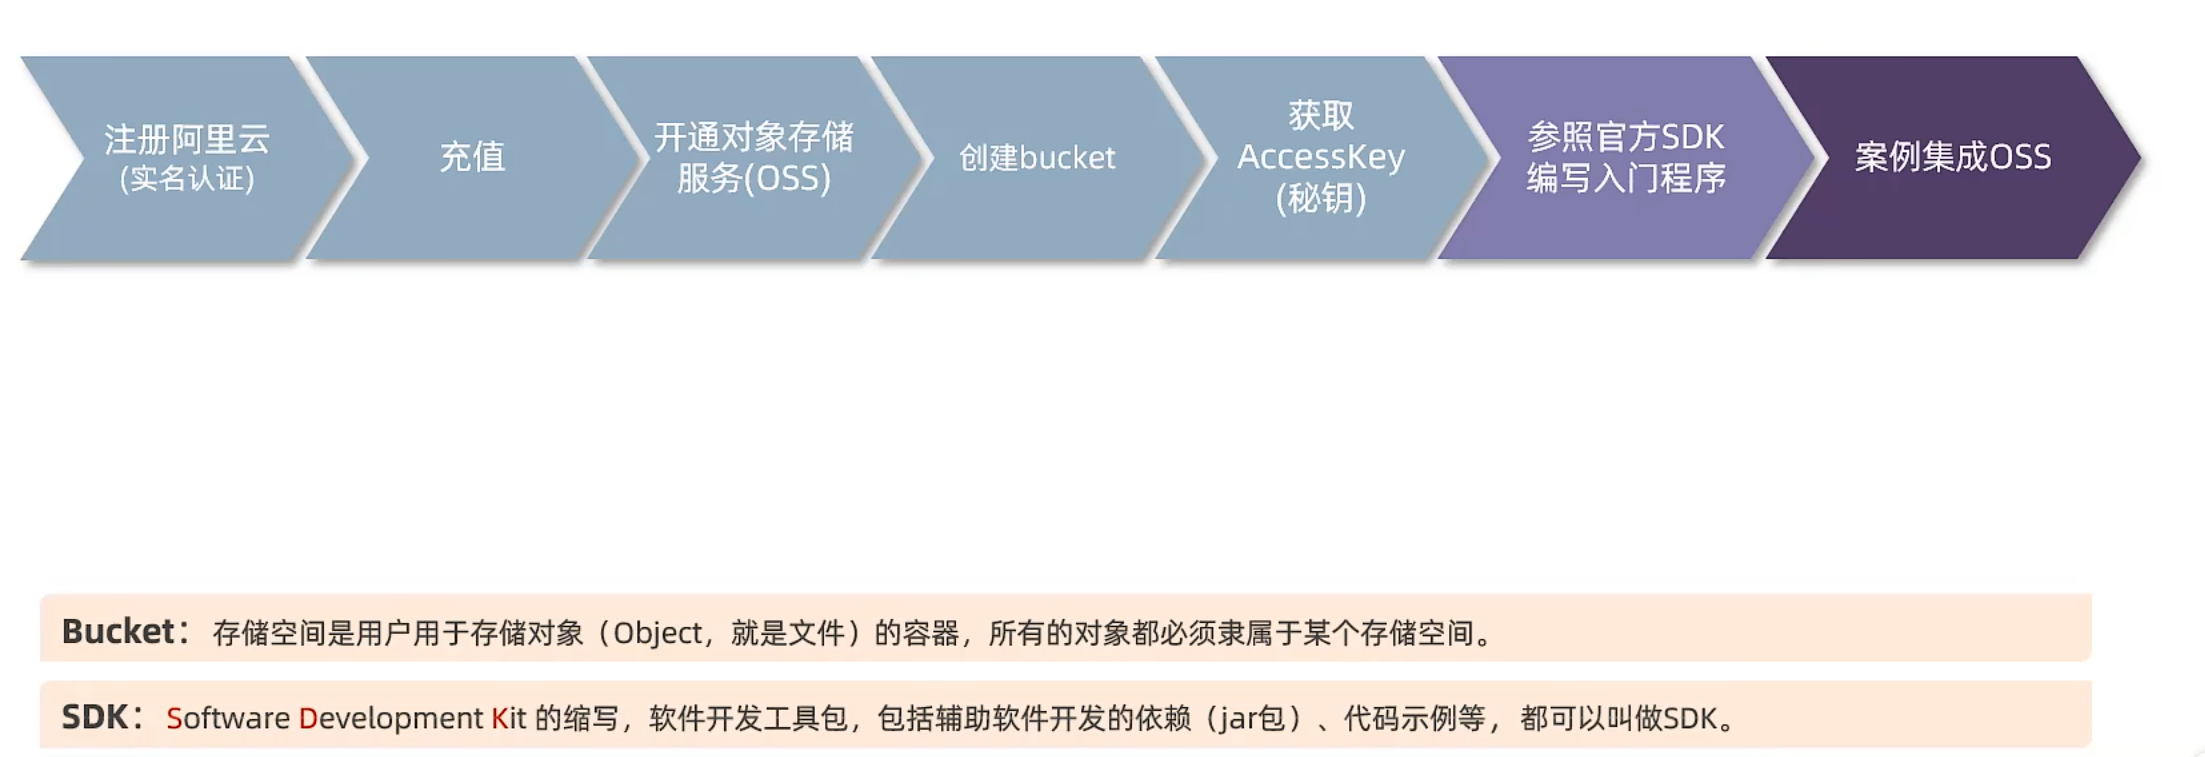
云存储
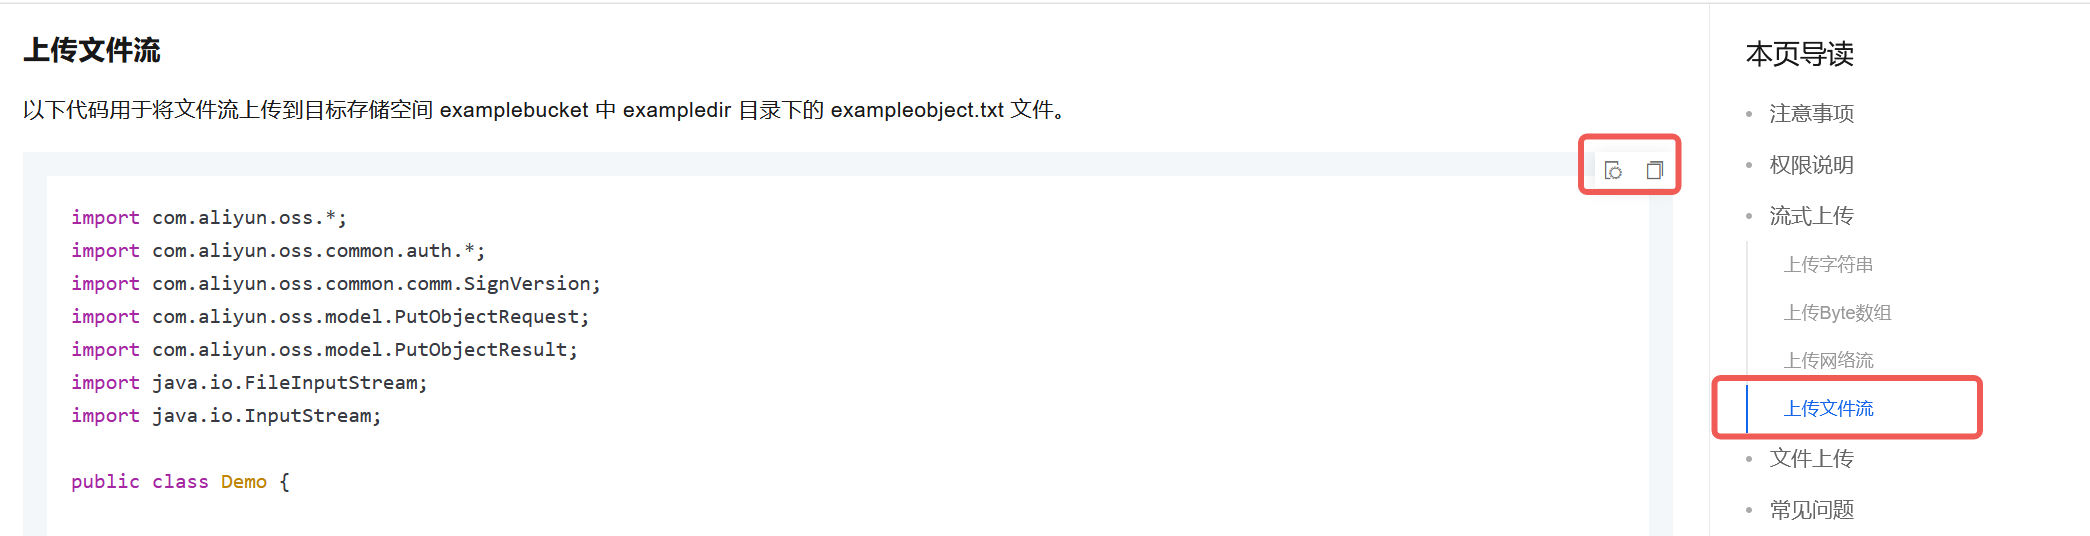
官方文档
文件上传SDK
复制官方代码
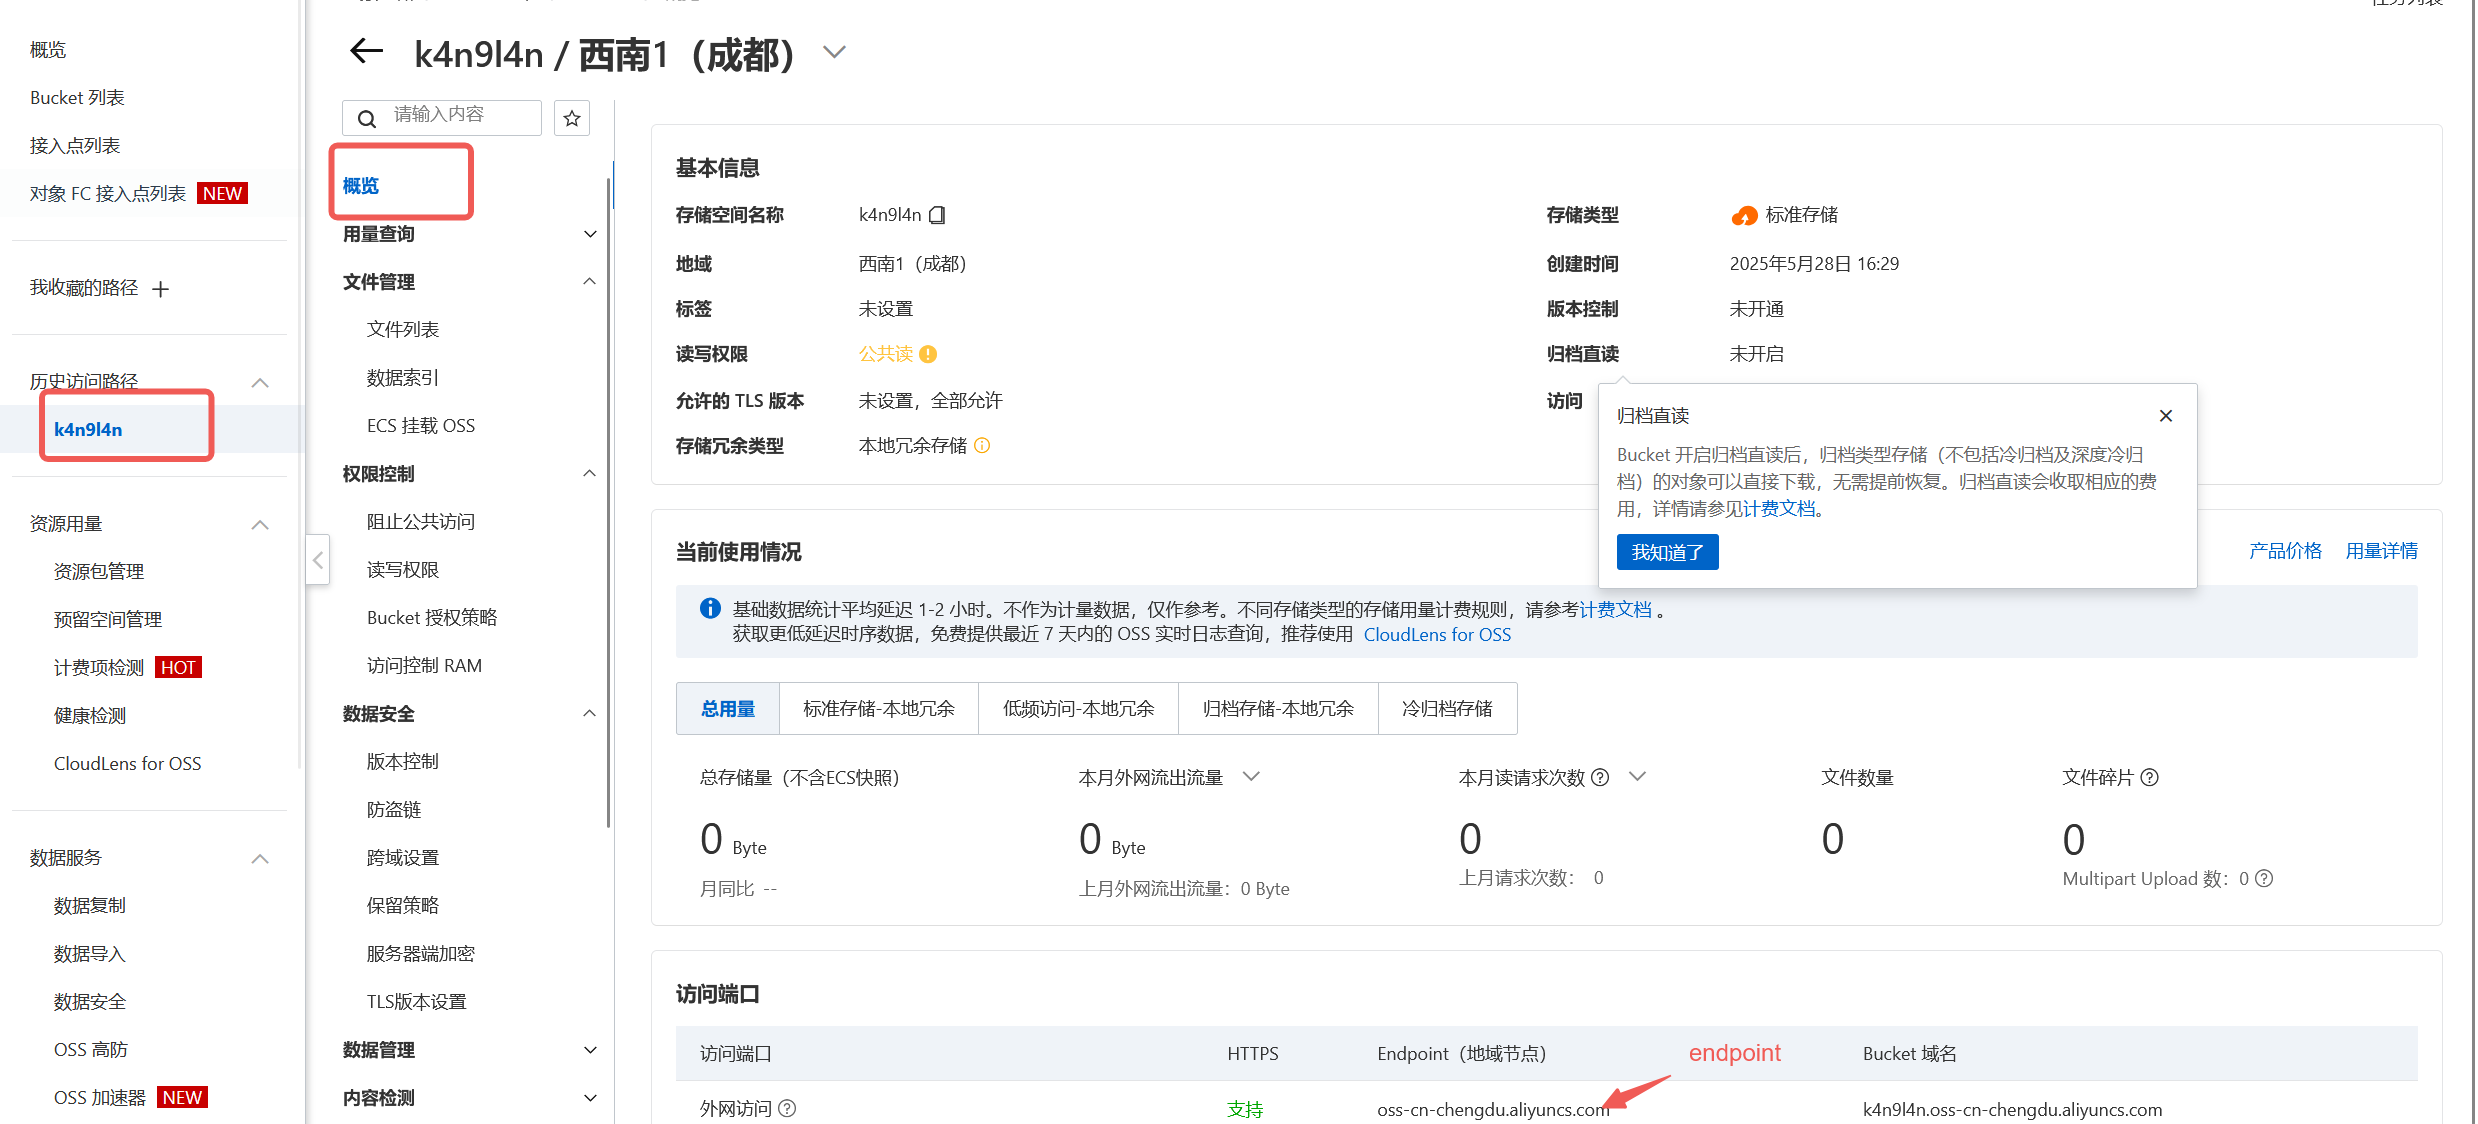
获取endpoint
设置上传到OSS中的文件名以及要上传的文件路径 1 2 3 4 5 6 String objectName = "test.md" ;String filePath= "D:\\My_Blogs\\myblogs\\source\\_posts\\Vue.md" ;
bucket文件列表中查看
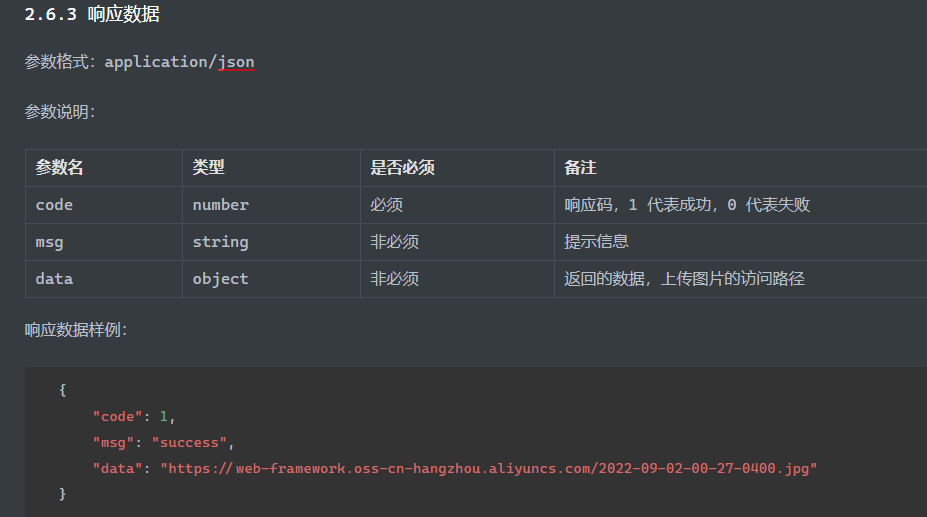
集成Aliyun-OSS 接口文档
工具类AliOSSUtils 官方代码改写
没有写成静态方法,就用IOC容器注入;工具类不属于三层架构,直接使用@Component注解
1 2 3 4 5 6 7 8 9 10 11 12 13 14 15 16 17 18 19 20 21 22 23 24 25 26 27 28 29 30 31 32 33 34 35 36 37 38 39 40 41 42 43 44 45 46 47 48 49 50 51 52 53 54 55 56 57 58 59 @Slf4j @Component public class AliOSSUtils { String endpoint = "https://oss-cn-chengdu.aliyuncs.com" ; String bucketName = "k4n9l4n" ; String region = "cn-chengdu" ; public String upload (MultipartFile file) throws Exception { String oringinalFileName = file.getOriginalFilename(); String fileName = UUID.randomUUID().toString()+oringinalFileName.substring(oringinalFileName.lastIndexOf("." )); EnvironmentVariableCredentialsProvider credentialsProvider = CredentialsProviderFactory.newEnvironmentVariableCredentialsProvider(); ClientBuilderConfiguration clientBuilderConfiguration = new ClientBuilderConfiguration (); clientBuilderConfiguration.setSignatureVersion(SignVersion.V4); OSS ossClient = OSSClientBuilder.create() .endpoint(endpoint) .credentialsProvider(credentialsProvider) .clientConfiguration(clientBuilderConfiguration) .region(region) .build(); try { InputStream inputStream = file.getInputStream(); PutObjectRequest putObjectRequest = new PutObjectRequest (bucketName, fileName, inputStream); PutObjectResult result = ossClient.putObject(putObjectRequest); String url = endpoint.split("//" )[0 ]+"//" +bucketName+"." +endpoint.split("//" )[1 ]+"/" +fileName; return url; } catch (OSSException oe) { log.info("Caught an OSSException, which means your request made it to OSS, " + "but was rejected with an error response for some reason." ); log.info("Error Message:" + oe.getErrorMessage()); log.info("Error Code:" + oe.getErrorCode()); log.info("Request ID:" + oe.getRequestId()); log.info("Host ID:" + oe.getHostId()); } catch (ClientException ce) { log.info("Caught an ClientException, which means the client encountered " + "a serious internal problem while trying to communicate with OSS, " + "such as not being able to access the network." ); log.info("Error Message:" + ce.getMessage()); } finally { if (ossClient != null ) { ossClient.shutdown(); } } return null ; } }
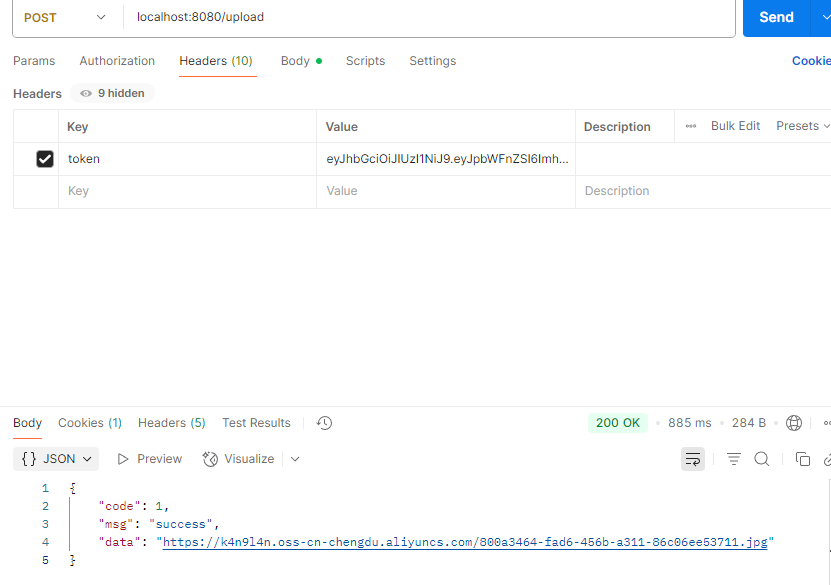
Controller层 1 2 3 4 5 6 7 8 9 10 11 12 13 14 15 16 17 18 19 20 @Slf4j @RestController @RequestMapping("/upload") public class UploadController { @Autowired private AliOSSUtils aliOSSUtils; @PostMapping public Result upload (MultipartFile image) throws Exception { log.info("接受到文件:{}" ,image.getOriginalFilename()); String url = aliOSSUtils.upload(image); if (url != null ){ log.info("上传文件的url:{}" ,url); return Result.success(url); } return Result.error("上传出错" ); } }
测试
案例
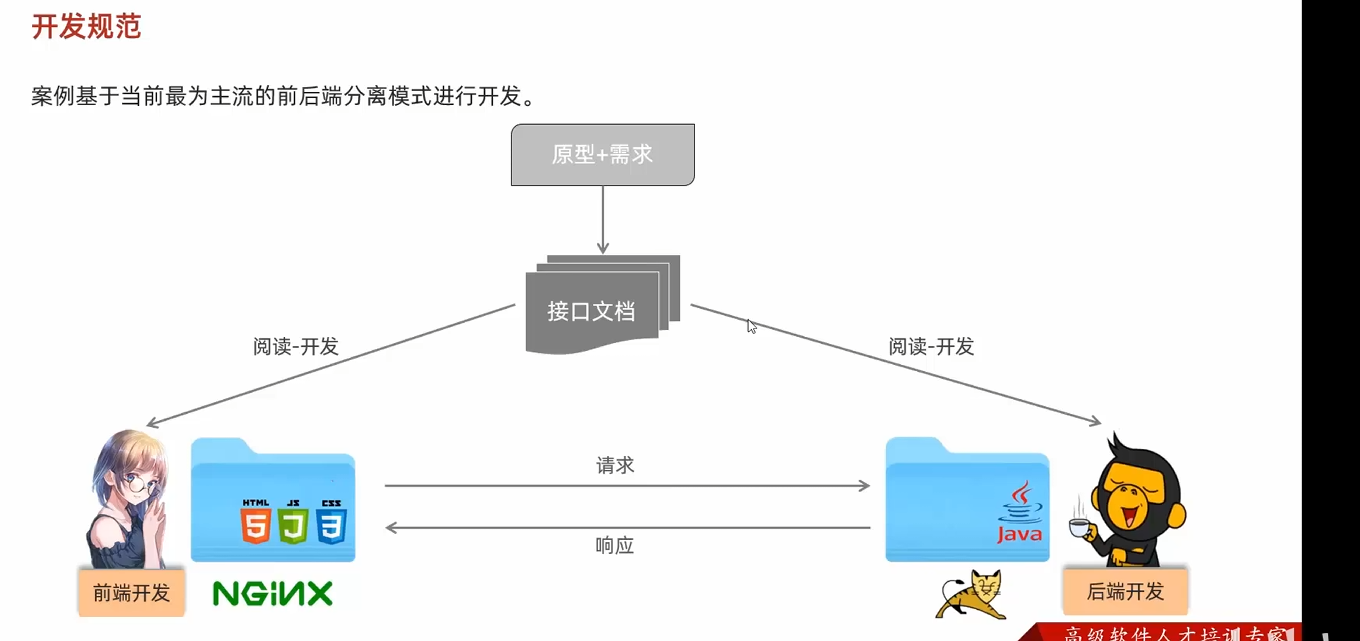
开发规范
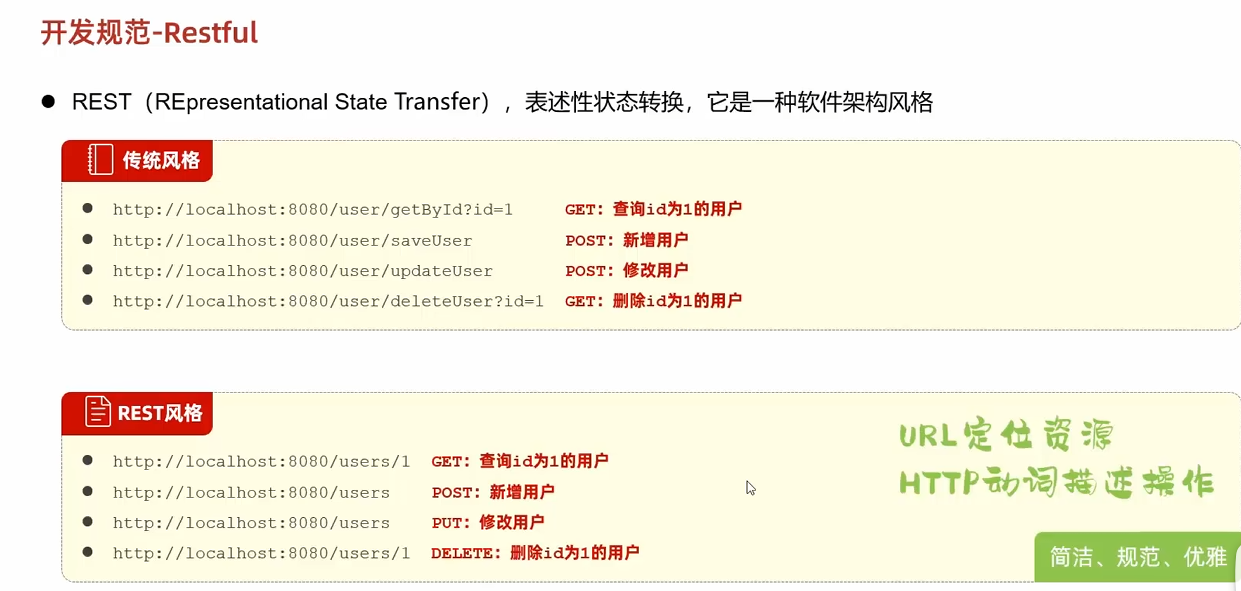
Restful
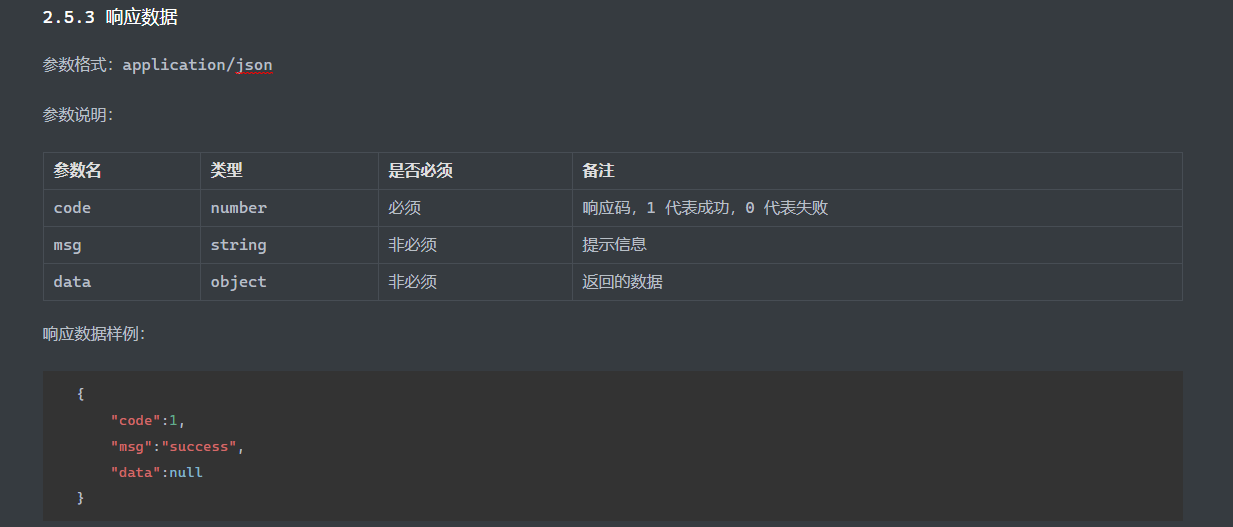
统一响应结果
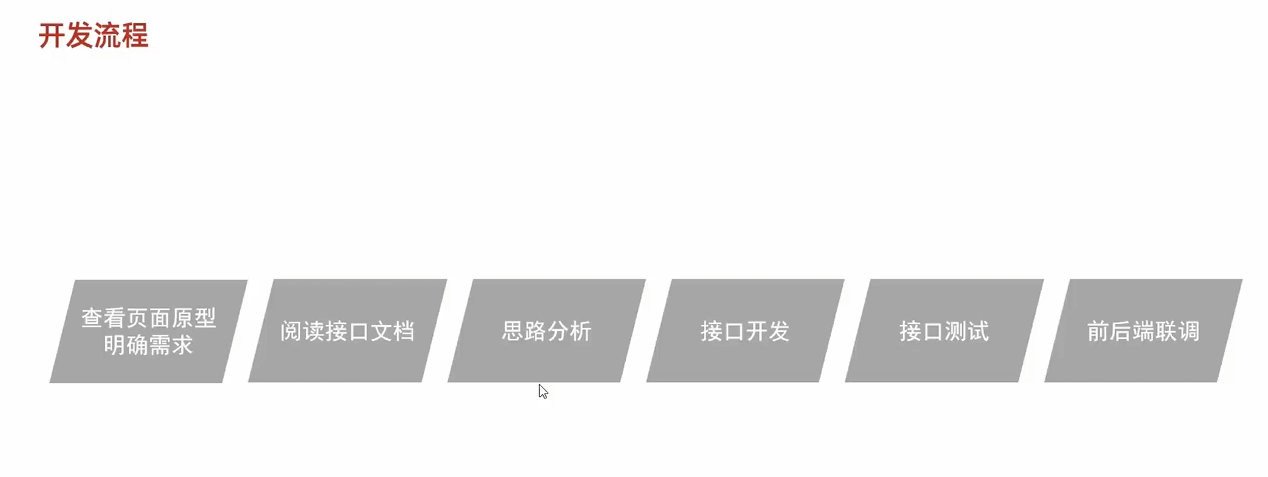
开发流程
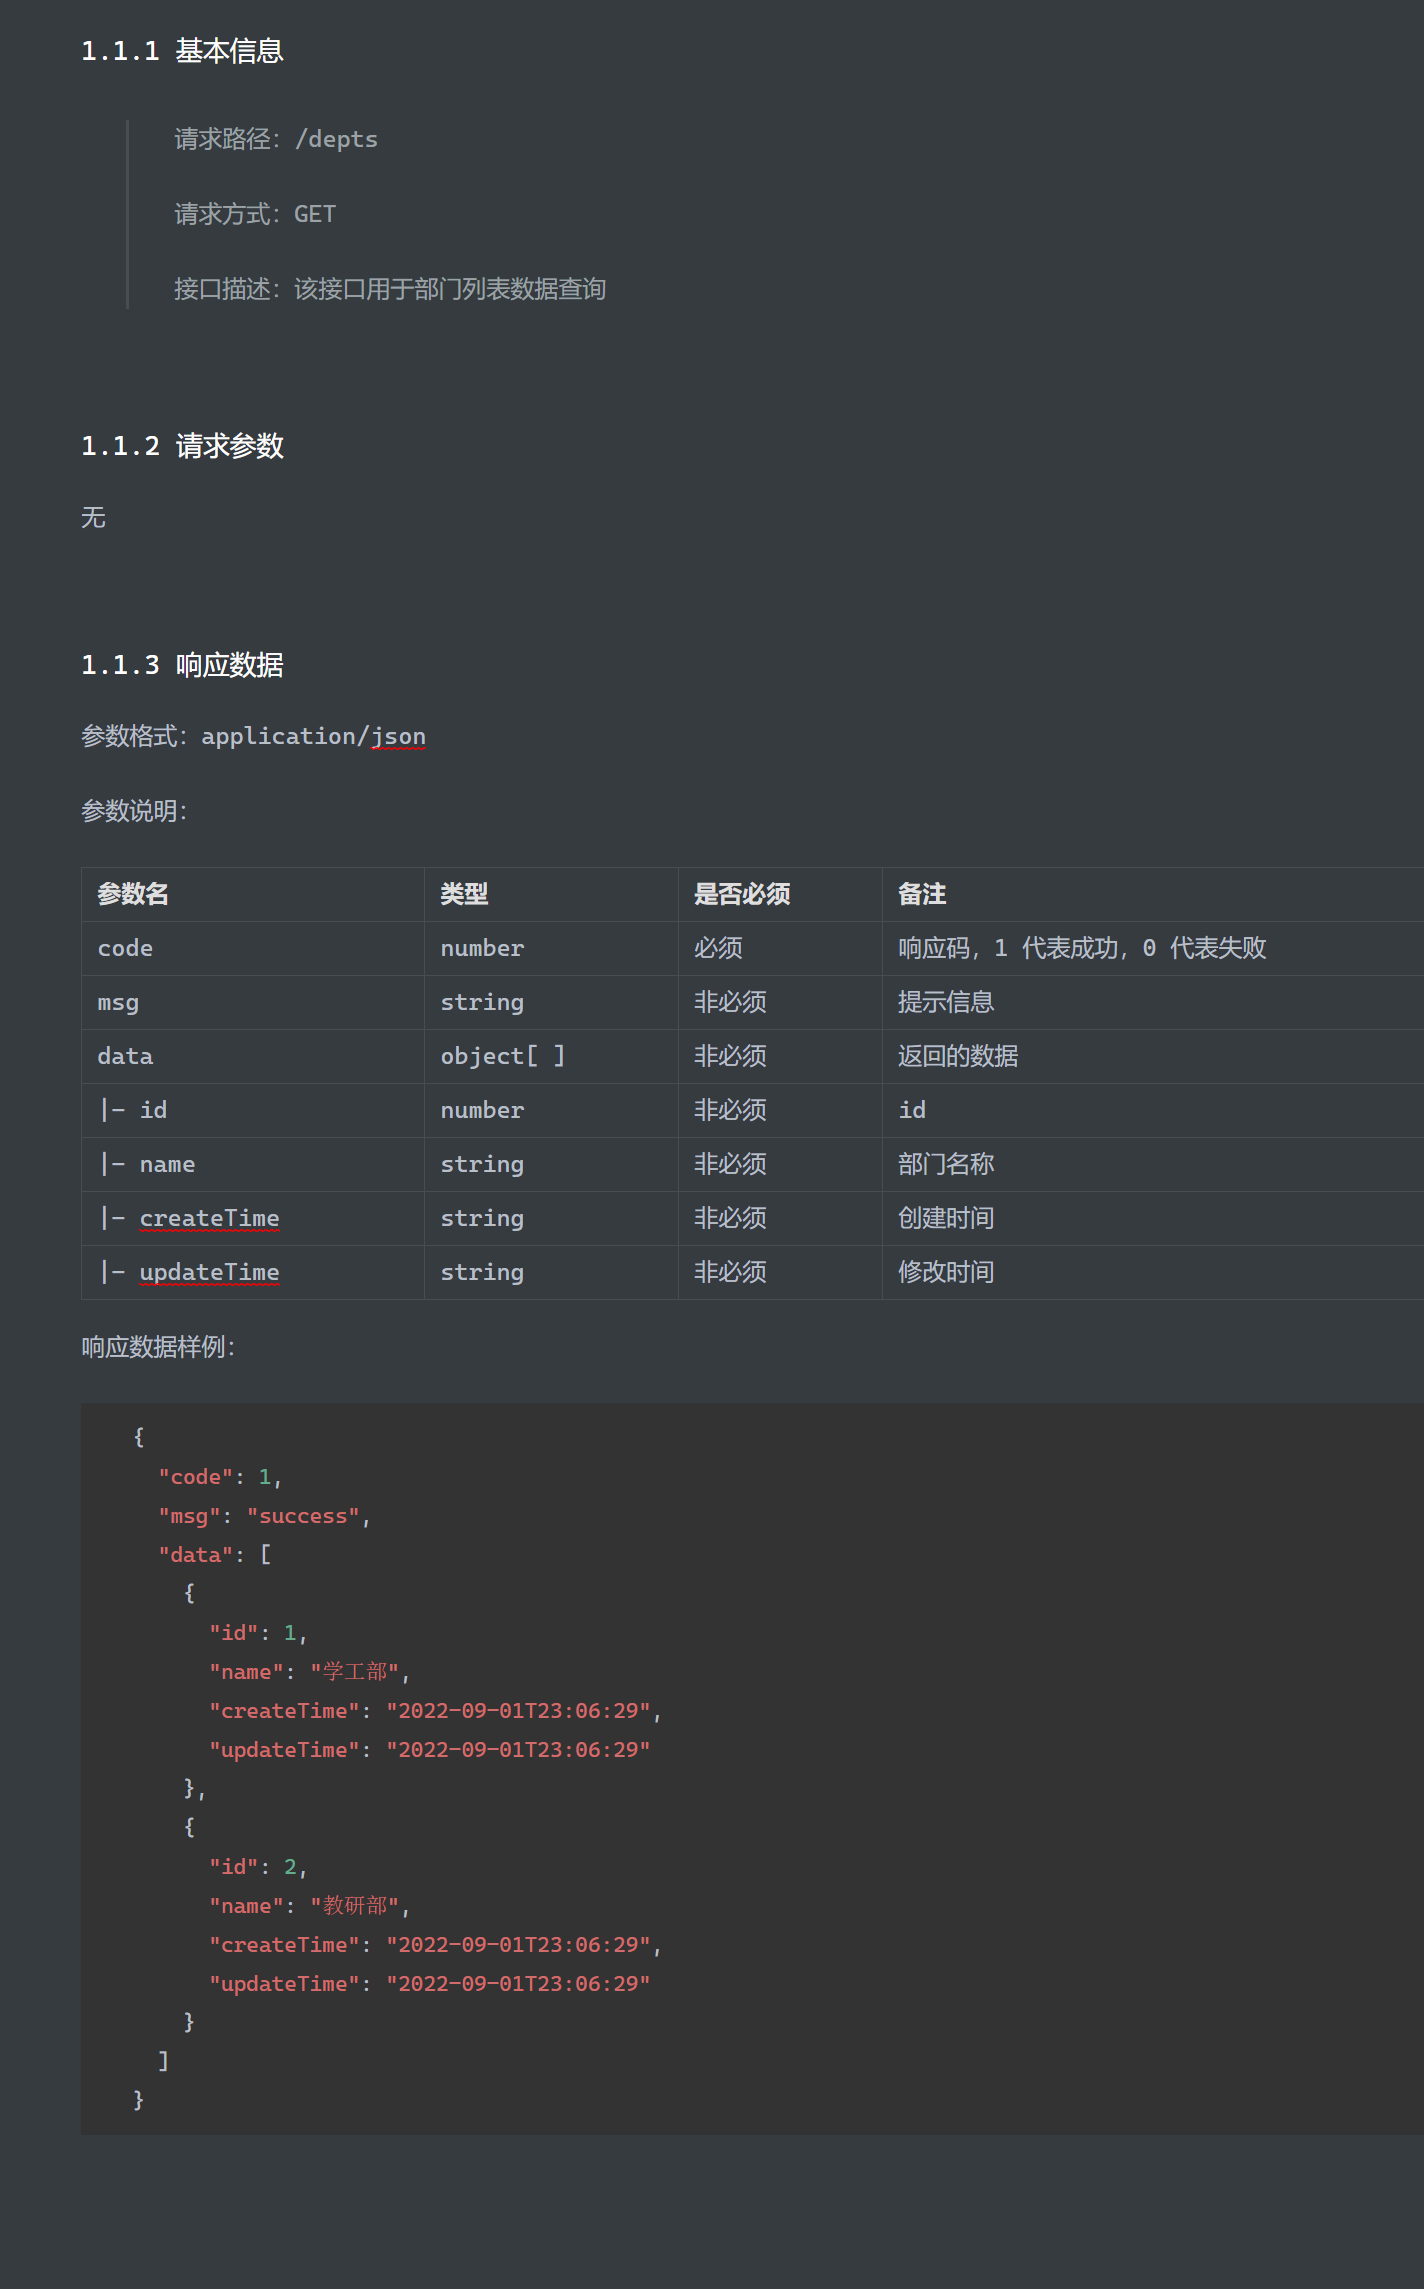
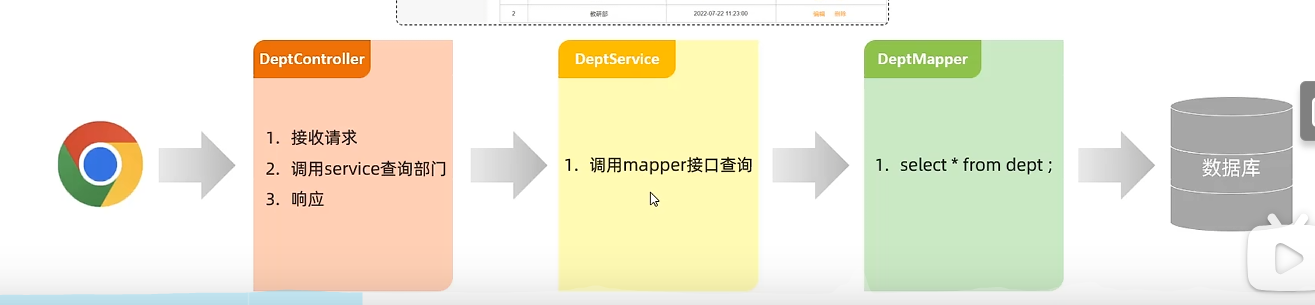
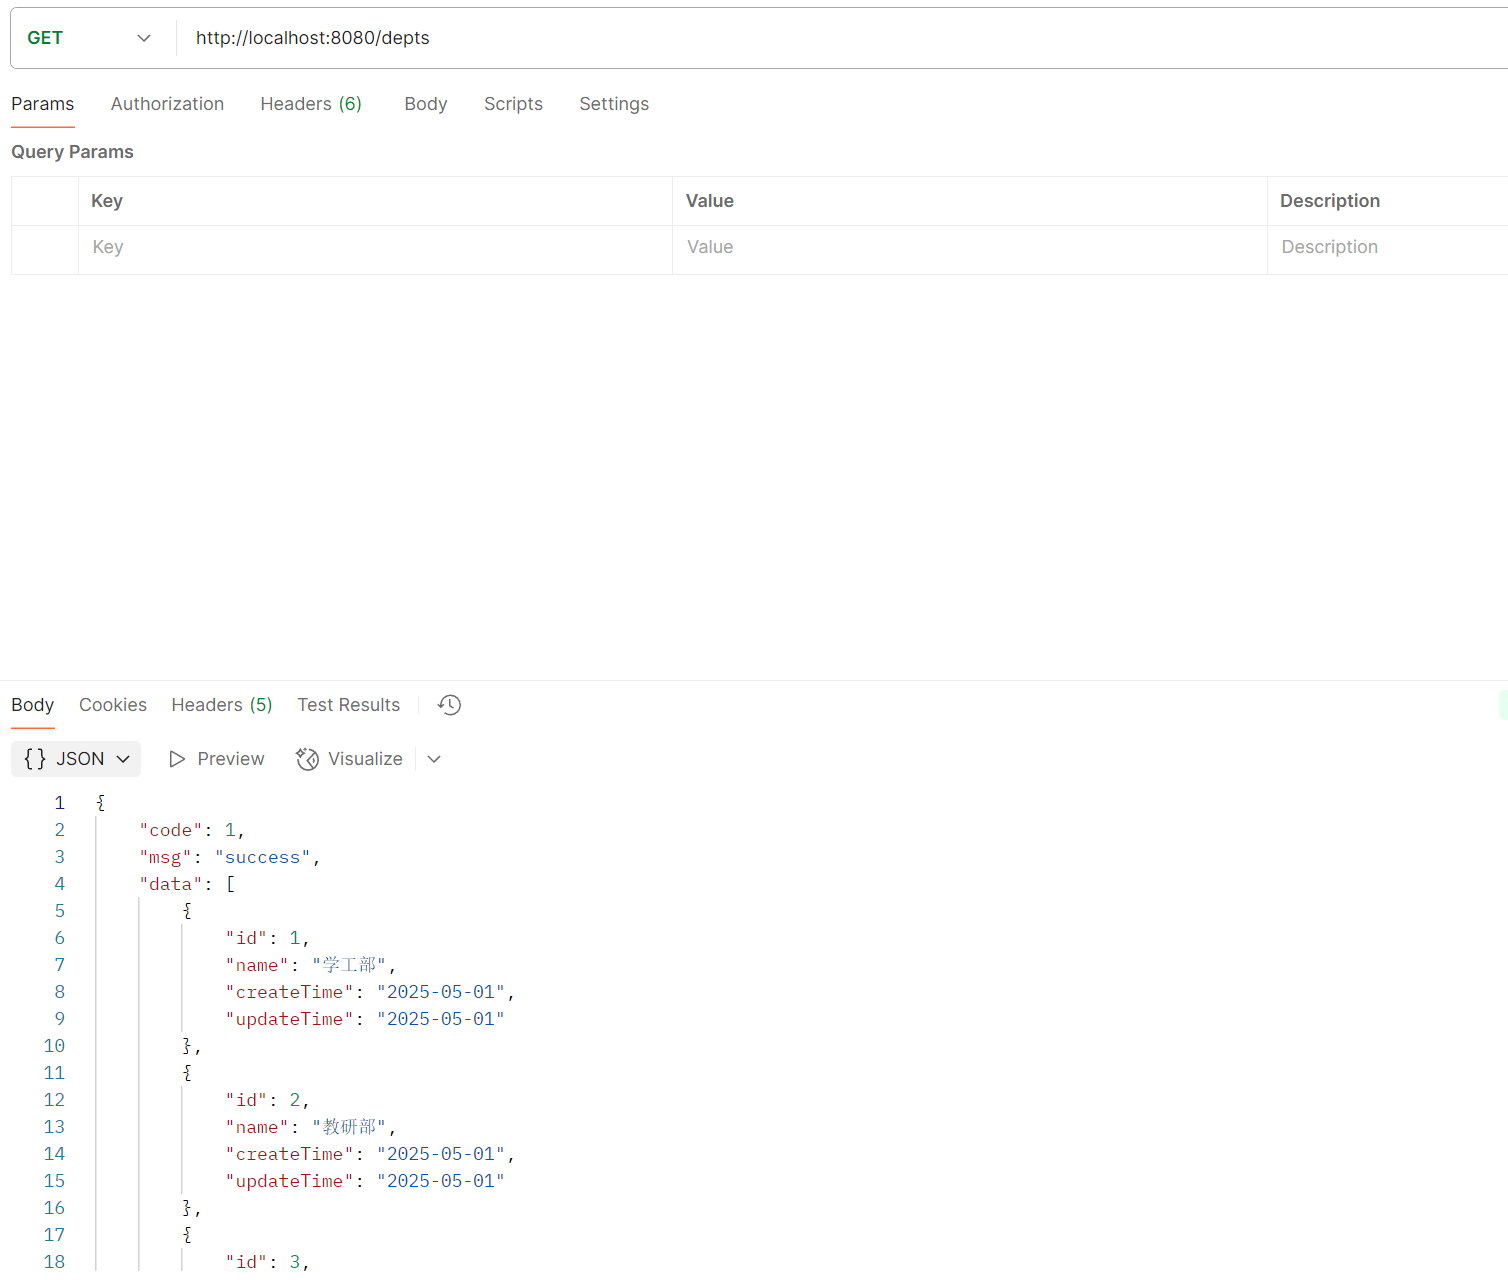
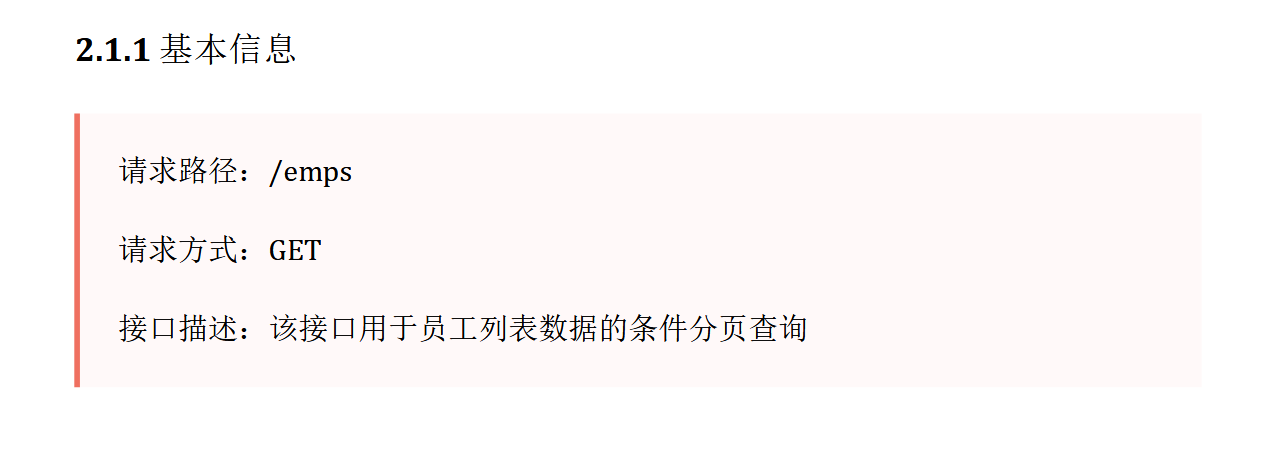
部门管理 部门管理-查询 接口文档:
1 2 3 4 5 6 7 8 9 10 @Slf4j @RestController public class deptController { @RequestMapping("/dept") public Result list () { log.info("查询所有部门信息" ); return Result.Success(); } }
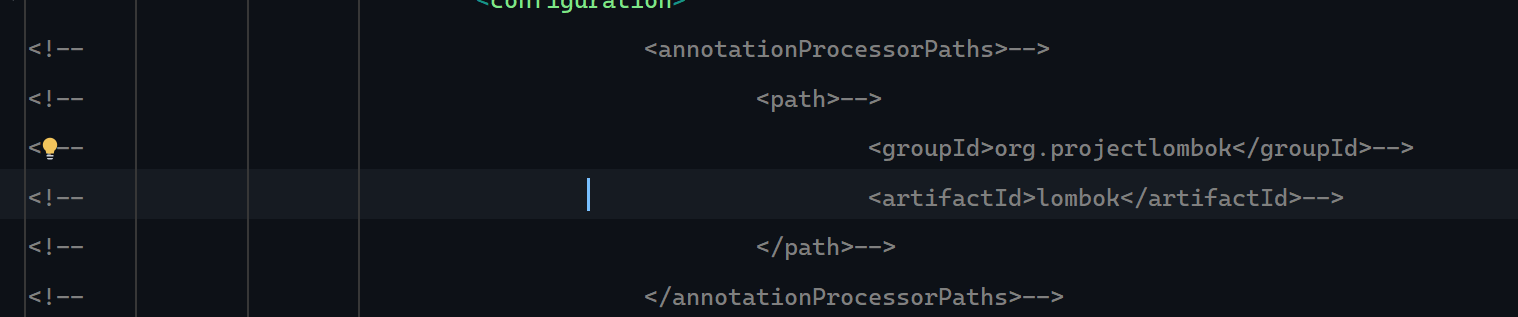
ps:构建项目时不要选lombok,否则要在pom.xml中注释以下内容:
否则报错:
postman测试:
日志输出:
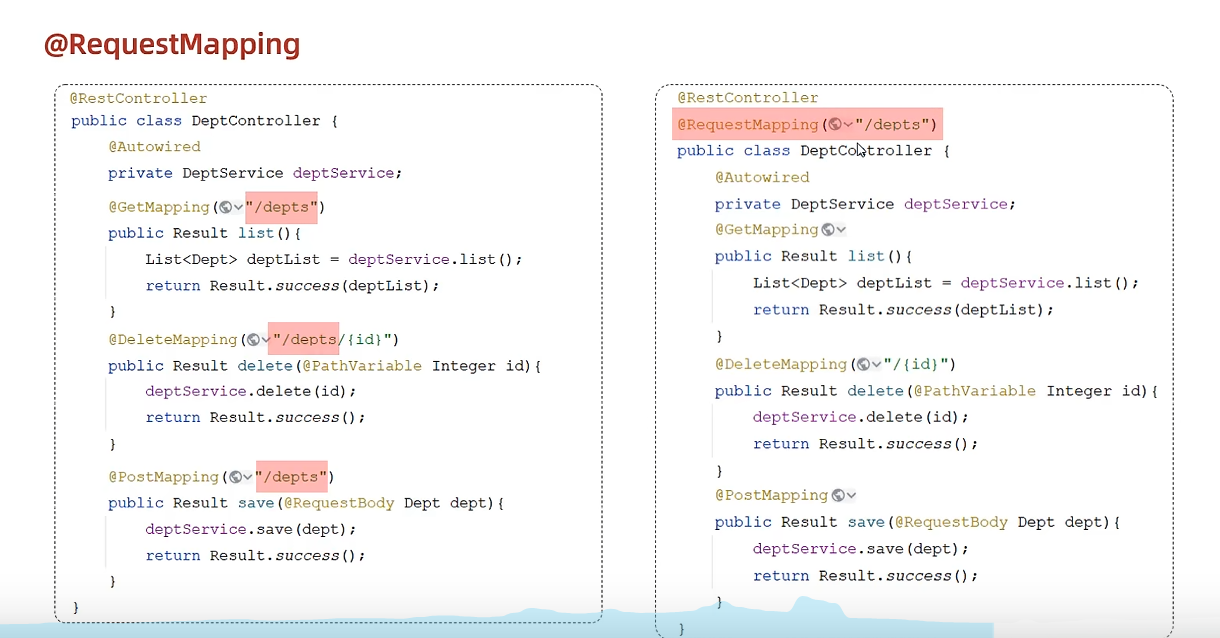
指定请求方法 1 2 3 @RequestMapping(value = "/depts",method = RequestMethod.GET) @GetMapping("depts")
注入依赖 Controller层
1 2 3 4 5 6 7 8 9 10 11 12 13 @Slf4j @RestController public class deptController { @Autowired private deptService service; @GetMapping("depts") public Result list () { log.info("查询所有部门信息" ); List<Dept> deptList = service.list(); return Result.success(deptList); } }
Service层
1 2 3 4 5 6 7 8 9 10 @Service public class deptImpl implements deptService { @Autowired private deptMapper mapper; @Override public List<Dept> list () { return mapper.list(); } }
Mapper层
1 2 3 4 5 @Mapper public interface deptMapper { @Select("select * from dept") public List<Dept> list () ; }
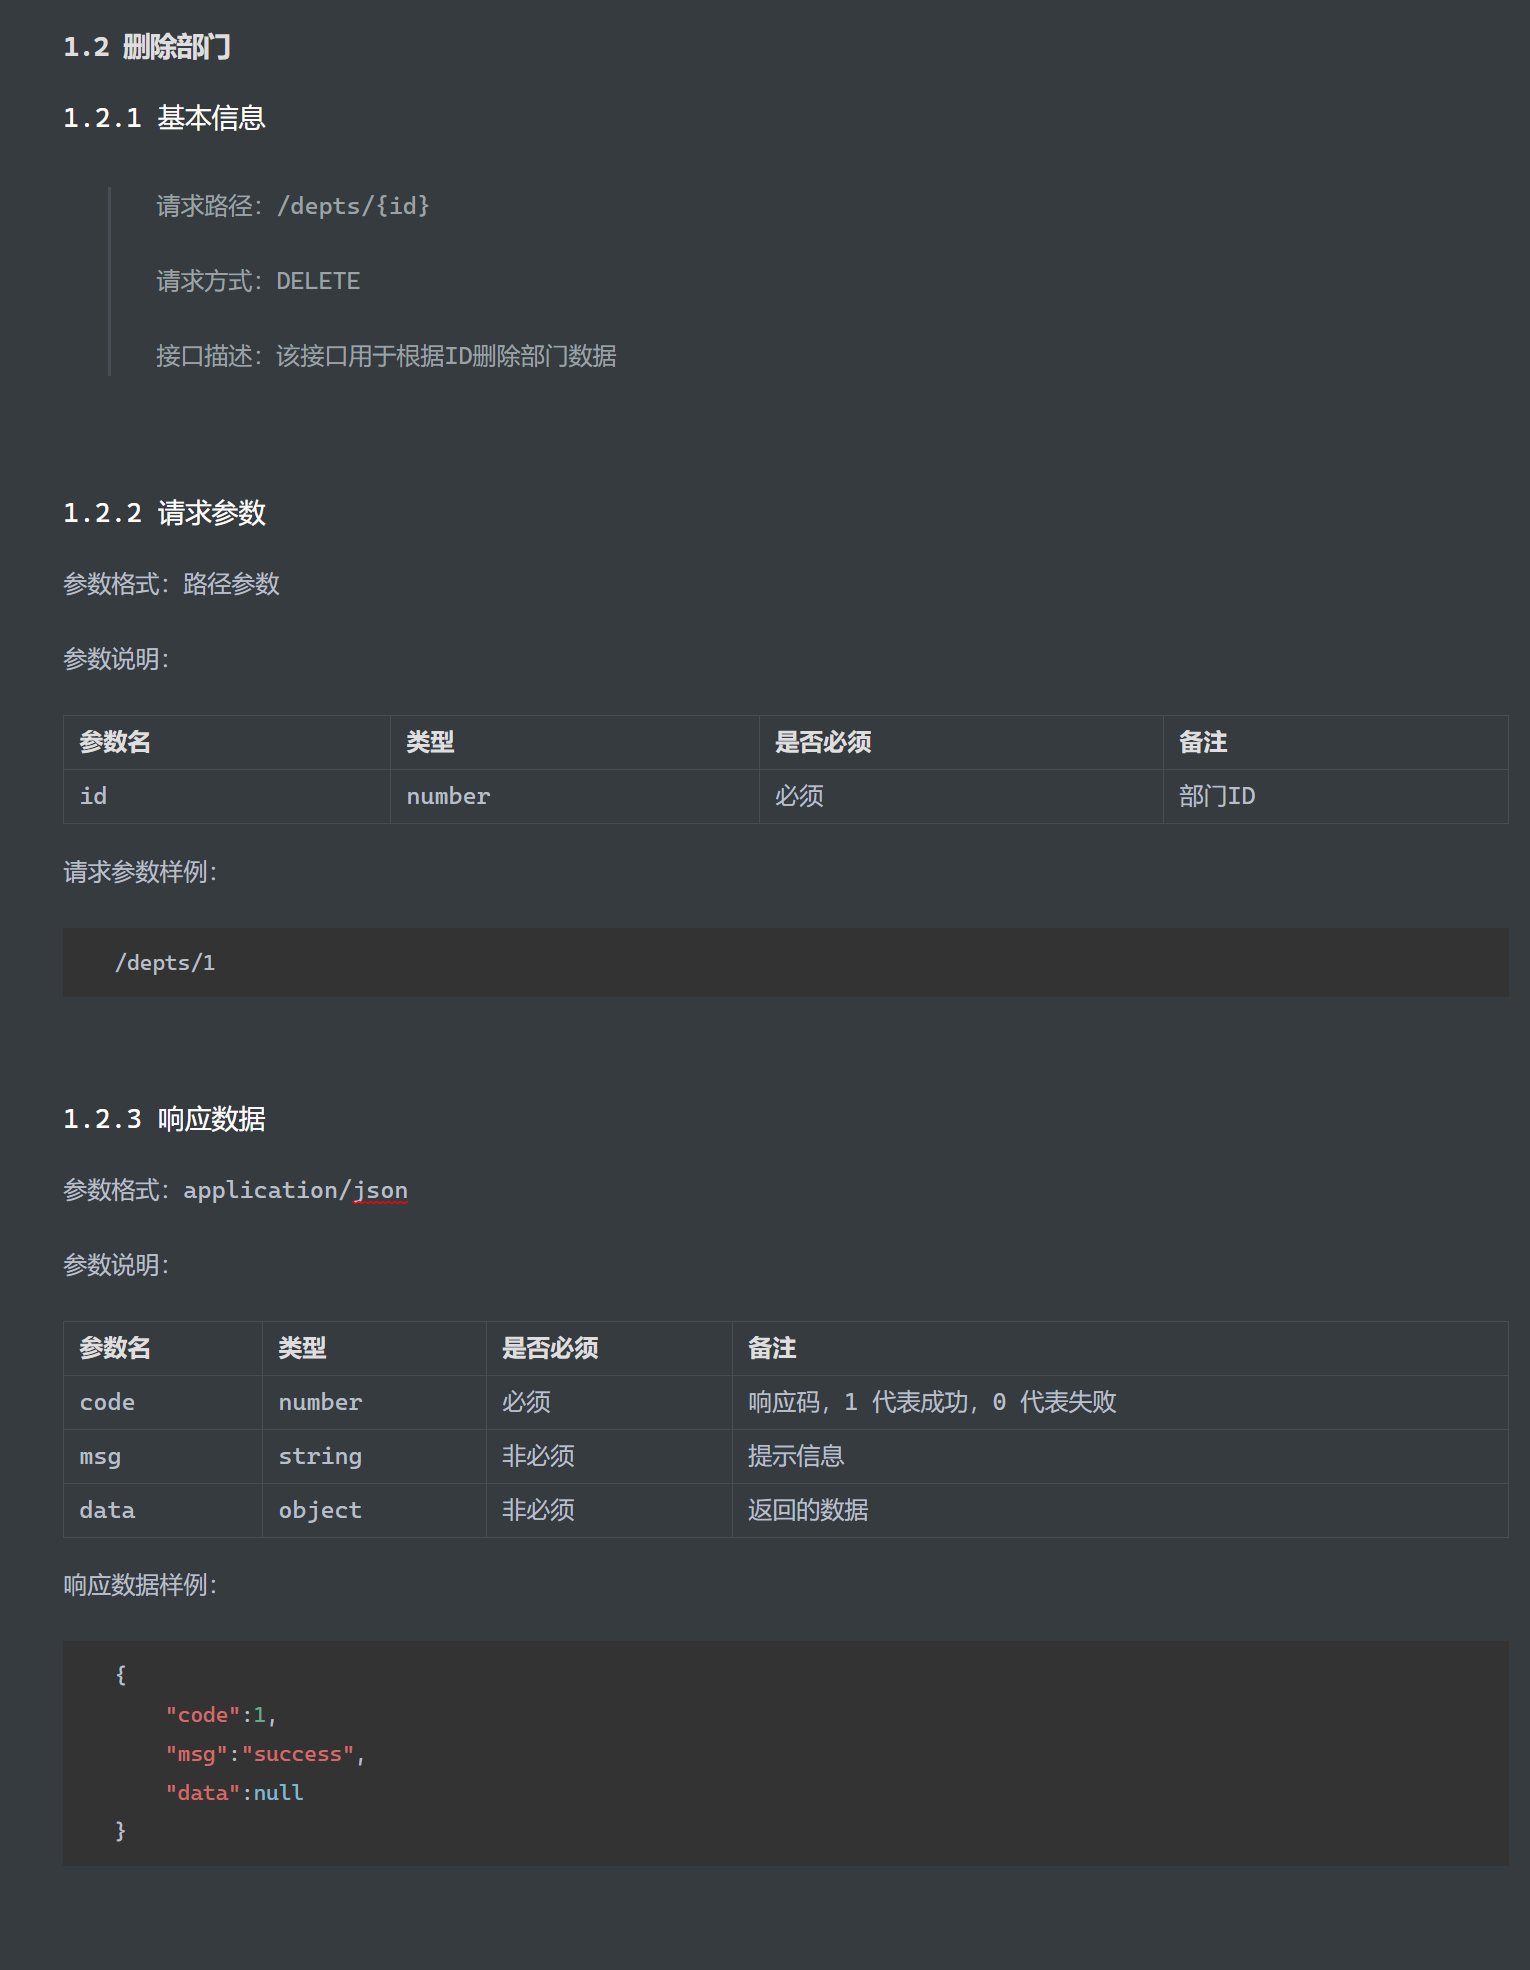
部门管理-删除 接口文档
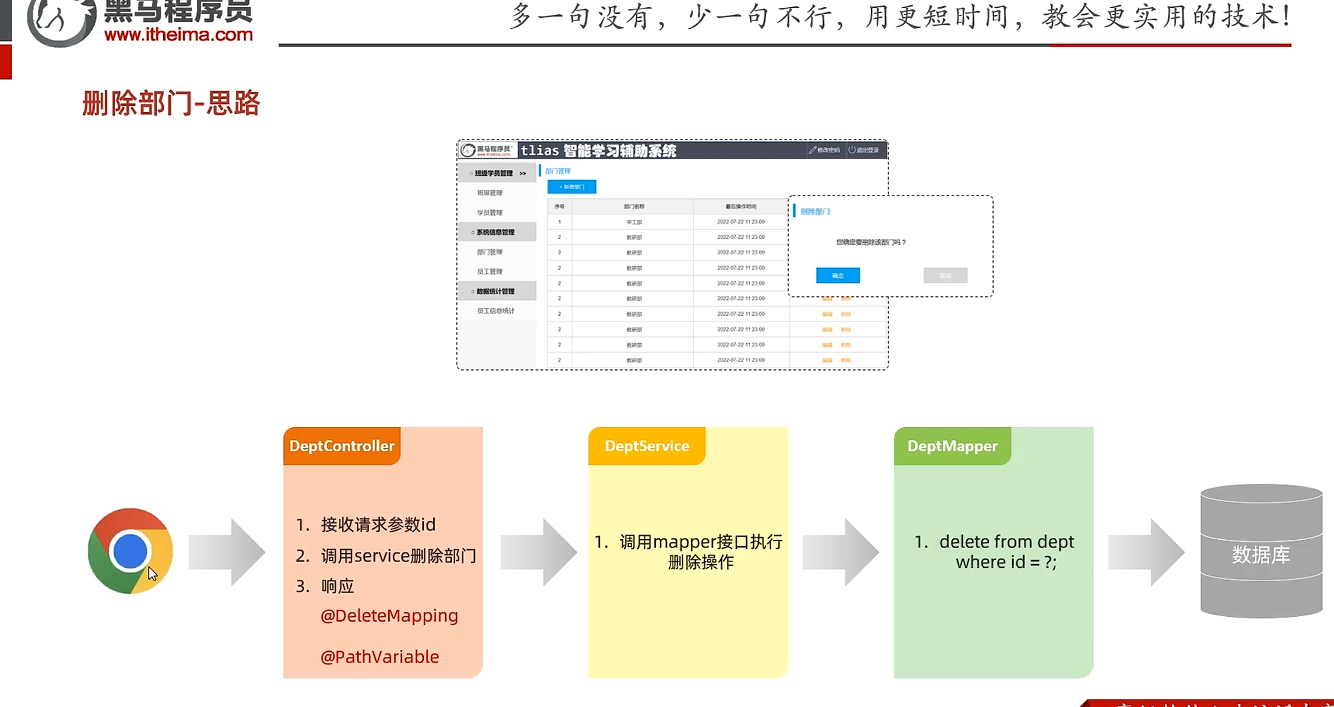
流程
Controller层 1 2 3 4 5 6 @DeleteMapping("/depts/{id}") public Result delete (@PathVariable Integer id) { log.info("根据id删除部门:{}" ,id); service.delete(id); return Result.success(); }
Service层 1 2 3 4 @Override public void delete (Integer id) { mapper.deleteById(id); }
Mapper层 1 2 @Delete("delete from dept where id=#{id}") void deleteById (Integer id) ;
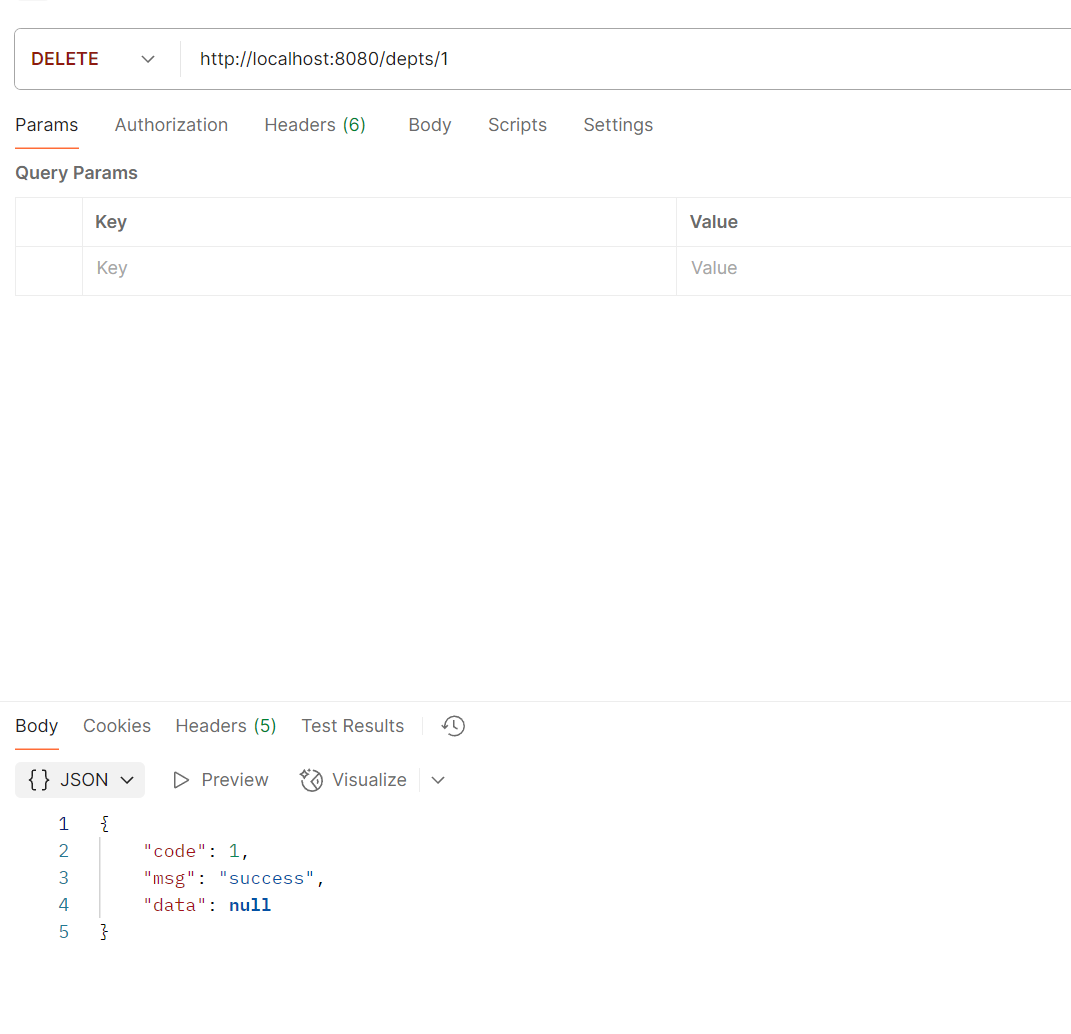
postman测试
执行结果
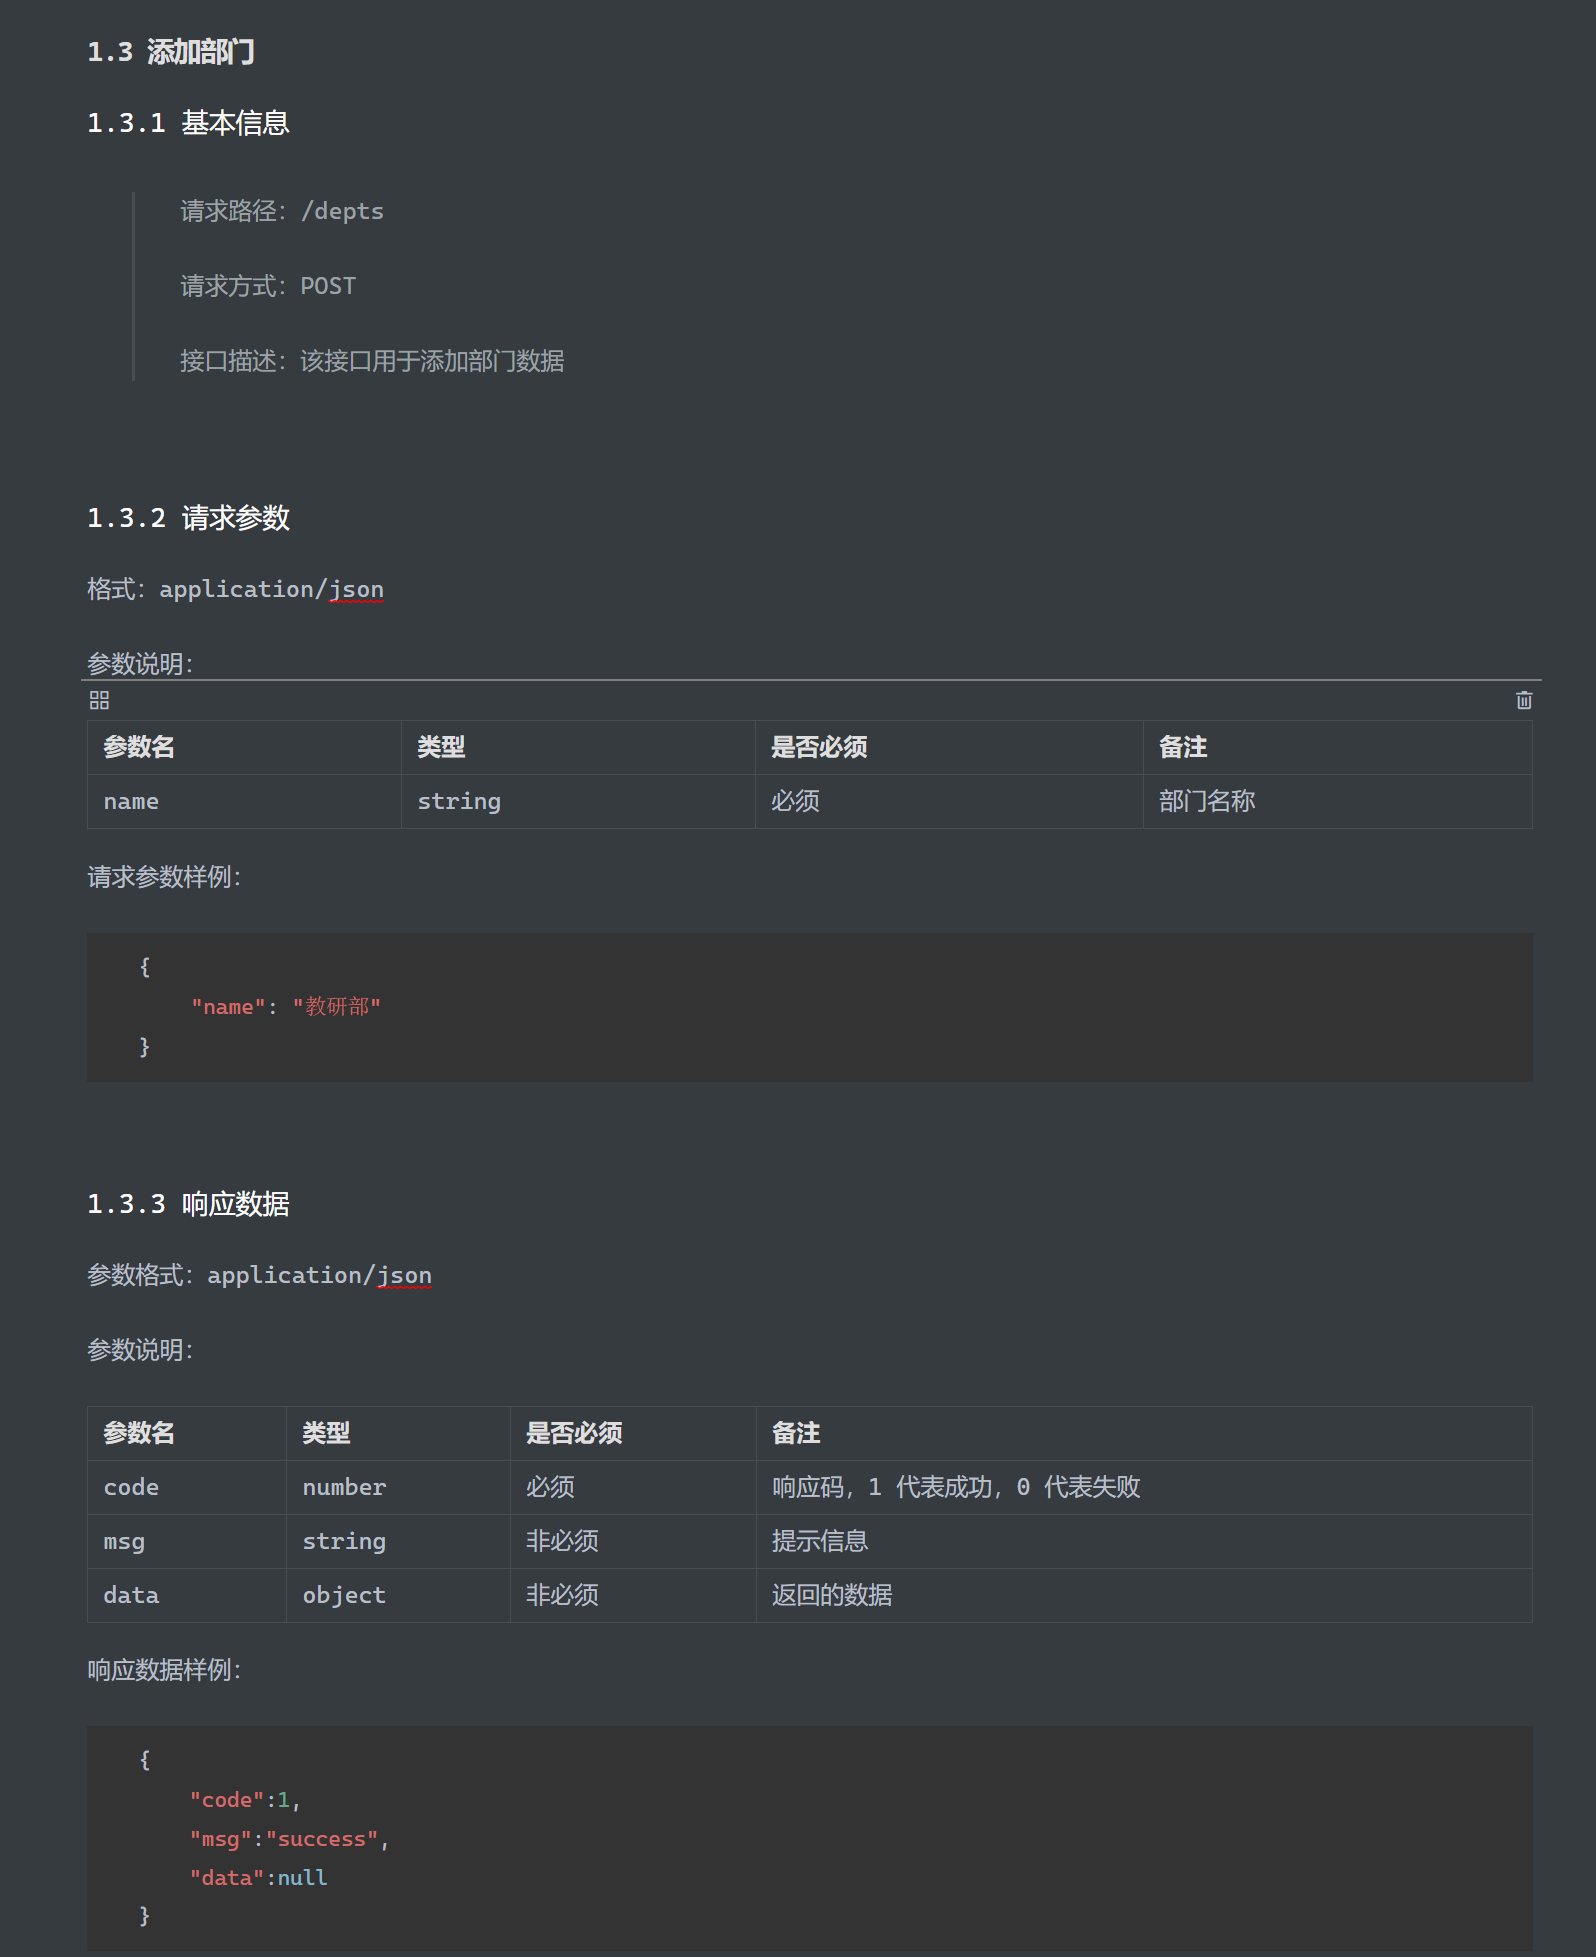
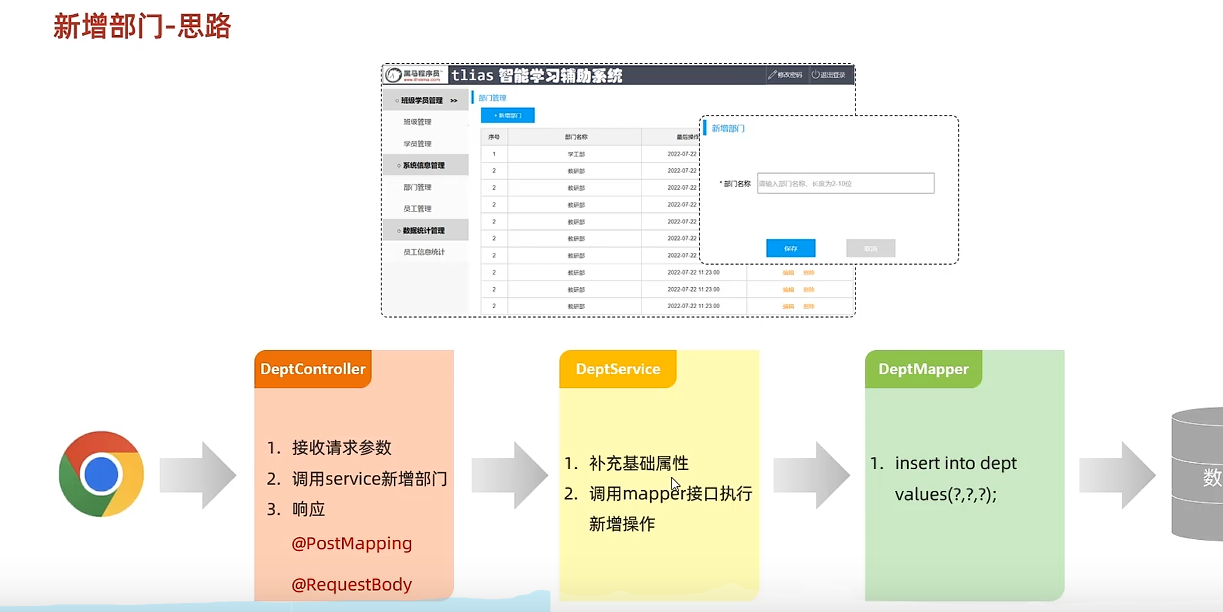
部门管理-新增 接口文档
Controller层 1 2 3 4 5 6 @PostMapping("/depts") public Result add (@RequestBody Dept dept) { log.info("新增部门{}" ,dept); service.add(dept); return Result.success(); }
Service层 1 2 3 4 5 6 7 @Override public void add (Dept dept) { dept.setCreateTime(LocalDate.now()); dept.setUpdateTime(LocalDate.now()); mapper.insert(dept); }
Mapper层 1 2 @Insert("insert into dept (name,create_time,update_time) values (#{name},#{createTime},#{updateTime})") void insert (Dept dept) ;
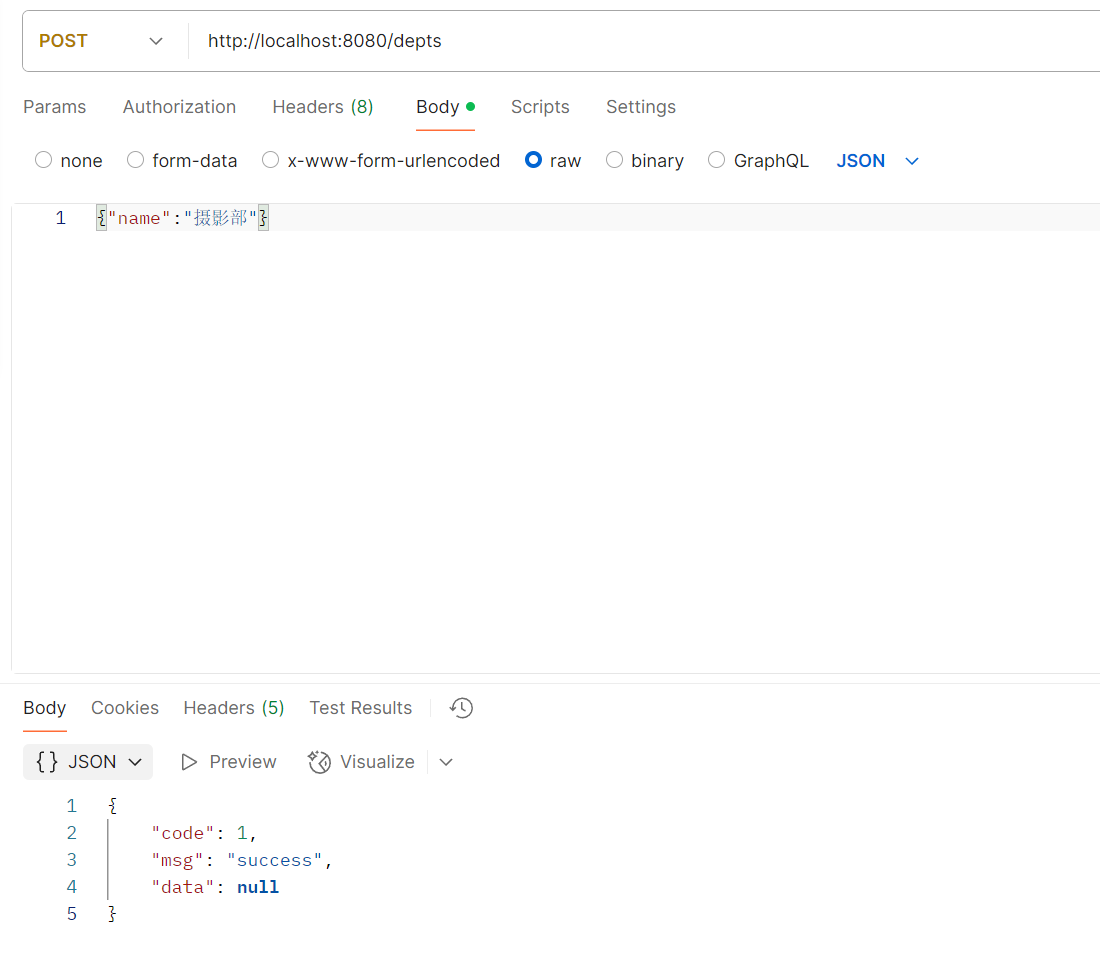
postman测试
结果
简化RequestMapping
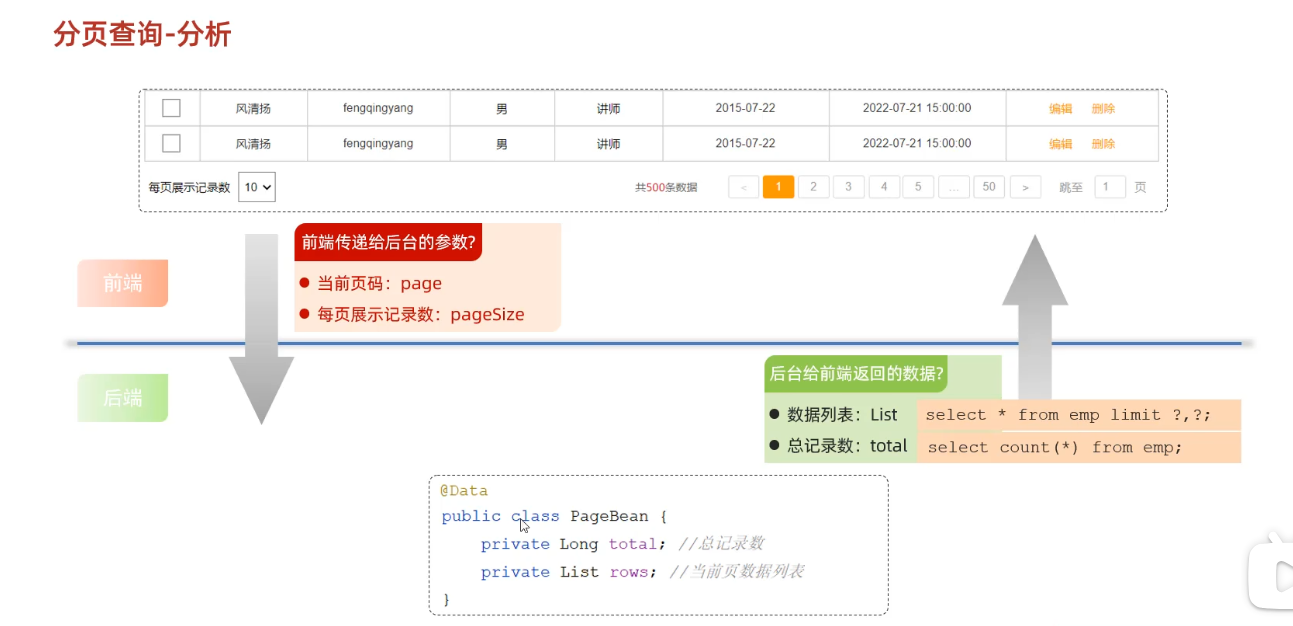
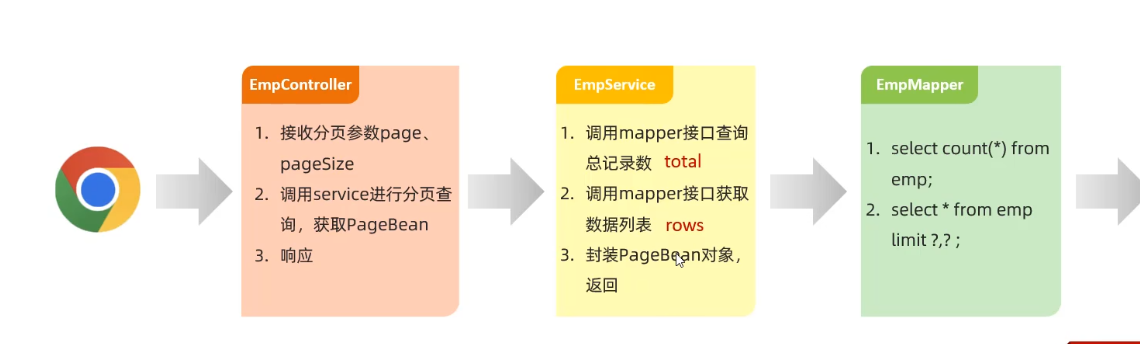
员工管理 分页查询 分析
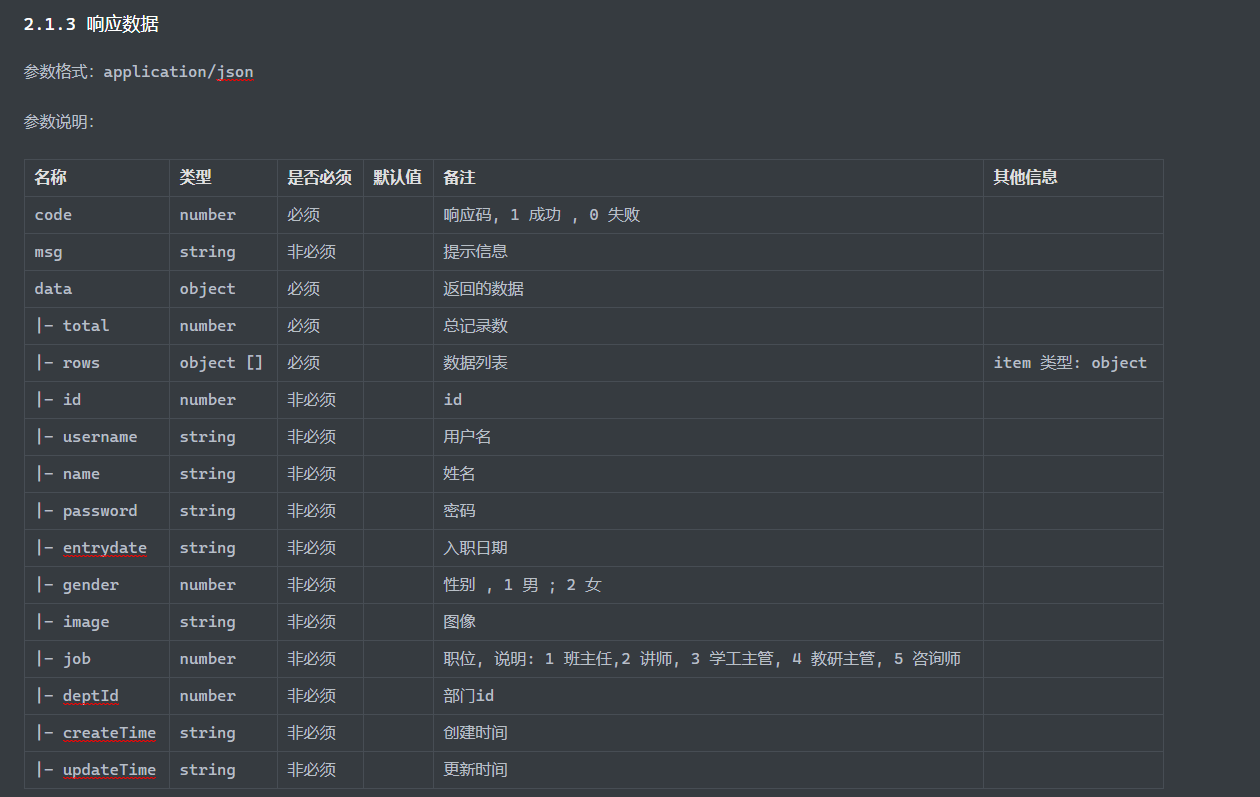
接口文档
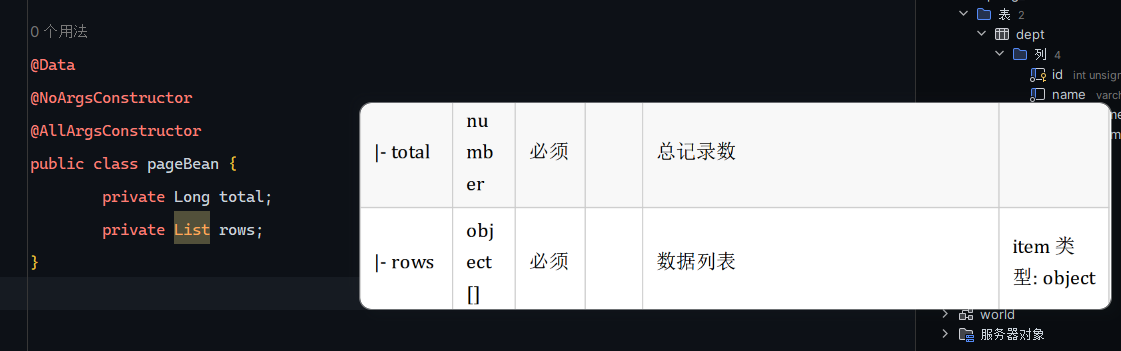
封装实体类
1 2 3 4 5 6 7 @Data @NoArgsConstructor @AllArgsConstructor public class pageBean { private Long total; private List rows; }
实现 Mapper层 1 2 3 4 5 6 7 8 9 10 11 12 13 14 15 16 17 18 @Mapper public interface EmpMapper { @Select("select count(*) from emp") Long count () ; @Select("select * from emp limit #{page},#{pageSize}") List<Emp> page (Integer page,Integer pageSize) ; }
Service层 1 2 3 4 5 6 7 8 9 10 11 12 13 14 15 @Service public class empImpl implements empService { @Autowired EmpMapper empMapper; @Override public PageBean page (Integer page, Integer pageSize) { Long total = empMapper.count(); Integer start = (page - 1 ) * pageSize; List<Emp> rows = empMapper.page(start, pageSize); PageBean pageBean = new PageBean (total,rows); return pageBean; } }
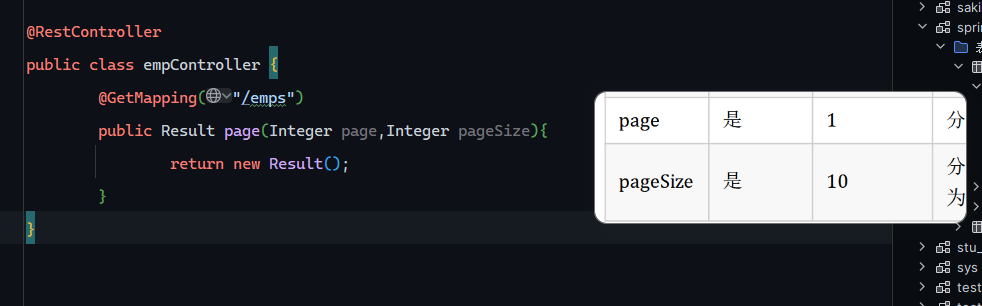
Controller层
用@RequestParam(defaultValue=””)设置参数默认值
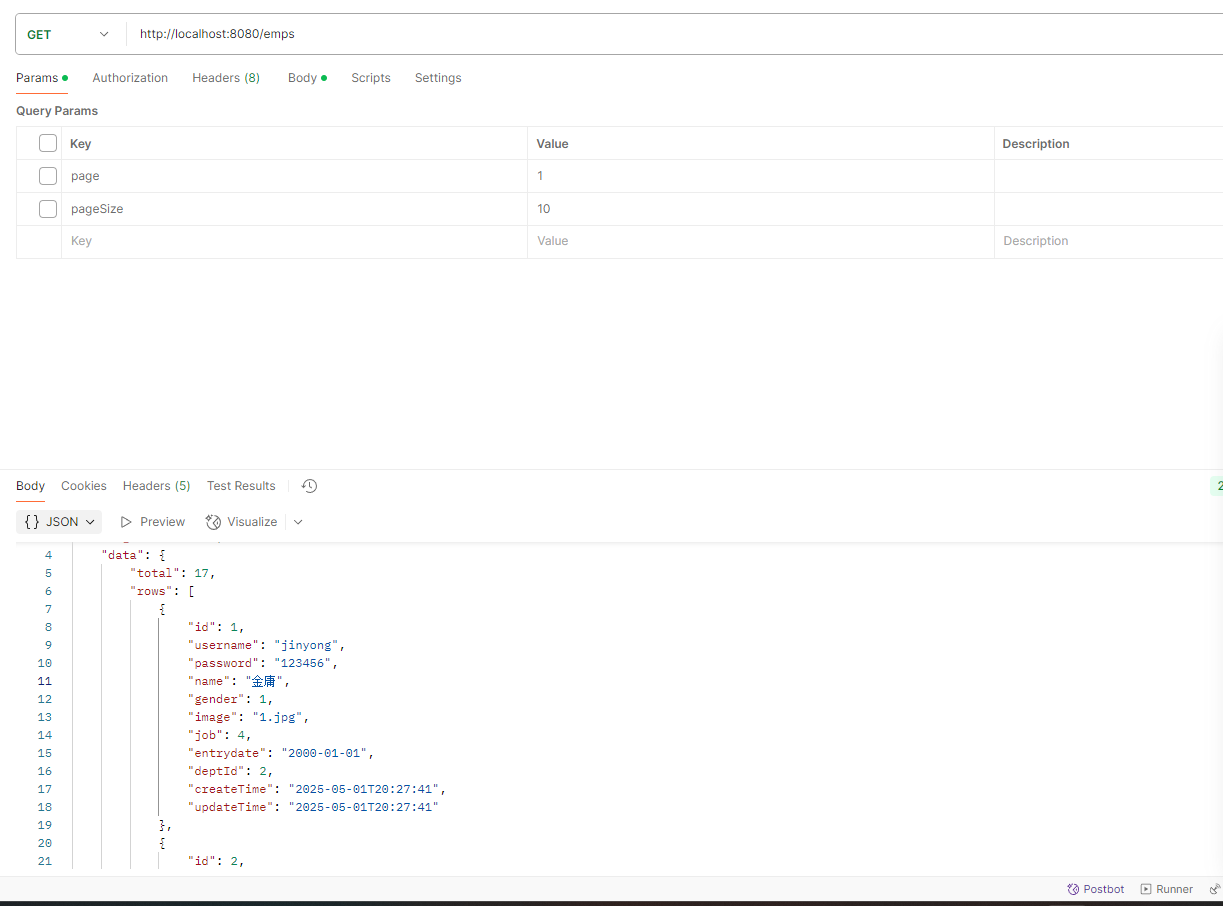
1 2 3 4 5 6 7 @RestController public class empController { @GetMapping("/emps") public Result page (@RequestParam(defaultValue = "1") Integer page, @RequestParam(defaultValue = "10") Integer pageSize) { return new Result (); } }
日志输出
1 log.info("分页查询,分页查询页码为{},每页记录数为{}" ,page,pageSize);
调用Service层
1 PageBean pageBean = empservice.page(page,pageSize);
1 2 3 4 5 6 7 8 9 10 11 12 13 @Slf4j @RestController public class empController { @Autowired empService empservice; @GetMapping("/emps") public Result page (@RequestParam(defaultValue = "1") Integer page, @RequestParam(defaultValue = "10") Integer pageSize) { log.info("分页查询,起始{},查询{}页" ,page,pageSize); PageBean pageBean = empservice.page(page,pageSize); return Result.success(pageBean); } }
测试 postman
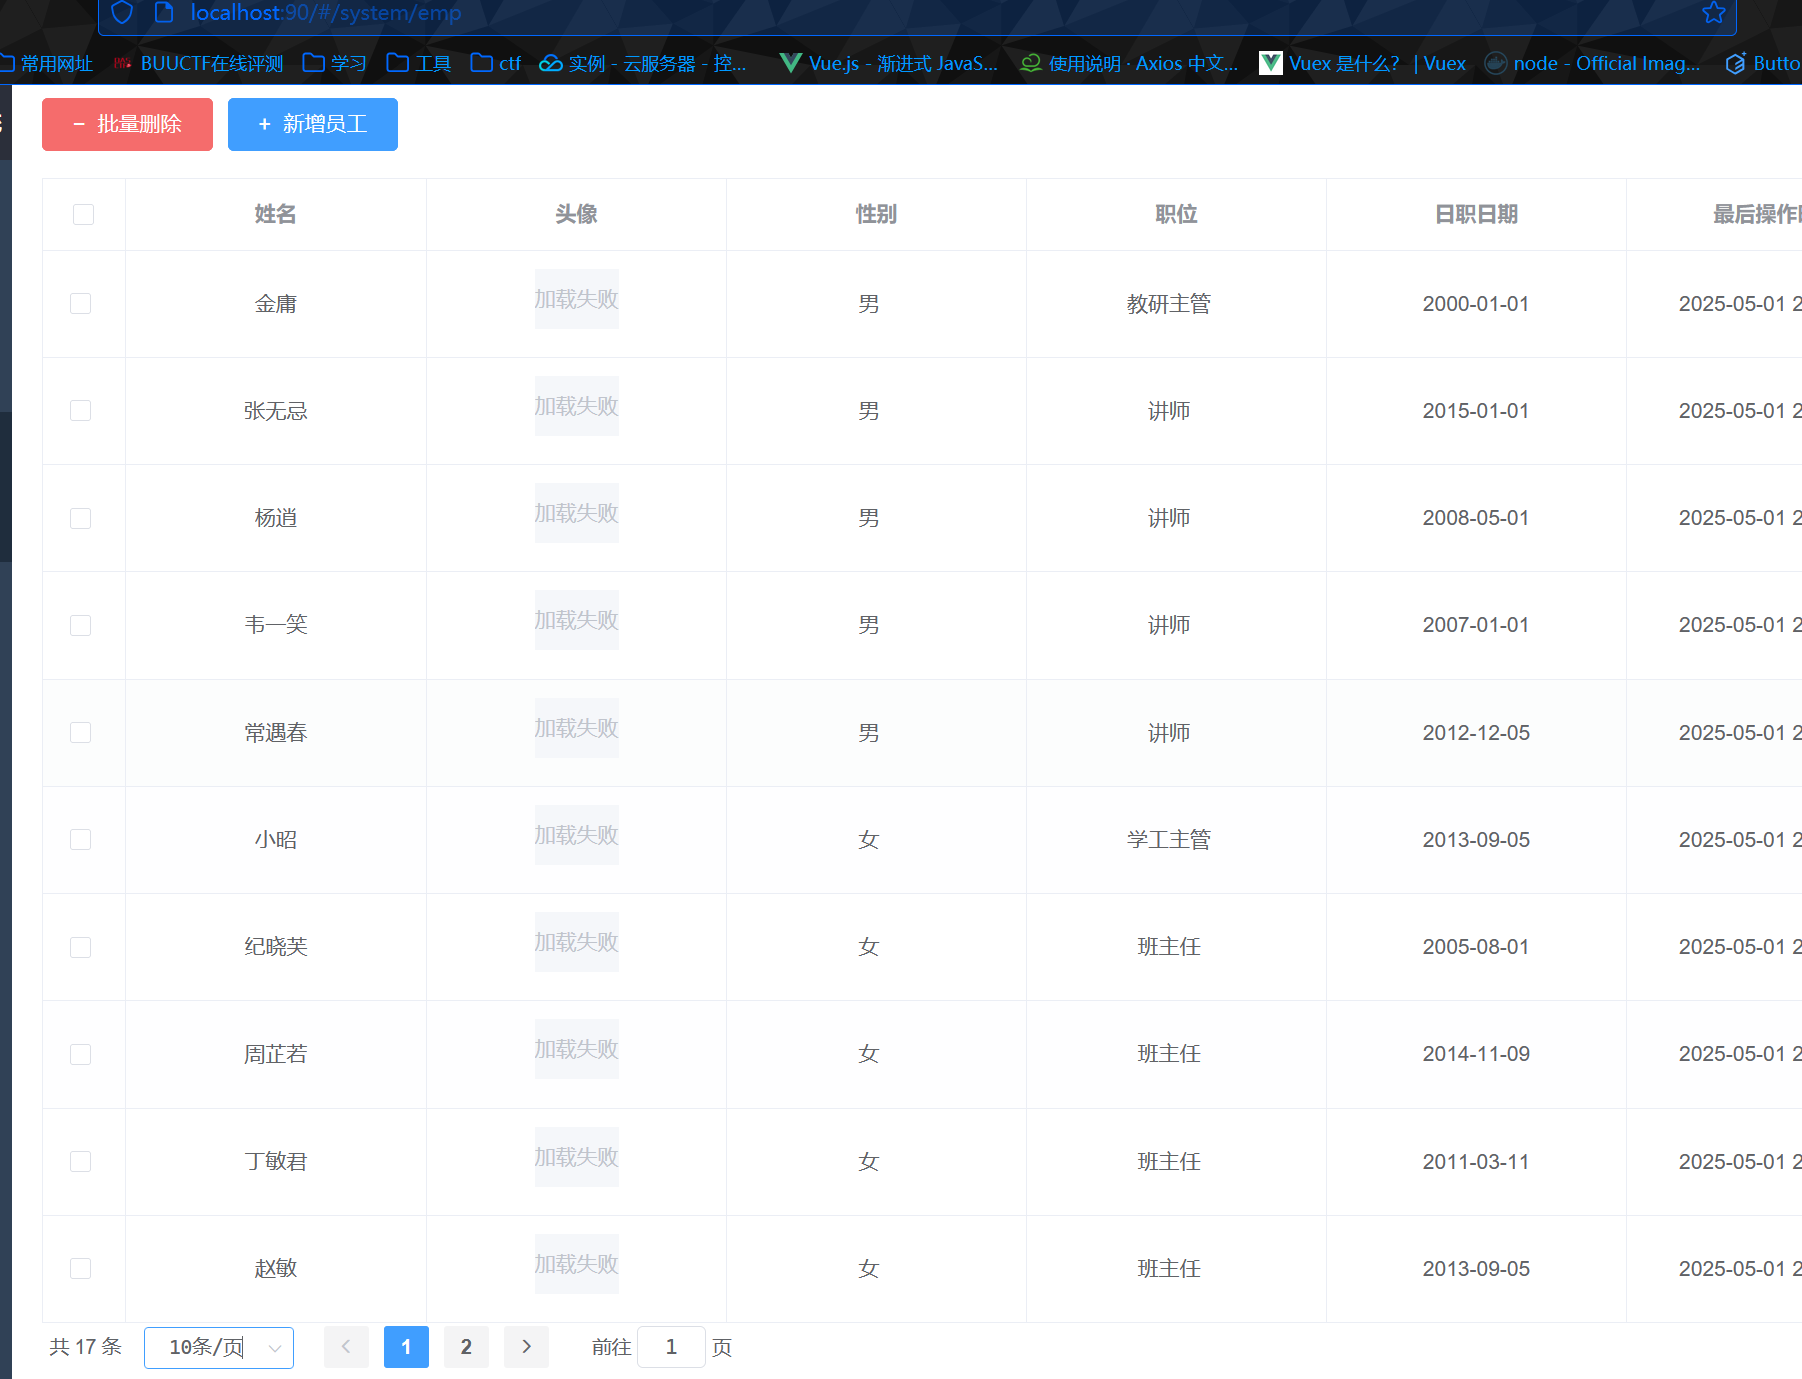
前后端联调
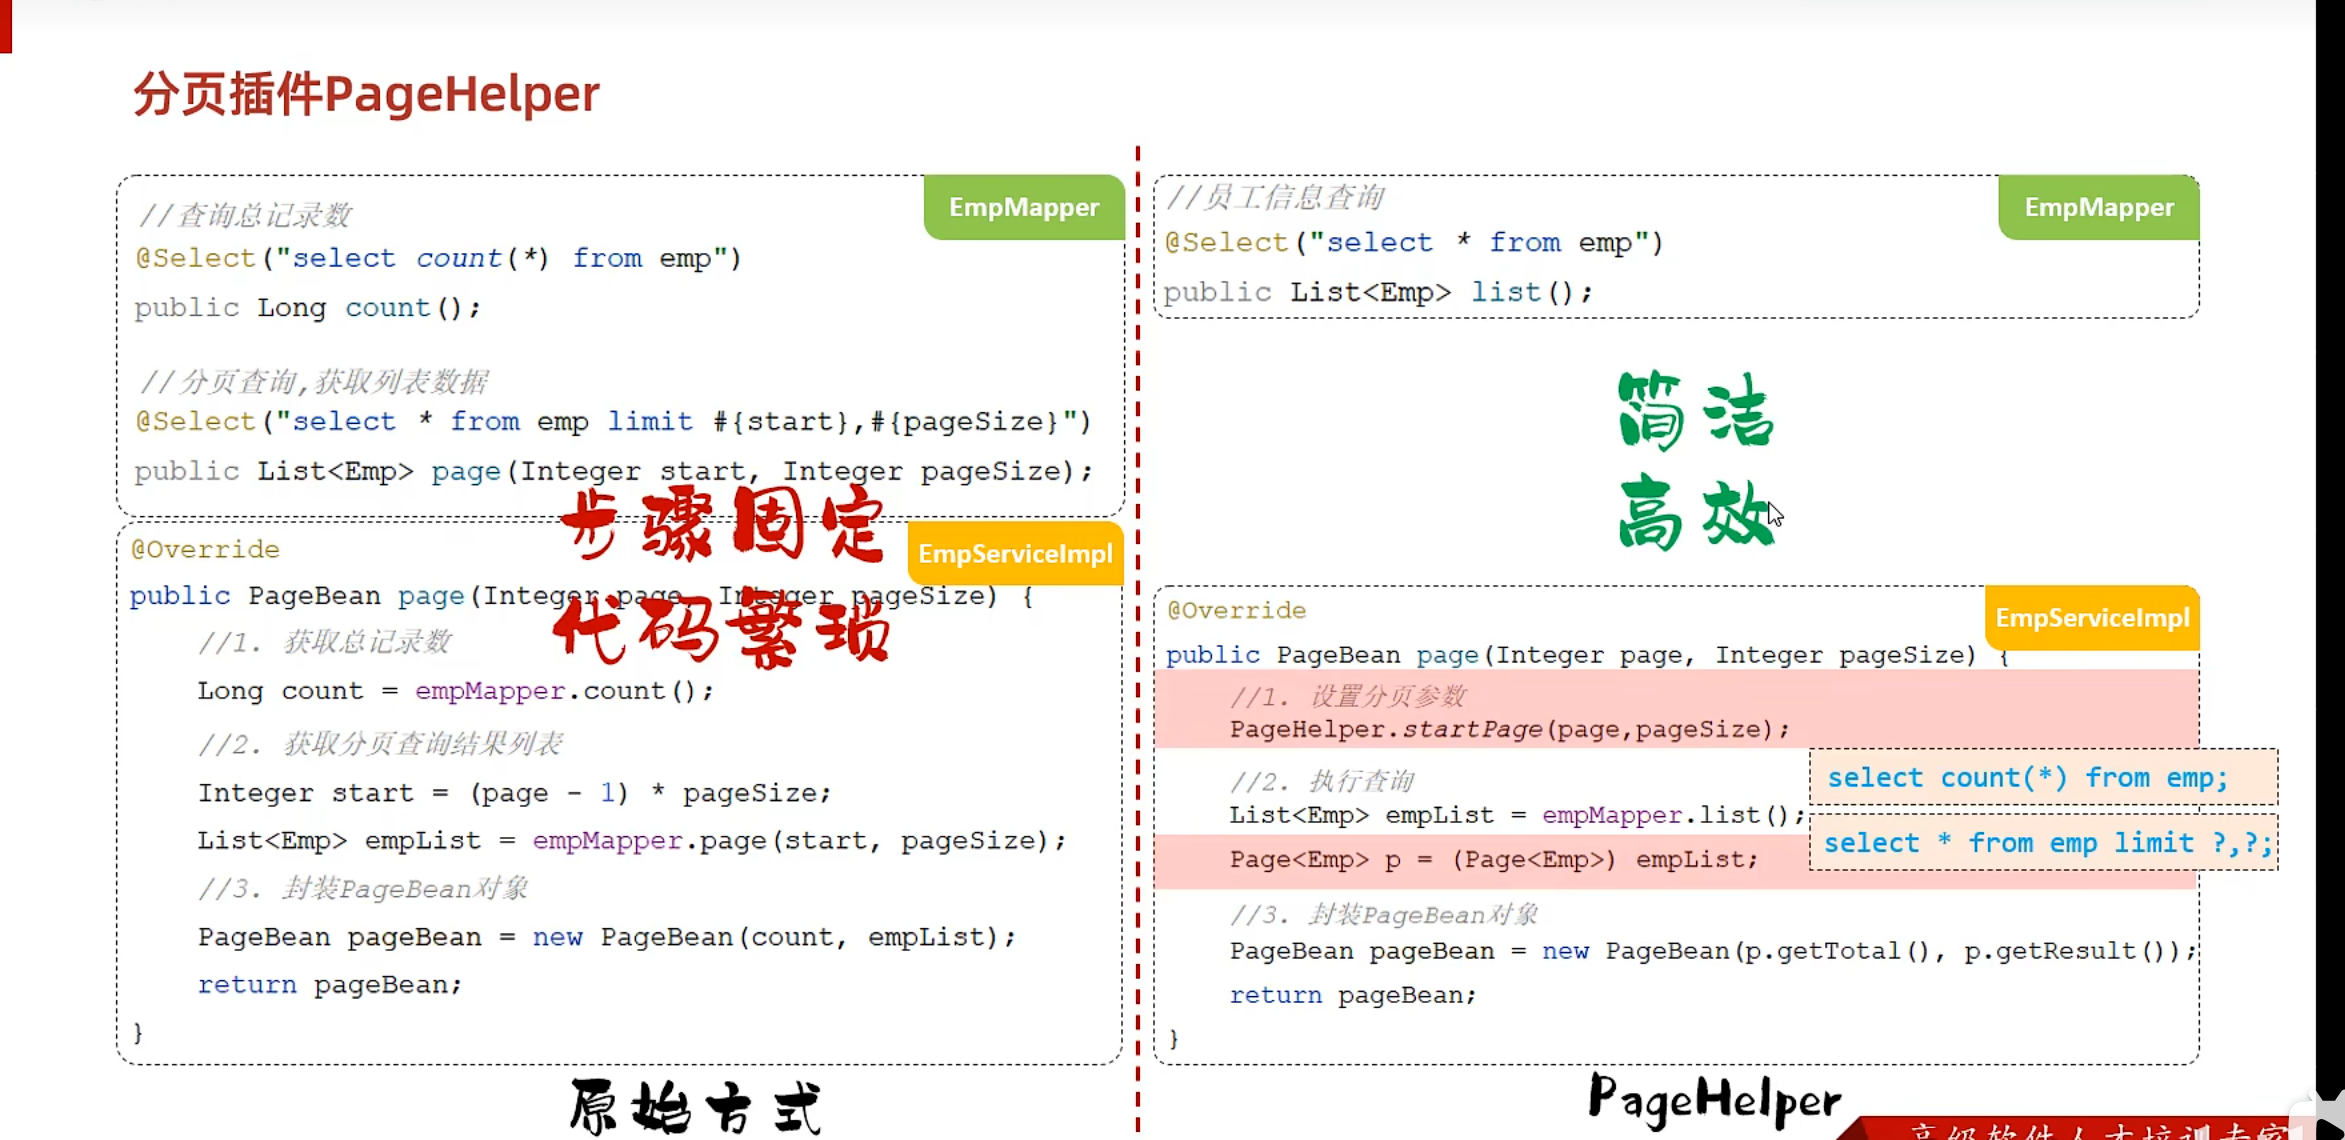
PageHelper插件
引入依赖
这里的版本不能按照课件的1.4.2,否则会强转异常(ClassCastException)
1 2 3 4 5 <dependency > <groupId > com.github.pagehelper</groupId > <artifactId > pagehelper-spring-boot-starter</artifactId > <version > 1.4.6</version > </dependency >
EmpMapper
1 2 @Select("select* from emp") List<Emp> list () ;
EmpServer的实现类
1 2 3 4 5 6 7 8 9 10 11 12 13 @Override public PageBean page (Integer page, Integer pageSize) { PageHelper.startPage(page,pageSize); List<Emp> empList = empMapper.list(); Page<Emp> page1 = (Page<Emp>)empList; PageBean pageBean = new PageBean (page1.getTotal(),page1.getResult()); return pageBean; }
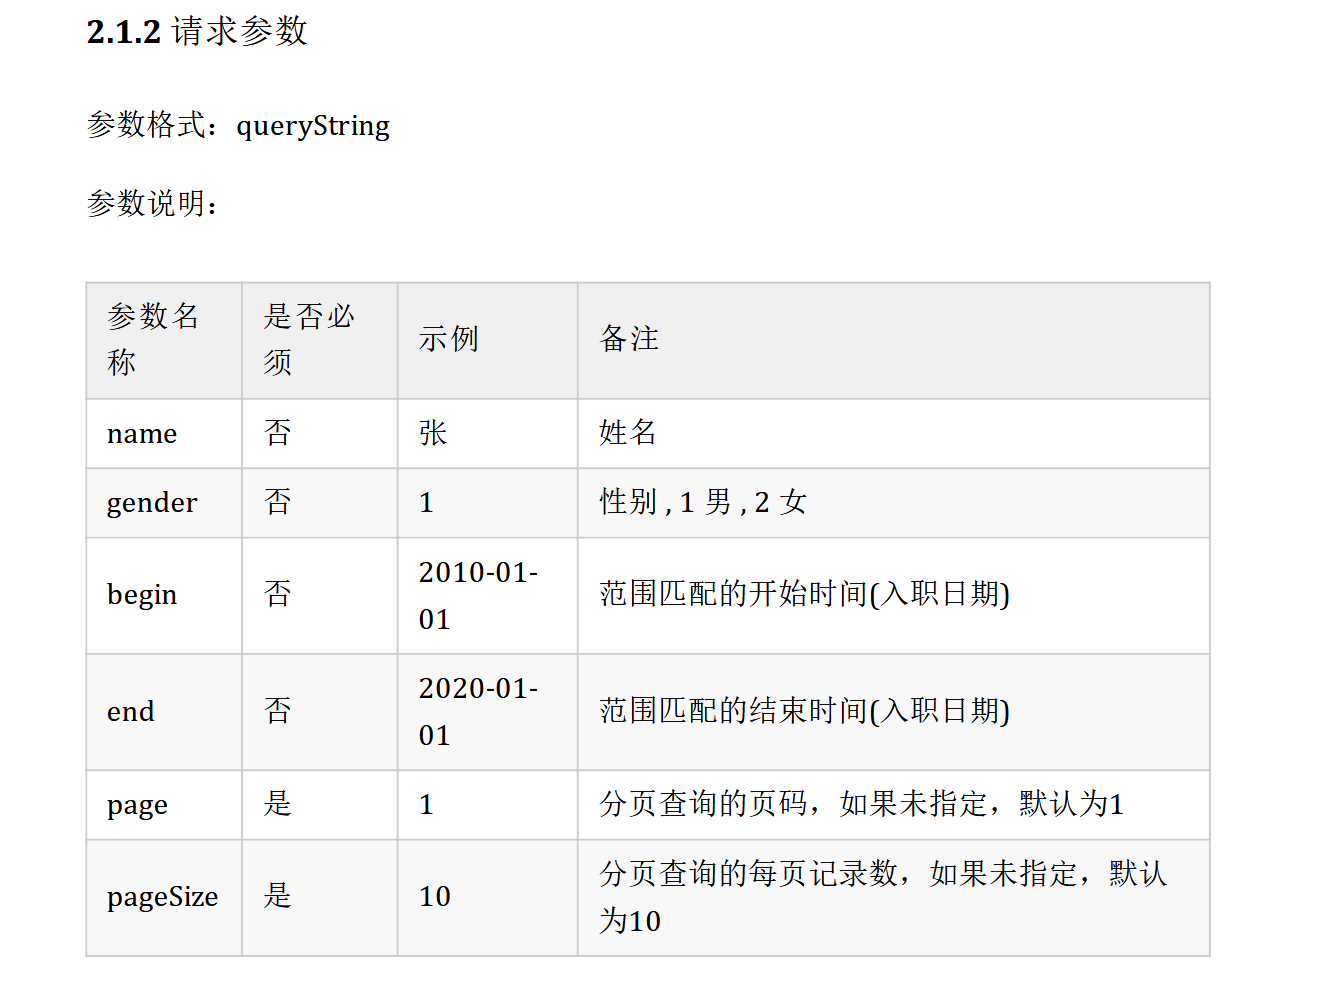
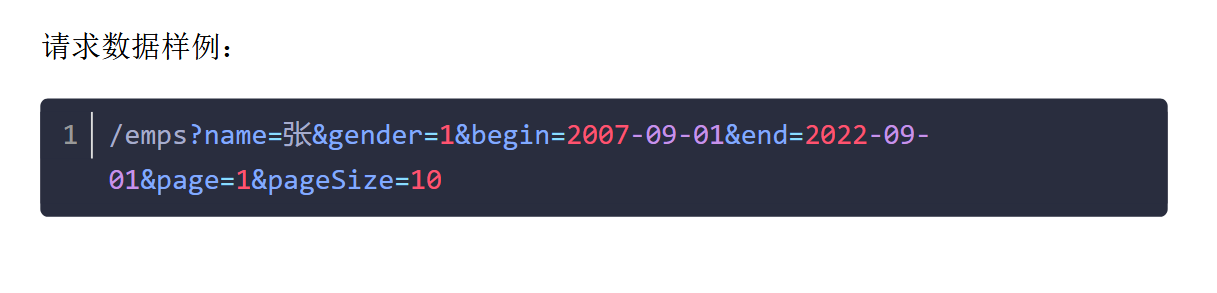
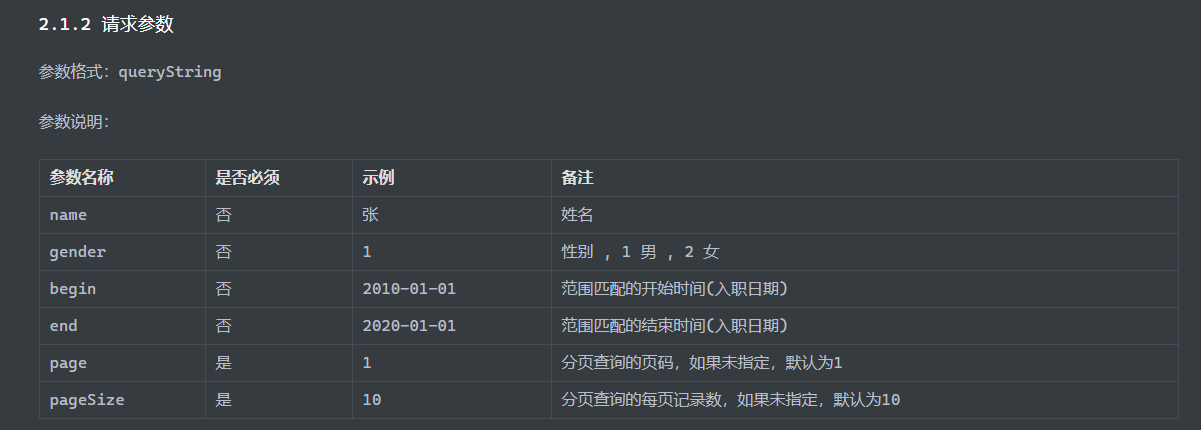
条件分页查询 接口文档
Controller 1 2 3 4 5 6 7 8 public Result page ( @RequestParam(required = false) String name, @RequestParam(required = false) Short gender, @RequestParam(required = false) @DateTimeFormat(pattern = "yyyy-MM-dd") LocalDate begin, @RequestParam(required = false) @DateTimeFormat(pattern = "yyyy-MM-dd") LocalDate end, @RequestParam(defaultValue = "1") Integer page, @RequestParam(defaultValue = "10") Integer pageSize )
Service层 1 2 3 4 5 6 7 8 9 10 @Override public PageBean page (String name, Short gender, LocalDate begin, LocalDate end, Integer page, Integer pageSize) { PageHelper.startPage(page,pageSize); List<Emp> empList = empMapper.page(name, gender, begin, end); Page<Emp> empPage = (Page<Emp>) empList; PageBean pageBean = new PageBean (empPage.getTotal(), empPage.getResult()); return pageBean; }
Mapper层 1 2 3 4 5 6 7 8 List<Emp> page (String name, Short gender, LocalDate begin, LocalDate end) ;
使用了PageHelper之后,Mapper中就不要再使用page与pageSize参数,否则会导致生成的sql变为
1 SELECT count (0 ) FROM emp LIMIT ?, ?
就查不到了
XML映射文件 1 2 3 4 5 6 7 8 9 10 11 12 13 14 15 16 17 18 19 20 21 22 23 24 <?xml version="1.0" encoding="UTF-8" ?> <!DOCTYPE mapper PUBLIC "-//mybatis.org//DTD Mapper 3.0//EN" "https://mybatis.org/dtd/mybatis-3-mapper.dtd" > <mapper namespace ="com.wwwtty.springmybatisdemo.Mapper.EmpMapper" > <select id ="page" resultType ="com.wwwtty.springmybatisdemo.pojo.Emp" > select * from emp <where > <if test ="name != null and name != ''" > name like concat('%',#{name},'%') </if > <if test ="gender != null" > and gender = #{gender} </if > <if test ="begin != null and end != null" > and entrydate between #{begin} and #{end} </if > </where > </select > </mapper >
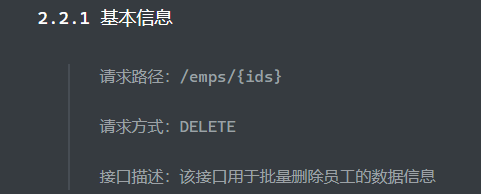
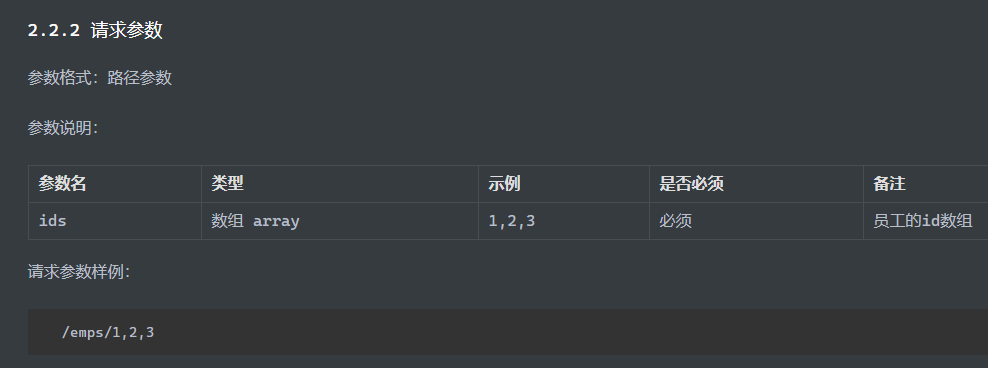
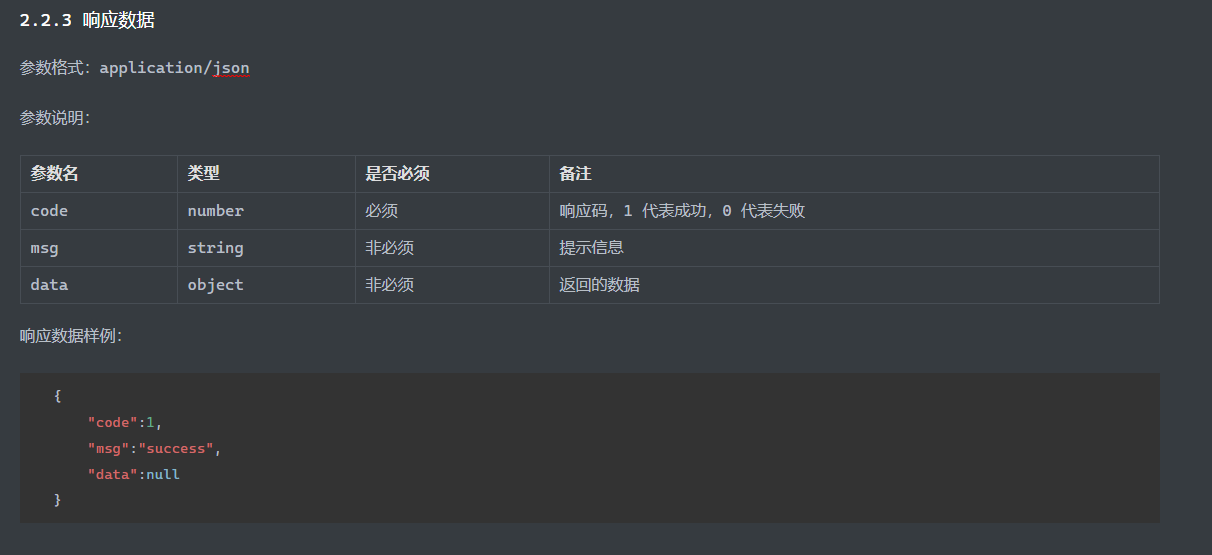
删除员工 接口文档
Controller层 1 请求方法为Delete,@DeleteMapping({ids})注解;路径参数ids前加上@PathVariable
1 2 3 4 5 6 7 8 @DeleteMapping("/{ids}") public Result delete (@PathVariable List<Integer> ids) { log.info("批量删除ids:{}" ,ids); empservice.delete(ids); return Result.success(); }
Service层 1 2 3 4 @Override public void delete (List<Integer> ids) { empMapper.delete(ids); }
Mapper层 对应sql:
1 delete from emp where id in (1 ,2 ,3 )
xml映射文件中:< foreach >实现对数组的遍历
1 2 3 4 5 6 <delete id ="delete" > delete from emp where id in <foreach collection ="ids" item ="id" separator ="," open ="(" close =")" > #{id} </foreach > </delete >
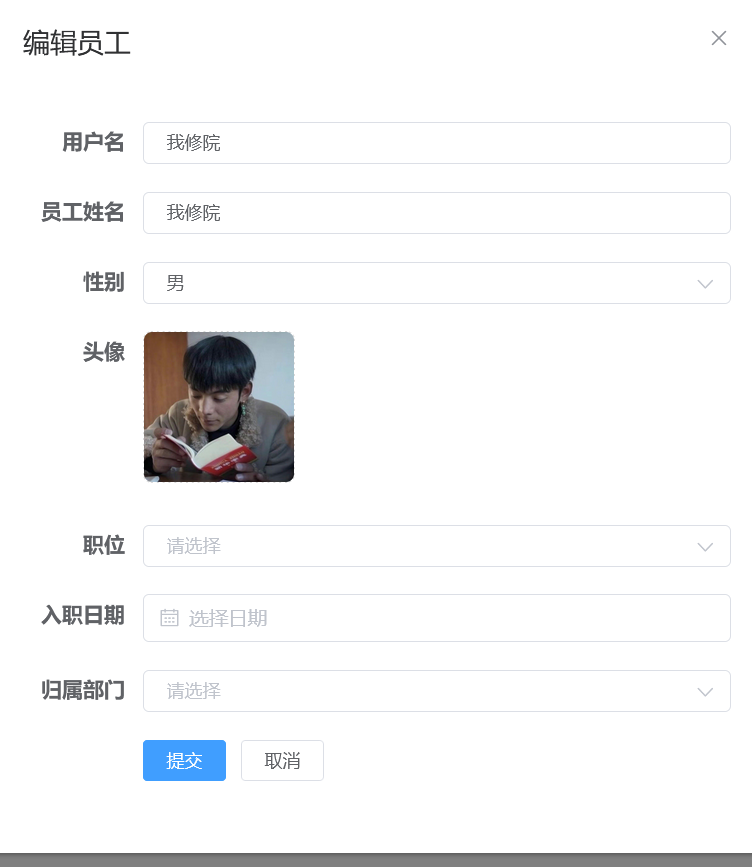
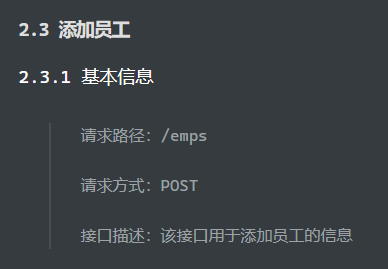
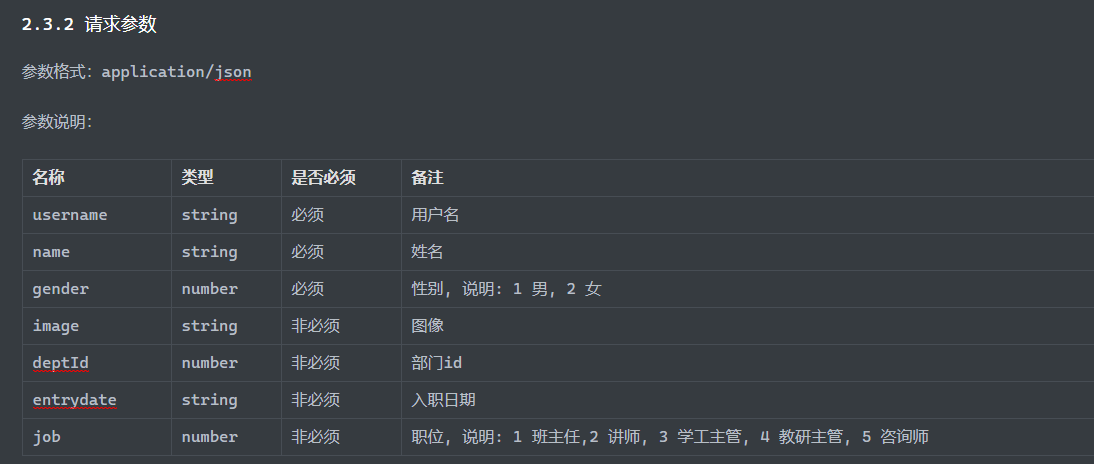
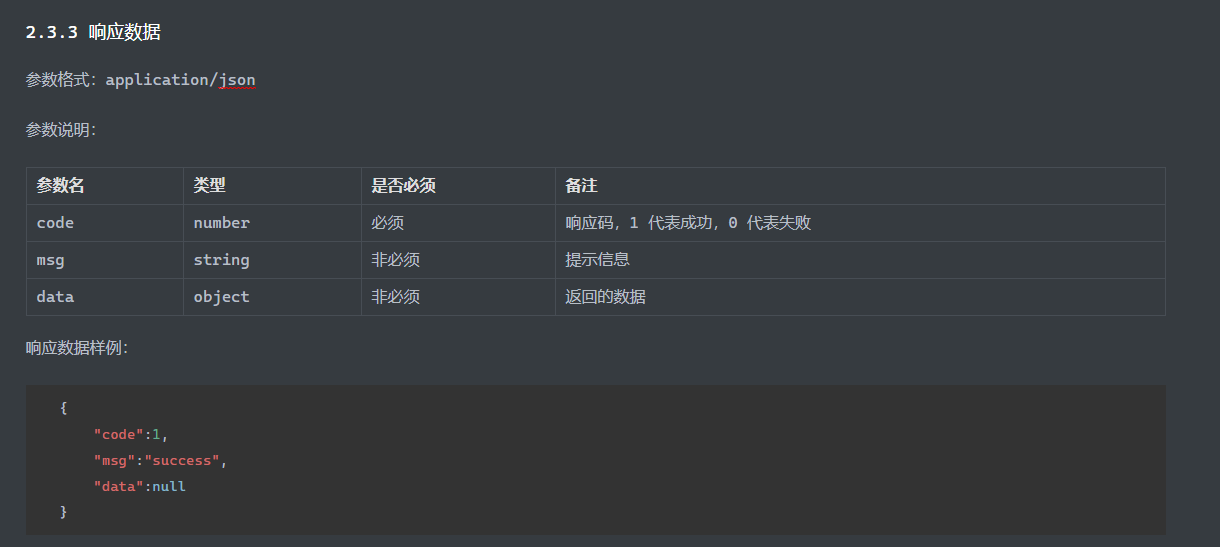
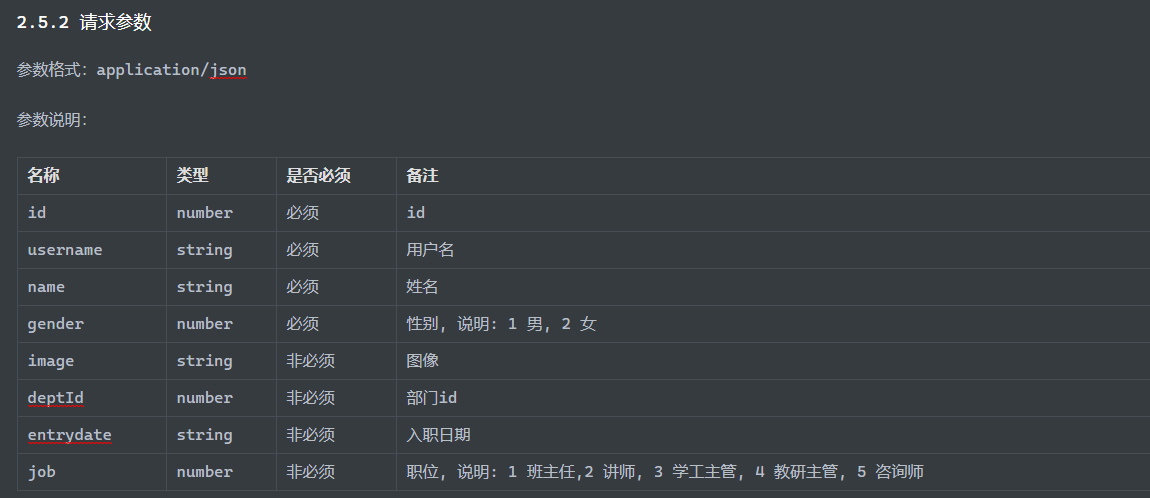
新增员工 接口文档
Controller层 1 2 3 4 5 6 7 @PostMapping public Result save (@RequestBody Emp emp) { empservice.save(emp); return Result.success(); }
Service层 1 2 3 4 5 6 7 @Override public void save (Emp emp) { emp.setCreateTime(LocalDateTime.now()); emp.setUpdateTime(LocalDateTime.now()); empMapper.insert(emp); }
Mapper层 xml映射文件
1 2 3 <insert id ="insert" > insert into emp (username, name, gender, image, job, entrydate, dept_id,create_time,update_time) values (# {username},#{name},#{gender},#{image},#{deptId},#{entryDate},#{job},#{createTime},#{updateTime}) </insert >
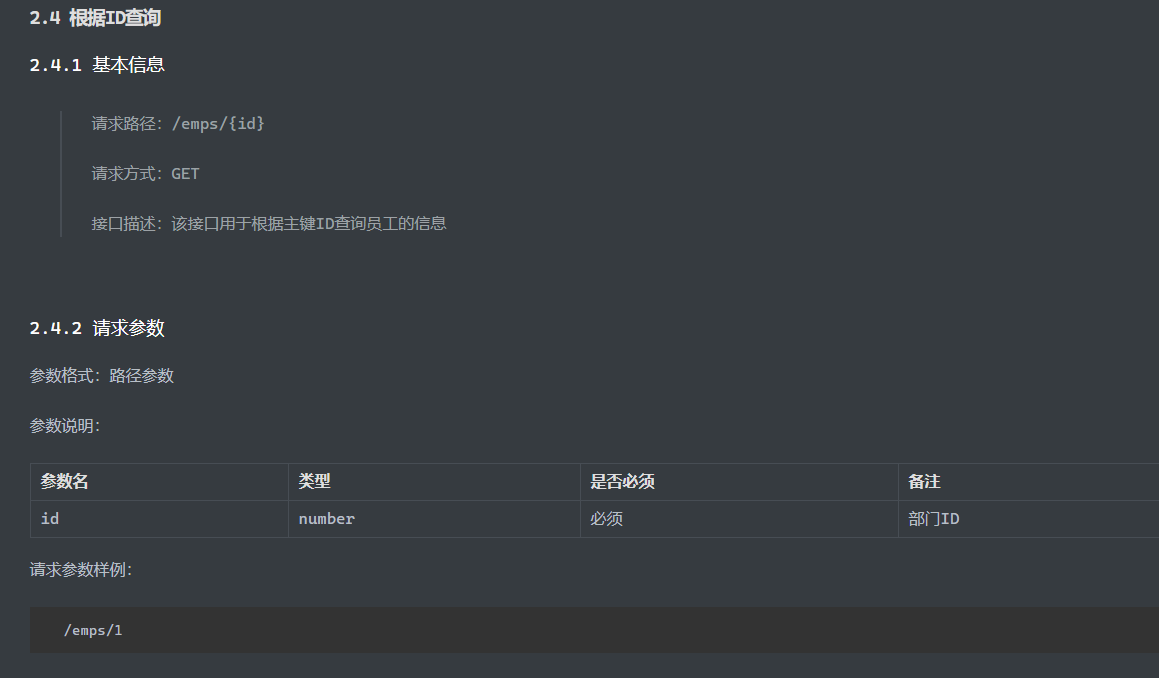
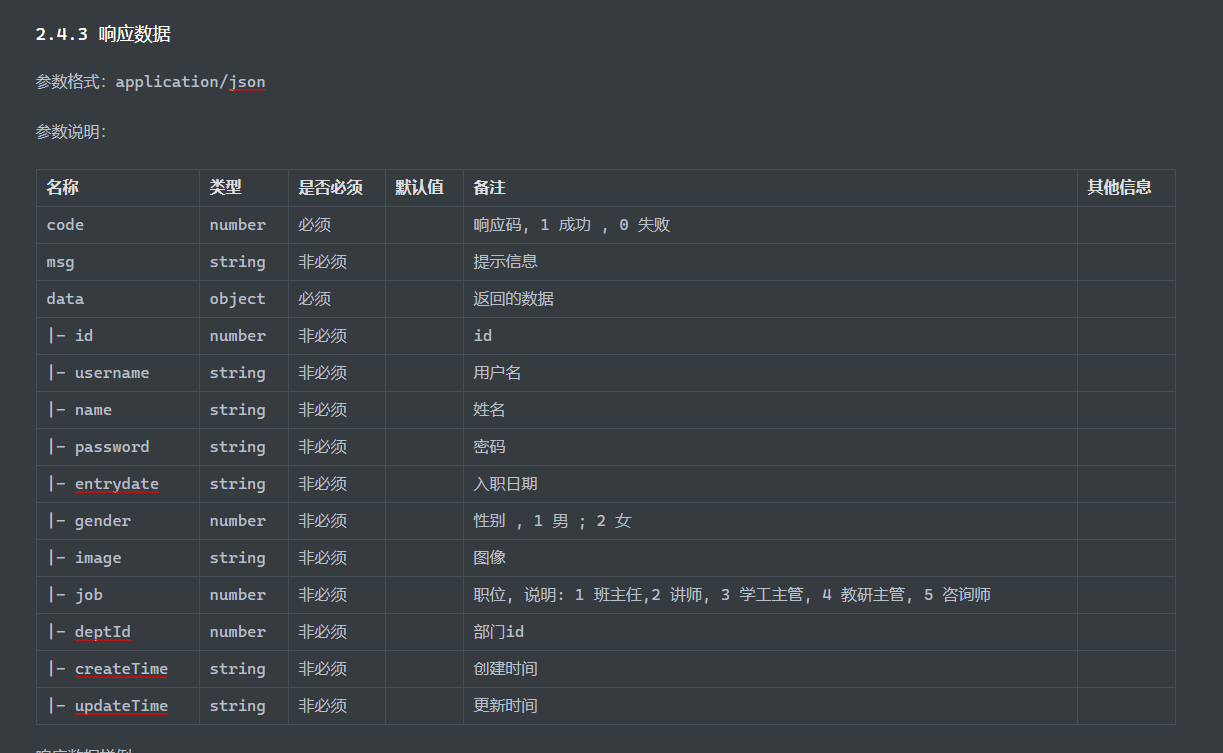
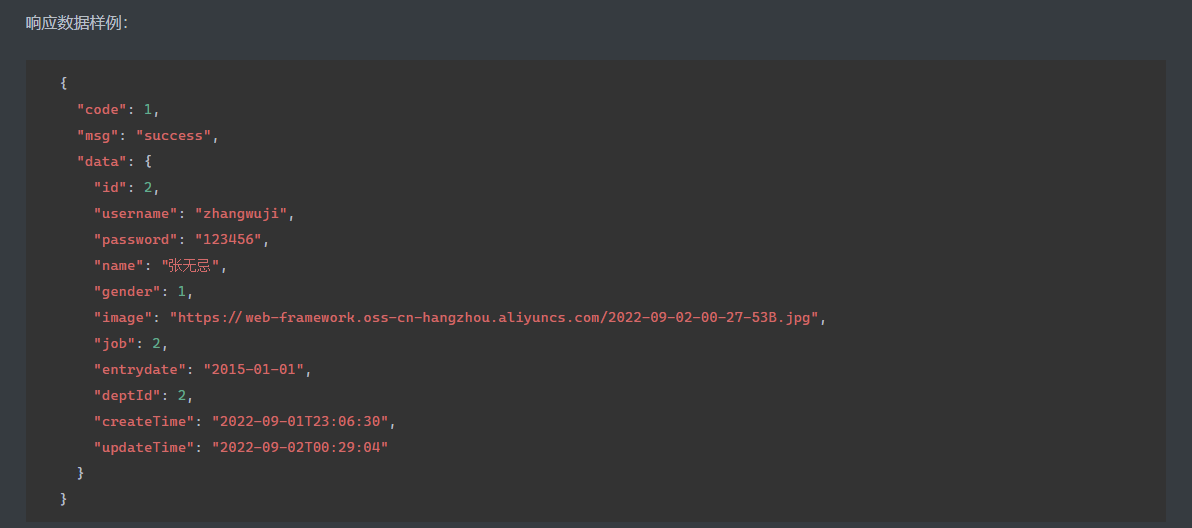
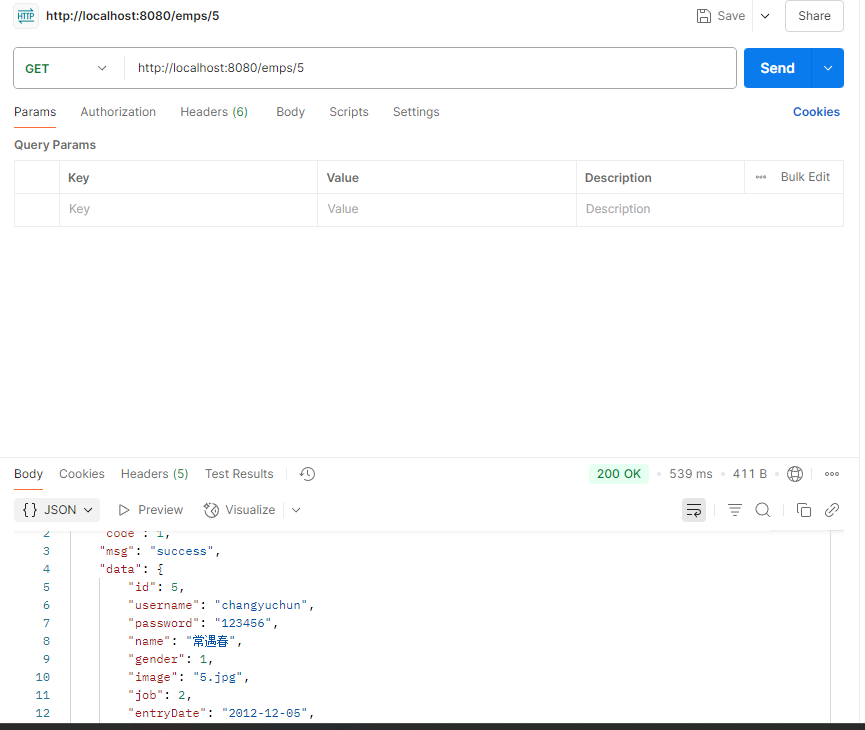
查询回显 接口文档
Contoller层 1 2 3 4 5 6 @GetMapping("/{id}") public Result getById (@PathVariable Integer id) { log.info("查询id:{}" ,id); return Result.success(empService.getById(id)); }
Service层 1 2 3 4 @Override public Emp getById (Integer id) { return empMapper.selectById(id); }
Mapper层 1 2 @Select("select* from emp where id=#{id}") Emp selectById (Integer id) ;
测试
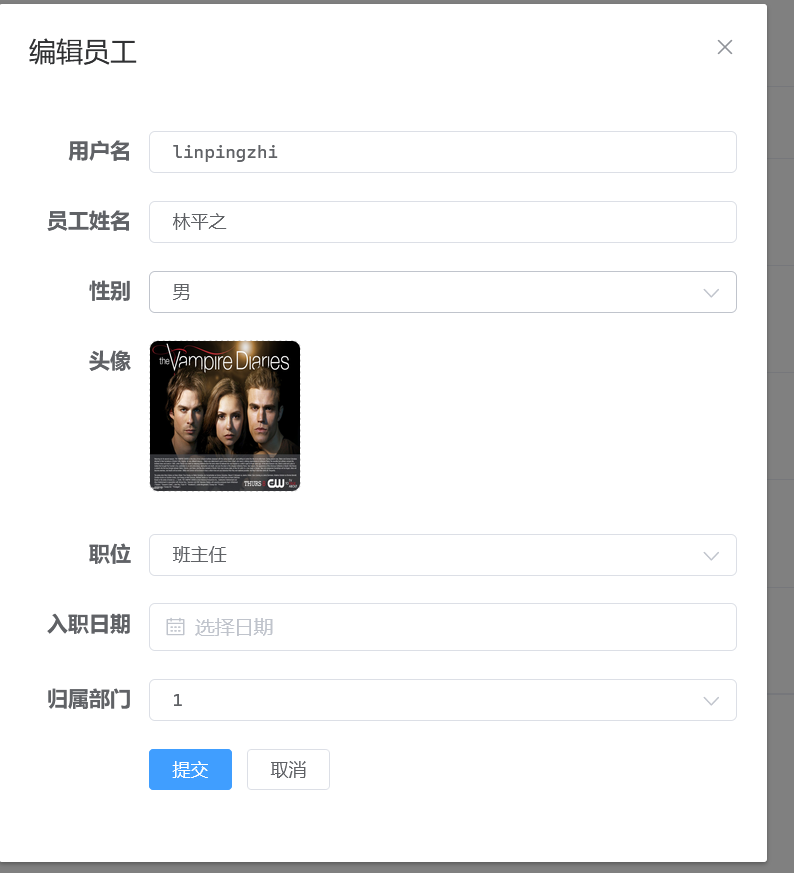
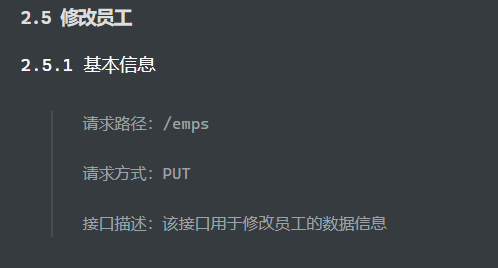
修改员工 接口文档
Contoller层 1 2 3 4 5 6 7 8 @PutMapping public Result update (@RequestBody Emp emp) { log.info("要修改的员工:{}" ,emp); empService.update(emp); return Result.success(); }
Service层 1 2 3 4 5 @Override public void update (Emp emp) { emp.setUpdateTime(LocalDateTime.now()); empMapper.update(emp); }
Mapper层 1 2 3 4 5 6 7 8 9 10 11 12 13 14 15 16 17 18 19 20 21 22 23 24 25 26 27 28 29 30 31 32 33 34 35 36 37 38 39 40 41 42 43 44 45 46 <update id="update" > UPDATE emp <set> <if test="username != null and username != ''" > username = #{username}, </if > <if test="password != null and password != ''" > password = #{password}, </if > <if test="name != null and name != ''" > name = #{name}, </if > <if test="gender != null" > gender = #{gender}, </if > <if test="image != null and image != ''" > image = #{image}, </if > <if test="job != null" > job = #{job}, </if > <if test="entryDate != null" > entrydate = #{entryDate}, </if > <if test="deptId != null" > dept_id = #{deptId}, </if > <if test="createTime != null" > create_time = #{createTime}, </if > <if test="updateTime != null" > update_time = #{updateTime} </if > </set> WHERE id = #{id} </update>
测试
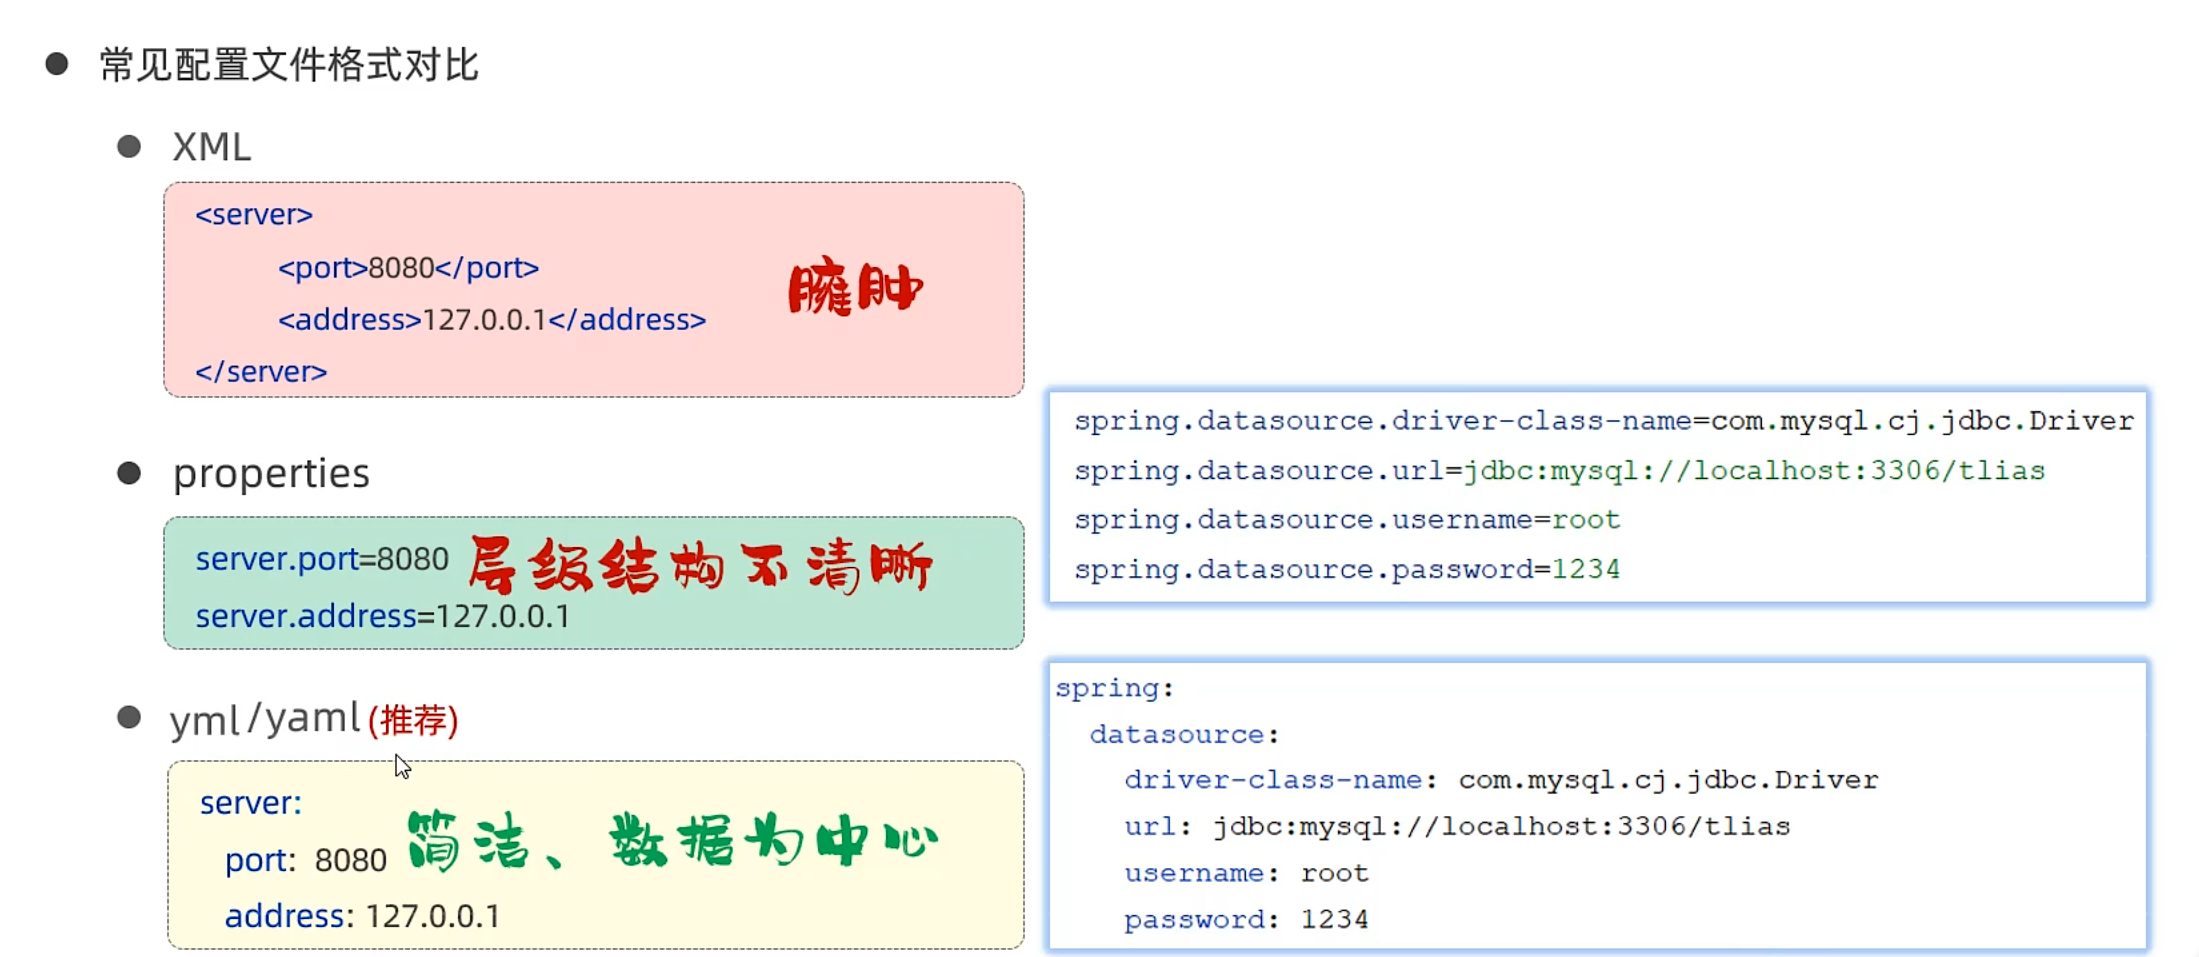
配置文件 对比
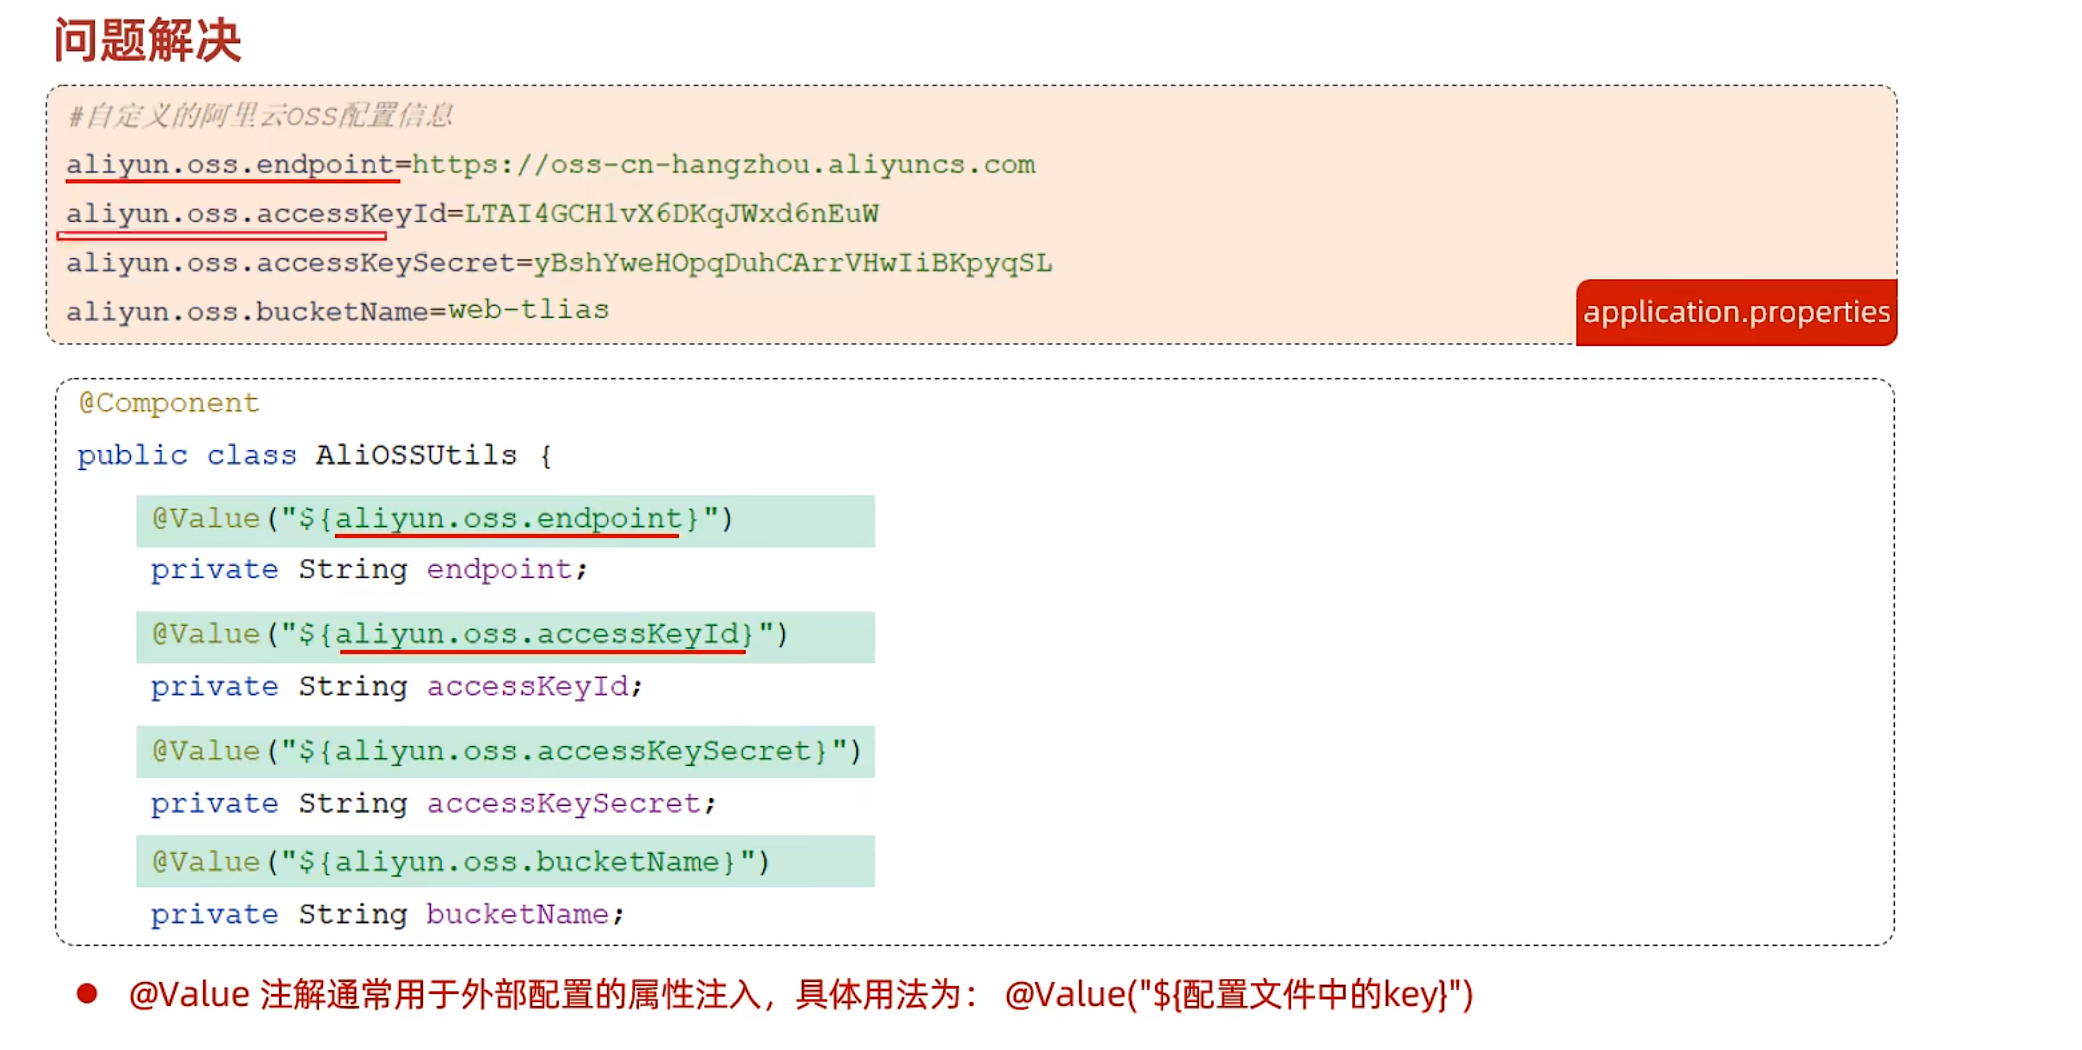
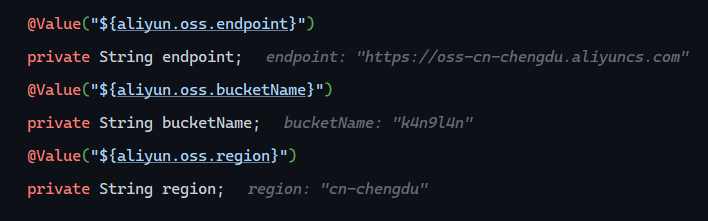
application.properties
1 2 3 4 5 6 7 @Value("${aliyun.oss.endpoint}") private String endpoint; @Value("${aliyun.oss.bucketName}") private String bucketName; @Value("${aliyun.oss.region}") private String region;
1 2 3 4 aliyun.oss.endpoint =https://oss-cn-chengdu.aliyuncs.com aliyun.oss.bucketName =k4n9l4n aliyun.oss.region =cn-chengdu
调试 注入成功
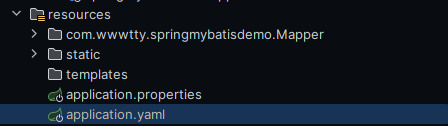
yaml 后缀为.yml / .yaml
配置文件命名为application.yaml;出现spring图标,说明被识别
写入:
测试:
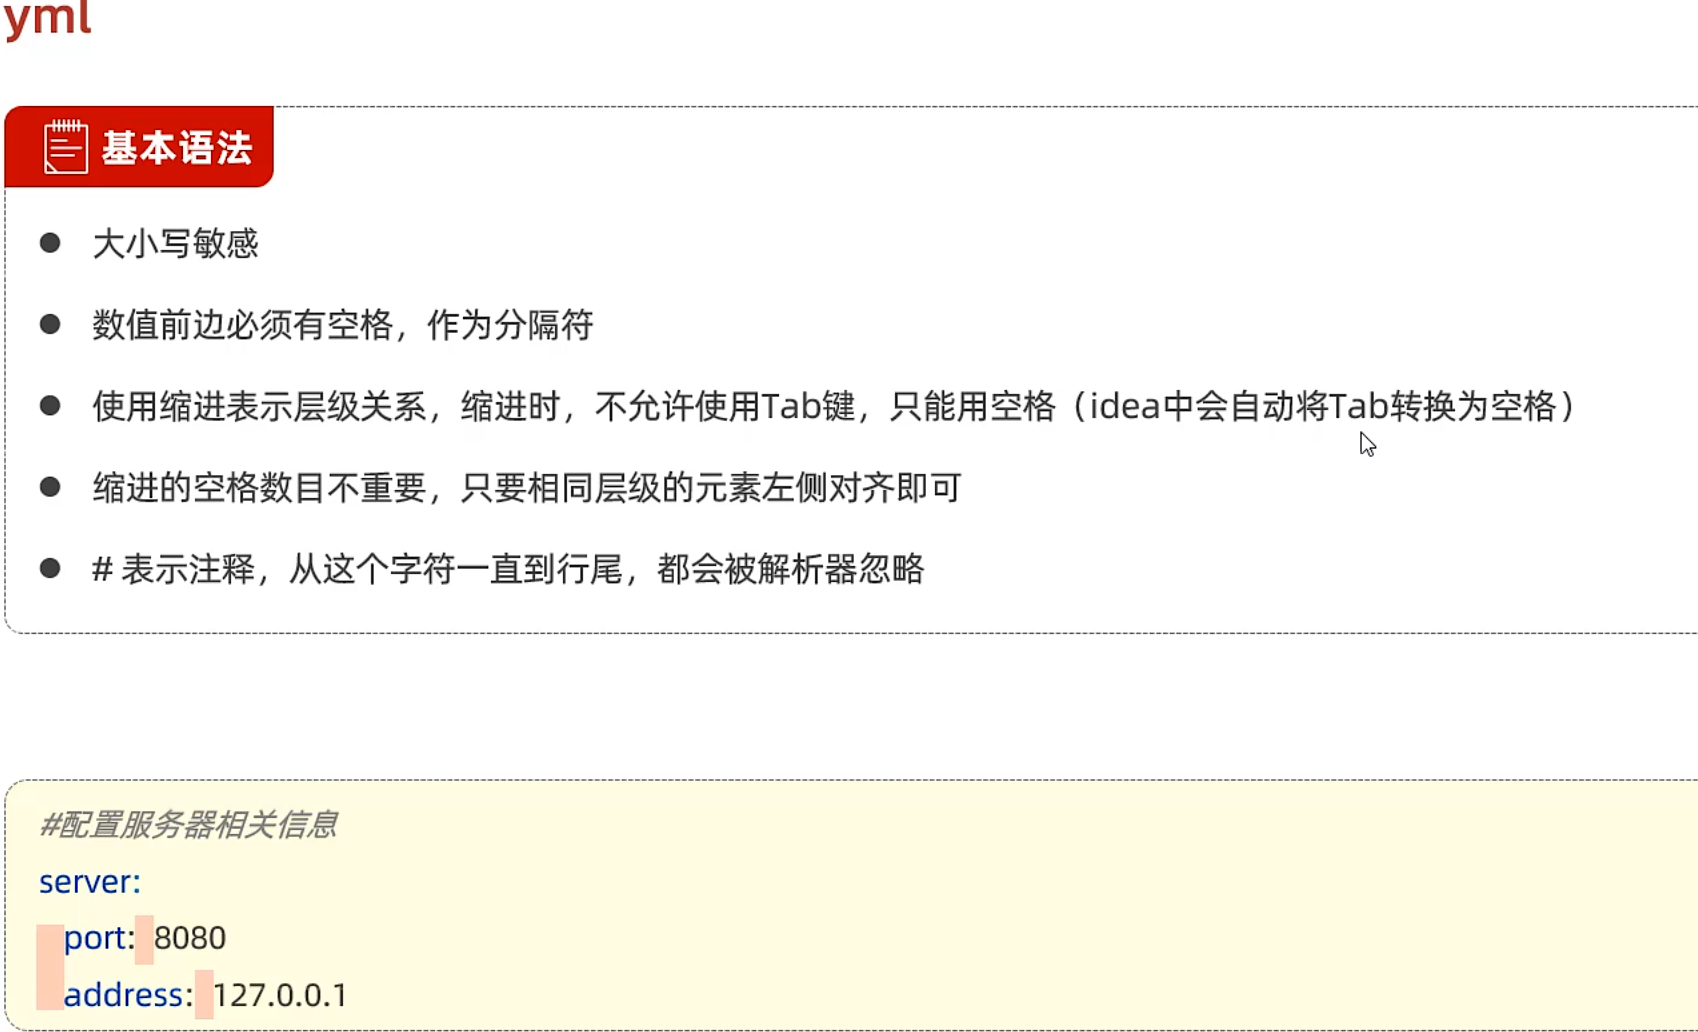
语法
定义对象/Map 1 2 3 User: name: 淳平 age: 24
定义数组/List/Set 1 2 3 List: - 114514 - 1919810
改写application.properties 1 2 3 4 5 6 7 8 9 10 11 12 13 14 15 16 17 18 19 20 21 22 23 24 25 26 spring: application: name: Spring-Mybatis-demo datasource: driver-class-name: com.mysql.cj.jdbc.Driver url: jdbc:mysql://localhost:3306/spring_demo username: root password: 114514 servlet: multipart: max-file-size: 10MB max-request-size: 100MB mybatis: configuration: log-impl: org.apache.ibatis.logging.stdout.StdOutImpl map-underscore-to-camel-case: true aliyun: oss: endpoint: https://oss-cn-chengdu.aliyuncs.com bucketName: k4n9l4n region: cn-chengdu
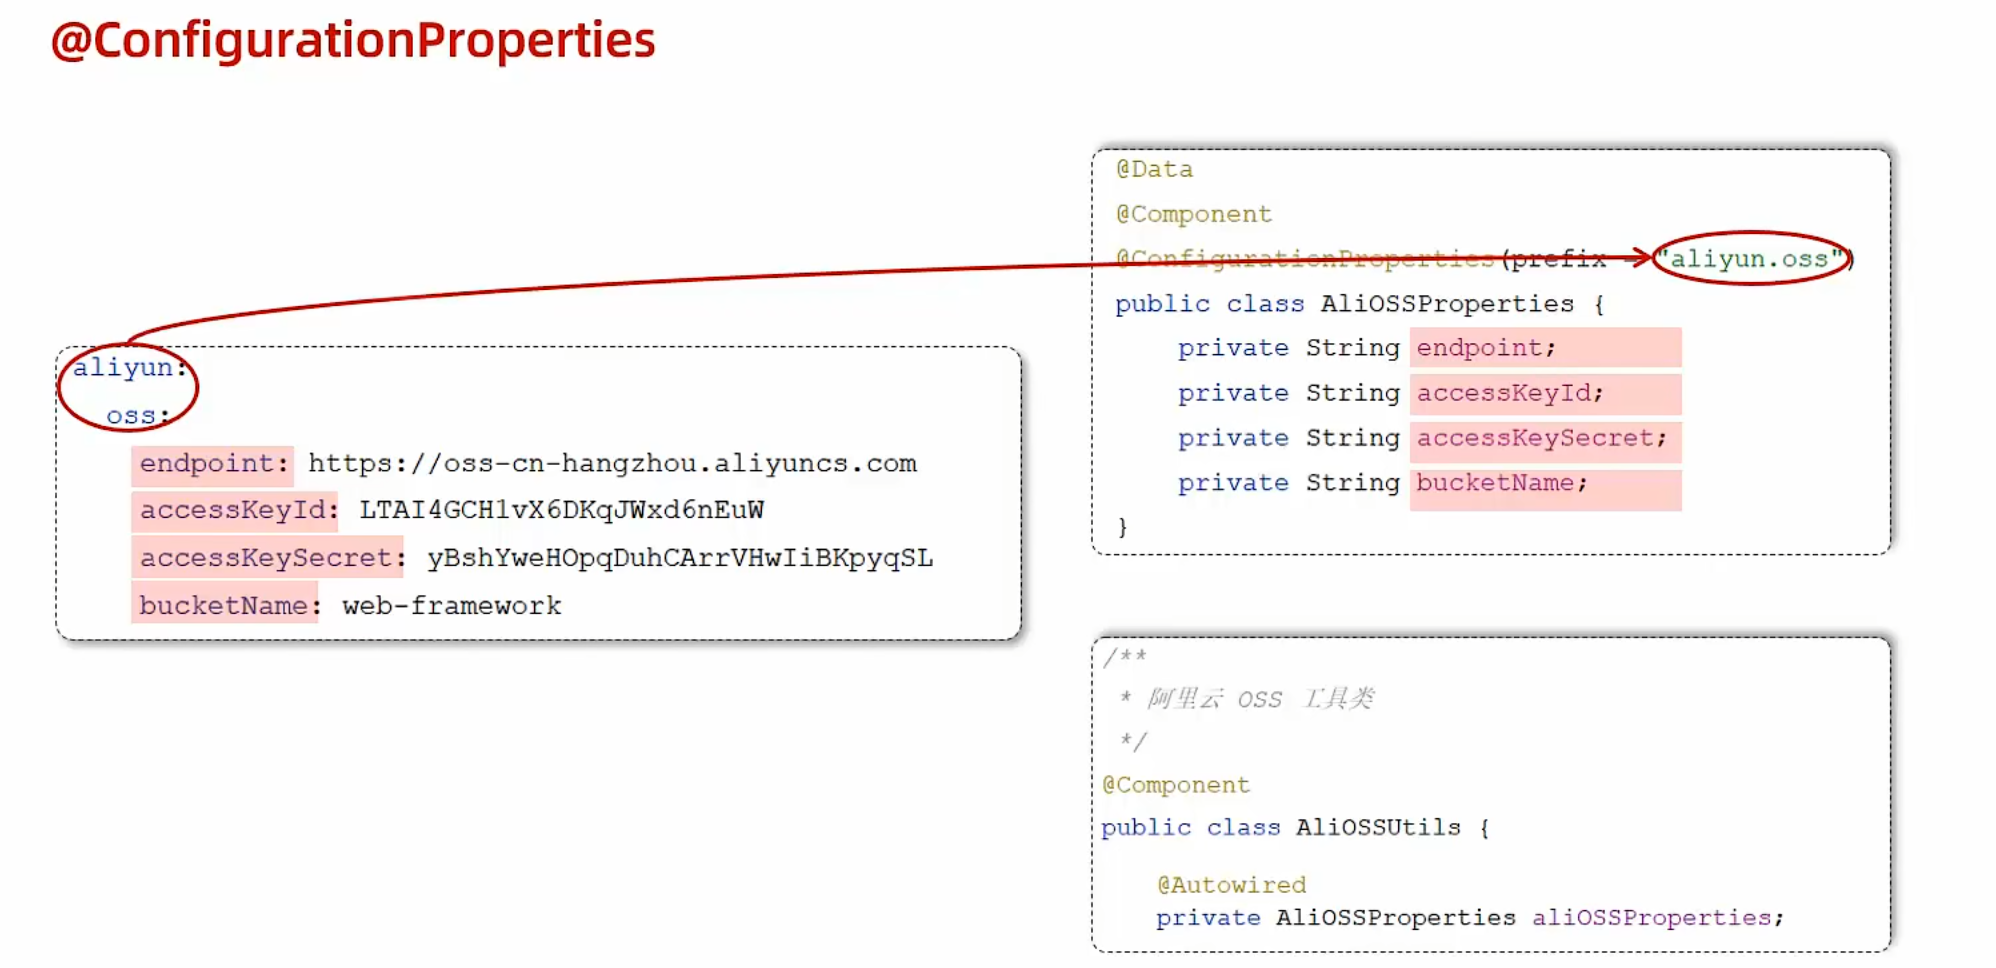
@ConfigurationProperties注解 问题分析:配置文件项多了,就有很多成员变量要加上@Value注解,很繁琐
1 @ConfigurationProperties(prefix = "前缀")
1 2 3 4 5 6 7 8 @Data @Component @ConfigurationProperties(prefix = "aliyun.oss") public class AliOssProperties { private String endpoint; private String bucketName; private String region; }
1 2 3 4 5 6 7 8 9 10 11 12 13 14 15 @Slf4j @Component public class AliOSSUtils { @Autowired private AliOssProperties aliOssProperties; public String upload (MultipartFile file) throws Exception { String endpoint = aliOssProperties.getEndpoint(); String bucketName = aliOssProperties.getBucketName(); String region = aliOssProperties.getRegion(); } }
调试
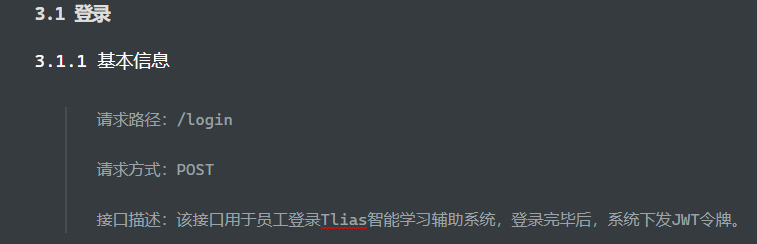
与@Value的区别 登录 登录功能 1 2 select * from emp where username = "xxx" and password = "xxx"
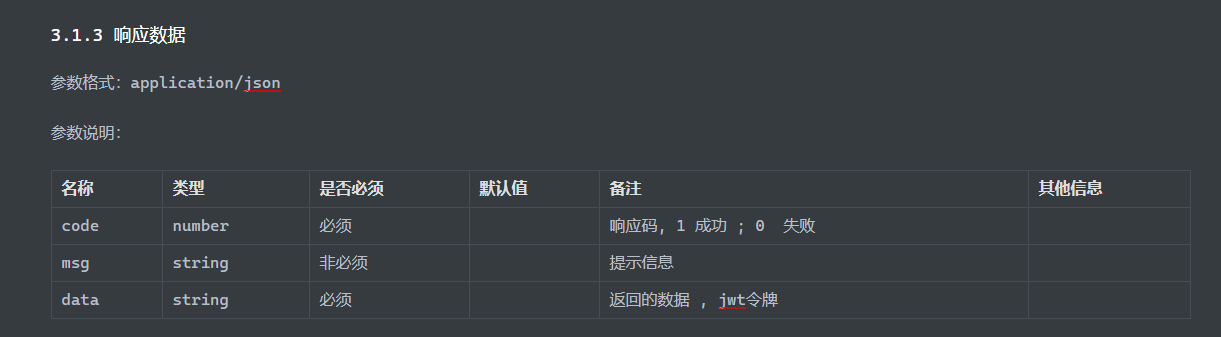
接口文档
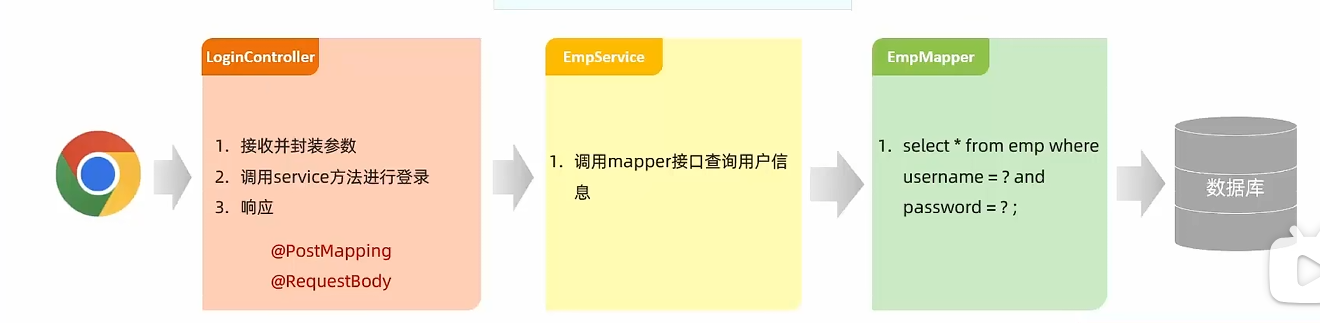
Controller层 1 2 3 4 5 6 7 8 9 10 11 12 13 14 15 16 17 @RestController @Slf4j @RequestMapping("/login") public class LoginController { @Autowired private EmpService empService; @PostMapping public Result login (@RequestBody Emp emp) { log.info("员工登录:{}" ,emp); Emp e = empService.login(emp); return e==null ?Result.error("用户名或密码错误" ):Result.success(); } }
Service层 1 2 3 4 @Override public Emp login (Emp emp) { return empMapper.getByUsernameAndPassword(emp); }
Mapper层 1 2 @Select("select * from emp where username=#{username} and password = #{password}") Emp getByUsernameAndPassword (Emp emp) ;
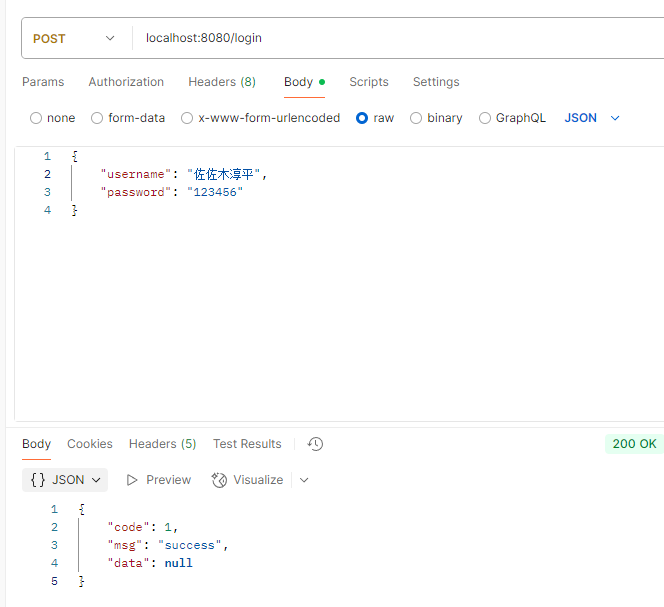
测试:
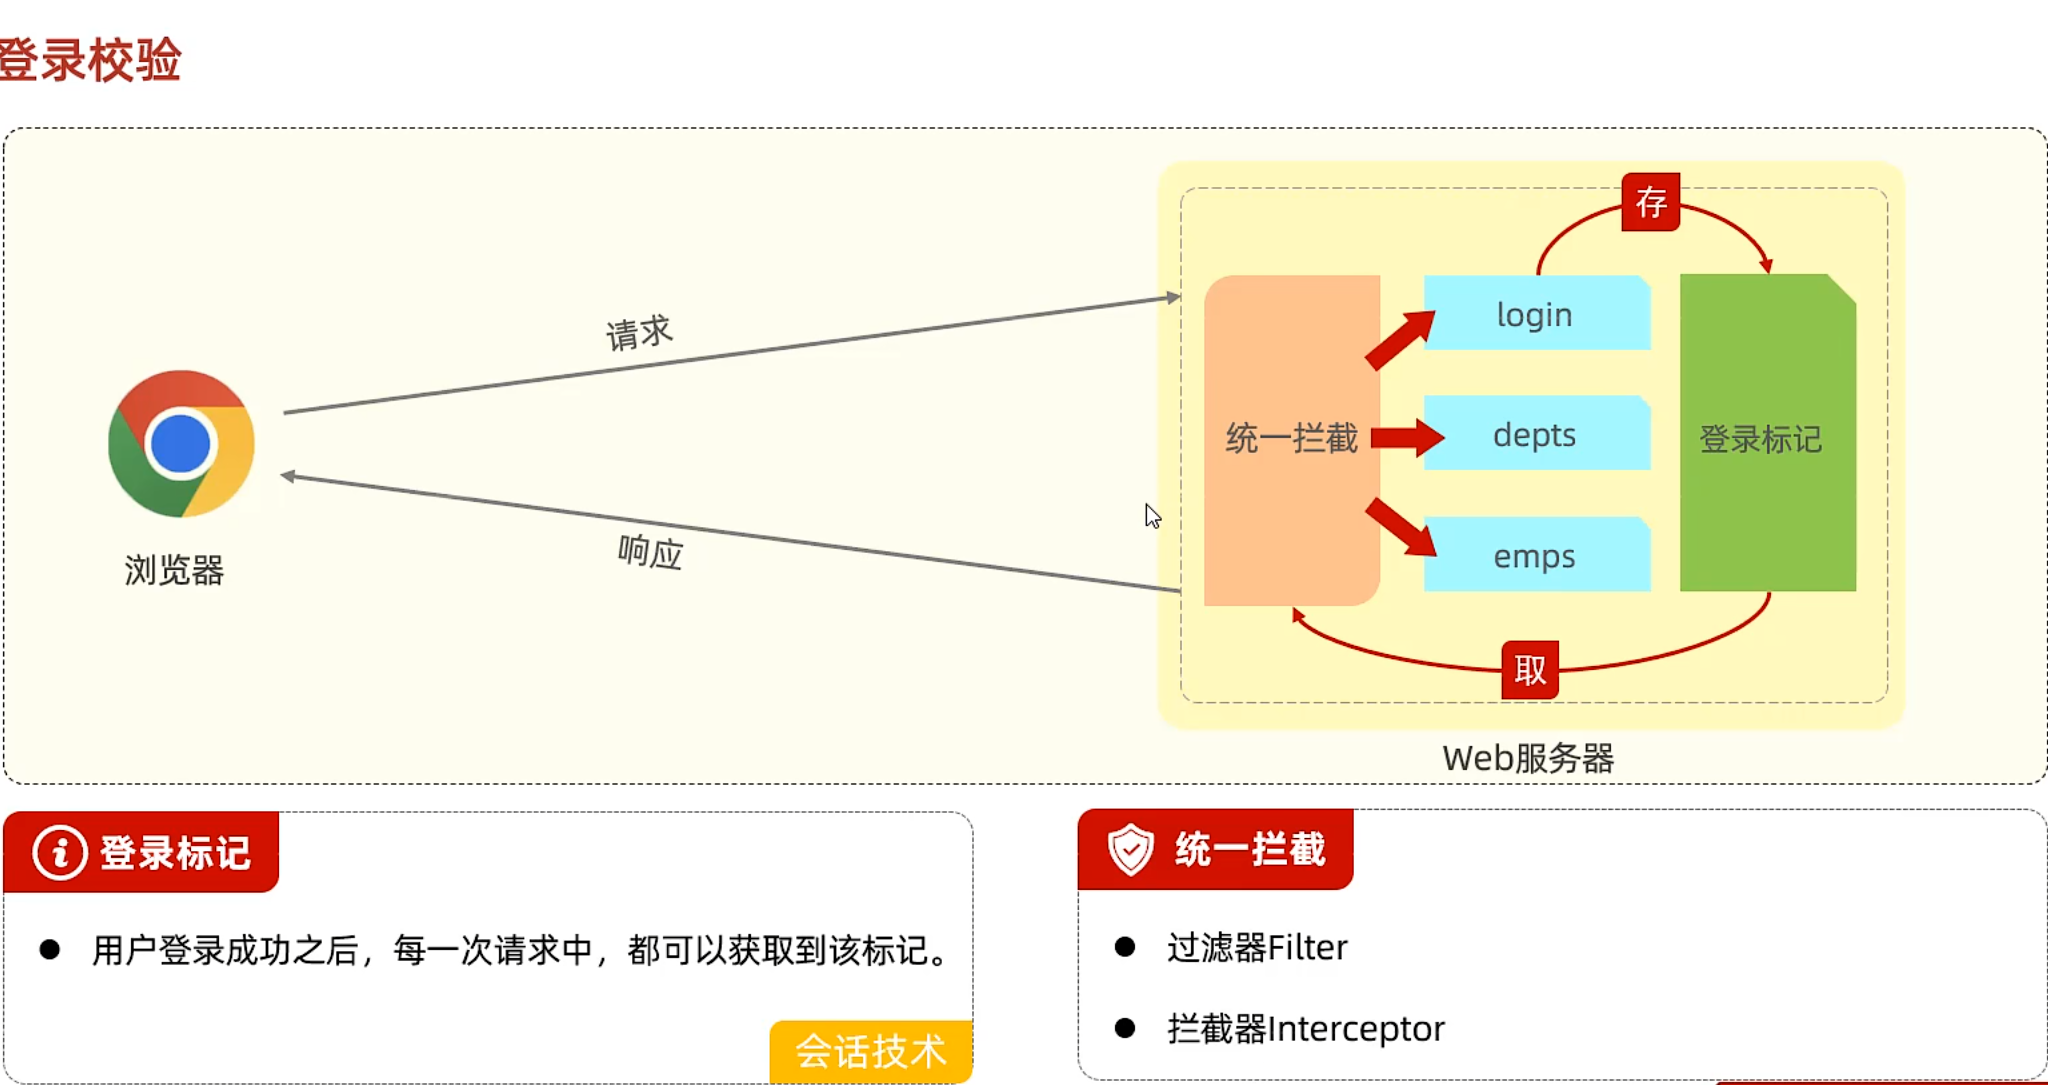
校验 只这样验证会未授权访问,即使退出登录了,输入原来的url就进入了后台
http是无状态的,请求其他业务时,并不知道用户在登录业务这块到底登录了没有
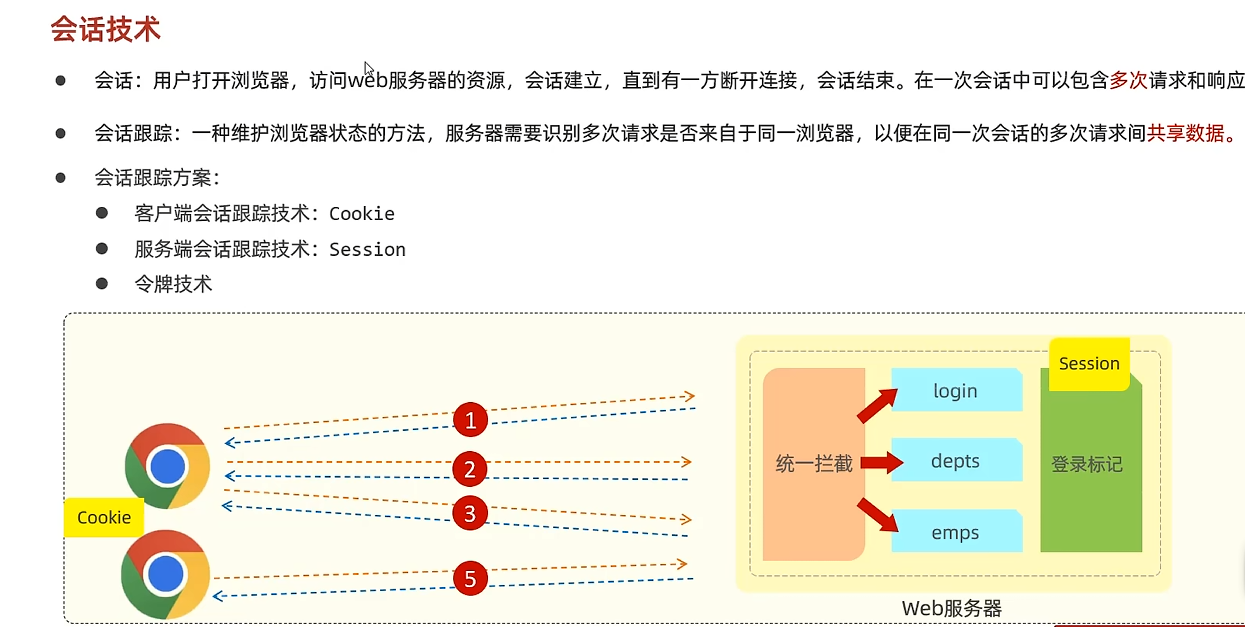
会话技术
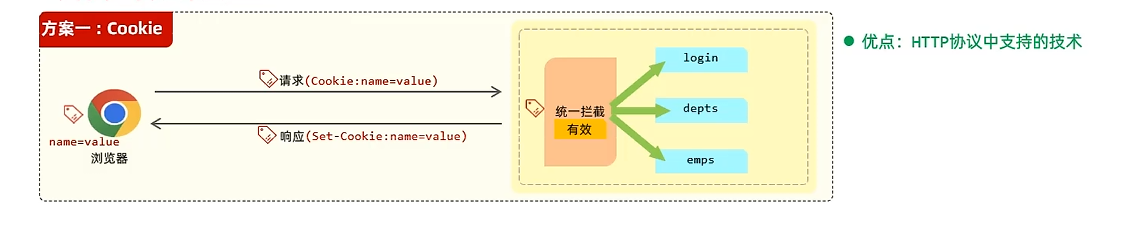
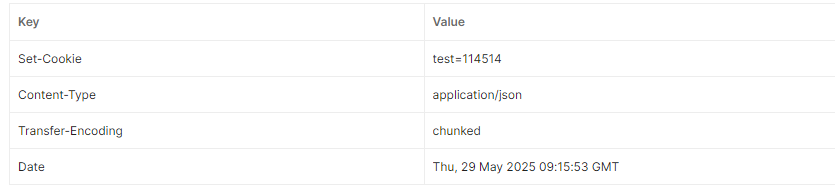
Cookie
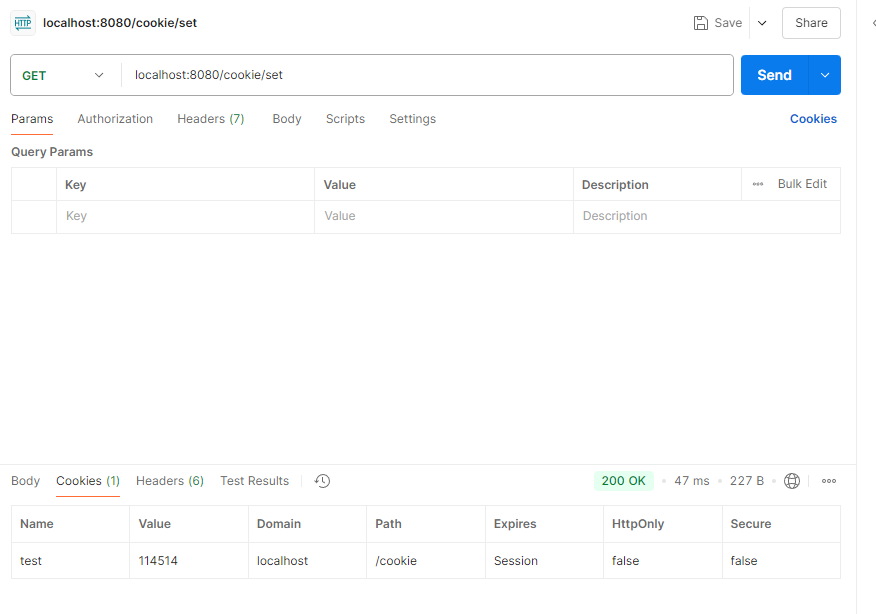
1 2 3 4 5 6 7 8 9 10 11 12 13 14 15 16 17 18 19 20 21 22 23 @RestController @RequestMapping("/cookie") public class CookieController { @GetMapping("/get") public Result get (HttpServletRequest request) { Cookie[] cookies = request.getCookies(); for (Cookie cookie : cookies) { if ("test" .equals(cookie.getName())){ System.out.println(cookie.toString()); } } return Result.success(); } @GetMapping("/set") public Result set (HttpServletResponse response) { response.addCookie(new Cookie ("test" ,"114514" )); return Result.success(); } }
测试:
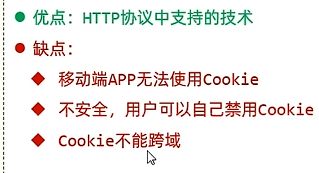
优缺点
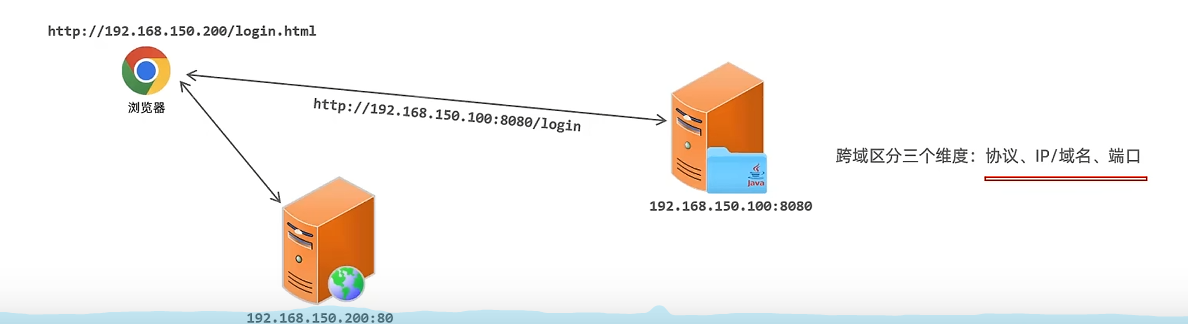
跨域:
三个维度有一个不同就是跨域
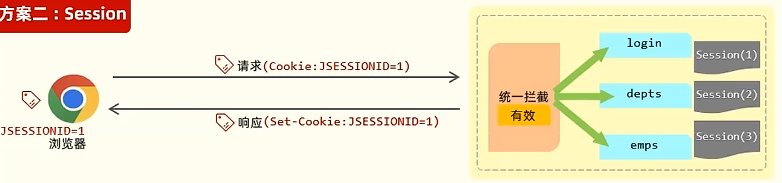
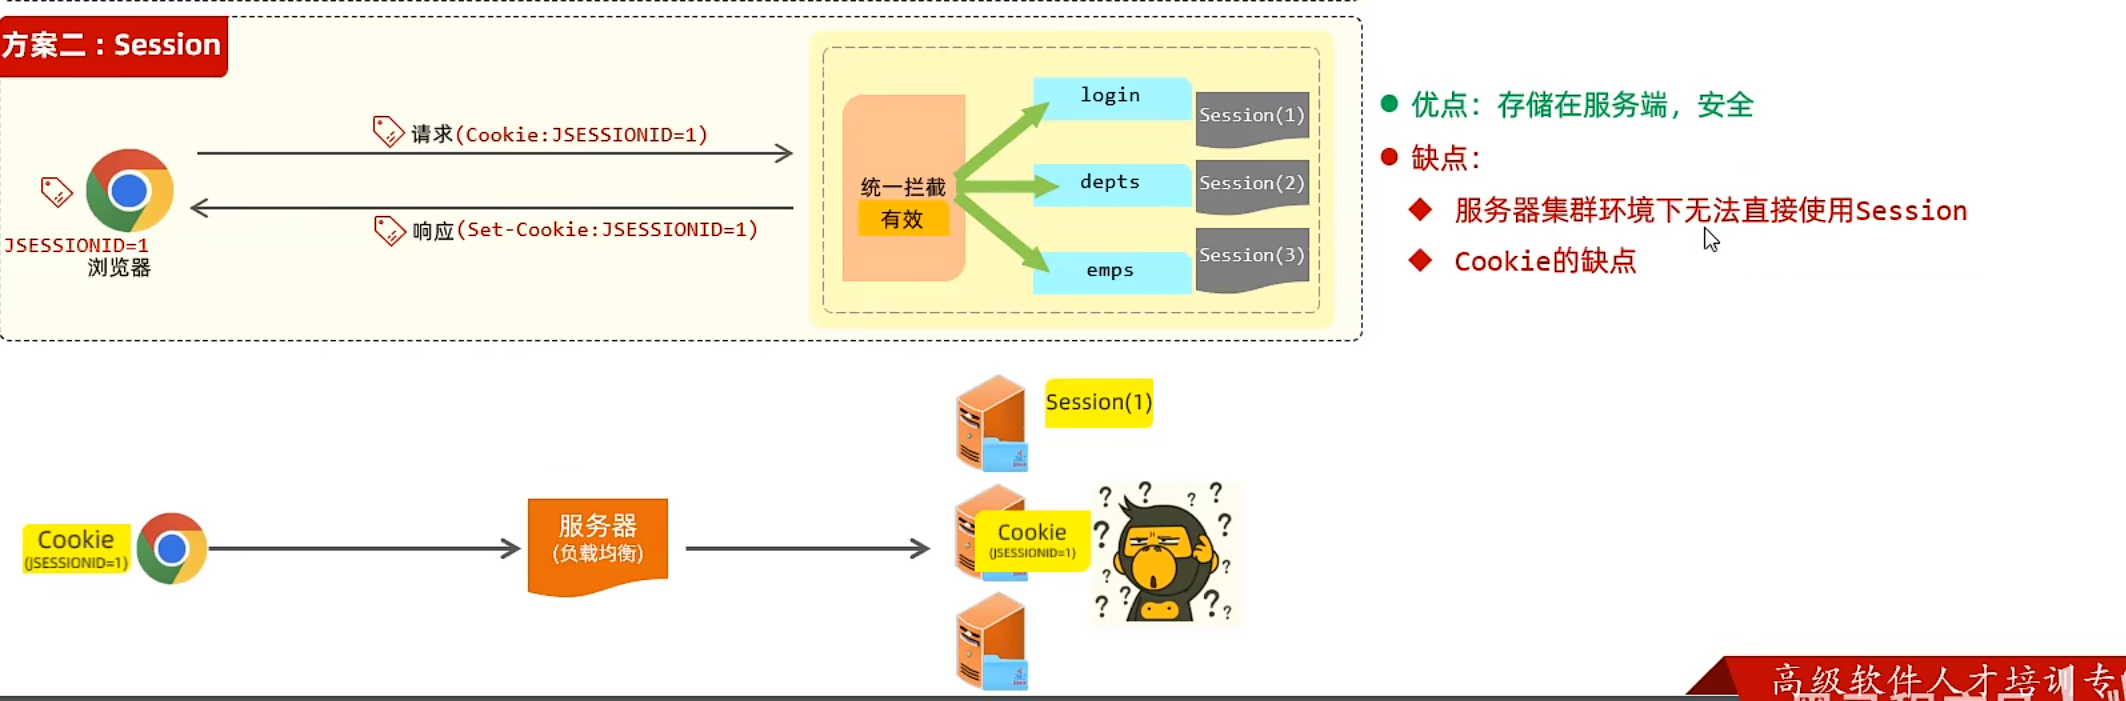
Session
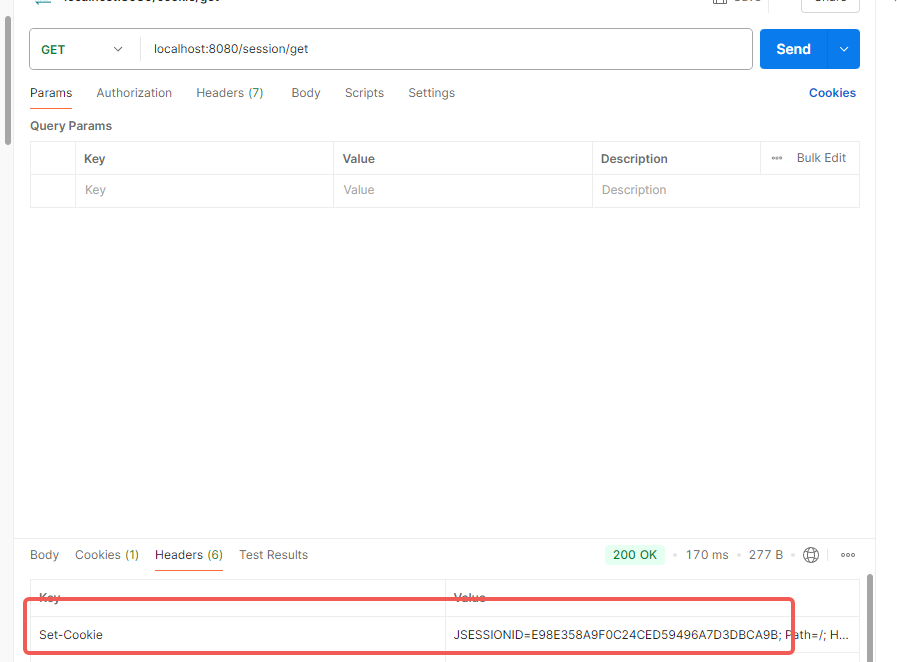
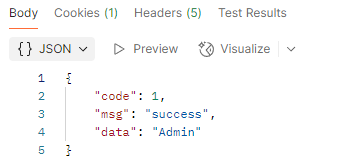
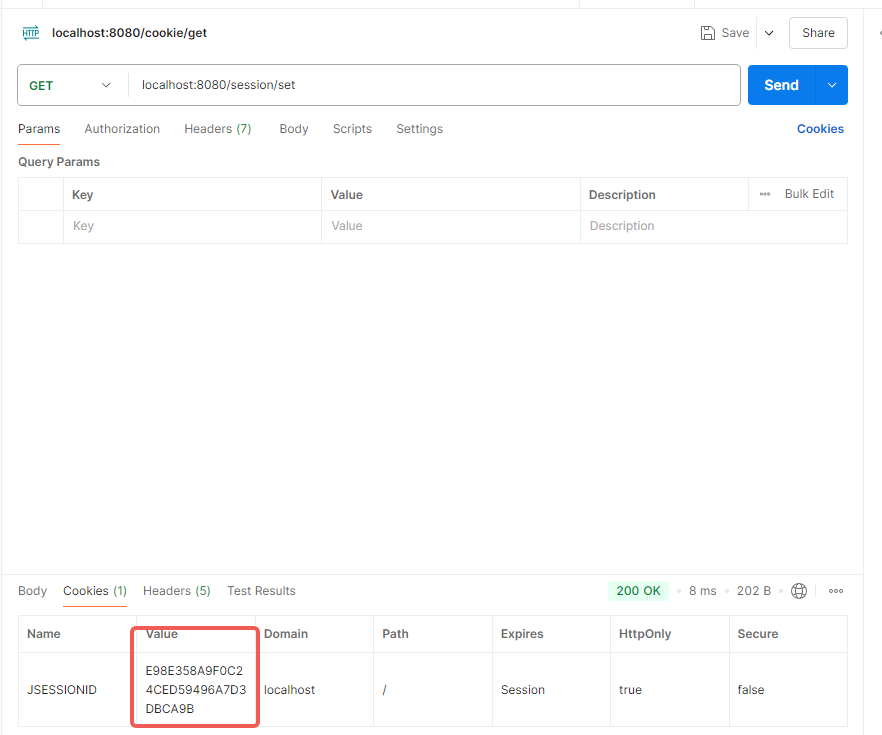
1 2 3 4 5 6 7 8 9 10 11 12 13 14 15 16 17 18 19 20 21 22 @RestController @Slf4j @RequestMapping("/session") public class SessionController { @GetMapping("/set") public Result set (HttpSession session) { log.info("Session-ID:{}" ,session.hashCode()); session.setAttribute("Admin" ,"Admin" ); return Result.success(); } @GetMapping("/get") public Result get (HttpServletRequest request) { HttpSession session = request.getSession(); log.info("Session-ID:{}" ,session.hashCode()); Object sessionAttribute = session.getAttribute("Admin" ); return Result.success(sessionAttribute); } }
测试:
/session/get
响应的key:
/session/set
日志输出
优缺点 会出现同一个浏览器的两个请求获取到不同的sessionID
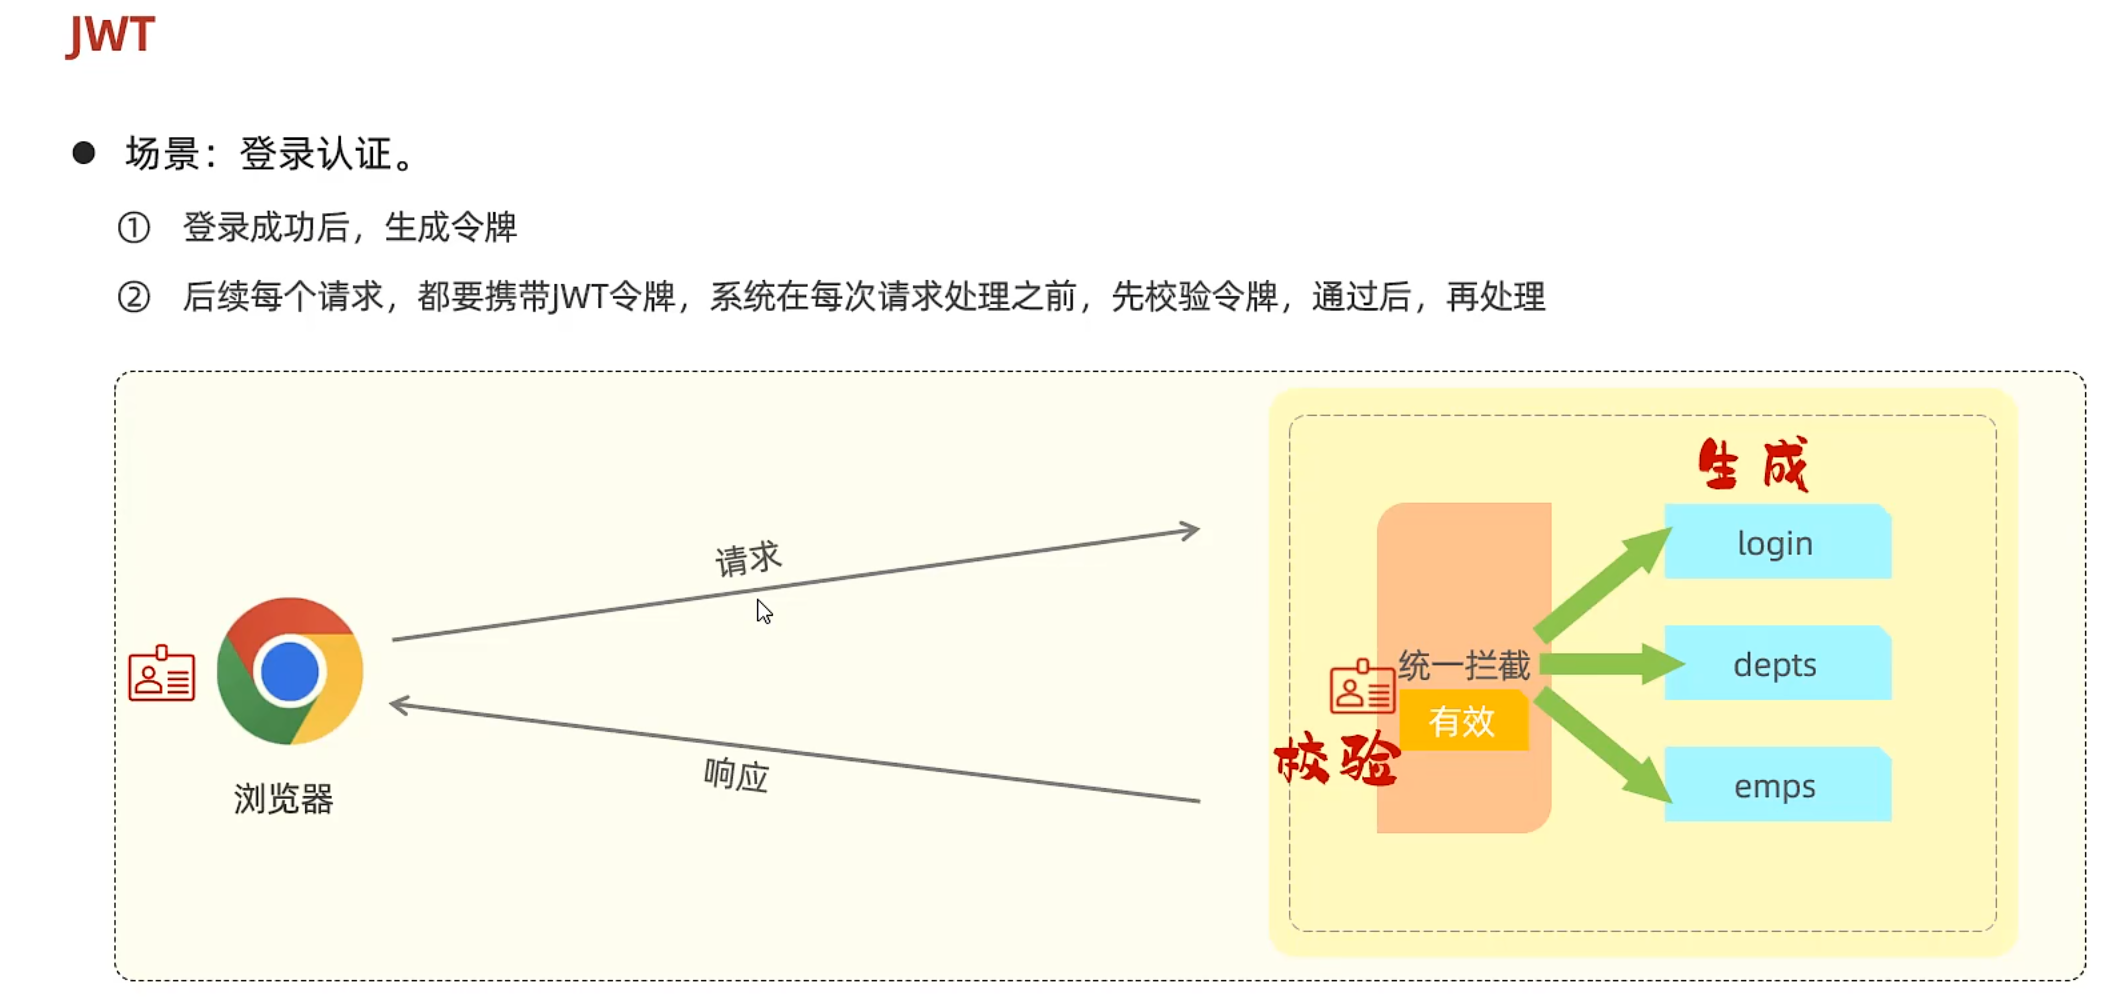
令牌
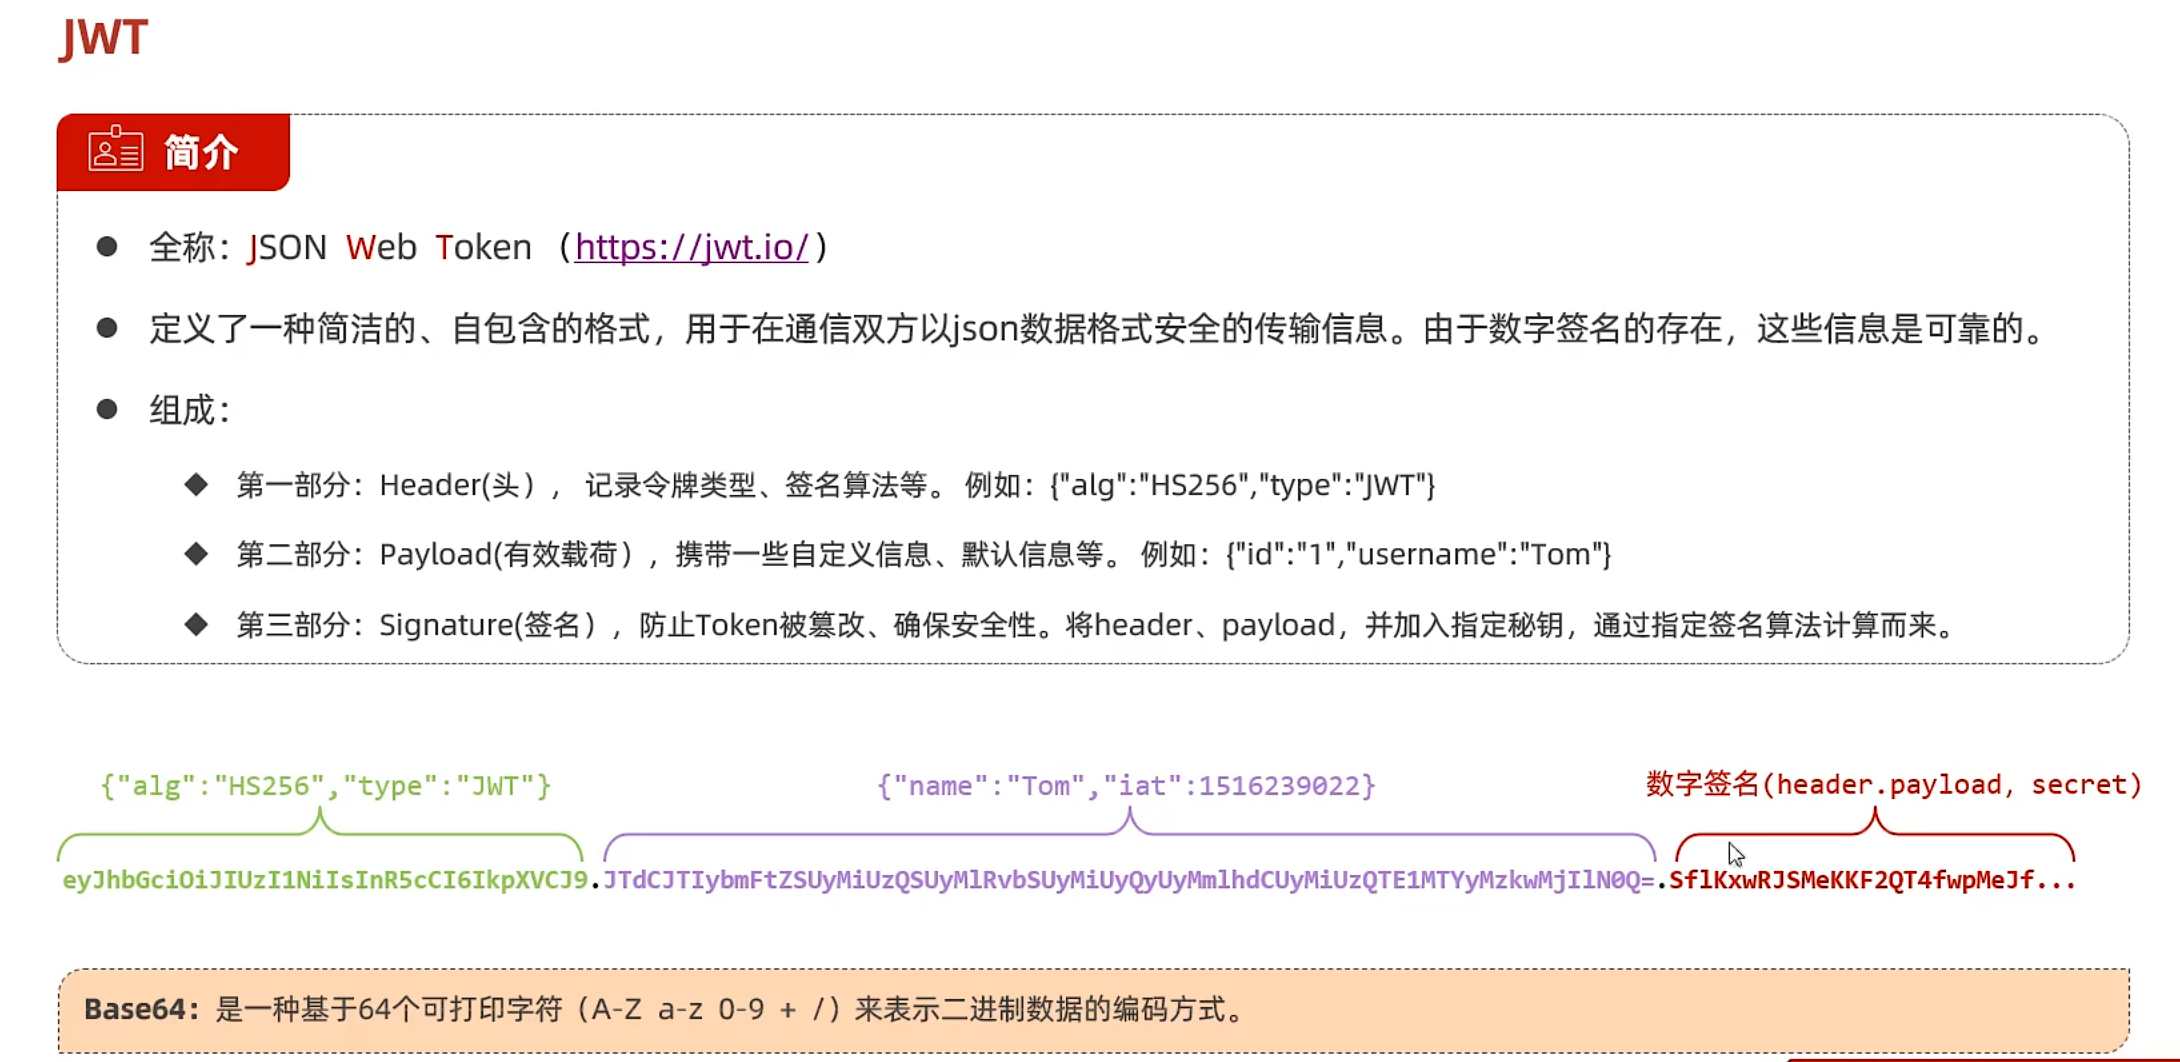
JWT令牌
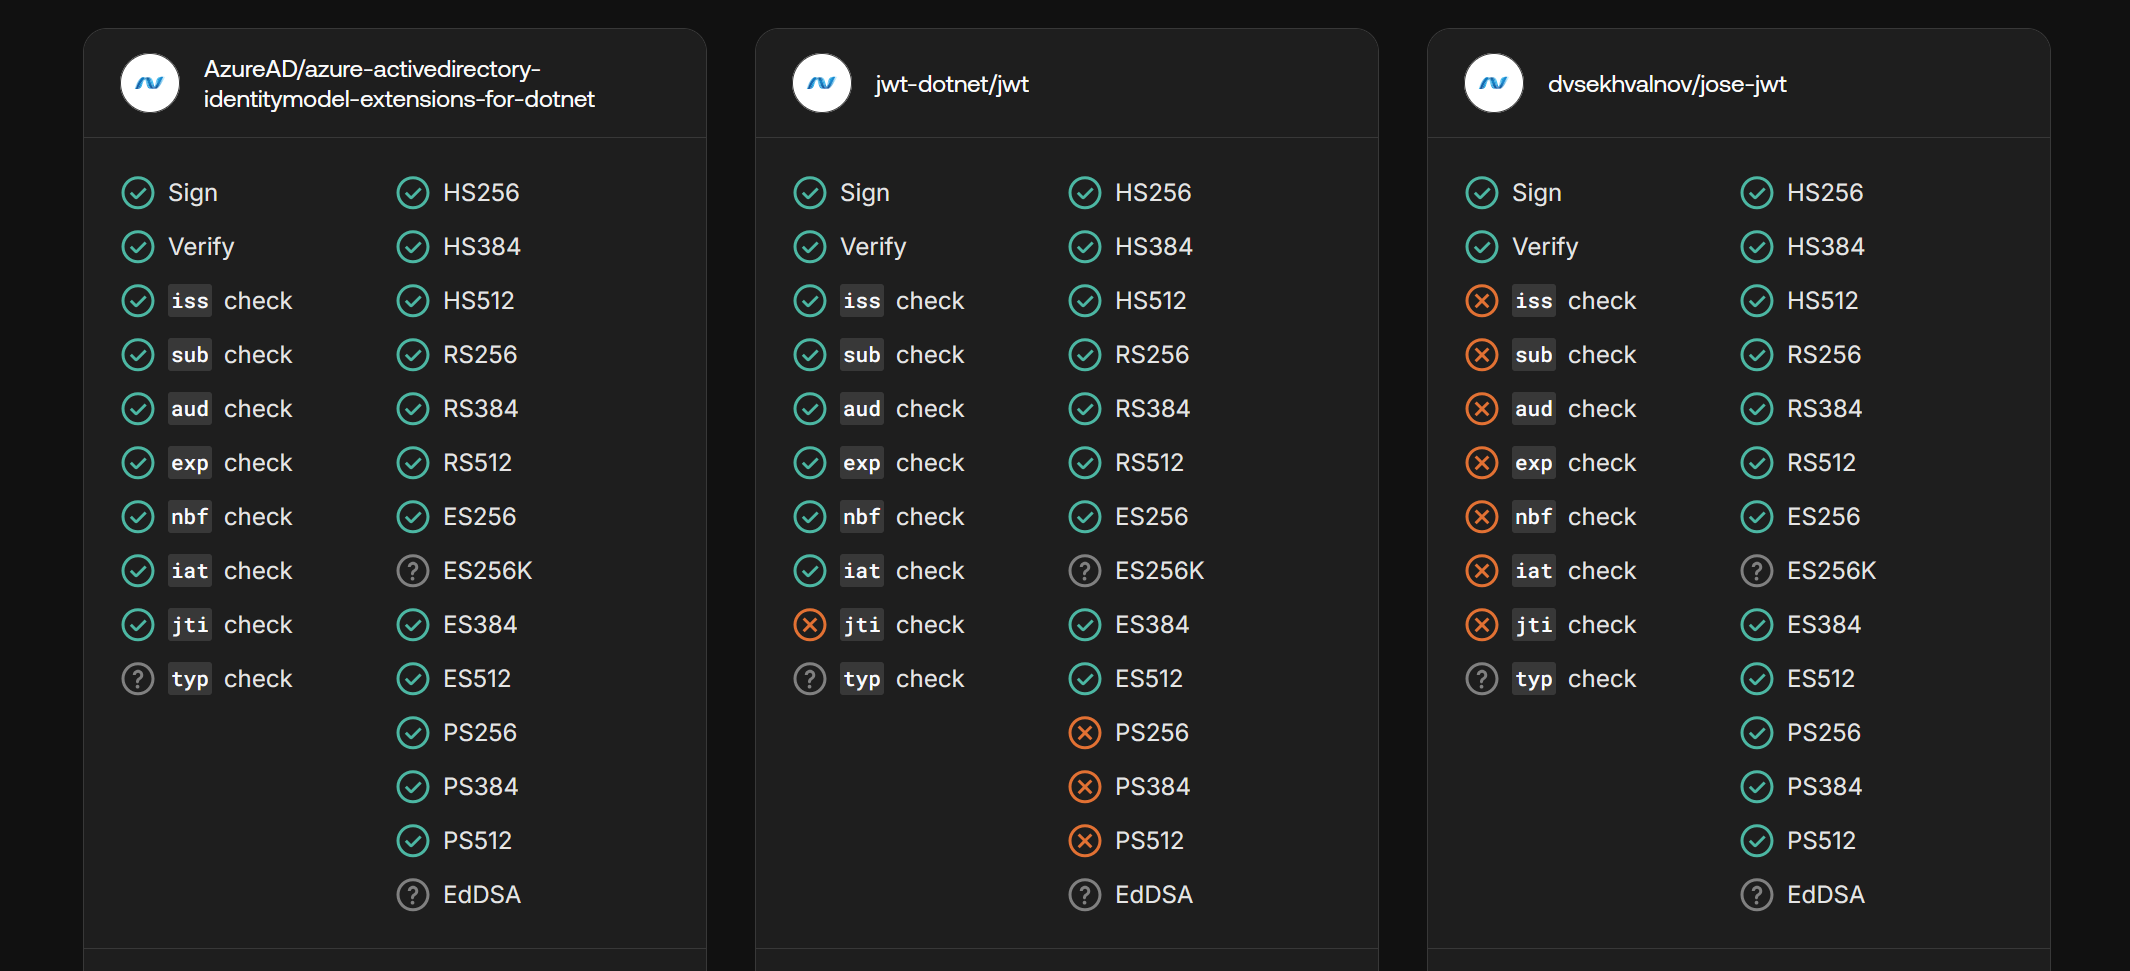
生成 使用的算法
生成jwt的操作
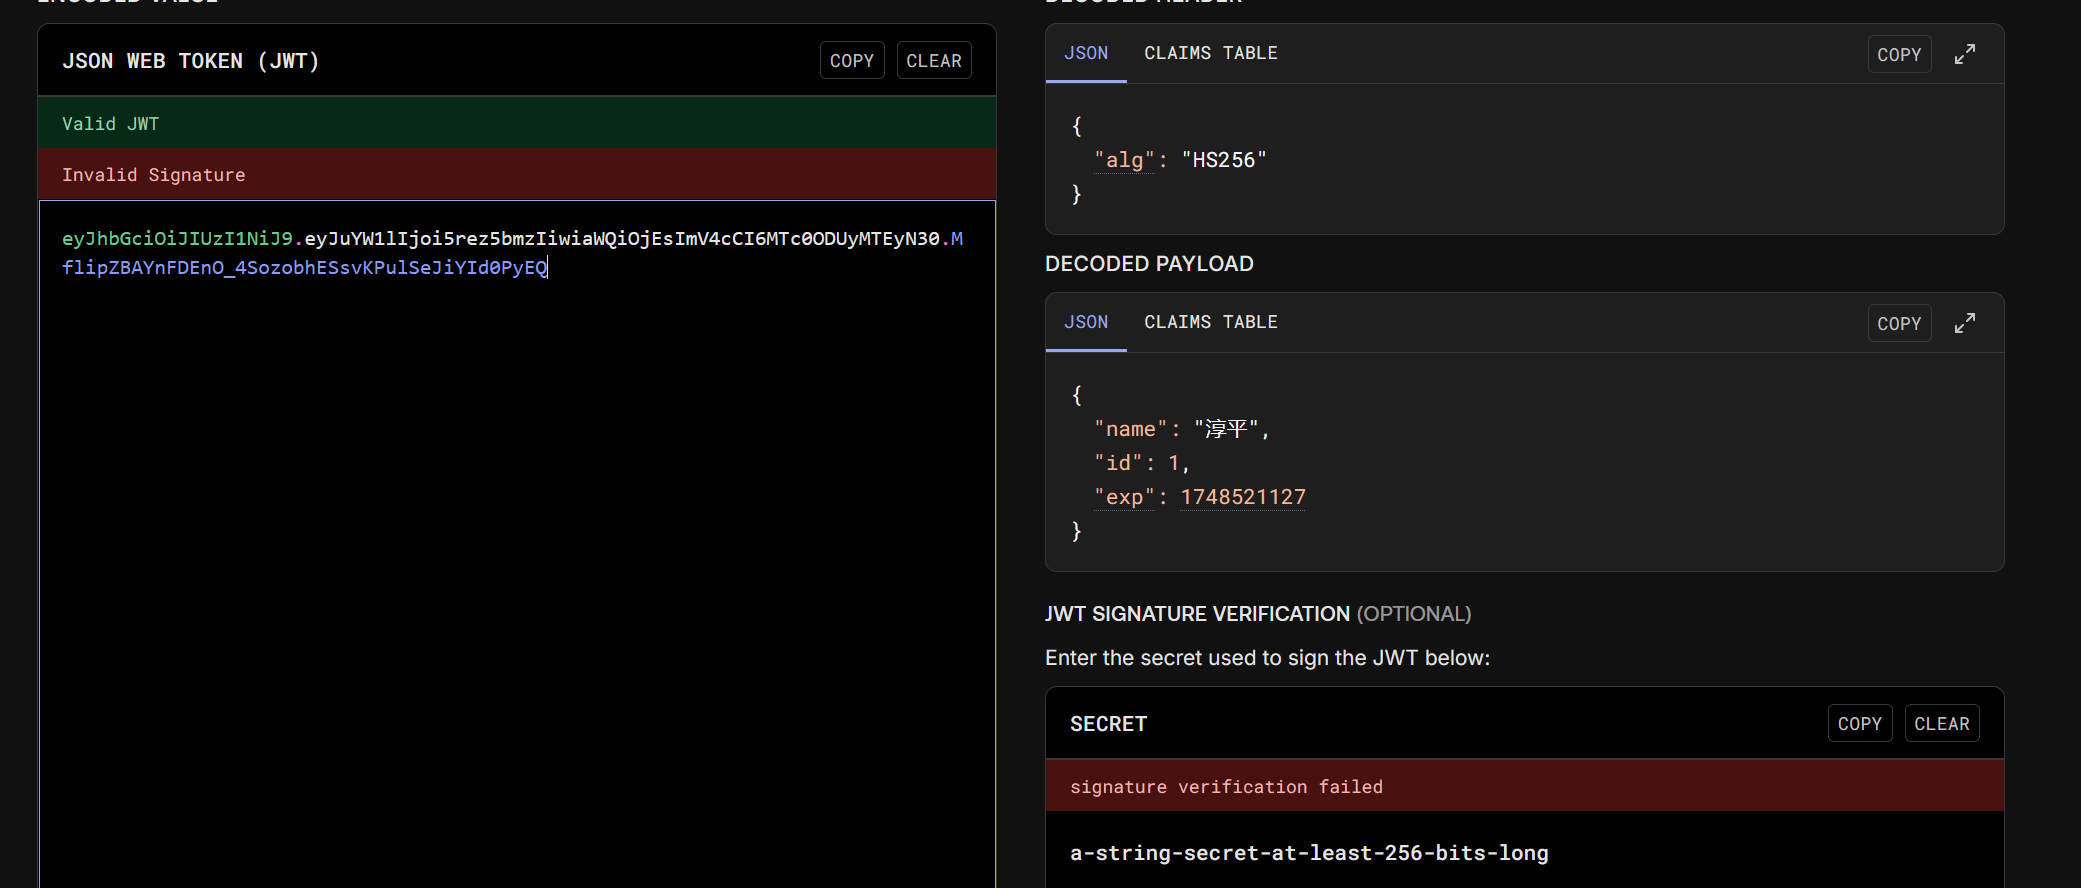
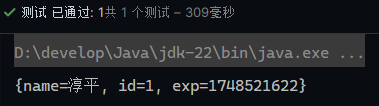
1 2 3 4 5 6 7 8 9 10 11 12 13 14 15 @Test public void testGenJWT () { Map<String,Object> claims = new HashMap <>(); claims.put("id" ,1 ); claims.put("name" ,"淳平" ); String jwt = Jwts.builder() .signWith(SignatureAlgorithm.HS256, "114514" ) .addClaims(claims) .setExpiration(new Date (System.currentTimeMillis() + 3600 * 1000 )) .compact(); System.out.println(jwt); }
将生成的令牌放到官网进行解码
我们只是简单测试一下jwt的生成,可以注释掉SpringBootTest注解,这样就不会加载整个项目
既然生成了,那我们如何解析呢
解析 1 2 3 4 5 6 7 8 9 @Test public void parseJwt () { Claims claims = Jwts.parser() .setSigningKey("114514" ) .parseClaimsJws("" ) .getBody(); System.out.println(claims); }
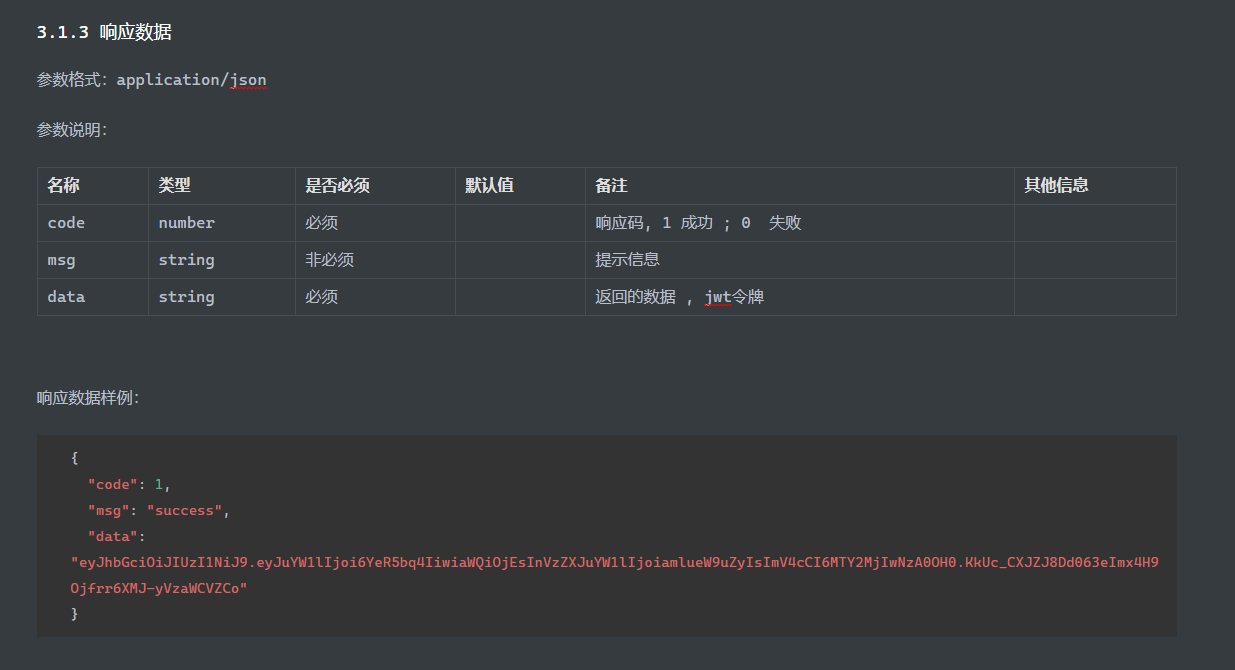
案例: 接口文档
JWT令牌工具类
1 2 3 4 5 6 7 8 9 10 11 12 13 14 15 16 17 18 19 20 21 22 23 24 25 26 27 28 29 30 31 32 public class JWTUtils { private static String signKey = "114514" ; private static Long expire = 43200000L ; public static String generateJwt (Map<String, Object> claims) { String jwt = Jwts.builder() .addClaims(claims) .signWith(SignatureAlgorithm.HS256, signKey) .setExpiration(new Date (System.currentTimeMillis() + expire)) .compact(); return jwt; } public static Claims parseJWT (String jwt) { Claims claims = Jwts.parser() .setSigningKey(signKey) .parseClaimsJws(jwt) .getBody(); return claims; } }
LoginController
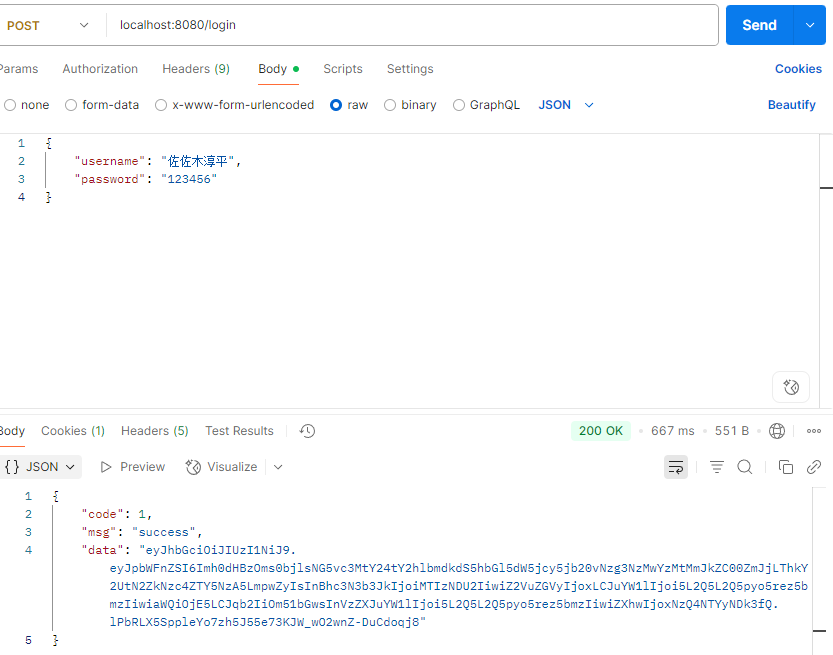
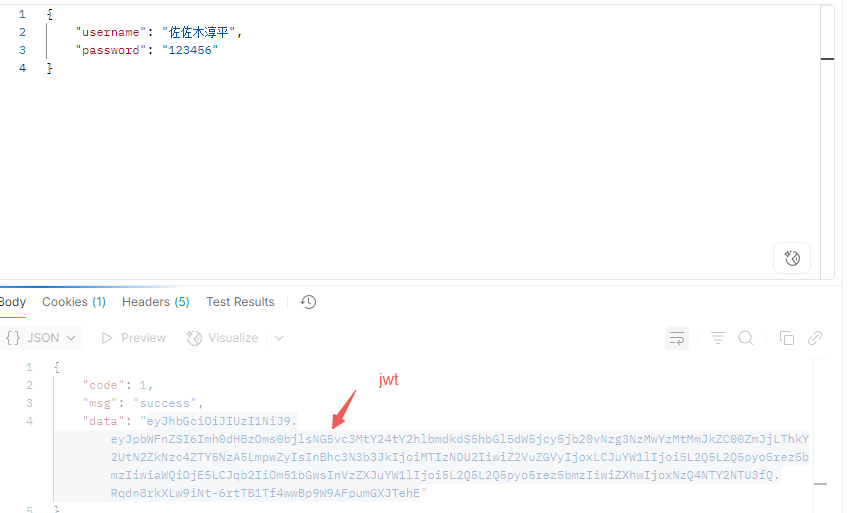
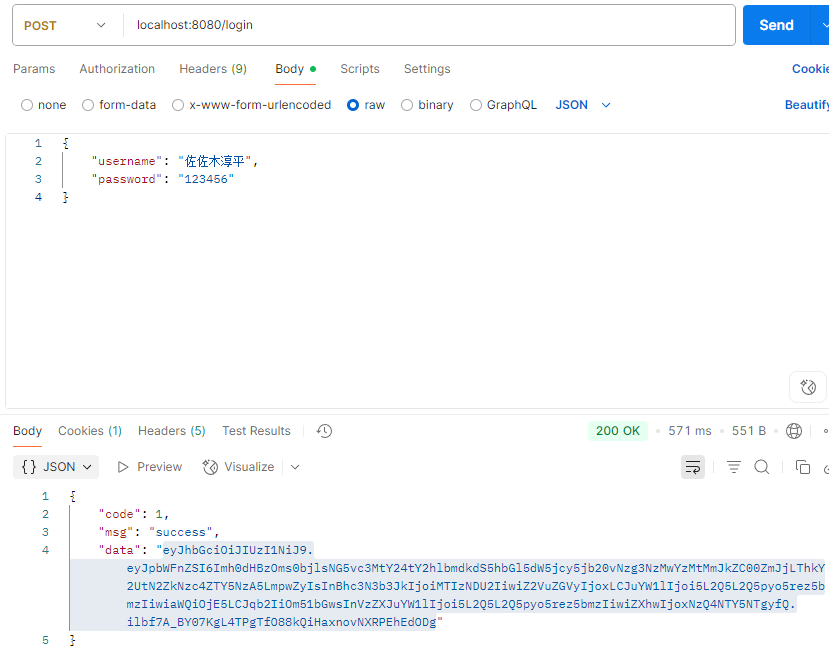
1 2 3 4 5 6 7 8 9 10 11 12 13 14 15 16 17 18 19 20 21 22 23 24 25 26 27 28 29 30 @RestController @Slf4j @RequestMapping("/login") public class LoginController { @Autowired private EmpService empService; @PostMapping public Result login (@RequestBody Emp emp) { log.info("员工登录:{}" ,emp); Emp e = empService.login(emp); if (e != null ){ Map<String,Object> claims = new HashMap <>(); claims.put("id" ,e.getId()); claims.put("username" ,e.getUsername()); claims.put("password" ,e.getPassword()); claims.put("name" ,e.getName()); claims.put("gender" ,e.getGender()); claims.put("image" ,e.getImage()); claims.put("job" ,e.getJob()); String jwt = JWTUtils.generateJwt(claims); return Result.success(jwt); } return Result.error("用户名或密码错误" ); } }
测试
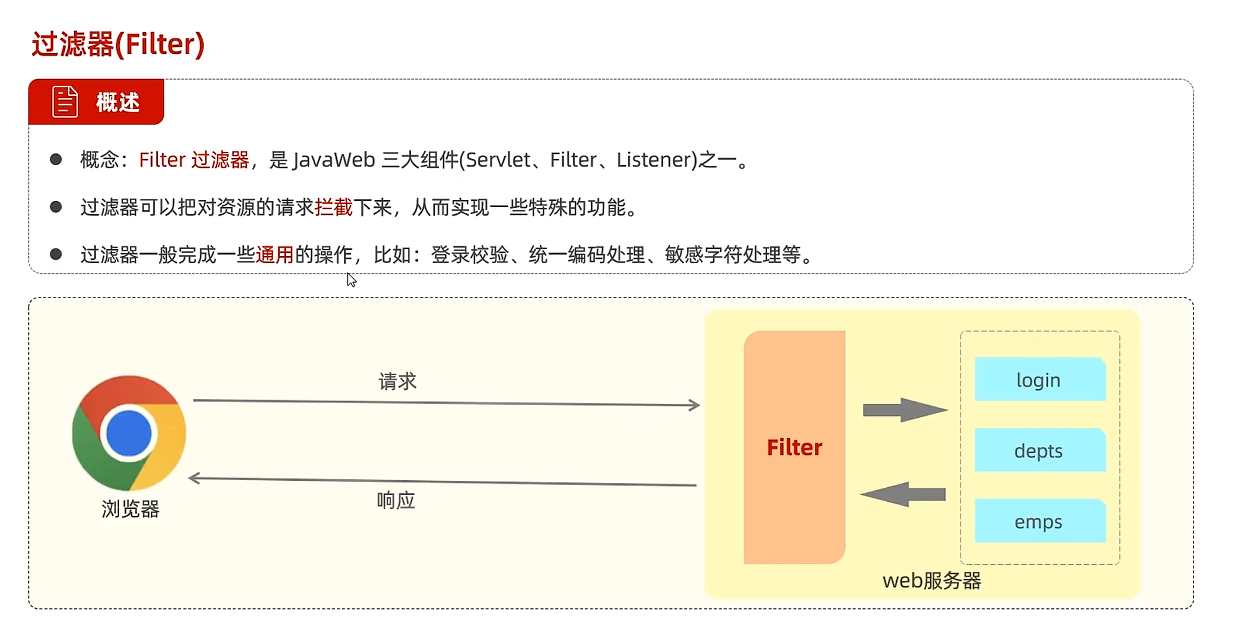
Filter过滤器
filterdemo
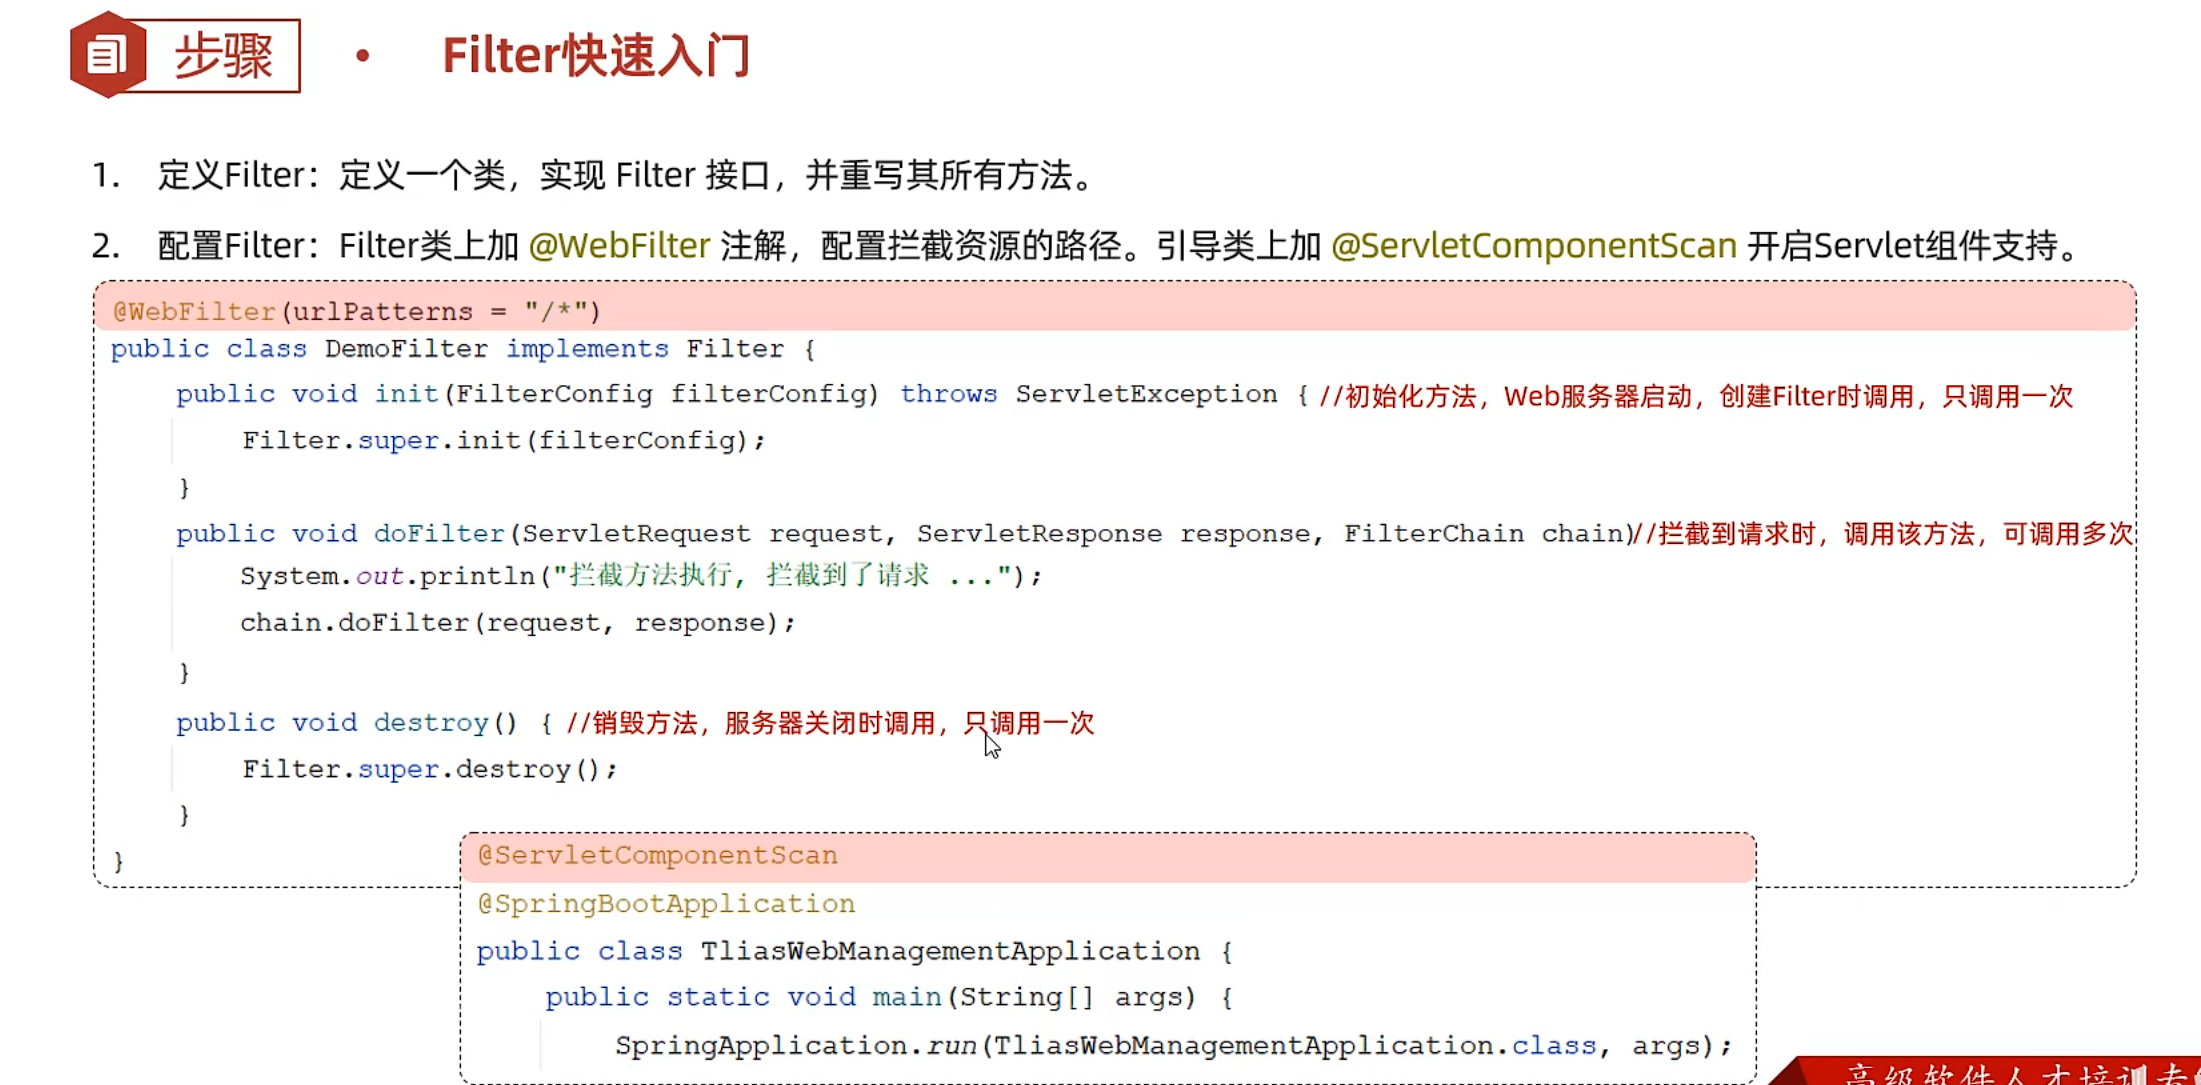
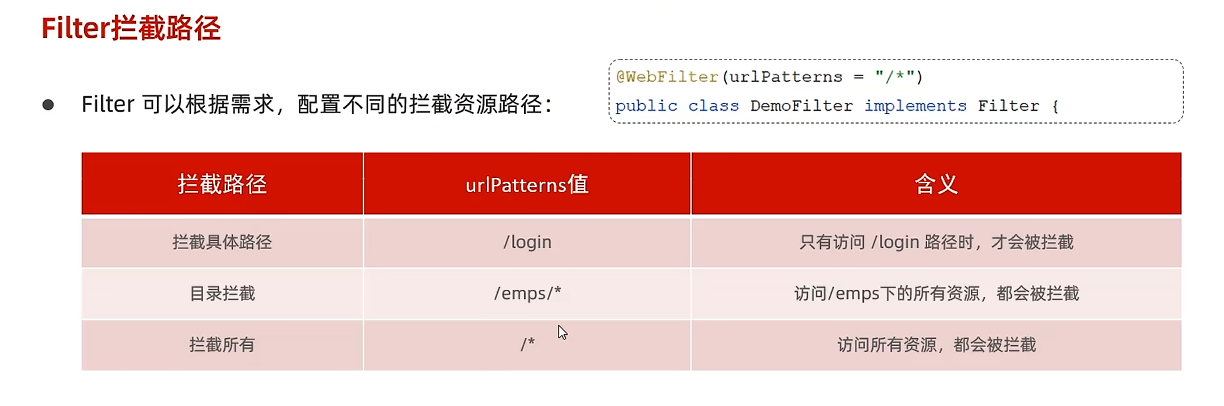
1 2 3 4 5 6 7 8 9 10 11 12 13 14 15 16 17 18 19 20 21 22 import jakarta.servlet.*;import jakarta.servlet.annotation.WebFilter;import java.io.IOException;@WebFilter(urlPatterns = "/*") public class FilterDemo implements Filter { @Override public void init (FilterConfig filterConfig) throws ServletException { System.out.println("init方法执行" ); } @Override public void doFilter (ServletRequest servletRequest, ServletResponse servletResponse, FilterChain filterChain) throws IOException, ServletException { System.out.println("doFilter方法执行" ); } @Override public void destroy () { System.out.println("destory方法执行" ); } }
启动类
1 2 3 4 5 6 7 8 9 @ServletComponentScan @SpringBootApplication public class SpringMybatisDemoApplication { public static void main (String[] args) { SpringApplication.run(SpringMybatisDemoApplication.class, args); } }
测试
运行
发送请求
拦截到了请求
拦截多次
放行
1 2 3 4 5 @Override public void doFilter (ServletRequest servletRequest, ServletResponse servletResponse, FilterChain filterChain) throws IOException, ServletException { System.out.println("doFilter方法执行" ); filterChain.doFilter(servletRequest,servletResponse); }
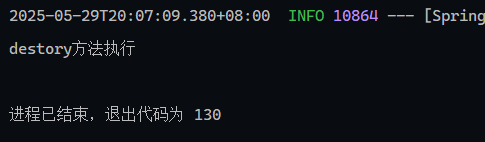
销毁
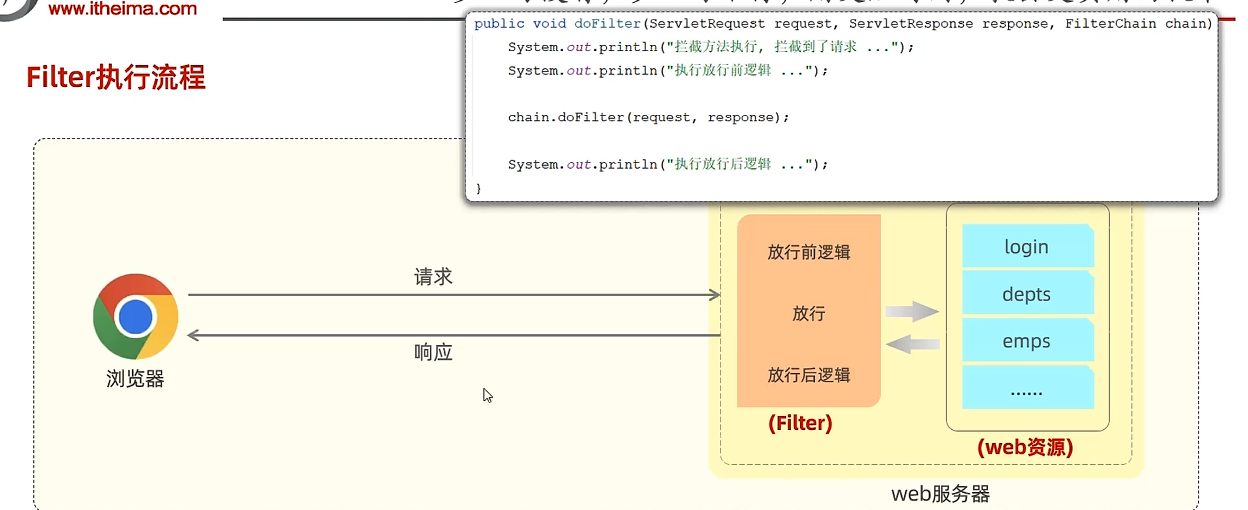
详解
放行后访问对应web资源后,还会再回到filter中,但是不会从头开始执行filter,从chain.filter后执行(只执行放行后逻辑)
拦截路径
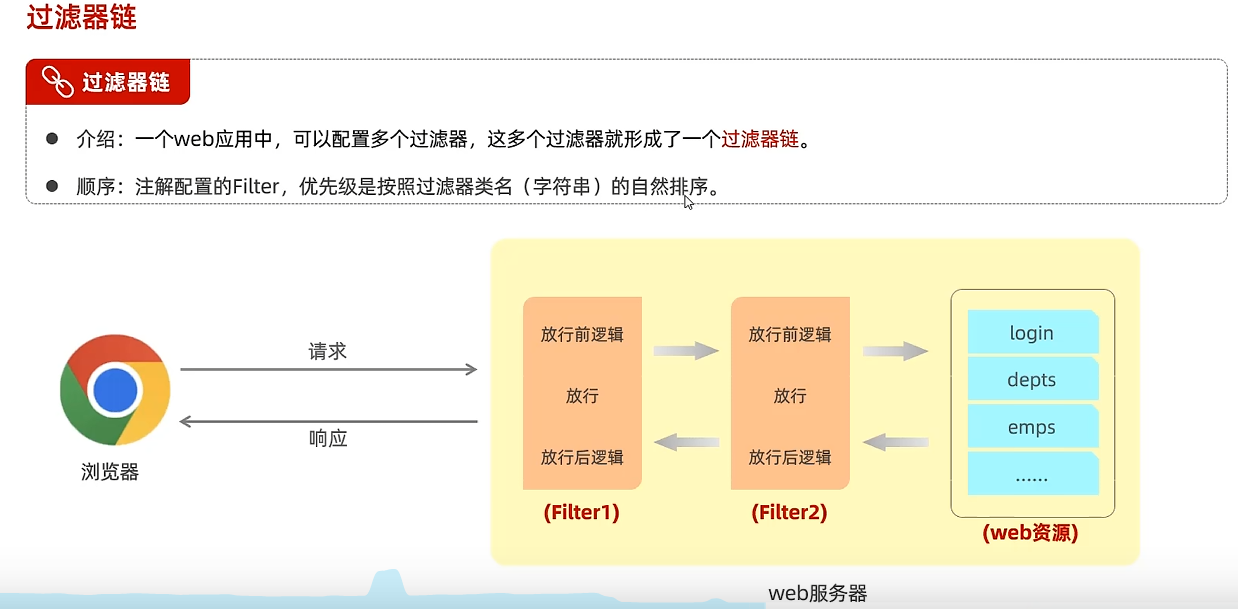
过滤器链
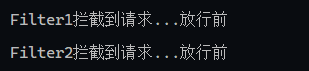
1 2 3 4 5 6 7 8 9 10 11 12 13 14 15 16 17 18 19 20 @WebFilter(urlPatterns = "/*") public class FilterDemo implements Filter { @Override public void init (FilterConfig filterConfig) throws ServletException { System.out.println("init方法执行" ); } @Override public void doFilter (ServletRequest servletRequest, ServletResponse servletResponse, FilterChain filterChain) throws IOException, ServletException { System.out.println("Filter1拦截到请求...放行前" ); filterChain.doFilter(servletRequest,servletResponse); System.out.println("Filter1拦截到请求...放行前" ); } @Override public void destroy () { System.out.println("destory方法执行" ); } }
1 2 3 4 5 6 7 8 9 10 @WebFilter(urlPatterns = "/*") public class FilterDemo2 implements Filter { @Override public void doFilter (ServletRequest servletRequest, ServletResponse servletResponse, FilterChain filterChain) throws IOException, ServletException { System.out.println("Filter2拦截到请求...放行前" ); filterChain.doFilter(servletRequest,servletResponse); System.out.println("Filter2拦截到请求...放行前" ); } }
filterChain的doFilter会将请求/响应发送到下一个Filter,如果是最后一个Filter了,就访问web资源/响应数据给浏览器
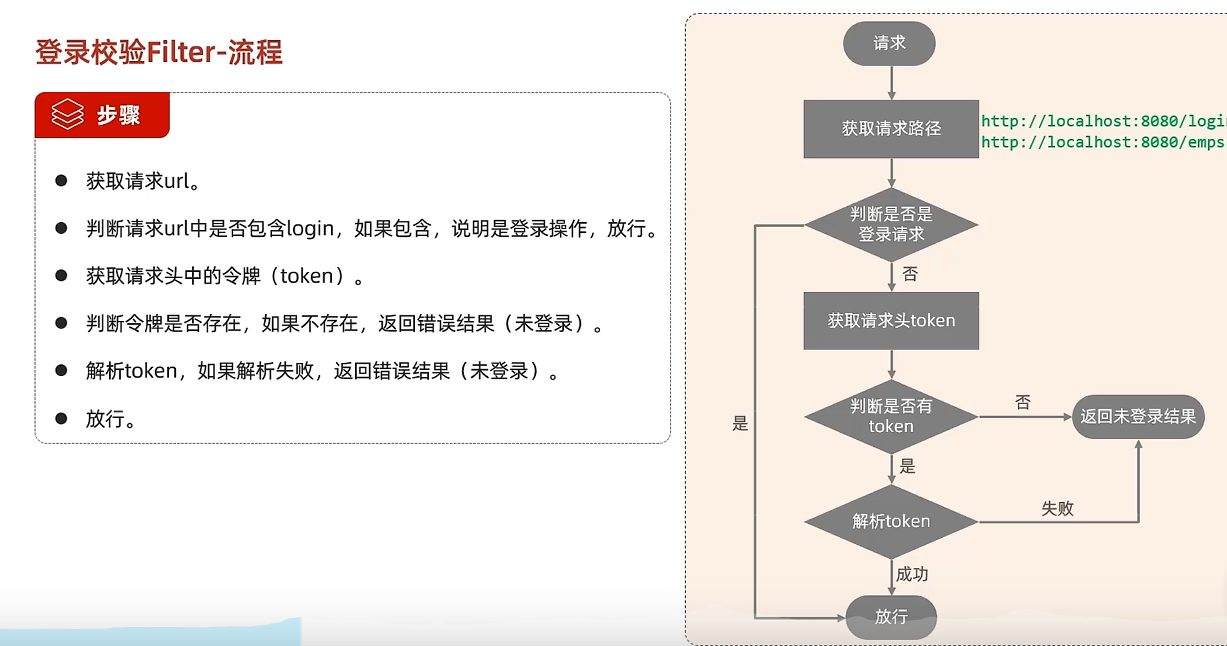
案例-登录校验 所有被拦截到的请求都要校验令牌吗?login不用,因为这步人家根本没有令牌
拦截请求后,什么时候才可以放行,执行业务操作?有令牌,且令牌合法,否则返回未登录错误信息
alibaba fastjson:将对象转换为json格式
1 2 3 4 5 <dependency > <groupId > com.alibaba</groupId > <artifactId > fastjson</artifactId > <version > 1.2.76</version > </dependency >
过滤器
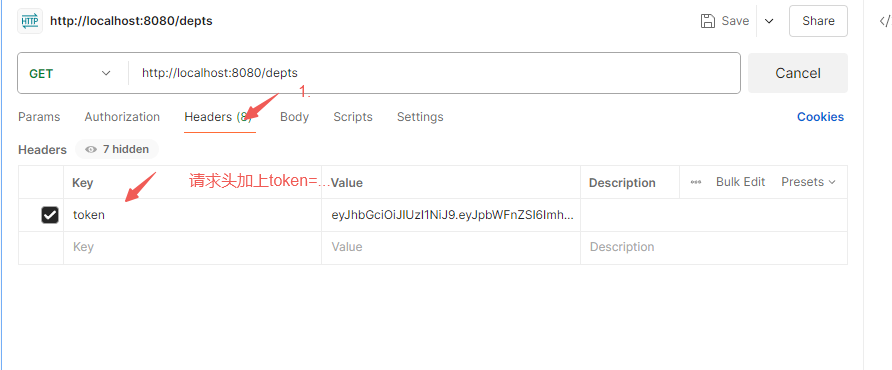
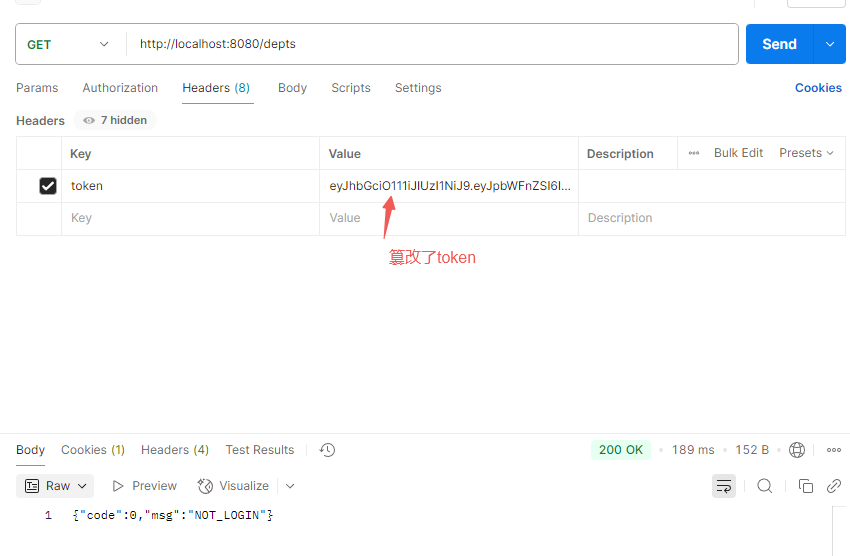
1 2 3 4 5 6 7 8 9 10 11 12 13 14 15 16 17 18 19 20 21 22 23 24 25 26 27 28 29 30 31 32 33 34 35 36 37 38 39 40 41 42 43 44 45 46 47 48 49 50 51 @Slf4j @WebFilter(urlPatterns = "/*") public class WebFilter0 implements Filter { @Override public void doFilter (ServletRequest servletRequest, ServletResponse servletResponse, FilterChain filterChain) throws IOException, ServletException { HttpServletRequest request = (HttpServletRequest) servletRequest; HttpServletResponse response = (HttpServletResponse) servletResponse; StringBuffer url = request.getRequestURL(); String ext = url.substring(url.lastIndexOf("/" )); log.info("请求路径:{}" ,ext); if ("/login" .equals(ext)) { log.info("登陆操作,放行" ); filterChain.doFilter(servletRequest, servletResponse); return ; } else { String jwt = request.getHeader("token" ); if (!StringUtils.hasLength(jwt)) { log.info("jwt不存在" ); Result result = Result.error("NOT_LOGIN" ); String jsonString = JSONObject.toJSONString(result); response.getWriter().write(jsonString); return ; } try { Map<String, Object> claims = JWTUtils.parseJWT(jwt); } catch (Exception e) { e.printStackTrace(); log.info("jwt非法" ); Result result = Result.error("NOT_LOGIN" ); String jsonString = JSONObject.toJSONString(result); response.getWriter().write(jsonString); return ; } log.info("令牌校验通过" ); filterChain.doFilter(servletRequest, servletResponse); } } }
测试
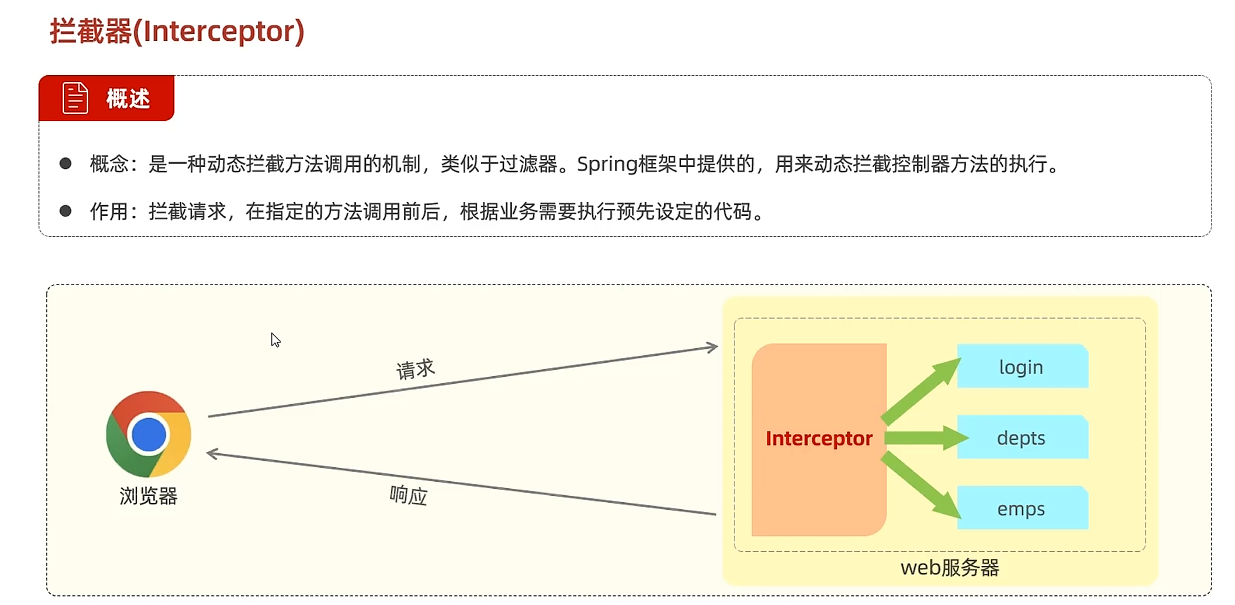
Interceptor拦截器 类似于Filter,但不同的是,Interceptor是Spring框架提供的
步骤
定义拦截器
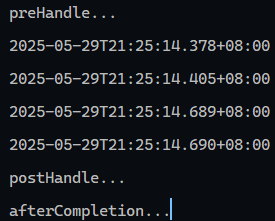
1 2 3 4 5 6 7 8 9 10 11 12 13 14 15 16 17 18 19 20 21 22 23 24 25 26 27 28 29 30 31 32 33 34 35 36 37 38 39 40 41 42 @Component public class InterceptorTest implements HandlerInterceptor { @Override public boolean preHandle (HttpServletRequest request, HttpServletResponse response, Object handler) throws Exception { System.out.println("preHandle..." ); return true ; } @Override public void postHandle (HttpServletRequest request, HttpServletResponse response, Object handler, ModelAndView modelAndView) throws Exception { System.out.println("postHandle..." ); } @Override public void afterCompletion (HttpServletRequest request, HttpServletResponse response, Object handler, Exception ex) throws Exception { System.out.println("afterCompletion..." ); } }
注册拦截器
1 2 3 4 5 6 7 8 9 @Configuration public class WebConfig implements WebMvcConfigurer { @Autowired private InterceptorTest interceptorTest; @Override public void addInterceptors (InterceptorRegistry registry) { registry.addInterceptor(interceptorTest).addPathPatterns("/**" ); } }
测试
拦截器中三个方法的顺序
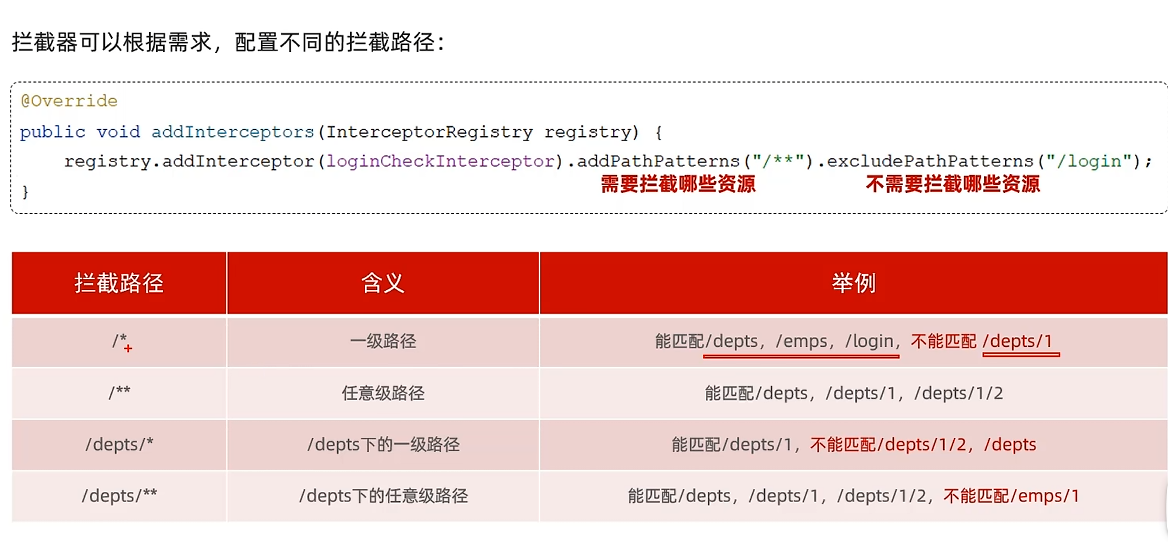
详解 拦截路径
1 2 3 4 5 6 7 8 9 10 11 @Configuration public class WebConfig implements WebMvcConfigurer { @Autowired private InterceptorTest interceptorTest; @Override public void addInterceptors (InterceptorRegistry registry) { registry.addInterceptor(interceptorTest) .addPathPatterns("/**" ) .excludePathPatterns("/login" ); } }
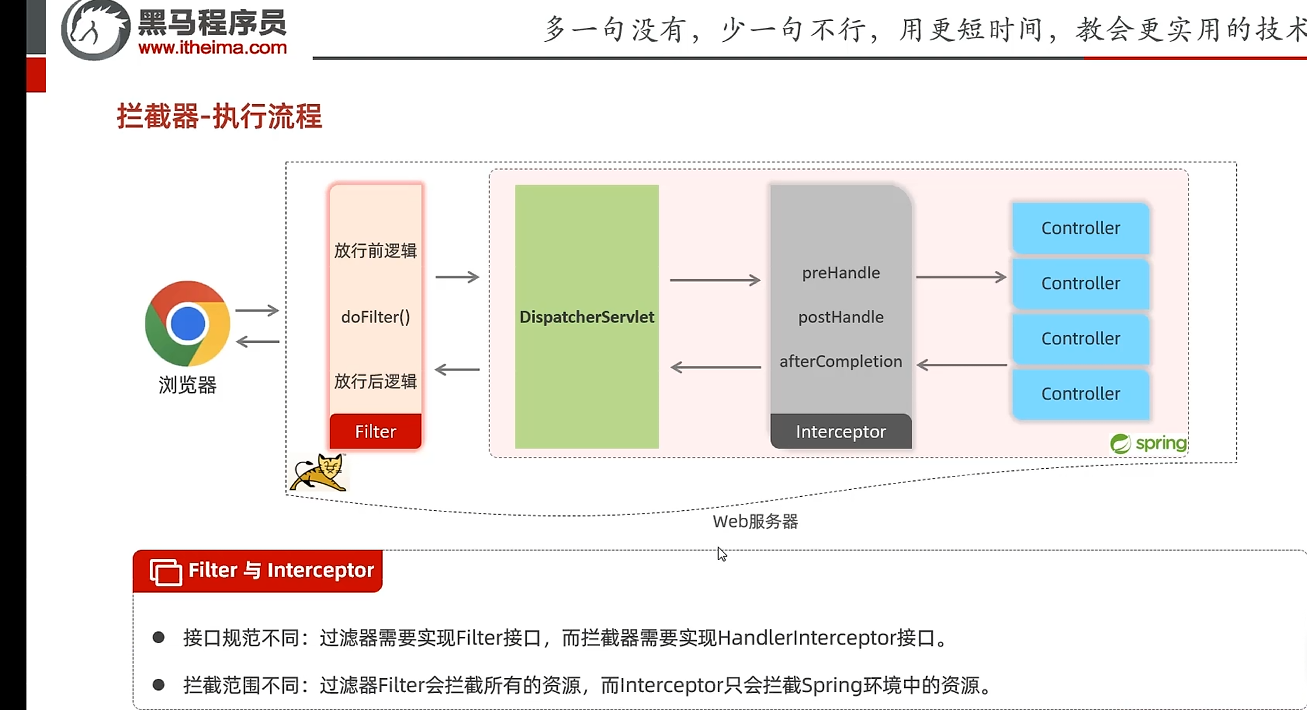
拦截流程
与Filter的区别
Filter:实现Filter接口,会拦截所有的资源
Interceptor:实现HandlerInterceptor接口,只会拦截Spring环境内的资源
案例 步骤与Filter中一致,不同的是,拦截器是否放行由返回值决定,而过滤器需要手动调用Chain.doFilter()
定义拦截器
1 2 3 4 5 6 7 8 9 10 11 12 13 14 15 16 17 18 19 20 21 22 23 24 25 26 27 28 29 30 31 32 33 34 35 36 37 38 39 40 41 42 43 44 45 46 47 48 49 50 51 52 53 54 55 @Component @Slf4j public class SpringInterceptor implements HandlerInterceptor { @Override public boolean preHandle (HttpServletRequest request, HttpServletResponse response, Object handler) throws Exception { StringBuffer url = request.getRequestURL(); log.info("url:{}" ,url); String ext = url.substring(url.lastIndexOf("/" )); if ("/login" .equals(ext)) { log.info("登陆操作,放行" ); return true ; } String jwt = request.getHeader("token" ); if (!StringUtils.hasLength(jwt)){ log.info("jwt不存在" ); Result result = Result.error("NOT_LOGIN" ); String jsonString = JSONObject.toJSONString(result); response.getWriter().write(jsonString); return false ; } try { Map<String, Object> claims = JWTUtils.parseJWT(jwt); } catch (Exception e) { e.printStackTrace(); log.info("jwt非法" ); Result result = Result.error("NOT_LOGIN" ); String jsonString = JSONObject.toJSONString(result); response.getWriter().write(jsonString); return false ; } log.info("令牌校验通过" ); return true ; } @Override public void postHandle (HttpServletRequest request, HttpServletResponse response, Object handler, ModelAndView modelAndView) throws Exception { HandlerInterceptor.super .postHandle(request, response, handler, modelAndView); } @Override public void afterCompletion (HttpServletRequest request, HttpServletResponse response, Object handler, Exception ex) throws Exception { HandlerInterceptor.super .afterCompletion(request, response, handler, ex); } }
注册拦截器
1 2 3 4 5 6 7 8 9 10 @Configuration public class WebConfig implements WebMvcConfigurer { @Autowired private SpringInterceptor springInterceptor; @Override public void addInterceptors (InterceptorRegistry registry) { registry.addInterceptor(springInterceptor) .addPathPatterns("/**" ); } }
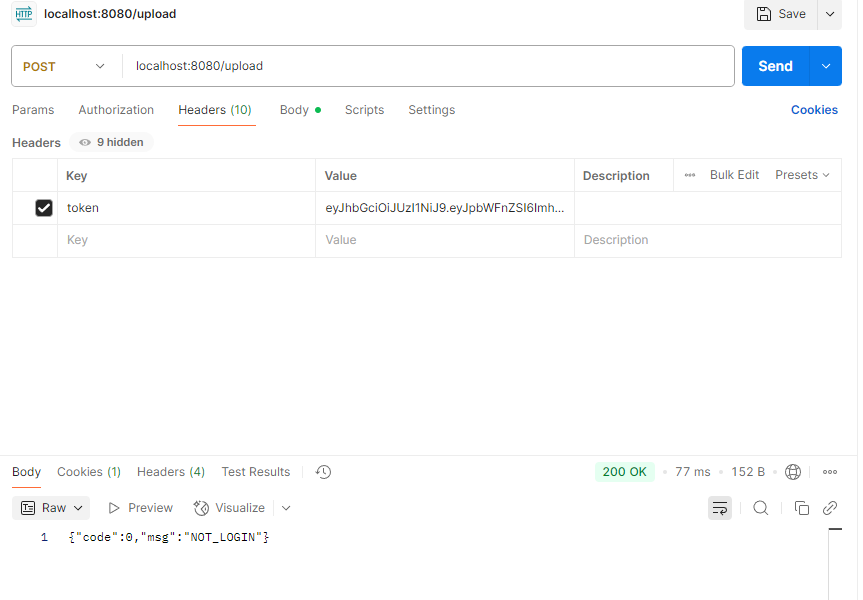
测试
无token进行其他请求
有token且token合法
token非法
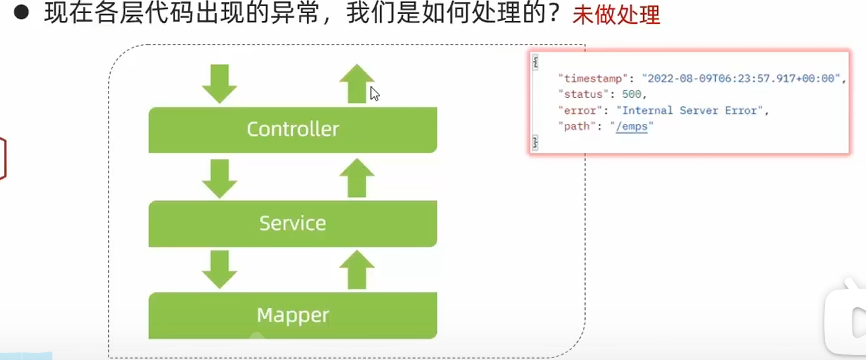
异常处理 在案例中,如果在新增部门处新增一个重复的部门,由于MySQL对部门这个字段做了unique约束,所以会引发异常
http状态码为500,服务器端异常
响应数据为
1 { "timestamp" : "2025-06-03T13:46:51.851+00:00" , "status" : 500 , "error" : "Internal Server Error" , "path" : "/depts" }
并不是我们预先设定的Result格式
1 2 3 4 5 { "code" : "msg" : "" "data" : "" }
所以前端无法处理框架抛出的异常
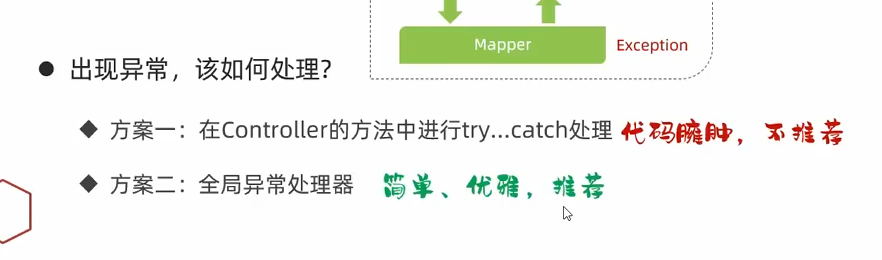
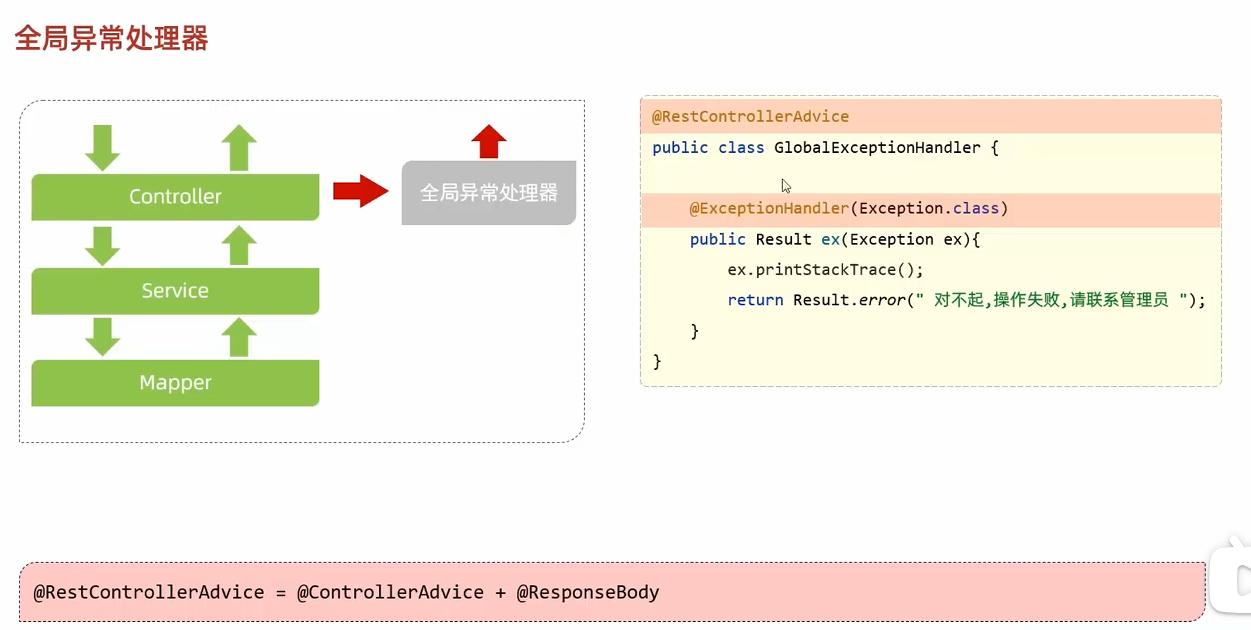
全局异常处理器
1 2 3 4 5 6 7 8 @RestControllerAdvice public class GlobalExceptionHandler { @ExceptionHandler(Exception.class) public Result handlerEx (Exception ex) { ex.printStackTrace(); return Result.error("操作失败" ); } }
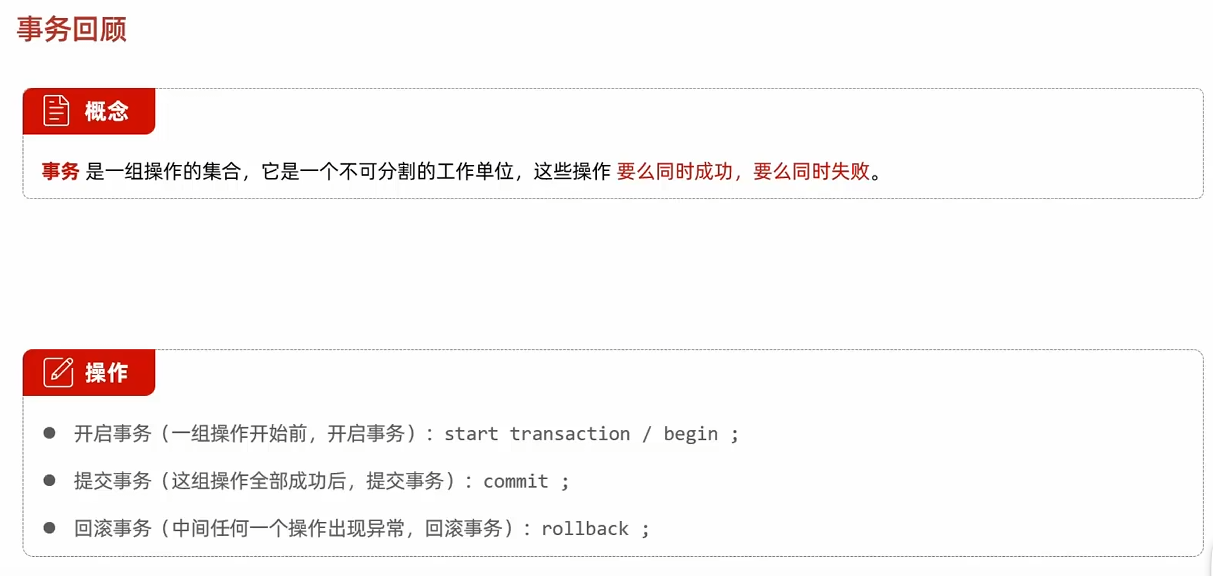
事务管理
在原本的部门管理中,删除部门就仅仅只是把部门删了,但是该部门下的员工却并未删除
1 2 3 4 @Override public void delete (Integer id) { mapper.deleteById(id); }
如果我们只是简单加上一个根据部门id删除员工的操作,那么如果这两步操作之间出现了异常,就会导致数据不一致,因此这两步操作需要被封装成一个事务
@Transactional 位置:Service层的类/方法/接口上
作用:将当前方法交给spring进行事务管理,方法执行前,开启事务,成功执行完毕,提交事务,否则回滚事务
我们需要在执行多次数据访问操作的方法上使用,查询不影响数据,单步操作如果失败,也会自动回滚
1 2 3 4 5 6 7 @Override @Transactional public void delete (Integer id) { mapper.deleteById(id); int i = 1 /0 ; mapper.deleteEmpByDeptId(id); }
控制台输出事务日志
1 2 3 4 logging: level: org.springframework.jdbc.support.JdbcTransactionManager: debug
引发异常
但是数据库中数据未发生变化
控制台日志
rollbackFor @Transactional默认只会回滚RuntimeException及其子类异常,要想回滚其他异常,需要配置rollbackFor属性
1 2 @Transactional(rollbackFor = Exception.class)
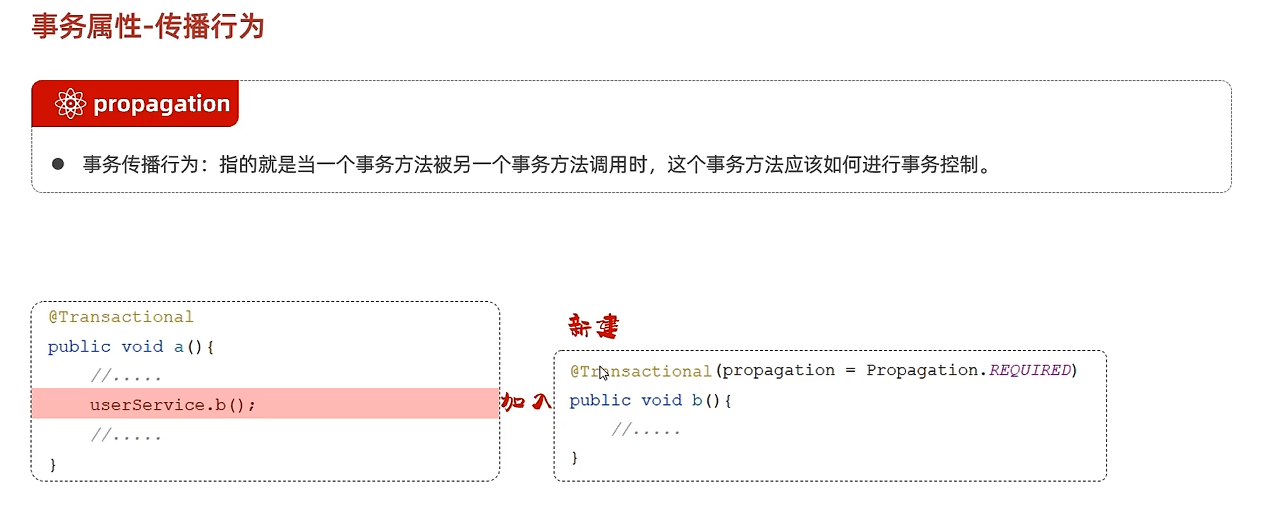
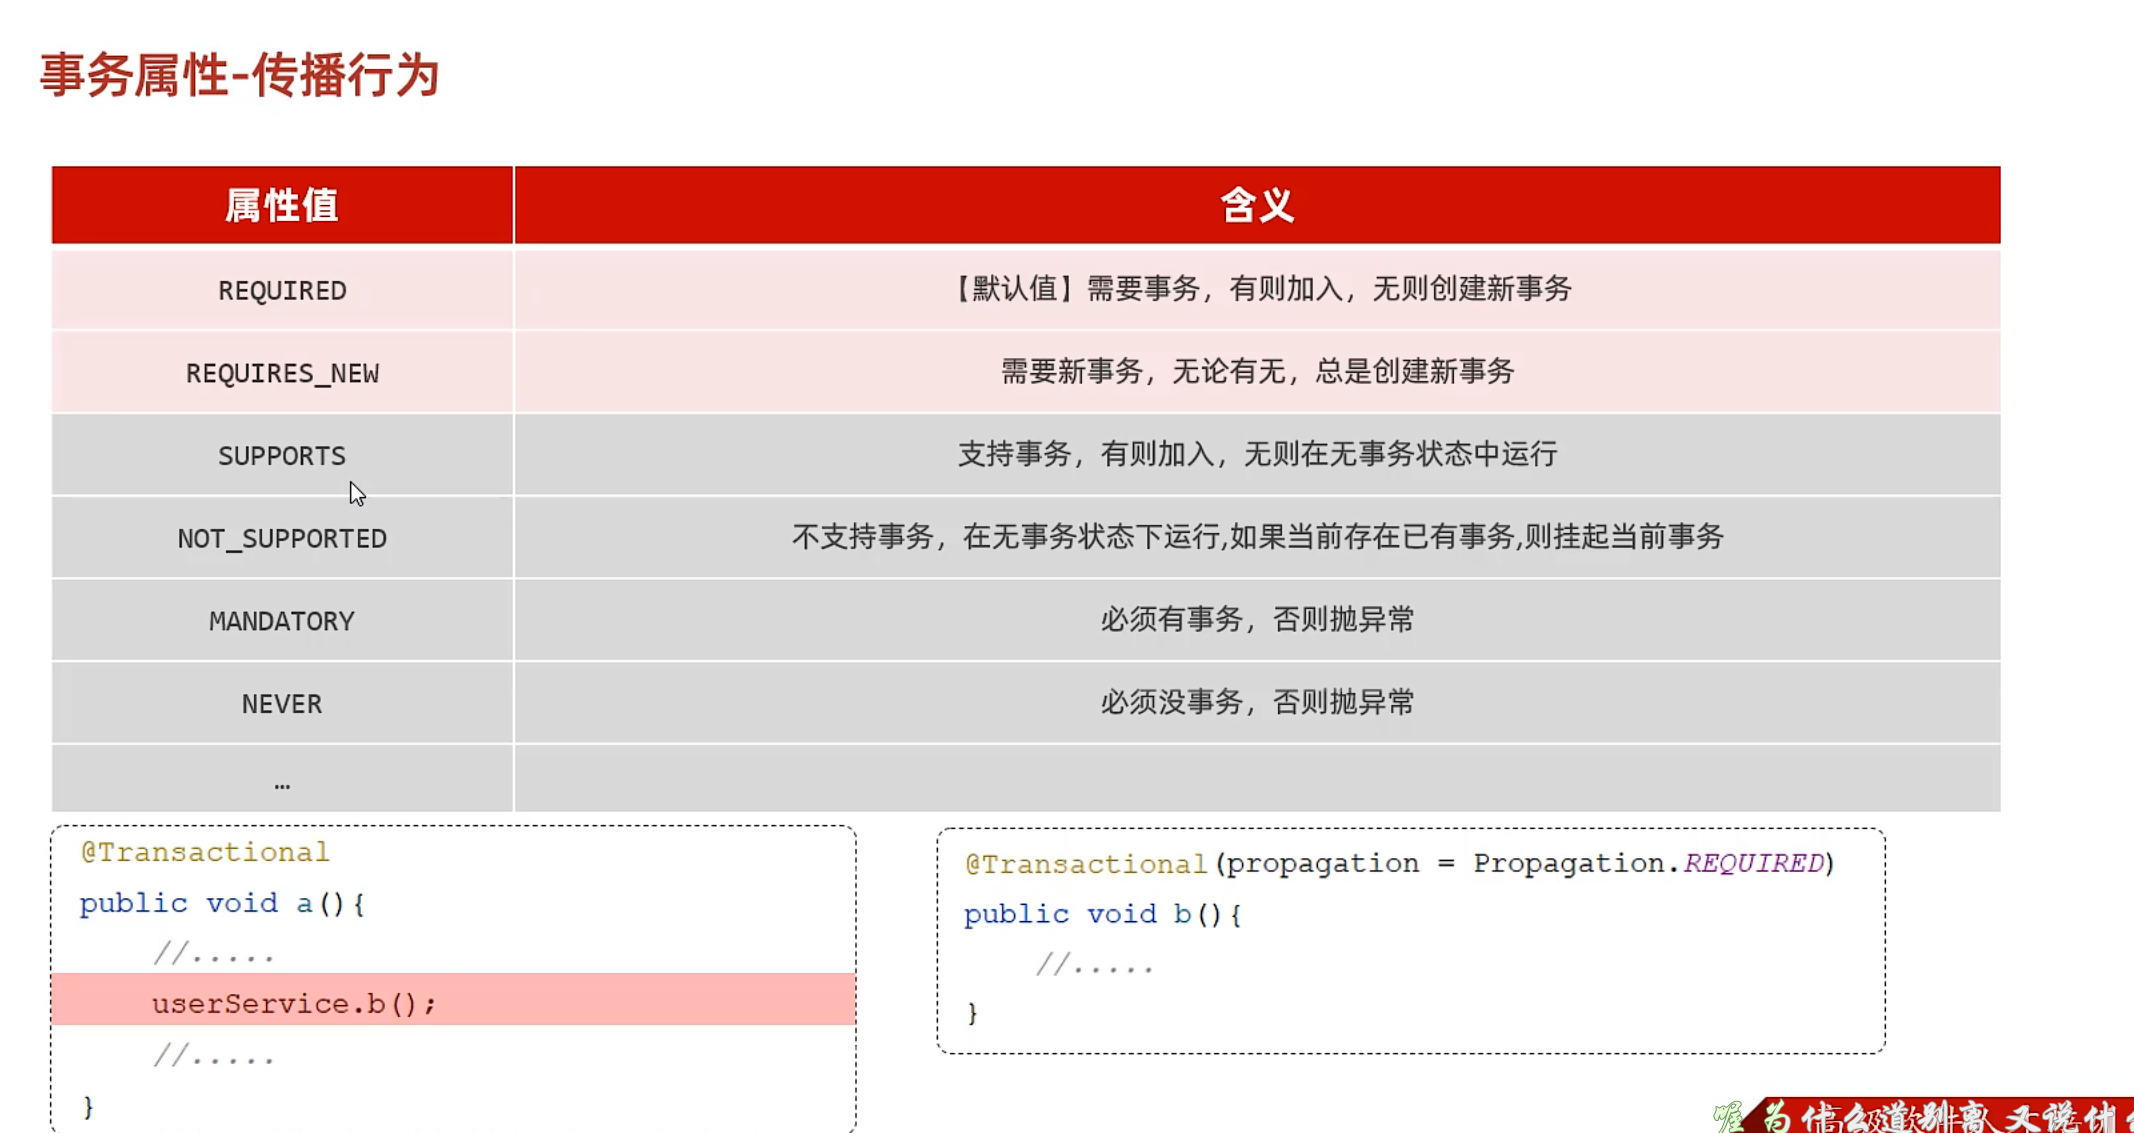
propagation propagation
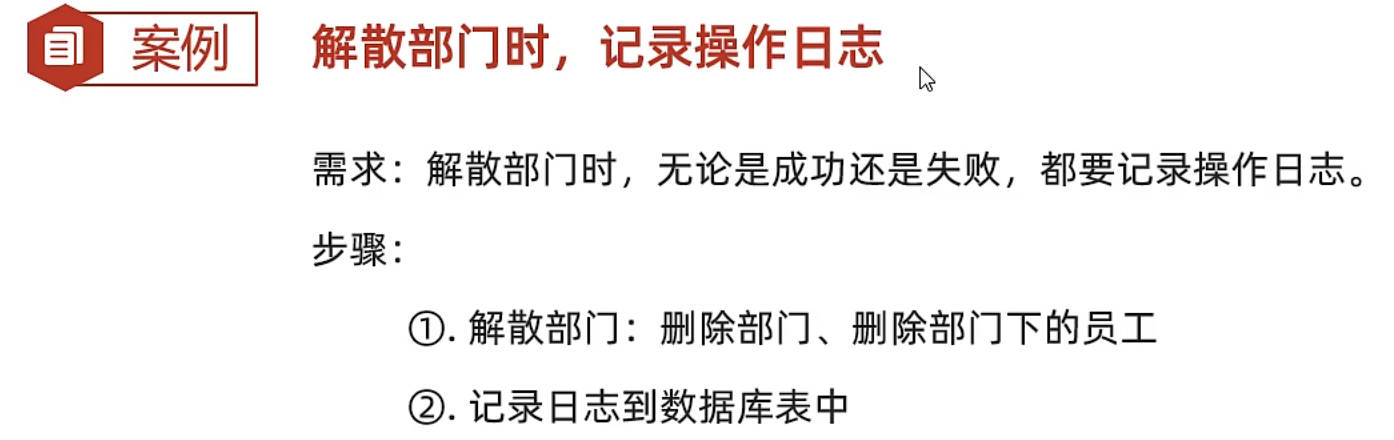
案例
记录日志这步要放在finally中,这样就可以无论成功失败都能记录
DeptLog对象
1 2 3 4 5 6 7 @Data @AllArgsConstructor @NoArgsConstructor public class DeptLog { private LocalDateTime createTime; private String description; }
Service层
1 2 3 4 5 6 7 8 9 10 @Service public class DeptLogImpl implements DeptLogService { @Autowired private DeptLogMapper deptLogMapper; @Override @Transactional public void insert (DeptLog deptLog) { deptLogMapper.insert(deptLog); } }
Mapper层
1 2 3 4 5 @Mapper public interface DeptLogMapper { @Insert("insert into dept_log values (#{createTime},#{description})") void insert (DeptLog deptLog) ; }
但是这么做,dept_log表中并不会添加日志
控制台日志中
向dept_log表中插入数据的事务是直接加入到当前删除部门的事务的,所以当删除部门的方法遇到异常回滚时,向dept_log表中插入数据这个动作也回滚了,就没有插入数据
将service层改为
1 2 3 4 5 6 7 8 9 10 @Service public class DeptLogImpl implements DeptLogService { @Autowired private DeptLogMapper deptLogMapper; @Override @Transactional(propagation = Propagation.REQUIRES_NEW) public void insert (DeptLog deptLog) { deptLogMapper.insert(deptLog); } }
控制台日志
删除部门的事务被挂起
完成插入日志信息的事务后,再完成删除部门的事务
删除部门回滚
插入数据成功
使用场景
AOP 定义 面向特定方法编程
要统计业务中每一个方法的耗时,如果在每一个方法中都用开始时间减去运行结束时间的话,太繁琐
步骤 引入依赖
1 2 3 4 <dependency > <groupId > org.springframework.boot</groupId > <artifactId > spring-boot-starter-aop</artifactId > </dependency >
编写AOP程序
使用@Component将类交给IOC容器管理,使用@Aspect声明这是一个AOP类
使用固定参数ProceedingJoinPoint proceedingJoinPoint封装原始方法,可用.getSignature()获取方法的签名
使用切入层表达式
*表示通配
面向Service层下的所有接口和类的所有方法
1 2 3 4 5 6 7 8 9 10 11 12 13 @Slf4j @Component @Aspect public class TimeAspect { @Around("execution(* com.wwwtty.springmybatisdemo.Service.*.*(..))") public Object recordTime (ProceedingJoinPoint proceedingJoinPoint) throws Throwable { long begin = System.currentTimeMillis(); Object ret = proceedingJoinPoint.proceed(); long end = System.currentTimeMillis(); log.info(proceedingJoinPoint.getSignature()+"运行耗时:{}ms" ,end-begin); return ret; } }
此时开启服务,进行测试
前端刷新页面时
AOP类给出日志输出,获取了方法的签名
在事务管理中其实就使用了AOP,方法执行前先开启事务,方法结束后commit/rollback
核心概念 连接点JointPoint 可以被AOP控制的方法(暗含方法执行时的相关信息)
通知Advice 在AOP类中做什么(比如前面的统计时间);重复的逻辑(共性功能,最终体现为一个方法)
切入点PointCut AOP实际控制的方法;匹配连接点的条件,通知仅在切入点方法执行时才被应用
切面Aspect 切入点+通知
目标对象Target 通知所应用的对象
执行流程
打上断点进行测试/depts查询所有员工信息这个接口
没加入AOP时,应该会执行到DeptService实现类中的list()方法
现在加了AOP时,进行测试
方法变成了另外一个增强的list()方法
在Service层这里,并没有直接执行mapper.list()
而是转到AOP类中
执行到proceedingJoinPoint.proceed()调用原方法时,才进入原来Service层中的mappe.list()
通知类型 !image-20250701094154119
@Around,如果原方法抛出异常,那么后面的通知就不会执行了
@Around需要考虑原方法调用,因此需要使用proceedingJoinPoint.proceed()调用原方法,同时返回值必须是Object
测试代码:
1 2 3 4 5 6 7 8 9 10 11 12 13 14 15 16 17 18 19 20 21 22 23 24 25 26 27 28 29 30 31 32 33 34 35 36 37 38 39 package com.wwwtty.springmybatisdemo.aop;import lombok.extern.slf4j.Slf4j;import org.aspectj.lang.ProceedingJoinPoint;import org.aspectj.lang.annotation.*;import org.springframework.stereotype.Component;@Slf4j @Component @Aspect public class AdviceTest { @Before("execution(* com.wwwtty.springmybatisdemo.Service.*.*(..))") public void before () { log.info("Before:Hello World!" ); } @Around("execution(* com.wwwtty.springmybatisdemo.Service.DeptService.list())) ") public Object around(ProceedingJoinPoint proceedingJoinPoint) throws Throwable { log.info(" around-before..."); Object res = proceedingJoinPoint.proceed(); log.info(" around-after..."); return res; } @After(" execution(* com.wwwtty.springmybatisdemo.Service.DeptService.list()))") public void after() { log.info(" after"); } @AfterReturning(" execution(* com.wwwtty.springmybatisdemo.Service.DeptService.list())") public void afterReturn() { log.info(" after-return "); } @AfterThrowing(" execution(* com.wwwtty.springmybatisdemo.Service.DeptService.*(..))") public void afterThrow() { log.info(" after-throw "); } }
Service层代码
1 2 3 4 5 6 7 8 9 10 11 12 13 14 15 16 17 18 19 20 21 22 23 24 25 26 27 28 29 30 31 32 33 34 @Service public class DeptImpl implements DeptService { @Autowired private DeptMapper mapper; @Autowired private DeptLogService deptLogService; @Override public List<Dept> list () { return mapper.list(); } @Override @Transactional(rollbackFor = Exception.class) public void delete (Integer id) { try { mapper.deleteById(id); int i = 1 /0 ; mapper.deleteEmpByDeptId(id); } finally { DeptLog deptLog = new DeptLog (LocalDateTime.now(),"解散了" +id+"部门" ); deptLogService.insert(deptLog); } } @Override public void add (Dept dept) { dept.setCreateTime(LocalDate.now()); dept.setUpdateTime(LocalDate.now()); mapper.insert(dept); } }
日志输出结果
但是这样写切入点表达式太麻烦了,写一个注解就要写一个表达式
@Pointcut 使用这个注解就可以抽取出重复的切入点表达式,只需要在通知注解中调用被@Pointcut注解的方法就可以
1 2 3 @Pointcut("execution(* com.wwwtty.springmybatisdemo.Service.DeptService.*(..))") private void cut () {}
1 2 3 4 5 6 7 8 9 10 11 12 13 14 15 16 17 18 19 20 21 22 23 24 25 26 27 28 29 30 31 32 33 34 35 36 37 38 39 40 41 42 43 package com.wwwtty.springmybatisdemo.aop;import lombok.extern.slf4j.Slf4j;import org.aspectj.lang.ProceedingJoinPoint;import org.aspectj.lang.annotation.*;import org.springframework.stereotype.Component;@Slf4j @Component @Aspect public class AdviceTest { @Pointcut("execution(* com.wwwtty.springmybatisdemo.Service.DeptService.*(..))") private void cut () { } @Before("cut()") public void before () { log.info("Before:Hello World!" ); } @Around("cut()") public Object around (ProceedingJoinPoint proceedingJoinPoint) throws Throwable { log.info("around-before..." ); Object res = proceedingJoinPoint.proceed(); log.info("around-after..." ); return res; } @After("cut()") public void after () { log.info("after" ); } @AfterReturning("cut()") public void afterReturn () { log.info("after-return" ); } @AfterThrowing("cut()") public void afterThrow () { log.info("after-throw" ); } }
通知顺序
切入点表达式 决定哪些方法要加入通知
@execution()
@annotation 切入点是使用特定注解的方法,使用特定注解的引用对切入点表达式进行简化
1.定义特定注解,使用两个元注解对生效范围和时间进行声明
1 2 3 4 @Retention(RetentionPolicy.RUNTIME) @Target(ElementType.METHOD) public @interface MyLog {}
2.在特定方法上注解
1 2 3 4 5 @Override @MyLog public List<Dept> list () { return mapper.list(); }
3.在@annotation中传入注解的引用
1 2 3 4 5 6 7 8 @Pointcut("@annotation(com.wwwtty.springmybatisdemo.aop.MyLog)") private void cut () {} @Before("cut()") public void before () { log.info("Before:Hello World!" ); }
连接点
1 2 3 4 5 6 7 8 9 10 @Pointcut("@annotation(com.wwwtty.springmybatisdemo.aop.MyLog)") private void cut () {} @Before("cut()") public void before (JoinPoint joinPoint) { log.info("方法签名:{}" ,joinPoint.getSignature()); log.info("方法参数列表:{}" , joinPoint.getArgs()); log.info("目标类名:{}" ,joinPoint.getClass().getName()); }
案例
分析:
使用AOP技术,对原始增删改查进行增强,要求记录返回值,通知使用@Around进行控制
增删改查的方法命名不同类各不相同,如果使用execution,不好命名,使用@annotation进行描述切入点表达式
引入依赖 1 2 3 4 <dependency > <groupId > org.springframework.boot</groupId > <artifactId > spring-boot-starter-aop</artifactId > </dependency >
建表 1 2 3 4 5 6 7 8 9 10 11 create table operate_log( id int unsigned primary key auto_increment comment 'ID' , operate_user int unsigned comment '操作人ID' , operate_time datetime comment '操作时间' , class_name varchar (100 ) comment '操作的类名' , method_name varchar (100 ) comment '操作的方法名' , method_params varchar (1000 ) comment '方法参数' , return_value varchar (2000 ) comment '返回值' , cost_time bigint comment '方法执行耗时, 单位:ms' ) comment '操作日志表' ;
实体类 1 2 3 4 5 6 7 8 9 10 11 12 @Data @NoArgsConstructor @AllArgsConstructor public class operateLog { private Integer id; private LocalDateTime operateTime; private String className; private String methodName; private String methodParams; private String returnValue; private Long costTime; }
Mapper接口 1 2 3 4 5 @Mapper public interface OperateLogMapper { @Insert("insert into operate_Log (id,operate_user,operate_time,class_name,method_name,method_params,return_value,cost_time) values (#{id},#{operateTime},#{className},#{methodName},#{methodParams},#{returnValue},#{costTime})") void insert (OperateLog operateLog) ; }
自定义注解 1 2 3 4 @Retention(RetentionPolicy.RUNTIME) @Target(ElementType.METHOD) public @interface Log {}
设计AOP类 1 2 3 4 5 6 7 8 9 10 11 12 13 14 15 16 17 18 19 20 21 22 23 24 25 26 27 @Slf4j @Component @Aspect public class LogAspect { @Autowired private HttpServletRequest httpRequest; @Autowired private OperateLogMapper mapper; @Around("@annotation(com.wwwtty.springmybatisdemo.anno.Log)") public Object record (ProceedingJoinPoint proceedingJoinPoint) throws Throwable { long begin = System.currentTimeMillis(); Object retValue = proceedingJoinPoint.proceed(); OperateLog operateLog = new OperateLog (); mapper.insert(operateLog); long end = System.currentTimeMillis(); long costTime = end - begin; return retValue; } }
AOP中一些细节 如何获取operateLog对象呢(内部需要id等参数)
每次请求时,请求头中都会附上token字段;而token字段是登录时将员工id等信息生成的jwt令牌,我们就使用请求头来进行获取
首先需要一个HttpServletRequest对象
1 2 @Autowired private HttpServletRequest httpRequest;
通过请求头的token字段获取jwt令牌
1 2 3 4 String token = httpRequest.getHeader("token" );Claims claims = JWTUtils.parseJWT(token);Integer operateUser = (Integer) claims.get("id" );
调用原方法的返回值是Object,而表中是varchar,转换成JSON存入表中,使用fastJSON
1 2 3 4 Object res = proceedingJoinPoint.proceed();String retValue = JSONObject.toJSONString(res);
切入点设置 增删改查方法加上@Log注解
1 2 3 4 5 6 7 8 9 10 11 12 13 14 15 16 17 18 19 20 21 22 23 24 25 26 27 28 29 30 31 32 33 34 35 36 @Service public class DeptImpl implements DeptService { @Autowired private DeptMapper mapper; @Autowired private DeptLogService deptLogService; @Override @Log public List<Dept> list () { return mapper.list(); } @Override @Log @Transactional(rollbackFor = Exception.class) public void delete (Integer id) { try { mapper.deleteById(id); int i = 1 /0 ; mapper.deleteEmpByDeptId(id); } finally { DeptLog deptLog = new DeptLog (LocalDateTime.now(),"解散了" +id+"部门" ); deptLogService.insert(deptLog); } } @Override @Log public void add (Dept dept) { dept.setCreateTime(LocalDate.now()); dept.setUpdateTime(LocalDate.now()); mapper.insert(dept); } }
整体AOP代码
1 2 3 4 5 6 7 8 9 10 11 12 13 14 15 16 17 18 19 20 21 22 23 24 25 26 27 28 29 30 31 32 33 34 35 36 37 38 39 40 41 42 43 44 45 46 @Slf4j @Component @Aspect public class LogAspect { @Autowired private HttpServletRequest httpRequest; @Autowired private OperateLogMapper mapper; @Around("@annotation(com.wwwtty.springmybatisdemo.anno.Log)") public Object record (ProceedingJoinPoint proceedingJoinPoint) throws Throwable { long begin = System.currentTimeMillis(); String token = httpRequest.getHeader("token" ); Claims claims = JWTUtils.parseJWT(token); Integer operateUser = (Integer) claims.get("id" ); LocalDateTime operateTime = LocalDateTime.now(); String className = proceedingJoinPoint.getTarget().getClass().getName(); String methodName = proceedingJoinPoint.getSignature().getName(); String methodParams= Arrays.toString(proceedingJoinPoint.getArgs()); Object res = proceedingJoinPoint.proceed(); String retValue = JSONObject.toJSONString(res); long end = System.currentTimeMillis(); long costTime = end - begin; log.info("耗时:{}ms" ,costTime); OperateLog operateLog = new OperateLog (null ,operateUser,operateTime,className,methodName,methodParams,retValue,costTime); mapper.insert(operateLog); log.info("AOP写入日志:{}" ,operateLog); return res; } }
配置优先级 配置文件优先级
.properties > .yml > .yaml
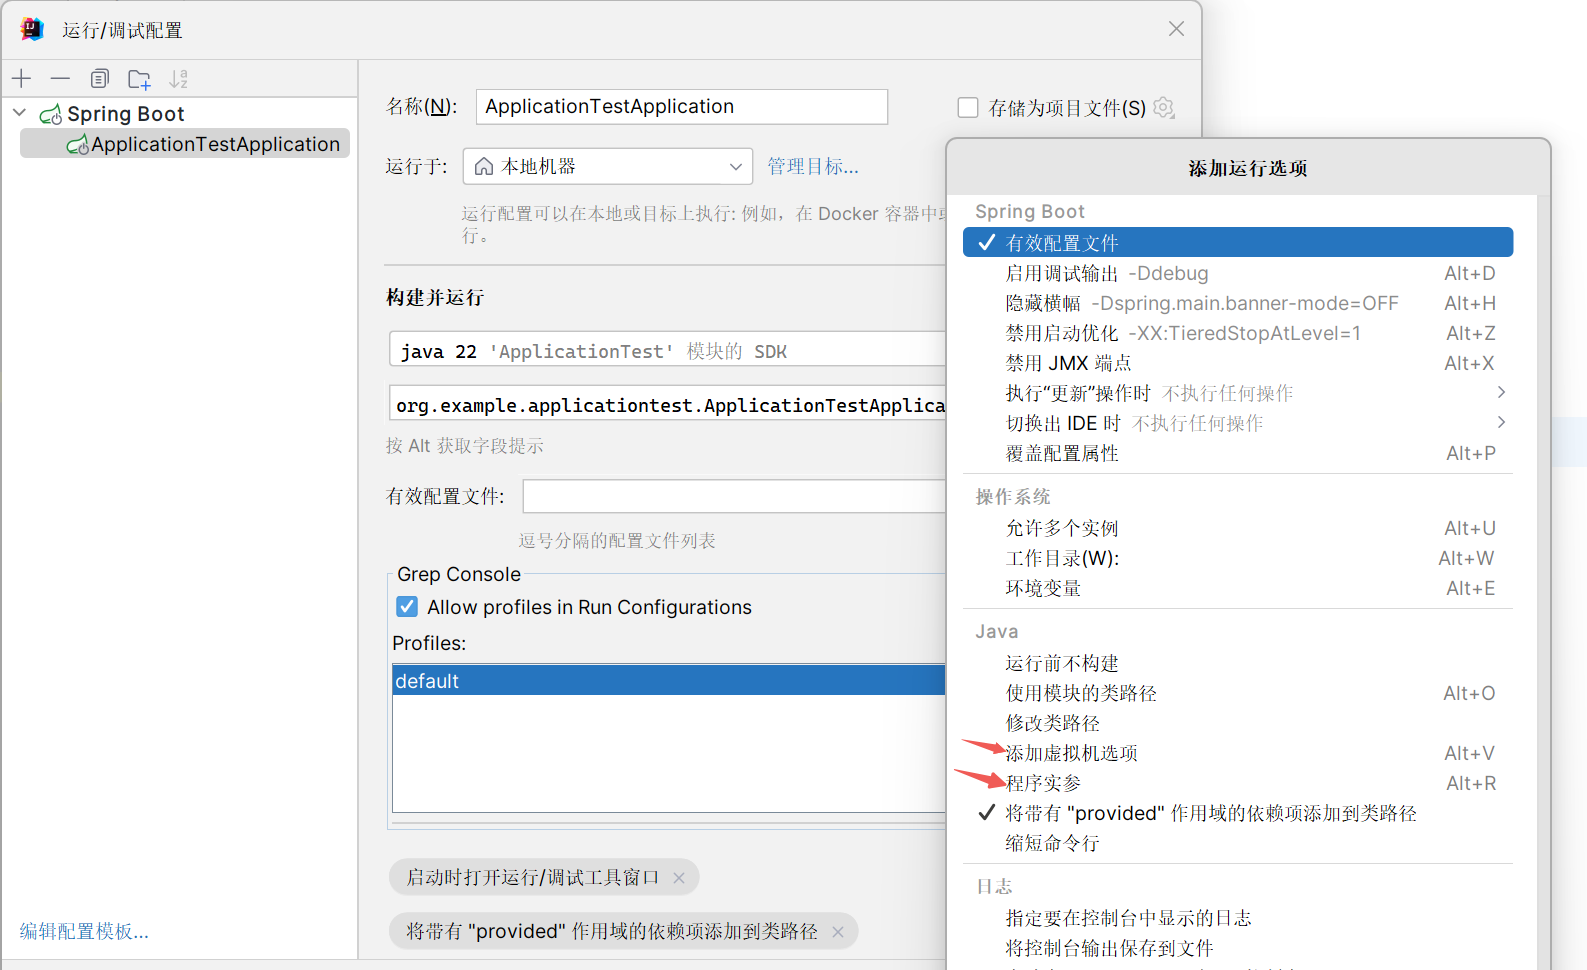
虚拟机选项-Dserver.port=
程序实参--server.port=
Bean的管理
IOC容器对象 ApplicationContext封装了IOC容器对象
1 2 3 4 5 6 7 8 9 10 11 12 13 14 @Test public void beanTest () { DeptService bean1 = (DeptService) applicationContext.getBean("deptImpl" ); System.out.println(bean1); DeptController bean2 = applicationContext.getBean(DeptController.class); System.out.println(bean2); DeptController bean3 = applicationContext.getBean("deptController" , DeptController.class); System.out.println(bean3); }
bean的作用域
默认情况下
DeptController类
1 2 3 4 5 6 7 8 9 10 11 12 13 14 15 16 17 18 19 20 21 22 23 24 25 26 27 28 29 30 31 32 33 @Slf4j @RestController @RequestMapping("/depts") @Scope("") public class DeptController { @Autowired private DeptService service; @GetMapping public Result list () { log.info("查询所有部门信息" ); List<Dept> deptList = service.list(); return Result.success(deptList); } @DeleteMapping("/{id}") public Result delete (@PathVariable Integer id) { log.info("根据id删除部门:{}" ,id); service.delete(id); return Result.success(); } @PostMapping public Result add (@RequestBody Dept dept) { log.info("新增部门{}" ,dept); service.add(dept); return Result.success(); } public DeptController () { System.out.println("DeptController" ); } }
测试方法
1 2 3 4 5 6 @Test public void scopeTest () { for (int i = 0 ; i < 10 ; i++) { System.out.println(applicationContext.getBean(DeptController.class)); } }
运行结果
bean对象在程序开始运行时就new好了
输出bean的信息
是同一个实例
@Lazy 使用该注解后,bean对象在第一次使用前才会被初始化
@Scope 该注解可以用于指定bean的作用域
指定作用域为prototype
运行结果,每个bean对象都不同
第三方bean 第三方提供的对象,我们不能在对应的类上直接加上@Component及其衍生注解,此时我们需要使用:
@Bean 方法1(不推荐):
在SpringBooot启动类中,定义一个返回值为第三方对象的方法,在这个方法上加上注解@Bean
1 2 3 4 5 6 7 8 9 10 @SpringBootApplication public class SpringMybatisDemoApplication { @Bean public SAXReader saxReader () { return new SAXReader (); } public static void main (String[] args) { SpringApplication.run(SpringMybatisDemoApplication.class, args); } }
方法2:单独创建一个配置类
1 2 3 4 5 6 7 @Configuration public class CommonConfig { @Bean public SAXReader saxReader () { return new SAXReader (); } }
@Bean注解下bean对象的名称
默认是方法名,可以通过@Bean的value/name属性进行命名
第三方bean依赖注入 之前我们都是使用@Autowired进行注入,但在第三方bean中,我们可以直接在方法中传入参数,参数会被IOC容器自动装配
1 2 3 4 5 6 7 8 @Configuration public class CommonConfig { @Bean public SAXReader saxReader (DeptController deptController) { System.out.println(deptController); return new SAXReader (); } }
SpringBoot原理
起步依赖
自动配置
引入第三方依赖
导入第三方的pom.xml
进行测试,看看Bean有没有正确添加到IOC容器中
1 2 3 4 @Test public void pomTest () { applicationContext.getBean(TokenParser.class); }
测试不通过
原因是SpringBoot启动类的注解扫描bean对象只能在本包下以及子包,TokenParser并没有和启动类在一个包下
方法1:用@ComponentScan
使用了@ComponentScan会覆盖原先@SpringBootApplication扫描当前包的行为,所以需要声明2个包
1 2 3 4 5 6 7 8 @ServletComponentScan @SpringBootApplication @ComponentScan({"com.example","com.wwwtty.springmybatisdemo"}) public class SpringMybatisDemoApplication { public static void main (String[] args) { SpringApplication.run(SpringMybatisDemoApplication.class, args); } }
这下就可以测试通过了
缺点是太繁琐
方案2:@Import导入
1 2 3 4 5 6 7 8 9 @ServletComponentScan @SpringBootApplication @Import({TokenParser.class, HeaderConfig.class}) public class SpringMybatisDemoApplication { public static void main (String[] args) { SpringApplication.run(SpringMybatisDemoApplication.class, args); } }
还是比较麻烦,要记住导入的类都是什么类型的
方案3:封装@Import
1 2 3 4 5 @Retention(RetentionPolicy.RUNTIME) @Target(ElementType.TYPE) @Import(MyImportSelector.class) public @interface EnableHeaderConfig {}
ImportSelector的实现类
1 2 3 4 5 public class MyImportSelector implements ImportSelector { public String[] selectImports(AnnotationMetadata importingClassMetadata) { return new String []{"com.example.HeaderConfig" ,"com.example.TokenParser" }; } }


 控制台输出
控制台输出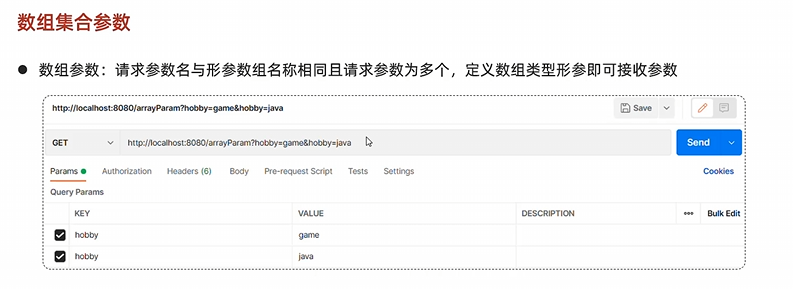


